BackBox Linux Usage Tips and Tricks
BackBox Linux is another Linux distribution for penetration testing. The OS has its own features, and I have no doubt that it will find its fans. The key features of BackBox are:
- based on Ubuntu (more friendly)
- lightweight desktop environment (should work well even on the old hardware)
- built-in anonymous mode (launched by a couple of clicks on the menu), which allows you to change the IP address and increase anonymity
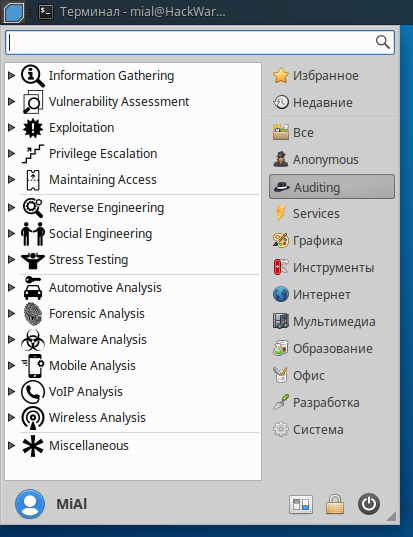
- collected the most high-quality programs (the menu is easy to navigate, perfect for beginners)
If you are well-acquainted with Kali Linux, some aspects of BackBox can be unusual for you. This collection of tips will come in handy and help to cope possible issues. Also these Tips and Tricks will be helpful for everyone who just started to study information security and ethical hacking with BackBox.
Let’s go!
Wireless interface wlan0 is absent in BackBox?
If you would try to launch familiar commands using wlan0, you will face with errors:
Interface wlan0:
ioctl(SIOCGIFINDEX) failed: No such device
Or
couldn't get pcap handle, exiting
And so on.
Wireless interfaces just have other names in BackBox. You can find out actual names of your wireless adapter with command:
iw dev
The output can be:
phy#0
    Interface wlx00c0ca96cfcb
        ifindex 3
        wdev 0x1
        addr 00:c0:ca:96:cf:cb
        type managed
The long string wlx00c0ca96cfcb is the name of wireless dongle. This string should be unique for every adapter and should be the same on different computers.
Therefore, instead of wlan0, wlan1 and so on just use the actual name of wireless adapter, which looks like wlx00c0ca96cfcb.
Wash does not show any Access Points / shows blank output
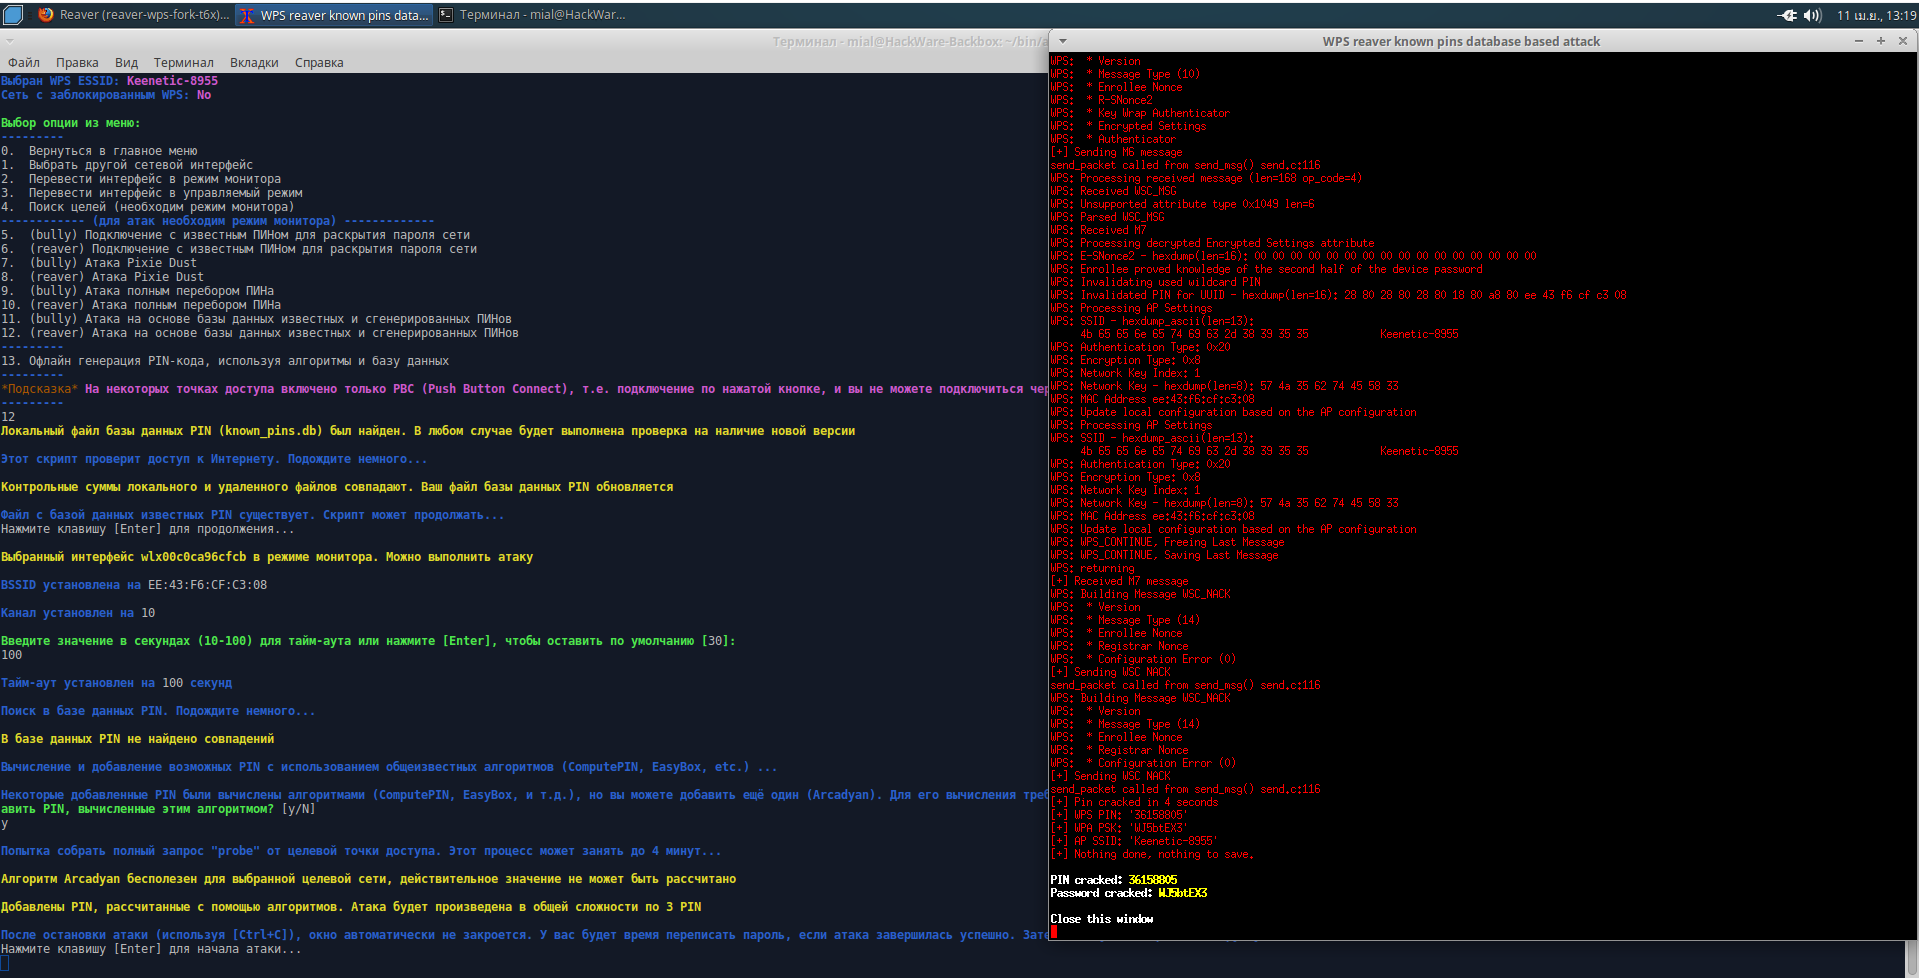
Reaver is a program for hacking WPS enabled access points, and Wash searches for these access points. By default, both programs are already present in the BackBox, but the version is old. I faced the issue: Wash shows nothing, accordingly, there is no data to launch Reaver. The problem is easily solved if you update the Reaver package (which includes Wash) to the latest version. To do this, simply run the following commands:
sudo apt -y install build-essential libpcap-dev
git clone https://github.com/t6x/reaver-wps-fork-t6x
cd reaver-wps-fork-t6x*/
cd src/
./configure
make
sudo make install
The update not only solves the problems, but also gives access to new functions and options.
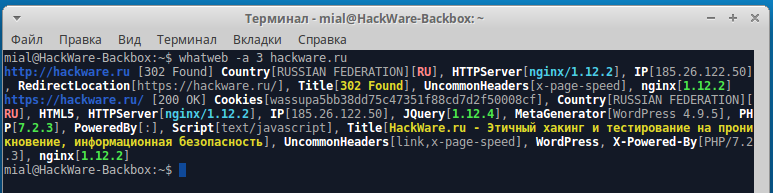
How to install WhatWeb / Troubleshooting with WhatWeb errors in BackBox
WhatWeb is a useful program for identifying the Web technologies used by a web-site. WhatWeb is present in the standard repository, but it is not installed by default. There are a lot of bugs in the version from the repository, such as:
/usr/bin/whatweb: /usr/lib/ruby/vendor_ruby/rchardet/universaldetector.rb:39: invalid multibyte escape: /[\x80-\xFF]/ (SyntaxError)
or:
/usr/share/whatweb/lib/tld.rb:85: warning: key "2nd_level_registration" is duplicated and overwritten on line 85
/usr/share/whatweb/lib/tld.rb:93: warning: key "2nd_level_registration" is duplicated and overwritten on line 93
/usr/share/whatweb/lib/tld.rb:95: warning: key "2nd_level_registration" is duplicated and overwritten on line 95
/usr/share/whatweb/plugins/wordpress.rb:436: warning: key "2.7-beta1" is duplicated and overwritten on line 453
or:
/usr/share/whatweb/lib/extend-http.rb:102:in `connect': Object#timeout is deprecated, use Timeout.timeout instead.
/usr/share/whatweb/lib/extend-http.rb:140:in `connect': Object#timeout is deprecated, use Timeout.timeout instead.
/usr/share/whatweb/lib/extend-http.rb:102:in `connect': Object#timeout is deprecated, use Timeout.timeout instead.
/usr/share/whatweb/lib/extend-http.rb:140:in `connect': Object#timeout is deprecated, use Timeout.timeout instead.
/usr/share/whatweb/lib/extend-http.rb:102:in `connect': Object#timeout is deprecated, use Timeout.timeout instead.
/usr/share/whatweb/lib/extend-http.rb:140:in `connect': Object#timeout is deprecated, use Timeout.timeout instead.
Instead of fixing errors in the three years old release, it's much better to install the latest version with the following commands:
https://github.com/urbanadventurer/WhatWeb
cd WhatWeb
sudo make
It is recommended to do the update:
sudo gem update
How to install airgeddon in BackBox
airgeddon is a very functional, yet easy-to-use program for security auditing / hacking of Wi-Fi networks.
If you are an absolute beginner, then for you airgeddon is the easiest way to start.
This program is by default absent in the BackBox, and there are also some dependencies that are required for it. To install all of this, run the following commands sequentially.
Some dependencies of airgeddon can be installed directly from standard repositories:
sudo apt install iw gawk curl git wireless-tools ettercap-graphical hostapd isc-dhcp-server iptables sslstrip lighttpd dsniff reaver xterm expect
sudo systemctl disable lighttpd
Create a directory in which we will download the source code of the programs and go to this directory:
mkdir ~/bin
cd ~/bin
Install bully dependencies, download bully source code, compile and install bully:
sudo apt install build-essential libpcap-dev libssl-dev
git clone https://github.com/aanarchyy/bully.git
cd bully*/
cd src/
make
sudo make install
# up
cd ../..
Download mdk3 source code, compile and install mdk3:
git clone https://github.com/charlesxsh/mdk3-master.git
cd mdk3-master
make
sudo make install
# up
cd ..
Install PixieWPS dependencies, download PixieWPS source code, compile and install PixieWPS:
sudo apt install libssl-dev
git clone https://github.com/wiire/pixiewps.git
cd pixiewps*/
make
sudo make install
# up
cd ..
Bettercap installation:
sudo apt install build-essential ruby-dev libpcap-dev net-tools
sudo apt install ruby
sudo gem install bettercap
Finally, we are going to install airgeddon:
git clone https://github.com/v1s1t0r1sh3r3/airgeddon.git
cd airgeddon/
Cleaning up:
cd ~/bin/
sudo rm -rf bully/ mdk3-master/ pixiewps/
Download the dictionary for hacking Wi-Fi
When you crack a password, you can use a mask attack or a dictionary attack. Second requires a dictionary. Rockyou is a good dictionary that you can use. The following commands will download rockyou and clear it from obviously unsuitable passwords candidates (duplicates, too long or too short):
cd ~/bin/
git clone git://git.kali.org/packages/wordlists.git
gunzip wordlists/rockyou.txt.gz
cat wordlists/rockyou.txt | sort | uniq | pw-inspector -m 8 -M 63 > ~/bin/newrockyou.txt
rm -rf wordlists/
Now the path to your dictionary is ~/bin/newrockyou.txt.
To find out the absolute path to it, type
ls ~/bin/newrockyou.txt
/home/mial/bin/newrockyou.txt
How to install Wine in the BackBox
Wine allows to run programs for Windows in Linux. To install Wine in the BackBox, run the following commands:
sudo dpkg --add-architecture i386 && sudo apt update && sudo apt -y install wine winbind
A window will appear with a suggestion to install fonts, we should agree. Use the TAB key to move, press the ENTER key to confirm the selection.
Accept the license agreement:

When the command completed, execute:
wine --config
Now everything is ready and you can use, for example, Router Scan by Stas'M directly into the BackBox.
Updating the operating system and tools in BackBox
To completely update the BackBox system (operating system, kernel, programs and tools), run the following command:
sudo apt update && sudo apt full-upgrade -y
To clean the system of unnecessary packages (which were installed automatically and are no longer required), from time to time run the following command:
sudo apt autoremove -y
And to clean the cache of downloaded packages, also run from time to time:
sudo apt clean -y
Configure Wireshark
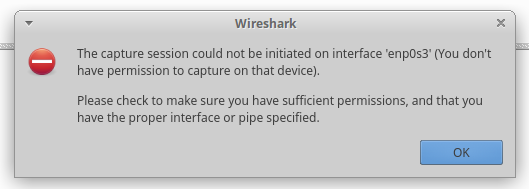
Wireshark is a popular program for capturing and analyzing network traffic. If you run the program and try to select a network interface on which to capture traffic (in the BackBox it's enp0s3), then the error will appear:
The capture session could not be initiated on interface 'enp0s3' (You don't have permission to capture on that device).
Please check to make sure you have sufficient permissions, and that you have the proper interface or pipe specified.
Wireshark can be run with root privileges as follows:
sudo wireshark
But then another error will appear:
Lua: Error during loading:
[string 7usr/share/wireshark/init.lua"]:44: dofile has been disabled due to running Wireshark as superuser. See https://wiki.wireshark.org/CaptureSetup/CapturePrivileges for help in running Wireshark as an unprivileged user.
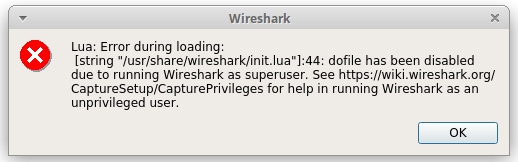
To allow Wireshark to capture packets under a normal user, run the following commands:
sudo dpkg-reconfigure wireshark-common
The following window appears:
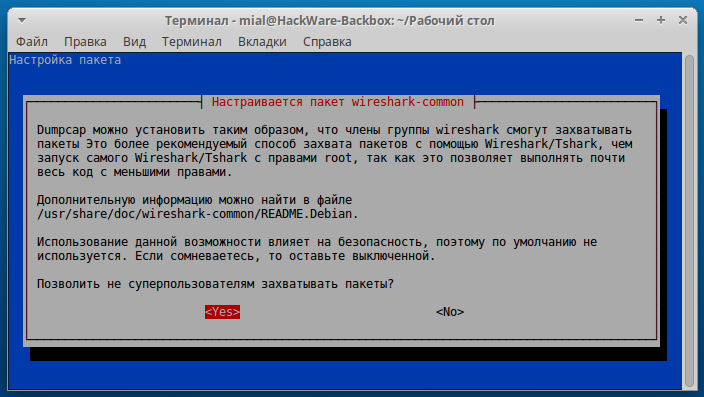
Select Yes.
Also run:
sudo usermod -a -G wireshark $USER
To apply the changes, restart the computer. Now the user is allowed to capture traffic from all devices that are available from the BackBox.
How to install Searchsploit (Exploit Database) on the Backbox
The author is Anton Gorodetsky.
Execute the commands:
sudo git clone https://github.com/offensive-security/exploit-database.git /opt/exploit-database
sudo ln -sf /opt/exploit-database/searchsploit /usr/local/bin/searchsploit
cp -n /opt/exploit-database/.searchsploit_rc ~/
Now open the ~/.searchsploit_rc file:
vim ~/.searchsploit_rc
If you do not know how to use the vim editor, then use any other text editor, for example, mousepad (in commands for opening files you can write mousepad instead of vim).
Comment out all the lines in the Papers section (you can just delete the Papers section).
If you opened in vim, then press <Esc>, then type :wq (to save and exit) and press ENTER.
Update the database with the following command:
sudo searchsploit -u
Help:
searchsploit -h
Optional: if you want to install Database-papers, you do not need to edit the ~/.searchsploit_rc file, but instead you need to perform the Database-papers installation:
sudo git clone https://github.com/offensive-security/exploit-database-papers.git /opt/exploit-database-papers
How to install nVidia CUDA toolkit in Backbox Linux
The author is Anton Gorodetsky.
nVidia CUDA toolkit is installed quite simply on the Backbox, but the process has a problem with the screen where you need to enter a password to decrypt the disk: while one attempts to enter the password, nothing happened, as if the keyboard did not work, so it was impossible to go to the next step - to the login page. All driver repositories were tried, but there was always the same problem, only standard system drivers worked. Then the /etc/default/grub file was edited, ware removed the quite splash strings from the line
GRUB_CMDLINE_LINUX_DEFAULT="quite splash"
as a result, the remains are:
GRUB_CMDLINE_LINUX_DEFAULT=" "
After saving the changes, you need to execute the following commands:
sudo update-grub
sudo reboot
After that everything started working fine, you could enter the password and continue on the login page, as it usually happens.
Perhaps, if you do not encrypt the disk, then you do not need it.
Go back to installing CUDA toolkit, follow the link https://developer.nvidia.com/cuda-downloads?target_os=Linux&target_arch=x86_64&target_distro=Ubuntu&target_version=1604&target_type=debnetwork
Download the selected file. There will also be commands for installation:
sudo dpkg -i cuda-repo-ubuntu1604_9.1.85-1_amd64.deb
sudo apt-key adv --fetch-keys http://developer.download.nvidia.com/compute/cuda/repos/ubuntu1604/x86_64/7fa2af80.pub
sudo apt update
sudo apt install cuda
The next step is to add this to the PATH variable:
Open the file ~/.profile with any text editor, for example with vim:
sudo vim ~/.profile
Add the following lines to it:
export PATH=/usr/local/cuda-9.1/bin:$PATH
export LD_LIBRARY_PATH=/usr/local/cuda-9.1/lib64:$LD_LIBRARY_PATH
Press the <Esc> key, type :wq and press ENTER.
Reboot
sudo reboot
Just as note, in this cuda toolkit nVidia drivers are included, if you want to install separately you may look to this link for details https://docs.nvidia.com/cuda/cuda-installation-guide-linux/index.html#package-manager-metas
And for the end, just one screenshot where I tested if everything running fine.

How to install Hashcat and JohnTheRipper (with nVidia CUDA support)
The author is Anton Gorodetsky.
This instruction is for those who want while cracking passwords to be able to use the power of GPU (video card) instead of CPU. This method is for those who have nVidia graphics card and ones need to install the proprietary driver nVidia, as shown above.
Hashcat
We start with the installation of Hashcat, it is present in the Backbox repository, but it is not installed by default. The repository contains quite an old version, so it is suggested to install the tool from the source code. To do this, create a directory from where we will install:
mkdir -p ~/src
Let's move on to it:
cd ~/src
Download the source code, compile and install:
git clone https://github.com/hashcat/hashcat.git
cd hashcat
git submodule update --init
make
sudo make install
Cached kernels, session files, restore- and pot-files etc. will go to $HOME/.hashcat/
John the Ripper
sudo apt remove john && sudo apt autoremove
We move to the previously created directory, you can use any other directory:
cd ~/src
And execute the commands:
sudo apt-get install build-essential libssl-dev git
sudo apt-get install yasm libgmp-dev libpcap-dev pkg-config libbz2-dev
sudo apt-get install nvidia-opencl-dev
git clone git://github.com/magnumripper/JohnTheRipper -b bleeding-jumbo john
cd ~/src/john/src
./configure && make -s clean && make -sj4
Test your build
../run/john --test=0
Benchmark your build
../run/john --test

Optionally, you can add john to $PATH
Open ~/.profile with any text editor:
sudo vim ~/.profile
We add there:
export PATH=/home/your_hostname/src/john/run:$PATH
Press the <Esc> key, enter :wq, press ENTER.
Reboot:
sudo reboot
How to hide IP in BackBox (anonymous mode)
In the Anonymous section, only three items
- anonymous start
- anonymous status
- anonymous stop

Let's start with the status check:
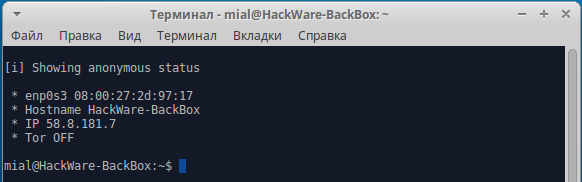
As you can see from the screenshot, my external IP address was defined, and it is also said that Tor is disabled.
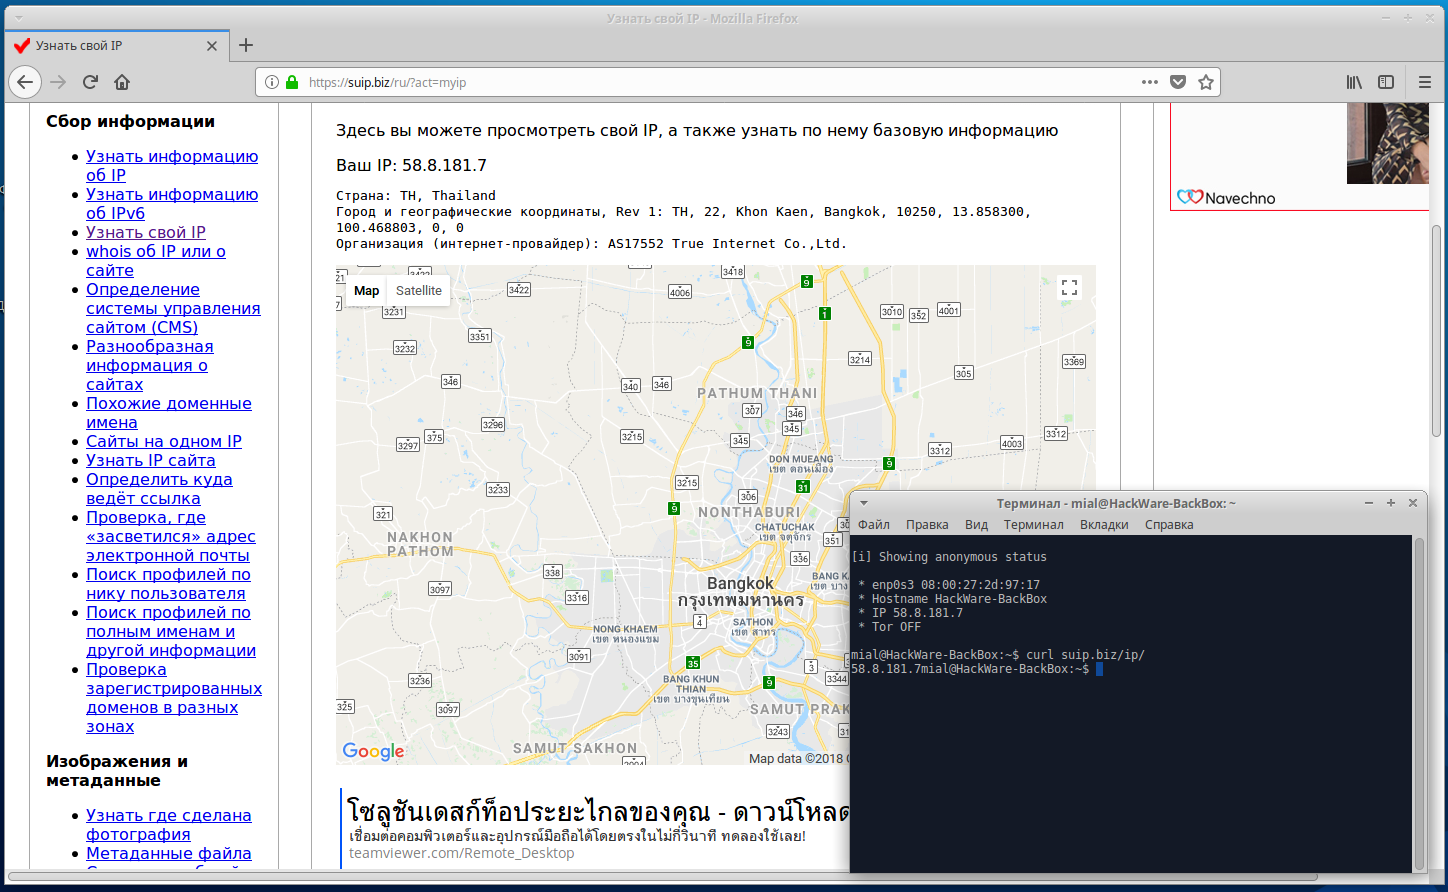
To check IP in a web browser, I will use SuIP.biz, and I will check the IP in the console by the command:
curl suip.biz/ip/
That's right, now run anonymous start:

We are consistently asked a few questions that determine exactly how we want to improve our anonymity.
We check in the browser whether our IP address has changed:
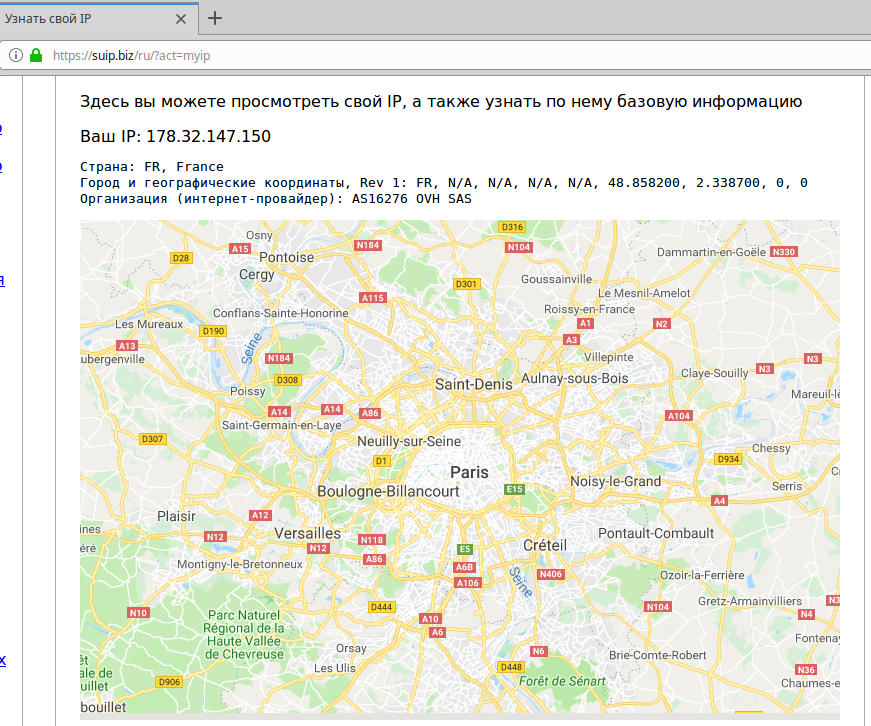
Yes, the IP, the country, the Internet service provider have changed.
We check IP on the command line (it is important that IP is also changed for console applications, because if this does not happen, the security audit tools will reveal your real IP, even though it has been changed in the browser):

Also note that the name of the local host (hostname) has been changed.
To stop anonymity, select ‘anonymous stop’ from the menu. You will again be asked a few questions.
Web server in the BackBox
To start the web server in the menu, go to Services -> Apache -> apache2 start

By default, the root folder for web documents is /var/www/html. In /var/www you can create your own virtual hosts.
The /var/www/html folder and all the files inside it belong to the root user. So for you can modify, add, delete files in this folder, you need to use sudo. For example, with the following command, you open the file manager to manage the contents of the folder.
sudo thunar /var/www/html
All other programs that make changes to /var/www/html must also be running with sudo.
On the local server, to simplify the use, you can make yourself the owner of this folder:
sudo chown -R $USER:$USER /var/www/html
Now you and the programs running on your behalf do not need superuser privileges to work with the contents of this directory:
thunar /var/www/html
Web-sites on your local web server are available at http://localhost
How to hack Wi-Fi with BackBox
In BackBox, there are many programs for hacking wireless networks. They all have a different function and to work with them you need to study each program. The airgeddon script automates these actions - we do not need to type commands, just select menu items, and the program will launch various attacks; i.e. we did not waste time while installing airgeddon.
Before each launch of airgeddon, it is recommended that you run the following commands:
sudo systemctl stop NetworkManager
sudo airmon-ng check kill
They will close the applications (including Network Manager) that might interfere.
Launching airgeddon:
cd ~/bin/airgeddon/
sudo bash airgeddon.sh
The program has a simple interface, translated into different languages; you will see many hints while working with the program. A detailed guide ‘The easiest and fastest ways to hack Wi-Fi (using airgeddon)’.
Wi-Fi adapter for airgeddon
For airgeddon (and generally for Wi-Fi penetration testing) not every wireless dongle is suitable. For best results, the Alfa AWUS036NHA is recommended, supplemented with an Alfa ARS-N19
antenna.
In principle, any card from this list is suitable, but for airgeddon it is recommended that Alfa AWUS036NHA, since it works without problems with Reaver for hacking access points with WPS; other cards can also be forced to crack WPS, but not in airgeddon.
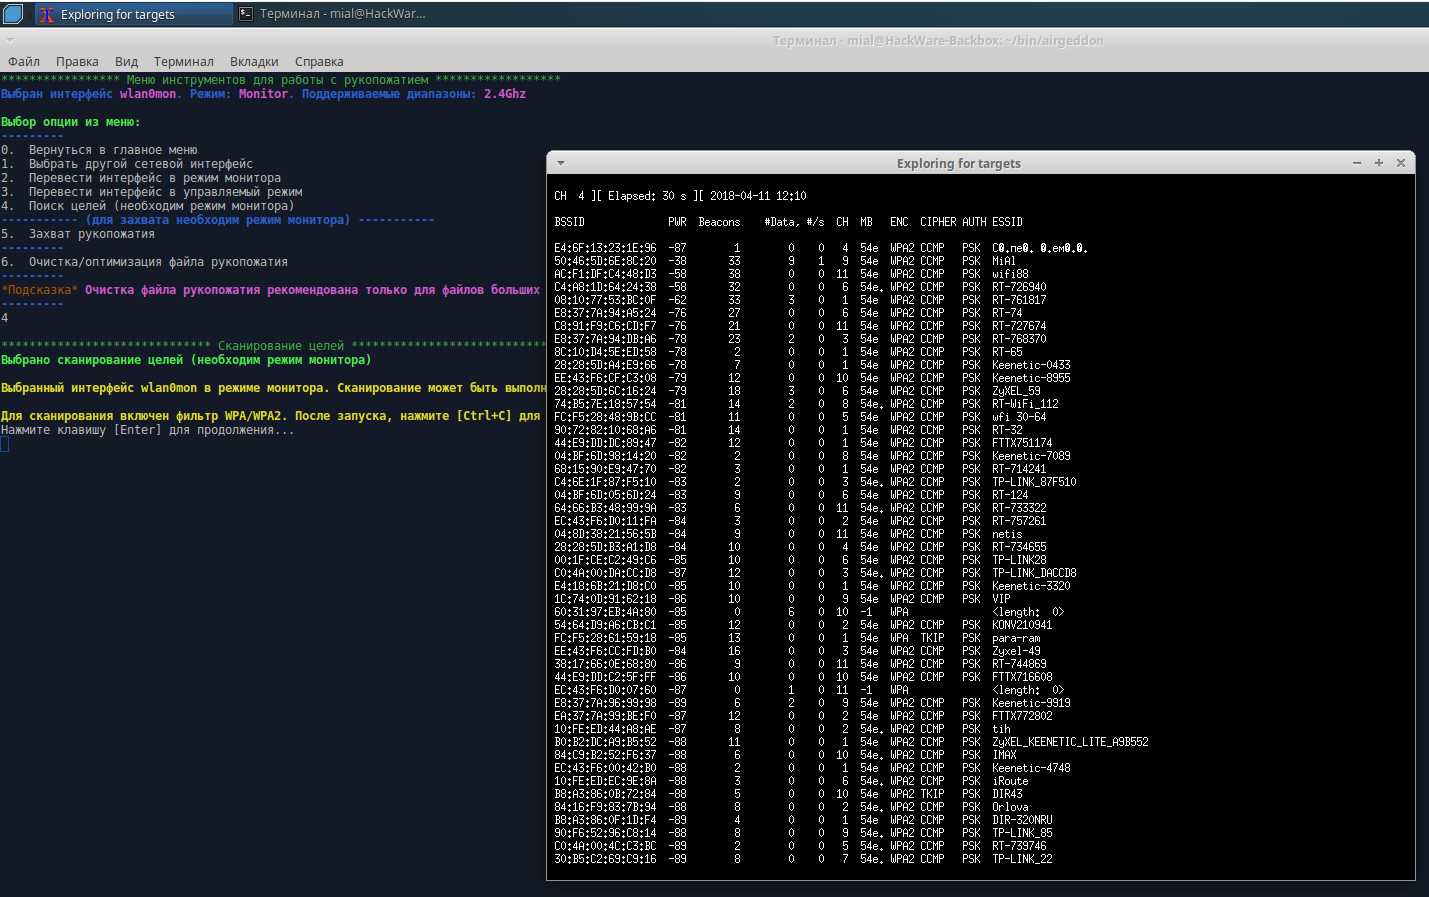
Several screenshots. Target searching:
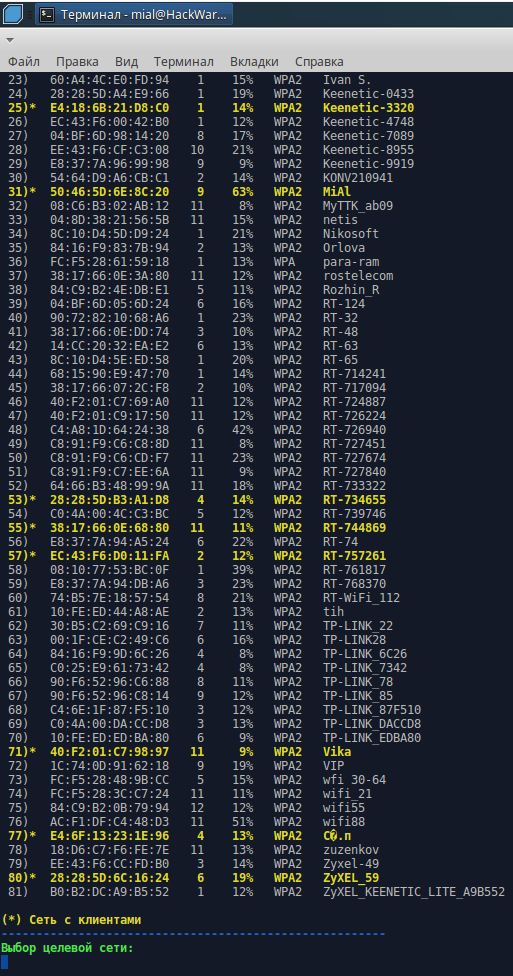
Target selection:
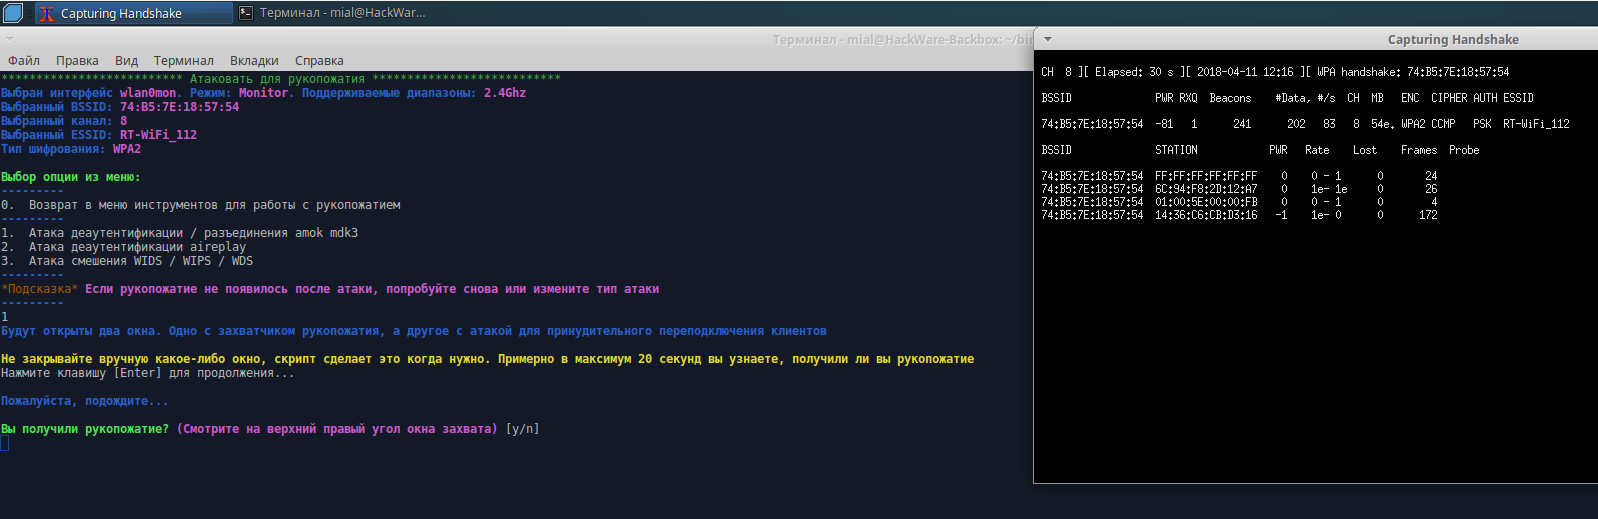
Handshake is captured:
Hacked WPS PIN and Wi-Fi password:
Related articles:
- How to install Go (compiler and tools) on Linux (100%)
- Package management in Kali Linux and other Debian-based distributions (searching, installing and removing programs, troubleshooting) (100%)
- How to install web server on Windows 10 (Apache 2.4, PHP 8, MySQL 8.0 and phpMyAdmin) (50%)
- Kali Linux Rolling post install tips (50%)
- How to install OWASP Mutillidae II and Damn Vulnerable Web Application (DVWA) in Kali Linux (50%)
- How to replace Default Desktop Environment with Cinnamon in Kali Linux (RANDOM - 50%)