CPU Undervolting in Linux
Undervolting in Linux
For Linux there is no official program for undervolting, so enthusiasts using reverse engineering methods have found ways to change the voltage on Intel CPUs and have created their own utilities.
Linux Undervolting Information: https://github.com/mihic/linux-intel-undervolt
Utilities for Undervolting in Linux:
I'll show you how to do undervolting in Linux with intel-undervolt, this utility is written in C (the other two are Python and Bash scripts).
Undervolting with intel-undervolt
Install the program:
git clone https://github.com/kitsunyan/intel-undervolt
cd intel-undervolt/
./configure --enable-systemd --enable-openrc
make
sudo make install
sudo systemctl daemon-reload
Using the program:
intel-undervolt MODE [OPTION]...
As a COMMAND can be
  read                     read and display current values
  apply                    apply values from config file
  measure                  measure power consumption
    -f, --format <format>  output format (terminal, csv)
    -s, --sleep <interval> sleep interval in seconds
  daemon                   run in daemon mode
Let's read the current values:
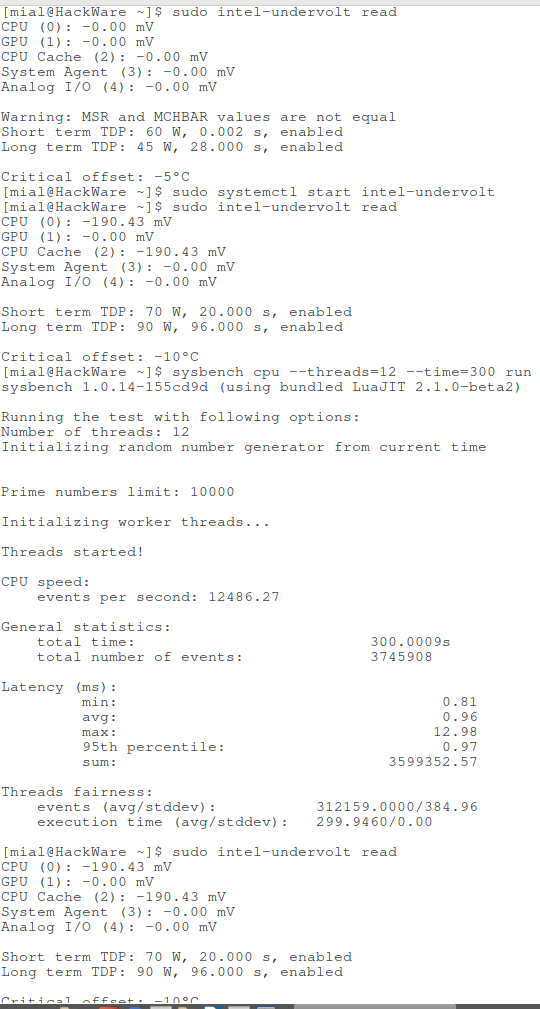
sudo intel-undervolt read
At the moment I have the default settings:
CPU (0): -0.00 mV
GPU (1): -0.00 mV
CPU Cache (2): -0.00 mV
System Agent (3): -0.00 mV
Analog I/O (4): -0.00 mV

I will install sysbench - a CPU benchmark tool for Linux. To install sysbench in Debian-based distros Ubuntu, Linux Mint, Kali Linux)
sudo apt install sysbench
I will start it for 5 minutes, with the load on all 12 cores:
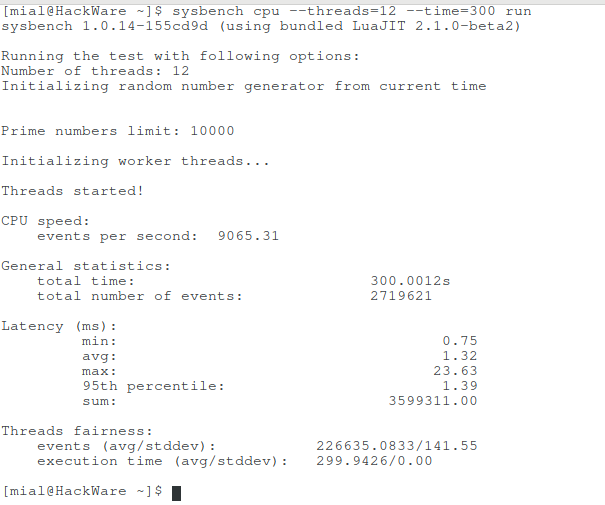
sysbench cpu --threads=12 --time=300 run
My current result without undervolting:
Setting up undervolt in intel-undervolt
To configure intel-undervolt, you need to change the values in the /etc/intel-undervolt.conf configuration file :
sudo gedit /etc/intel-undervolt.conf
By default, it contains the following:
# Enable or Disable Triggers (elogind)
# Usage: enable [yes/no]

enable no

# CPU Undervolting
# Usage: undervolt ${index} ${display_name} ${undervolt_value}
# Example: undervolt 2 'CPU Cache' -25.84

undervolt 0 'CPU' 0
undervolt 1 'GPU' 0
undervolt 2 'CPU Cache' 0
undervolt 3 'System Agent' 0
undervolt 4 'Analog I/O' 0

# Power Limits Alteration
# Usage: power ${domain} ${short_power_value} ${long_power_value}
# Power value: ${power}[/${time_window}][:enabled][:disabled]
# Domains: package
# Example: power package 45 35
# Example: power package 45/0.002 35/28
# Example: power package 45/0.002:disabled 35/28:enabled

# Critical Temperature Offset Alteration
# Usage: tjoffset ${temperature_offset}
# Example: tjoffset -20

# Energy Versus Performance Preference Switch
# Usage: hwphint ${mode} ${algorithm} ${load_hint} ${normal_hint}
# Hints: see energy_performance_available_preferences
# Modes: switch, force
# Load algorithm: load:${capture}:${threshold}
# Power algorithm: power[:${domain}:[gt/lt]:${value}[:[and/or]]...]
# Capture: single, multi
# Threshold: CPU usage threshold
# Domain: RAPL power domain, check with `intel-undervolt measure`
# Example: hwphint force load:single:0.8 performance balance_performance
# Example: hwphint switch power:core:gt:8 performance balance_performance

# Daemon Update Interval
# Usage: interval ${interval_in_milliseconds}

interval 5000

# Daemon Actions
# Usage: daemon action[:option...]
# Actions: undervolt, power, tjoffset
# Options: once

daemon undervolt:once
daemon power
daemon tjoffset
To apply the undervolting settings, use the syntax: apply ${index} ${display_name} ${undervolt_value}.
Here: apply - the command to apply the settings, ${index} - the number of the setting that we apply, ${display_name} - the value of the undervolting.
As ${index} can be:
- 0 - CPU
- 1 - GPU (that is, the video core of the CPU)
- 2 - CPU Cache (that is, the cache of the CPU)
- 3 - System Agent
- 4 - Analog I / O
For example:
apply 2 'CPU Cache' -25.84
means CPU cache undervolting for 25.84 mV.
Power limit
Here you can specify values for TDP.
TDP for processors matters for a short time Turbo Boost and for a long time Turbo Boost. The duration of both intervals of the Turbo Boosts can also be adjusted.
Two syntax options are supported:
power package ${short_term} ${long_term}
power package ${short_term}/${time_window} ${long_term}/${time_window}
Here:
- ${short_term} - the maximum power for that period of Turbo Boost when it is allowed to go beyond the boundaries of the usual Turbo Boost
- ${long_term} - the limiting power of the ‘normal’ Turbo Boost
- ${time_window} - the duration of this period of the usual Turbo Boost or a short ‘super’ Turbo Boost
Example:
power package 35/5 25/60
It sets the value of TDP to 35 when the Turbo Boost is allowed to go beyond the usual Turbo Boost, while the duration of this segment is 5 seconds. The value of the ‘normal’ Turbo Boost is set to 25, and its duration is 60 seconds.
It is not necessary to specify the time of a short and long Turbo Boost, you can use the following syntax, only with TDP values:
power package 35 25
In this case, default time intervals will be used.
Temperature Limit
You can set the temperature limit, after which thermal throttling begins. The temperature is indicated as the offset value from the maximum temperature level. Suppose we have:
tjoffset -20
If the maximum temperature level is set to 100, the resultant limit is 100 — 20 = 80°C. Remember that an offset of more than 15°C is allowed only in Skylake and newer ones.
Apply settings
After you changed the file /etc/intel-undervolt.conf, for the settings to take effect you need to run
sudo intel-undervolt apply
The program needs the root permissions. You can apply your settings automatically by enabling the intel-undervolt.service service.
Daemon Mode
Sometimes power and temperature limits can be reset by EC, BIOS or something else. This behavior can be suppressed by periodically applying limit settings. intel-undervolt-loop.service allows you to run this program in the deamon mode, which will apply the settings at a certain interval. You can change the interval by changing the value interval:
interval 5000
This value is in milliseconds, by default it is set to 5 seconds.

Undervolt Tests in Linux
After applying the undervolt, start the benchmark again:
sysbench cpu --threads=12 --time=300 run
New value:
The first time I got:
- CPU speed: events per second: 9065.31
- Overall statistics: the total number of events: 2719621
The event in this benchmarking program is the number of operations performed.
The second time I got:
- CPU speed: events per second: 12486.27
- General statistics: the total number of events: 3745908
The increase in productivity is 12486.27 / 9065.31 * 100% = 137,73%, that is, 37%.
In Windows, I have increased productivity in Hashcat when cracking Wi-Fi passwords on the central processor from 16995 H/s to 19850 H/s.
19850/16995 * 100% = 116.8%, that is, 16%.
As you can see, there really is a growth. And the longer the processor runs at the maximum frequency, the greater the gain in power compared to the standard settings.
Note: I also greatly increased the TDP, do not do so, if not sure. In my case, after lowering the voltage, throttling due to the excess of TDP does not practically come (default TDP is enough for CPU), so this setting has very little effect at all + cooling system works really nice in my model. With this setting you can bring your processor to the extreme temperature - without stress tests with temperature control, do not change this value. If you have a thermal throttling (due to overheating) - do not change this setting at all! In this case, you will make much worse and there are real prospects to ‘burn’ the processor.
Starting the intel-undervolt service
To start the intel-undervolt service, use the command:
sudo systemctl start intel-undervolt
To stop:
sudo systemctl stop intel-undervolt
To check the status:
systemctl status intel-undervolt
After the reboot, the service will not start. To do this, you need to enable auto running:
sudo systemctl enable intel-undervolt
Warning: Before adding the service to startup, make sure that your system is stable with the selected undervolting values. Otherwise, you risk getting an endlessly rebooted system.
Conclusion
So, undervolting actually allows you to achieve power increase and (or) a cooler CPU without additional electricity consumption.
In this article, I did not consider the underwriting of the CPU core video (Intel HD GPU). This should especially give positive results for netbooks, in which there is no discrete (separate) video card.
Undervolting is not magic, so do not expect sudden changes.
Remember that you can add to the startup only settings for which the system is stable. All tests should be done with disabled intel-undervolt autoloading (or similar programs) - this is the best guarantee that you will be able to boot into the system if you chose wrong values for undervolting.
Related articles:
- How in Windows view the contents of a Linux disk and copy files from it (51.7%)
- How to use Android phone as GPS sensor in Linux (51.7%)
- How to brute-force passwords using GPU and CPU in Linux (51.7%)
- Linux kernel modules (51.7%)
- Linux Wi-Fi Cheat Sheet: Tips and Troubleshooting (51.7%)
- SMB and Samba Security Audit Tools (RANDOM - 1.7%)
Thanks for all articles in Your Blog. I was search this kind of article about software for GNU/Linux and how they works in real life ( with whole explanation ).
Thanks 😀
When i opened the intel-undervolt.conf
i had 'undervolt' instead of apply, tho when i ran 'intel-undervolt' to see what commands i can run, it showed apply instead of undervolt.
I tried both and nothing happened. It just gave me output as if i enter intel-undervolt
Usage: intel-undervolt COMMAND
read Read and display current values
apply Apply values from config file
measure Measure power consumption
daemon Run in daemon mode
all other commands seem to work tho i havent tried daemon yet. Anyone help?
I was doing it wrong. I changed the values in conf file
# CPU Undervolting
# Usage: undervolt ${index} ${display_name} ${undervolt_value}
# Example: undervolt 2 'CPU Cache' -25.84
undervolt 0 'CPU' -89.8
undervolt 1 'GPU' -46.9
undervolt 2 'CPU Cache' -89.8
undervolt 3 'System Agent' -46.9
undervolt 4 'Analog I/O' 0
when i ran sudo intel-undervolt apply
i get
CPU (0): -0.00 mV
GPU (1): -0.00 mV
CPU Cache (2): -0.00 mV
System Agent (3): -0.00 mV
Analog I/O (4): -0.00 mV
Ended up getting it done with the undervolt pip package. If you know what i did wrong tho let me know. Thanks.
Thank you for you effort!
I got input output error when I did undervolt read
Thanks for this !
Its far more easier to understand than the official manual pages.
This is what I'm getting when I try to check status
is there something wrong?
ichigo@Ichigo:~$ systemctl status intel-undervolt
● intel-undervolt.service - Intel Undervolt Service
Loaded: loaded (/lib/systemd/system/intel-undervolt.service; disabled; ven>
Active: inactive (dead)
Aug 01 22:51:15 Ichigo systemd[1]: intel-undervolt.service: Succeeded.
Aug 01 22:51:15 Ichigo systemd[1]: Finished Intel Undervolt Service.
Aug 01 22:51:18 Ichigo systemd[1]: Starting Intel Undervolt Service…
Aug 01 22:51:18 Ichigo intel-undervolt[19130]: CPU (0): -129.88 mV
Aug 01 22:51:18 Ichigo intel-undervolt[19130]: GPU (1): -0.00 mV
Aug 01 22:51:18 Ichigo intel-undervolt[19130]: CPU Cache (2): -125.00 mV
Aug 01 22:51:18 Ichigo intel-undervolt[19130]: System Agent (3): -0.00 mV
Aug 01 22:51:18 Ichigo intel-undervolt[19130]: Analog I/O (4): -0.00 mV
Aug 01 22:51:18 Ichigo systemd[1]: intel-undervolt.service: Succeeded.
Aug 01 22:51:18 Ichigo systemd[1]: Finished Intel Undervolt Service.
lines 1-14/14 (END)
Undervolting seems to work. But you set different values for CPU and CPU Cache, GPU undervolting is not set at all.
To check current values you can use the command:
My intel cpu does't have an integrated gpu, so I didn't change the values of gpu.
I'm not sure what is the meaning of the lines that I highlighted. Can you enlighten me about that?
ichigo@Ichigo:~$ sudo intel-undervolt read
CPU (0): -129.88 mV
GPU (1): -0.00 mV
CPU Cache (2): -125.00 mV
System Agent (3): -0.00 mV
Analog I/O (4): -0.00 mV
ichigo@Ichigo:~$ sudo systemctl start intel-undervolt
ichigo@Ichigo:~$ systemctl status intel-undervolt
● intel-undervolt.service - Intel Undervolt Service
Loaded: loaded (/lib/systemd/system/intel-undervolt.service; disabled; ven>
Active: inactive (dead)
Aug 02 14:14:03 Ichigo systemd[1]: intel-undervolt.service: Succeeded.
Aug 02 14:14:03 Ichigo systemd[1]: Finished Intel Undervolt Service.
Aug 02 14:15:18 Ichigo systemd[1]: Starting Intel Undervolt Service…
Aug 02 14:15:18 Ichigo intel-undervolt[2990]: CPU (0): -129.88 mV
Aug 02 14:15:18 Ichigo intel-undervolt[2990]: GPU (1): -0.00 mV
Aug 02 14:15:18 Ichigo intel-undervolt[2990]: CPU Cache (2): -125.00 mV
Aug 02 14:15:18 Ichigo intel-undervolt[2990]: System Agent (3): -0.00 mV
Aug 02 14:15:18 Ichigo intel-undervolt[2990]: Analog I/O (4): -0.00 mV
Aug 02 14:15:18 Ichigo systemd[1]: intel-undervolt.service: Succeeded.
Aug 02 14:15:18 Ichigo systemd[1]: Finished Intel Undervolt Service.
ichigo@Ichigo:~$ sudo intel-undervolt read
CPU (0): -129.88 mV
GPU (1): -0.00 mV
CPU Cache (2): -125.00 mV
System Agent (3): -0.00 mV
Analog I/O (4): -0.00 mV
To tell you the truth, I don't understand what you don't understand… It looks pretty obvious.
Let's take my data, since yours does not seem complete to me.
Strings “Process: 574 ExecStart=/usr/bin/intel-undervolt apply (code=exited, status=0/SUCCESS)” and “Main PID: 574 (code=exited, status=0/SUCCESS)” mean that the service started and finished without errors. This is good.
Strings ‘Active: inactive (dead)’ and ‘intel-undervolt.service: Deactivated successfully’ and ‘Finished Intel Undervolt Service’ mean that the service is currently not running, but it’s OK, because it is fire-and-forget service. It applied changes (CPU undervolting) and exited.
Yeah looking at yours, mine seems incomplete.
I don't know why mine doesn't have the Process and Main FID strings. How will I know if my cpu is already undervolted? Does the result of read command showing my undervolt values means that it is already undervolted?
Here is my intel-undervolt.conf file.
I just changed the line 4 to enable yes, it is enable no on my previous screenshot. Same result either yes or no.
I just installed linux the other day, so I'm really noob here.
Yes, it does.
Got it.
Thanks bro