How to continue brute-force from the hashcat restore point (hashcat sessions)
hashcat supports sessions that allow ones to restore an interrupted cracking. Information about these sessions, including the options with which the program was running, and the recovery point, are written to a file with the .restore extension. The format of the .restore file is a custom format designed specifically for hashcat.
hashcat supports resuming brute-force tasks for any and every type of hash, attack mode, type of input (even stdin - standard input), etc. It does not even matter why the work stopped until you have a .restore file. This file contains all the necessary information for hashcat so that it can continue to crack. Of course, there should also be directory structure/dictionaries/masks/rules/hashes/hash files and others used in the original brute-force task. It does not matter if you have a power failure or you just decided to stop the brute-force task because you decided to take a nap next to your hardware, with the --restore option you should be able to restore password cracking.
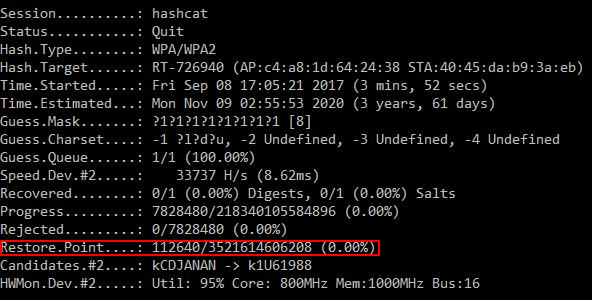
It is important to know that the .restore file is updated automatically, each time the corresponding line in the status window changes:
Restore.Point....:
…but not when the next line changes (hashcat should reach the next restore point):
Progress.........:
The second most important thing to remember is that stopping hashcat through the Checkpoint function, by pressing 'c', will cause the program to continue brute-force until the restore file is updated. In this case, the forced exit from hashcat, when the 'q' is pressed, will lead to immediate exit from the program and the restore point file will not be updated! By pressing 'q' instead of 'c', you lose the work done between the last update of the restore point file and the exit time, because when you exit, the restore file is not updated!
The .restore file will be automatically removed when all the brute-force tasks are completed (when there are no more password candidates) or when each hash in the list is cracked.
To disable the recovery support, you can use the --restore-disable option.
If you want to specify a different path for the recovery file, you can use the --restore-file-path option.
Unnamed session
If you did not specify a session name, then the default name ‘hashcat’ will be used, i.e. the hashcat.restore file will be created.
To resume work on this session it is enough to specify the option --restore:
./hashcat64.bin --restore
…and the name of the session should not be specified, because it is default.
Also, you do not need to specify any options - they are all saved in the .restore file and will be automatically taken from it.
Let’s consider now nominal sessions. As a name, take session_name.
Let’s say you ran brute-force of passwords with the following command:
hashcat64.exe -m 2500 -a 3 --session session_name -1 ?l?d?u 25739_1504275368.hccapx ?1?1?1?1?1?1?1?1
…and while it was running you pressed 'c' (or 'q' to quit) or it was stopped/killed for some other reason.
The command to resume this cracking task will be:
hashcat --session session_name --restore
The command with --restore does not need any additional arguments or options except --session. You can not add or change any arguments when you resume work.
Can I restore hashcat session on another computer or is it possible to add a new GPU to my system?
Yes! You just need to make sure that you have all the necessary files and that they have not changed.
The most important file in this case is .restore (the name depends on the name of the session you specified with the --session option). You need to copy to the new computer at least the original hash list and the .restore file. If you used other files (masks, rules, etc.), they also need to be copied to a new computer.
Also, if you moved to another PC, make sure that all paths are the same and all files exist.
Related articles:
- Hashcat manual: how to use the program for cracking passwords (100%)
- How to use Hashcat to crack passwords containing non-Latin characters (100%)
- How to use precomputed tables to crack Wi-Fi passwords in Hashcat and John the Ripper (100%)
- Practical examples of Hashcat usage (100%)
- Hashcat doesn't detect AMD CPUs (SOLVED) (100%)
- WiFi-Pumpkin: Rogue Wi-Fi Access Point Attack with GUI and rich functionality (RANDOM - 9.7%)