How to set up OpenVPN server and clients
Table of contents
1. What is VPN for, what does it give me
4. Clear and workable instructions for setting up OpenVPN
8. Creating OpenVPN keys in Debian, Ubuntu, Linux Mint, Kali Linux
9. Creating OpenVPN keys in Arch Linux, BlackArch
10. Placing key files on the server and on the client
11.1 OpenVPN configuration file
11.2 Testing and running an OpenVPN server
11.3 Enable traffic routing on the OpenVPN server
12. Setting up OpenVPN server clients
12.1 Configuring Windows to use OpenVPN
12.2 Configuring Debian (Ubuntu, Linux Mint, Kali Linux), and Arch Linux (BlackArch) to use OpenVPN
13. Embedding certificates in the .ovpn file
What is VPN for, what does it give me
VPN creates a connection between one or more computers. This connection uses strong encryption. As a result, you can safely exchange information using unreliable connections. For example, when connected to an open Wi-Fi network, your traffic can be sniffed, both from other devices of the local network and from those who have not even connected to this network - it is enough to intercept wireless traffic without connecting to it. But if you, after connecting to an open network, begin to use a VPN, then your traffic is encrypted.
It is impossible to extract any data from this encrypted traffic. For example, if without a VPN you open a site that uses HTTPS, then as a result of sniffing it is impossible to know which data you sent and which pages you visited. But even with HTTPS, eavesdroppers can see which sites you connect to. When using a VPN, a third party, even if it has access to your traffic, cannot determine which sites you opened or retrieve other data in any way — all traffic is a stream of encrypted data that has the same value for eavesdroppers as a random flow of 0s and1s.
How VPN works
VPN technology allows you to combine multiple devices into a secure network.
VPN is divided into server and client. A single server can have multiple clients that are connected to a virtual private network where they can safely exchange data.
If some client needs to access the global network, then it contacts the VPN server, this server receives data for it and forwards it to the requesting client. Thanks to this model, VPN is often used to hide IP and to bypass regional restrictions.
What is OpenVPN
OpenVPN is a free, open source program that implements VPN technology. This program has both a client and a server. It works on various operating systems, including Linux, Windows, Android.
Due to the prevalence, even there are routers that support OpenVPN.
Clear and workable instructions for setting up OpenVPN
I tried to describe each step as clearly as possible. If you have any questions, write them in the comments.
While preparing this guide, I tested OpenVPN servers on two VPS running Arch Linux and Debian, and also checked clients running Windows, Debian (Kali Linux, Ubuntu), Arch Linux.
Therefore, if you fail or have errors, then try to perform operations more carefully. If this does not help - then write in the comments – we will try to figure it out together.
With all its details, this instruction is not for complete noobs, at least you:
- must have a VPS
- should be able to use text editors with the command line interface (vim or nano). Nano is easier - if you don't know how to use vim, then replace it with nano in commands.
Well, you need enough concentration to not get confused. The advantage of this approach (the use of asymmetric encryption and various additional protections) is that if no encryption keys are received, then the transmitted traffic cannot be decrypted by any means, by any supercomputers.
OpenVPN Certificates
We will configure OpenVPN so that the program will use certificates in its work. This is a very reliable way to encrypt the transmitted traffic, and to protect the connection to the server.
Setting up OpenVPN will be clearer if you understand the cryptographic basics.
In cryptography, there is the concept of symmetric encryption and asymmetric encryption.
An example of symmetric encryption: a password is used for encryption, the same password is used for decryption.
With asymmetric encryption, data is encrypted with one key, and decrypted with another.
For example, when encrypting with a public key: there are two keys: a private key and a public key (the public key is called a certificate). Private must be kept secret, and the public is distributed freely. Using a public key, you can encrypt messages and verify a digital signature. Using the private key, you can decrypt messages encrypted with the public key and sign the data with an electronic signature.
If the two parties have their own private key, and they have exchanged public keys, then before sending the data they encrypt them with the public key of the other party. Such an encrypted data can only be decrypted by the true recipient - the owner of the private key.
But that's not all. Key pairs cannot be created just like that - they must be signed by a certification authority (CA). For signing certificates, the certificate authority uses its own private key. And so that you can verify that the certificate is actually signed by an authorized certificate authority, the public key (certificate) of this CA is distributed between all participators.
So, it turns out that:
- the server has two files (certificate, i.e. public key, and private key)
- the client has two files (certificate, i.e. public key, and private key)
- Certificate Authority has two files (certificate, i.e. public key, and private key)
Certificates are not secret, and private keys must be secret!
- The .pem file is additionally generated: Diffie-Hellman protocol (Diffie-Hellman, DH) is a cryptographic protocol that allows two or more parties to obtain a shared secret key using an unprotected communication channel. The resulting key is used to encrypt further exchange using symmetric encryption algorithms.
It turns out already seven required files.
- to add an additional HMAC signature to the SSL/TLS handshake packets, you can create another file — it will be the eighth. This is an optional file, but we will still use it, because it allows you to discard the obviously inappropriate packages.
This is the number of files that can cause confusion. But if you understand which file is used for what, then there are no problems.
If anyone is interested, check out the relevant Wikipedia articles (if you don’t understand this completely, then don’t worry, we’ll set up your VPN anyway):
- https://en.wikipedia.org/wiki/Public_key_infrastructure
- https://en.wikipedia.org/wiki/Certificate_authority
- https://en.wikipedia.org/wiki/Public-key_cryptography
- https://en.wikipedia.org/wiki/Diffie%E2%80%93Hellman_key_exchange
After creating all the certificates, you need to configure the server and client. The setting process include:
- the generated key files need to be copied to the correct location on the server and clients (each client has its own public-private key pair)
- specify the path to the key files,
- specify the IP of OpenVPN server and some other options.
How to install OpenVPN
In different systems, OpenVPN is installed in slightly different ways. In Linux, we simultaneously install both the server and the client. In Windows, we will work only with the client. Therefore OpenVPN need to be installed on both the server and the client machine. For example, if you have a VPS with Linux, and you will use VPN from a home computer running Windows, then install OpenVPN on both computers as it is written for each system below.
Installing OpenVPN on Debian, Ubuntu, Linux Mint, Kali Linux
To install packages, it is enough to run the following commands (it is recommended that the system be updated and rebooted):
sudo apt update
sudo apt install openvpn easy-rsa
Installing OpenVPN in Arch Linux, BlackArch
Installation is performed by the following command:
sudo pacman -S openvpn easy-rsa
Installing OpenVPN on Windows
For Windows there is an OpenVPN with GUI. Go to https://openvpn.net/index.php/open-source/downloads.html, download the installer with the .exe extension.
Installation is performed as usual for Windows programs with an installation wizard.
Please note that if you wish, you can check the box next to “EasyRSA 2 Certificate Management Scripts”. This program and scripts to generate keys. In this instruction, we will generate the keys on a Linux machine, i.e. we will not need these scripts, but you can install them if you wish.

Solving the problem with the error "OpenVPN GUI does not support more than 50 configurations. Please contact the author if you need more. ”
An error may occur:
OpenVPN GUI does not support more than 50 configurations. Please contact the author if you need more.
To fix it, go to the folder C:\Program Files\OpenVPN\config\ and delete the files from there. These files could leave some builds based on OpenVPN.
Creating OpenVPN keys
For security, it is recommended that the CA be on a separate computer, the server keys are generated on a different computer, and each client generates its own keys on its computer.
For simplicity, I will perform actions on the same system (on the OpenVPN server), and then transfer the client keys to the desired computer.
| File name | Needed for | Purpose | Secret |
| ca.crt | server + all clients | Public key (certificate) of root certificate authority (CA) | NO |
| ca.key | only for a machine that signs keys | Private key of a root certification authority (CA) | YES |
| dh{n}.pem | server only | Diffie Hellman parameters | NO |
| ta.key | server + all clients | HMAC signature to SSL/TLS packets | YES |
| server.crt | server only | Certificate (public key) of the server | NO |
| server.key | server only | Private server key | YES |
| client1.crt | only client1 | Certificate (public key) of Client1 | NO |
| client1.key | only client1 | Client1 private key | YES |
| client2.crt | only client2 | Certificate (public key) of Client2 | NO |
| client2.key | only client2 | Client2 private key | YES |
| client3.crt | only client3 | Certificate (public key) of Client3 | NO |
| client3.key | only client3 | Client3 private key | YES |
Keys can be generated on any operating system — they will also work on any OS. For example, the server runs on Arch Linux and the keys are created on it, and then the client keys are sent to the OS running Windows or Ubuntu.
Depending on your system, select the appropriate instruction: for Debian derivatives or for Arch Linux derivatives.
Creating OpenVPN keys in Debian, Ubuntu, Linux Mint, Kali Linux
We start with the initialization of the certification authority:
cd /usr/share/easy-rsa
export EASYRSA=$(pwd)
sudo ./easyrsa init-pki
sudo dd if=/dev/urandom of=pki/.rand bs=256 count=1
sudo dd if=/dev/urandom of=pki/.rnd bs=256 count=1
sudo ./easyrsa build-ca
Two files will be created:
- usr/share/easy-rsa/pki/ca.crt
- /usr/share/easy-rsa/pki/private/ca.key
The first (ca.crt) is a certificate, i.e. certification authority public key. It is needed both for the server and for each client - with the help of it, they will check that the public keys of others are really signed by the certificate authority and that there are no ‘strangers’ here, not approved by the certificate authority.
Create a folder where all the certificates of the OpenVPN server will be:
mkdir /etc/openvpn/certs/
and copy-paste the first file there:
cp /usr/share/easy-rsa/pki/ca.crt /etc/openvpn/certs/ca.crt
Creating OpenVPN server keys
Now we need to generate a key pair for the OpenVPN server.
./easyrsa gen-req server nopass
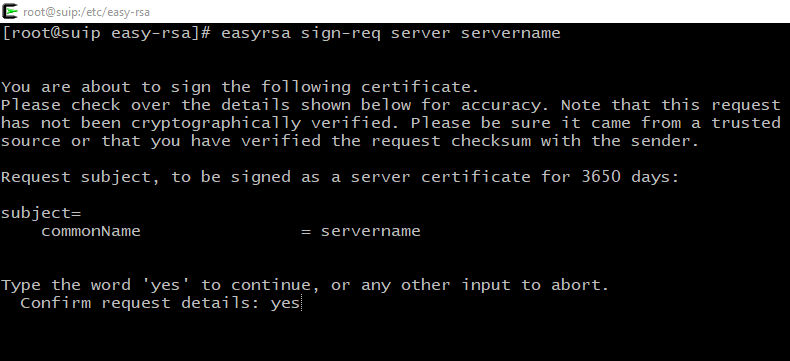
You need to sign the certificate with the keys of the Certification Center, for this:
./easyrsa sign-req server server
A question will be asked if we exactly want to sign, type yes, then enter the password from the Certification Center (CA).
Copy the files to the /etc/openvpn/certs/ folder:
cp /usr/share/easy-rsa/pki/issued/server.crt /etc/openvpn/certs/
cp /usr/share/easy-rsa/pki/private/server.key /etc/openvpn/certs/
The Diffie-Hellman (DH) parameter file is needed for the public key exchange protocol.
openssl dhparam -out /etc/openvpn/certs/dh2048.pem 2048
Create an HMAC key:
sudo openvpn --genkey secret /etc/openvpn/certs/ta.key
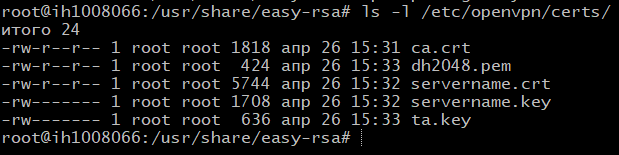
Now we have 5 files needed to start the OpenVPN server, located in the /etc/openvpn/certs/ folder. Check if all files are in place:
ls -l /etc/openvpn/certs/
Creating and signing OpenVPN client keys
./easyrsa gen-req client1 nopass
./easyrsa sign-req client client1
Similarly, you will need to answer yes to the question and enter the password of your Certification Center.
Now download the /etc/openvpn/certs/ca.crt file from the server and place it the same path, i.e. /etc/openvpn/certs/ca.crt on the client machine.
From the server, download the /etc/openvpn/certs/ta.key file and place it the same path, i.e. /etc/openvpn/certs/ta.key on the client machine.
From the server, download the /usr/share/easy-rsa/pki/issued/client1.crt file, but place it in the client machine to the /etc/openvpn/certs/client1.crt path.
From the server, download the file /usr/share/easy-rsa/pki/private/client1.key, but place it in the client machine to the /etc/openvpn/certs/client1.key path.
Files can be opened with a text editor and copy-paste to the client machine.
Check if all files are in place (there should be four files on the client):
ls -l /etc/openvpn/certs/
So, if you created keys in Debian (or derivatives), then you do not need to create keys in Arch Linux, i.e. skip the next section.
Placing key files on the server and on the client
So, all in all on the server should be five files and they should be placed in the following paths:
- /etc/openvpn/certs/ca.crt
- /etc/openvpn/certs/servername.crt
- /etc/openvpn/certs/servername.key
- /etc/openvpn/certs/dh2048.pem
- /etc/openvpn/certs/ta.key
Check if all files are in place:
ls -l /etc/openvpn/certs/

The following files should be on the client machine, and in the case of Linux, place them like this:
- /etc/openvpn/certs/ca.crt
- /etc/openvpn/certs/client1.crt
- /etc/openvpn/certs/client1.key
- /etc/openvpn/certs/ta.key
Check if all files are in place:
ls -l /etc/openvpn/certs/

Files can be downloaded using the scp program or in any other way. Also, their contents can be copied-pasted, since they are plain text.
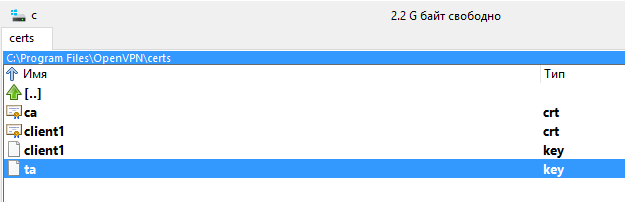
For Windows machines, create the folder C:\Program Files\OpenVPN\certs\ and place these files there:
- C:\Program Files\OpenVPN\certs\ca.crt
- C:\Program Files\OpenVPN\certs\client1.crt
- C:\Program Files\OpenVPN\certs\client1.key
- C:\Program Files\OpenVPN\certs\ta.key
Start OpenVPN server
This is a universal instruction for Debian, Ubuntu, Linux Mint, Kali Linux, Arch Linux and their derivatives.
OpenVPN configuration file
The /usr/share/doc/openvpn/examples/sample-config-files/server.conf.gz archive or the /usr/share/openvpn/examples/ folder contains sample configuration files. From there, you can take the server.conf file and customize it to fit your needs. If you acted according to this instruction, you can simply create a new /etc/openvpn/server/server.conf file.
vim /etc/openvpn/server/server.conf
and copy-paste there:
# Which port to use
# The default value is 1194
# I use port 53, mimicking DNS traffic
# this setting sometimes helps to get around
# Captive Portals
#port 1194
port 53

# TCP or UDP protocol. UDP recommended
;proto tcp-server
proto udp

# No need to change
;dev tap
dev tun

# Keys: first goes the public key of the certificate authority
# then the public key of the server
# then server private key
ca /etc/openvpn/certs/ca.crt
cert /etc/openvpn/certs/servername.crt
key /etc/openvpn/certs/servername.key # This file must be kept secret

#Diffie hellman parameters
dh /etc/openvpn/certs/dh2048.pem

# A virtual local area network will be created.
# Here are its parameters
# No need to change anything without special reasons
topology subnet
server 10.8.0.0 255.255.255.0

# When the server is restarted, the client will be assigned his previous IP address
ifconfig-pool-persist ipp.txt


# This setting makes it so that when connected to a VPN
# for clients, the VPN server becomes the default gateway
push "redirect-gateway def1 bypass-dhcp"


# If you uncomment this setting,
# then for several clients you can use the same pair
# private-public key,
# but this is not recommended
;duplicate-cn

# Ping a remote node every 10 seconds
# and consider him fallen if he did not answer in 120 seconds
keepalive 10 120

# Additional protection for DoS attacks and UDP port flooding
# thanks to the creation of "HMAC firewall"
# by adding an additional signature to SSL/TLS
# ta.key file was created during key generation,
# it must also be delivered to every customer
remote-cert-tls client
tls-auth /etc/openvpn/certs/ta.key 0 # This file must be kept secret

# Selection of cryptographic ciphers
# Customers should have the same set
#cipher AES-256-CBC
data-ciphers AES-256-GCM:AES-128-GCM

# Enable compression and send settings to the client
;compress lz4-v2
;push "compress lz4-v2"

# Maximum number of simultaneously connected clients
;max-clients 100

# Lowering privileges of the OpenVPN daemon
# after launch
#
# Only for non-Windows systems.
;user nobody
;group nobody

# Store keys in memory, in case it does not work
# get access to them due to lower privileges
persist-key
persist-tun

# Short file of current status
# contains current connections
# clipped and overwritten every minute
status openvpn-status.log

# By default logs go to syslog
# "log" means overwriting the log file each time OpenVPN starts,
# a "log-append" means log addition
# Use only one, not both!
;log         openvpn.log
;log-append  openvpn.log

# Verbality Level
#
# 0 silent, except fatal errors
# 4 is suitable for normal use.
# 5 and 6 help in debugging when solving connection problems
# 9 is extremely verbal
verb 4

# Warn client that server is restarting
# so that clients can reconnect automatically.
explicit-exit-notify 1
Save and close the file.
Testing and running an OpenVPN server
You can test the OpenVPN server settings like this:
openvpn /etc/openvpn/server/server.conf
If there are errors in the configuration file, the program will immediately terminate with an error. To solve problems, turn on the logs in the settings file, increase the verbality to 6 and deep in the error log:
cat /var/log/openvpn.log
cat /var/log/openvpn-status.log
And if everything is fine, start the OpenVPN server and add it to the autoload.
systemctl start openvpn-server@server.service
systemctl status openvpn-server@server.service
systemctl enable openvpn-server@server.service

Please note that with systemctl, use the openvpn-server@<configuration>.service command, where <configuration> is the configuration file that lies in the /etc/openvpn/server/ folder, but without the .conf extension.
If you followed this instruction and did not change the file name, then the above commands will suit you, they do not need to be changed.
If you encounter an error:
Options error: --explicit-exit-notify cannot be used with --mode server
That from /etc/openvpn/server/server.conf
Remove directive
explicit-exit-notify 1
The reason for the error is that support for the explicit-exit-notify 1 directive has been added to OpenVPN since version 2.4. And on your machine, obviously, OpenVPN is an older version.
If you encounter an “Address already in use” error, for example:
TCP/UDP: Socket bind failed on local address [AF_INET][undef]:53: Address already in use
Exiting due to fatal error
This means that the port is occupied by another program. You can check which programm uses the port with the command:
sudo netstat -tulpn | grep ":PORT_NUMBER"
For example, to check port 53:
sudo netstat -tulpn | grep ":53"
Use any other non-busy port - for this, edit the port 53 directive in the OpenVPN server and client configuration files.
Enable traffic routing on the OpenVPN server
At this stage, if someone connected to the OpenVPN server, then he will not be able to connect to the global network. To make this possible, you need to configure traffic routing.
To do this, create a file vpn_route.sh.
Please note that I create a script in the /root/bin/ folder, if you do not have it, then create it in advance
mkdir /root/bin/
If you want to place the script in another folder, then edit the following data for your own.
Create a file:
vim /root/bin/vpn_route.sh
In this file, copy the following content, editing it to fit your needs. Pay attention to:
- PRIVATE=10.8.0.0/24 - change the subnet according to your settings. If you followed this guide, then you do not need to change anything.
- Enter DEV value! Type the name of your network interface there. This name can be seen by the command
ip a
If you do not enter a name, it is likely that when the computer is booted, the script will not be able to automatically get the name of the network interface and therefore traffic routing will not work correctly!
#!/bin/sh

# specify the name of the interface, otherwise the script will try to select it automatically
#DEV='eth0'
DEV='ens3'
PRIVATE=10.8.0.0/24

if [ -z "$DEV" ]; then
    DEV="$(ip route | grep default | head -n 1 | awk '{print $5}')"
fi
# Turn forwarding packets on from the tunnel interface
# they got to the external interface
sysctl net.ipv4.ip_forward=1
# Make sure iptables do not block redirected traffic:
iptables -I FORWARD -j ACCEPT
# Network Address Translation (NAT) for packets coming from the tunnel
# When forwarding is enabled, packets are forwarded by default.
# with the original address unchanged, that is, in our case 10.8.0.*
# such packages are either deleted at the ISP gateway, or even if they are
# go to the destination, the answer never finds a way back.
# These private addresses are not routed to the Internet.
#
# The solution is Network Address Translation (NAT) of outgoing traffic,
# i.e. replace private 10.8.0.* address with the public IP address of the VPN server.
# This will allow responses to reach the VPN server,
# and there they will be sent back to the tunnel.
iptables -t nat -I POSTROUTING -s $PRIVATE -o $DEV -j MASQUERADE
Make the file executable:
chmod 755 /root/bin/vpn_route.sh
To make changes right now, before restarting your computer, run:
bash /root/bin/vpn_route.sh
If everything is fine, then to add it to startup, create the file /etc/systemd/system/enable-openvpn-routing.service:
vim /etc/systemd/system/enable-openvpn-routing.service
With the following content:
[Unit]
Description=Enable OpenVPN traffic routing.

[Service]
ExecStart=/root/bin/vpn_route.sh

[Install]
WantedBy=multi-user.target
Pay attention to the /root/bin/vpn_route.sh line - replace it with your own path if you placed the file in a different place or named it differently.
And activate the autorun of this file:
systemctl enable enable-openvpn-routing
Setting up OpenVPN server clients
Configuring Windows to use OpenVPN
As already mentioned, the necessary keys should be placed in the following folders:
- C:\Program Files\OpenVPN\certs\ca.crt
- C:\Program Files\OpenVPN\certs\client1.crt
- C:\Program Files\OpenVPN\certs\client1.key
- C:\Program Files\OpenVPN\certs\ta.key
Now in the C:\Program Files\OpenVPN\config\ folder create a client.ovpn file with the following contents:
ATTENTION: replace the remote 185.117.153.79 IP address with your own!!!
# The program acts as a client (not a server)
client

# The most important setting:
# enter here the IP address of YOUR OpenVPN SERVER
# Other settings in not necessary to change !!!
remote 185.117.153.79

# Server uses port 53, the same port is specified here.
port 53

# Do not change
dev tun

# Select TCP or UDP protocol
# Must be the same as on server
;proto tcp-client
proto udp

# Hostname/IP and server port.
# You can enter several remote servers
# for load balancing.
;remote my-server-1 1194
;remote my-server-2 1194

# If you have several hosts for load balancing
# then when you turn on this option will be selected random
# otherwise they will be used one by one
;remote-random

# Infinitely trying to resolv hostname of an
# OpenVPN servers. Very useful on machines.
# who are connected to the Internet is not permanent,
# for example for laptops
resolv-retry infinite

# Most clients do not need
# bind to a specific local port
nobind

# Lower privileges after connecting (non-Windows only)
;user nobody
;group nobody

# Try to keep the previous state after the restart.
persist-key
persist-tun

# Here you can configure HTTP proxy
# to connect to the OpenVPN server
# remote proxy authentication supported
;http-proxy-retry # retry on connection failures
;http-proxy [proxy server] [proxy port #]

# Wireless networks often create a lot of duplicate packets.
# Enable this setting to not show warnings.
# about duplicates
;mute-replay-warnings

# Path to certificates
# Notice how this is done in Windows:
# Path to files taken in double quotes,
# backslashes escaped
ca "C:\\Program Files\\OpenVPN\\certs\\ca.crt"
cert "C:\\Program Files\\OpenVPN\\certs\\client1.crt"
key "C:\\Program Files\\OpenVPN\\certs\\client1.key"

# Additional protection
remote-cert-tls server

# Key for extra protection
tls-auth "C:\\Program Files\\OpenVPN\\certs\\ta.key" 1

# A set of ciphers as on the server
#cipher AES-256-CBC
data-ciphers AES-256-GCM:AES-128-GCM

# Compression. Do not enable if not enabled on server
#comp-lzo

# Log verbality.
verb 3
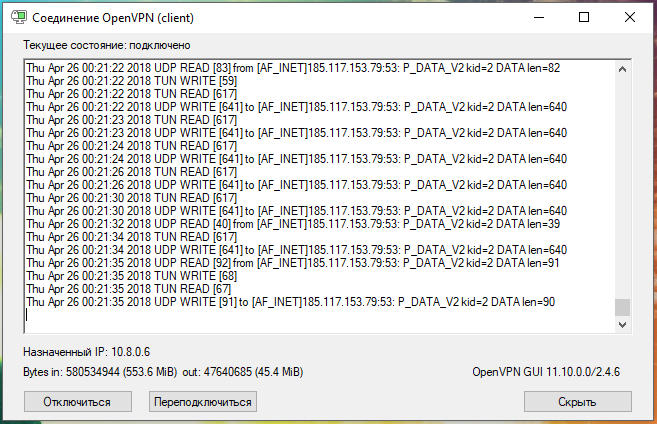
Now select the “client” connection and click “Connect”:

You can check your IP at https://suip.biz/?act=myip
Configuring Debian (Ubuntu, Linux Mint, Kali Linux), and Arch Linux (BlackArch) to use OpenVPN
This is a universal instruction for all derivatives of Debian and Arch Linux on connecting to OpenVPN.
Now we will configure the client who will use OpenVPN on Linux. As it was said almost at the very beginning, the OpenVPN package should already be installed.
The generated keys must be in these files:
- /etc/openvpn/certs/ca.crt
- /etc/openvpn/certs/client1.crt
- /etc/openvpn/certs/client1.key
- /etc/openvpn/certs/ta.key
If you do not have the /etc/openvpn/certs/ folder, then create it:
sudo mkdir /etc/openvpn/certs/
And copy all the necessary keys there.
Check if all files are in place (4 files):
ls -l /etc/openvpn/certs/
Create a /etc/openvpn/client/client.conf file
sudo gedit /etc/openvpn/client/client.conf
And copy-paste there (be sure to change the IP address in the remote 185.117.153.79 line to the IP address of YOUR OpenVPN server):
# The program acts as a client (not a server)
client

# The most important setting:
# enter here the IP address of YOUR OpenVPN SERVER
# Other settings are not necessary to change!!!
remote 185.117.153.79

# Server uses port 53, the same port is specified here.
port 53

# Do not change
dev tun

# Select TCP or UDP protocol
# Must be the same as on server
;proto tcp-client
proto udp

# Hostname/IP and server port.
# You can enter several remote servers
# for load balancing.
;remote my-server-1 1194
;remote my-server-2 1194

# If you have several hosts for load balancing
# then when you turn on this option will be selected random
# otherwise they will be used one by one
;remote-random

# Infinitely trying to convert hostname
# OpenVPN servers. Very useful on machines.
# which conniction to the Internet is not permanent,
# for example for laptops
resolv-retry infinite

# Most clients do not need
# bind to a specific local port
nobind

# Lower privileges after connecting (non-Windows only)
;user nobody
;group nobody

# Try to keep the previous state after the restart.
persist-key
persist-tun

# Here you can configure HTTP proxy
# to connect to the OpenVPN server
# remote proxy authentication supported
;http-proxy-retry # retry on connection failures
;http-proxy [proxy server] [proxy port #]

# Wireless networks often create a lot of duplicate packets.
# Enable this setting to not show warnings.
# about duplicates
;mute-replay-warnings

# Path to certificates
ca /etc/openvpn/certs/ca.crt
cert /etc/openvpn/certs/client1.crt
key /etc/openvpn/certs/client1.key

# Additional protection
remote-cert-tls server

# Key for extra protection
tls-auth /etc/openvpn/certs/ta.key 1

# A set of ciphers is same as on the server
#cipher AES-256-CBC
data-ciphers AES-256-GCM:AES-128-GCM

# Compression. Do not enable if not enabled on server
#comp-lzo

# Verbality of the log.
verb 3
You can test the OpenVPN client settings like this:
sudo openvpn /etc/openvpn/client/client.conf

The words “Initialization Sequence Completed” indicate that the connection was successful.
If for some reason there is no Internet, then check if the IP is pinged.
ping 8.8.8.8
and whether host names is reachable:
ping google.com
If you can ping IP adrasses, but you cannot ping host names, then open the /etc/resolv.conf file:
sudo gedit /etc/resolv.conf
And replace its contents with:
nameserver 8.8.8.8
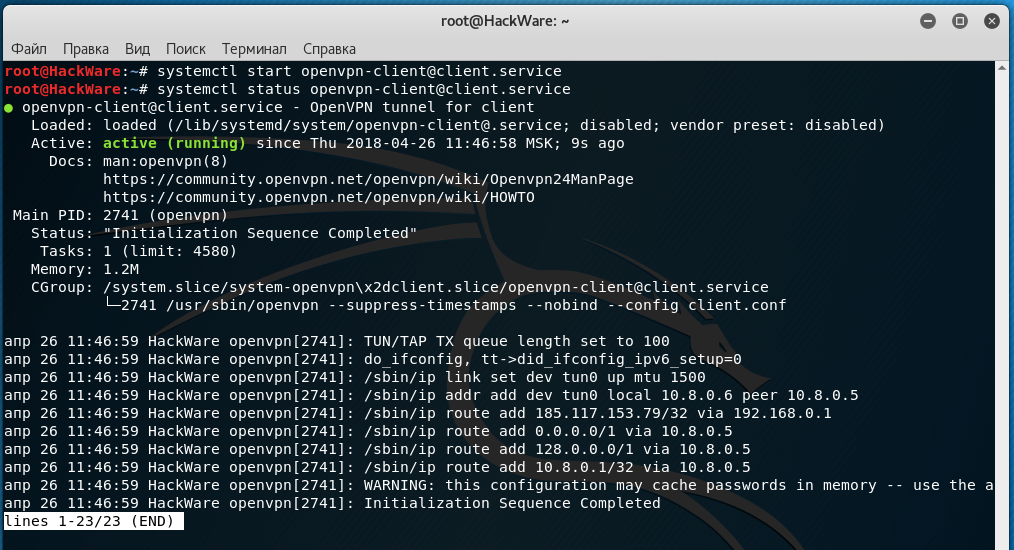
And if everything is fine, run the OpenVPN client in the background and, if desired, add it to the autoload. This is optional - you can connect to OpenVPN on request.
sudo systemctl start openvpn-client@client.service
Status check:
sudo systemctl status openvpn-client@client.service
Adding to autostart:
sudo systemctl enable openvpn-client@client.service
If you need to stop, enter:
sudo systemctl stop openvpn-client@client.service
If you need to disable autorun, then run:
sudo systemctl disable openvpn-client@client.service
Embedding certificates in the .ovpn file
Certificates do not have to be in separate files. The certificate can be embedded directly into the .ovpn file and, in fact, it is very convenient! That is, to distribute the configuration among OpenVPN clients, it is not necessary to transfer five files (settings and four certificates), it is enough to transfer only one settings file into which certificates are already embedded.

OpenVPN allows you to include files in the main configuration files, which are indicated by the options --ca, --cert, --dh, --extra-certs, --key, --pkcs12, --secret, --crl-verify, --http-proxy-user-pass, --tls-auth and --tls-crypt.
Each certificate is preceded by the string <option> (where instead of the word “option” you need to enter the option that this certificate replaces, that is ca, cert, dh, and so on). When the certificate text ends, the closing </option> tag is put.
An example of using an embedded certificate:
<cert>
-----BEGIN CERTIFICATE-----
[...]
-----END CERTIFICATE-----
</cert>
As you can see, you need to copy the entire contents of the files, along with the comments. If the file is embedded --pkcs12, then it must be encoded in base64. You can encode a --pkcs12 file in base64, for example, using OpenSSL, by running
openssl base64 -in input.p12
Consider specifically for our configuration. We use four certificates:
ca "C:\\Program Files\\OpenVPN\\certs\\ca.crt"
cert "C:\\Program Files\\OpenVPN\\certs\\client1.crt"
key "C:\\Program Files\\OpenVPN\\certs\\client1.key"
tls-auth "C:\\Program Files\\OpenVPN\\certs\\ta.key" 1
These four lines need to be removed from the configuration file. Please note that with tls-auth after the file name there is a digit 1 - this is an additional option, and so that it is not lost, add the line to your .ovpn file:
key-direction 1
Now directly in the .ovpn file add:
<ca>
 [...]
</ca>
<cert>
[...]
</cert>
<key>
 [...]
</key>
<tls-auth>
 [...]
</tls-auth>
Where, instead of dots […], insert the appropriate certificates/keys in full, along with comments. It turns out like this:
<ca>
-----BEGIN CERTIFICATE-----
[...]
-----END CERTIFICATE-----
</ca>
<cert>
[...]
</cert>
<key>
-----BEGIN PRIVATE KEY-----
[...]
-----END PRIVATE KEY-----
</key>
<tls-auth>
#
# 2048 bit OpenVPN static key
#
-----BEGIN OpenVPN Static key V1-----
[...]
-----END OpenVPN Static key V1-----
</tls-auth>
Now the .ovpn settings file can be downloaded to various OpenVPN clients: on the phone, for example, or on another computer — separate certificate files are no longer needed.
Conclusion
If you do not have your own VPS, and you want to buy it right now, then a couple of links:
- popular hoster, you can rent servers in different countries
- Russian VPS hoster (it is extremely cheap)
Related articles:
- Introduction to IPv6 Addresses: How to Use and How to Explore the Network (Part 2) (66.4%)
- Errors in Kali Linux ‘W: Failed to fetch’ and ‘W: Some index files failed to download. They have been ignored, or old ones used instead.’ (SOLVED) (65.3%)
- How to install Intercepter-NG in Linux (63.8%)
- How to install and configure RDP server on Linux (63.8%)
- How to connect to Windows remote desktop from Linux (63.8%)
- How to install Greenbone Vulnerability Management (GVM) (formerly OpenVAS) on Kali Linux (RANDOM - 51.1%)
Hi there,
I wrote this comment but there is no notification and i think that is lost. I am writing again.
Hope you are well. I am an OpenVPN client use. And as you know there is a Proxy setting in OpenVPN GUI.
My questions are:
*What is the advantages and disadvantages of use OpenVPN with proxy? I mean security, privacy, etc.
**What does exactly makes Proxy setting on OpenVPN connection? I mean what is the role of Proxy in this scenario?
***How can i test the connection in this scenario? I mean i am connecting with Italy OVPN TCP file and writing Sweden Proxy servers to the Proxy section. When i check my IP, it is Italy IP. But what is doing Sweden Proxy in this scenario?
Could you please help me about these issues?
Thanks in advance.
Have a good day.
Hi,
Im using kali 2020.4 fully updated and upgraded
./easyrsa init-pki seems to work fine
but
./easyrsa build-ca doesnt.
It gives the following error:
Hello! Hopefully the problem is now resolved. You can check it like this:
By the way, it is enough to create only 1 file named .rand. But I believe there is a typo in the /usr/share/easy-rsa/pki/openssl-easyrsa.cnf file that can be fixed in the next release, so we create both files just in case.
Check the contents of the file:
There, the RANDFILE variable was assigned a different value twice:
Many thanks Alex !!!
you are absolutely right. in that .cnf file the value to the RANDFILE variable is assigned twice with different values.
Now with your workaround this step is working as a charm.
Ill continue executing the rest of the steps
Thanks again !
Im not sure what to do now. Looks like something went wrong again
# openvpn --genkey --secret /etc/openvpn/certs/ta.key
2021-02-17 11:16:17 WARNING: Using --genkey --secret filename is DEPRECATED. Use --genkey secret filename instead.
should have had provided the command
openvpn --genkey secret /etc/openvpn/certs/ta.key
instead ?? I dont understand very well what has happened
Another issue arised when creating the hmac key so the output of the command:
openvpn --genkey --secret /etc/openvpn/certs/ta.key
was:
2021-02-17 11:16:17 WARNING: Using --genkey --secret filename is DEPRECATED. Use --genkey secret filename instead.
Im not sure what to do now. Does this mean that the command provided should have been:
openvpn --genkey secret /etc/openvpn/certs/ta.key
Im in doubt now
You are right. I’ve updated the manual. As well I updated it in terms of Topology net30 →Topology subnet.
Help please I can't get it working. I already removed the # on 5 or 6 verbality.
When I input this:
openvpn/etc/openvpn/server/server.confI get this:──(rootkali)-[/home/sscoconut]└─# openvpn /etc/openvpn/server/server.conf
Options error: Unrecognized option or missing or extra parameter(s) in /etc/openvpn/server/server.conf:92: Use (2.5.1)
Use --help for more information.
Hi! As you yourself can see from the error text, you have something wrong on line 92 of the /etc/openvpn/server/server.conf file. Have you checked line 92 in /etc/openvpn/server/server.conf? What's in it?
Hello thank you for your reply.
I manged to make it work by changing the name from servername to server. I now able to connect to my OpenVPN server in my LAN but my problem is I can't connect to it outside of my home network.
What solutions do I need to take to make it work so I can do remote access outside of my LAN?
Hello! Please double check Enable traffic routing on the OpenVPN server section.
Hello thank you for your fast reply. This is what inside of my
vpn_route.sh#!/bin/sh# specify the name of the interface, otherwise the script will try to select it automatically#DEV='eth0'
DEV='wlan0'
PRIVATE=10.8.0.0/24
if [ -z "$DEV" ]; thenDEV="$(ip route | grep default | head -n 1 | awk '{print $5}')"
fi
# Turn forwarding packets on from the tunnel interface
# they got to the external interface
sysctl net.ipv4.ip_forward=1
# Make sure iptables do not block redirected traffic:
iptables -I FORWARD -j ACCEPT
# Network Address Translation (NAT) for packets coming from the tunnel
# When forwarding is enabled, packets are forwarded by default.
# with the original address unchanged, that is, in our case 10.8.0. *
# such packages are either deleted at the ISP gateway, or even if they are
# go to the destination, the answer never finds a way back.
# These private addresses are not routed to the Internet.
#
# The solution is Network Address Translation (NAT) of outgoing traffic,
# i.e. replace private 10.8.0.* address with the public IP address of the VPN server.
# This will allow responses to reach the VPN server,
# and there they will be sent back to the tunnel.
iptables -t nat -I POSTROUTING -s $PRIVATE -o $DEV -j MASQUERADE
Do I need to change the PRIVATE IP into my public IP? I really can't access the VPN when I'm not connected to my home network.
When I'm connected on my home network, I can connect to my OpenVPN server and I can surf the web. The problem is when I switch to my mobile phone data to connect to OpenVPN, it just says waiting for server and can't connect.
I seem to have misunderstood what exactly you are asking. I thought that you can connect to the VPN server, but after that you lose your connection to the Global network.
Now I started to think that you have both the VPN server and the client from which you can connect work on the local network and you cannot connect to it from the global network, is that so?
If so, then you need the VPN server to have a white, global IP. Configuring a global IP for a local network is definitely beyond the scope of this article, it very much depends on your circumstances and in some situations it is impossible at all.
VPN server operation implies the following scheme:
1. There is a computer with a global IP, a VPN server is started on it. For personal purposes, individuals rent a VPS with a global IP. Large companies have their own servers
2. Due to the fact that the VPN server has a global IP, any client can connect to it
3. Clients connect to the VPN server, as a result they find themselves in a virtual private network (VPN), which turns out to be a local network for all of them, even if they are located in different parts of the world. At the same time, they exchange traffic over an encrypted channel.
If I misunderstood again, please explain more precisely.
Thank you for your reply. I will explain it in more precise way:
I managed to make it work by following your guide. I will break it down on how my devices are connected to each other:
I have a WiFi router at home. My RaspberryPi 4b is running on Kali Linux which I set it up as my OpenVPN server. Now I managed to make it work by following your guide. I can connect to it with my devices at home only. In other words all of them are under the same WiFi router.
Now I went to my cousin's home just to check if I could connect to my OpenVPN server that is RaspberryPi 4b at home but to no avail. In this case this is a different WiFi router now. I'm using OpenVPN on my Android device when I'm trying to connect to my OpenVPN server at my home but I can't connect. It just shows this at the OpenVPN logs on my phone:
Contacting 192.168.100.7:53 via UDP
EVENT: WAIT
Connecting to [192.168.100.7]:53(192.168.100.7) via UDPv4
EVENT: RECONNECTING
It just endless loop. So basically my problem is when I'm not in the range of the WiFi router where the OpenVPN machine is connected to, I really can't connect to the VPN.
Thank you for the reply. Here's more detailed explanation:
I have an OpenVPN Server that is running on my Raspberry Pi 4 which is connected to my WiFi Router. I can easily connect to my OpenVPN Server at home with my devices that is also connected to the same WiFi Router as the OpenVPN Server.
I did another test if I could connect to my OpenVPN Server so what I did was I went to my cousin's home. This time it is a different WiFi Router now. The problem is I can't connect to my OpenVPN Server if I'm not at home.
Any solutions to this?
There is a solution for this, but first, you must know what a global IP address is, what a local IP address is, what are publicly routable and non-routable IP addresses, why a local IP is non-routable, what is port forwarding. Second, you need to know how to set it up.
In this comment, I already wrote that the VPN server for global access must have a global IP. The easiest way to get it is by renting a VPS. In fact, you can rent a global IP from your ISP, but, firstly, it may turn out to be more expensive than renting a VPS with which there is always a global IP in addition, and secondly, you must forward ports on your router.
P.S. comments can be displayed with a delay due to the caching of the site pages, so there is no need to duplicate them.
Hello, so basically I will never get to connect on my OpenVPN server at home unless I contacted my ISP for a VPS am I right?
I'm starting to think that you are trolling me. A VPS is a virtual private server that you can rent for $5 from any hoster.
You can rent Public address from ISP (in previous posts I call it global).
If you're not trolling me, and you really don't understand, then why don't you start by googling the following topics:
Google it, read it, I think a lot will become clearer for you.