How to create a proxy on shared hosting
I wrote in a previous article about how to get a large number of proxies, and how to compose a list in a convenient format that can be imported into programs that use proxies.
But sometimes not a list with unreliable proxies, but just one additional IP address is needed, which is always stably accessible and stably working.
In this tutorial, I will show you how to create your own proxy on a usual virtual hosting. For obvious reasons, such a proxy is not suitable for anonymity, but it can fully satisfy the needs, for example, to bypass regional censorship, or be used as an additional IP address when accessing a service, the number of requests to which from one IP is limited. It does not make sense to pay specifically for virtual hosting for the sake of a proxy – then it’s easier to rent the cheapest VPS (virtual private server) and set up a VPN on it – it will be a more stable and more secure connection than a proxy on a virtual hosting.
However, if you are a webmaster and anyway pay for hosting every month, then if there is a need, you can also set up a proxy.
We need access to the console (SSH), which is currently available on many modern hosters – sometimes access to the console is available by default, sometimes available on request. Sometimes this is a full-fledged SSH server, sometimes it is an SSH emulator with a web interface — we can use any option (although with a full-featured SSH there will be a more stable connection).
I will show with the example of my hoster – there is an SSH emulator available with a web interface. In your case, the interface may be different, the path to the user's home folder may be different, but in general, the essence of the process is the same everywhere.
We will consider the following questions:
- how to check the availability of the necessary program and, if necessary, install it
- how to run a proxy
- how to add a task to Cron to check the work of a proxy and restart it in case of fail of the proxy process
1. Check and install ncat
As a proxy server, we will use the ncat program. The choice is made to use this program for the following reasons:
- on many servers it is available by default
- in case of absence, it is easy to install (there are official binaries for popular Linux distributions, that is, you do not need to compile yourself)
- this program is well known to me (by the way, I recommend the corresponding article “How to use netcat (nc), ncat”)
So, let's start by checking if the ncat program is available on the hosting. To do this, open the console and run there:
ncat --version
If something like this is displayed:
Ncat: Version 6.47 ( http://nmap.org/ncat )
This means that the program is installed by default and you can immediately proceed to the next step.
If there is a message that the program is not found, then you need to start with the installation.
Please note: analogs like netcat and nc are NOT suitable for this guide.
If the program is missing, then we can install it even if we do not have root privileges! The fact is that the program is completely portable, so just download the installation package and unpack it. After that, the program can be started by referring to the file in the absolute path or placed in the ~/bin directory to run by the file name. To listen to ports starting from 1024 and higher, superuser rights are also not required. That is, for all operations we have enough of our usual limited rights of the Shared hosting client.
We need to start by determining which Linux distribution the hosting runs on in order to know which package to use.
If the hosting is powered by Red Hat Enterprise Linux (RHEL), Fedora, CentOS, Suse, Mandrake, Yellow Dog and their derivatives, then we will use the official RPM package.
If hosting works on Debian, Ubuntu and their derivatives, then… we will still use the RPM package, since the .deb package is missing. But we will need to do an additional action.
You can find out which Linux distribution is used with the command:
cat /etc/issue
Example output:
CentOS release 6.5 (Final)
Kernel \r on an \m
Another reliable option is to check which program is present in the system: yum or apt. This can be done, for example, with the which command:
which yum
If displayed:
/usr/bin/yum
then yum is present in the system, which is the RPM package manager.
And if the command is absent as in the following case:
which apt
This will show something like the following:
/usr/bin/which: no apt in (/usr/kerberos/sbin:/usr/kerberos/bin:/usr/local/bin:/bin:/usr/bin:/usr/local/sbin:/usr/sbin:/sbin:/home/host900000/bin)
This means that apt is not present in the system, which means it is not Debian or a derivative distribution.
Create a bin folder and go to it:
mkdir bin
cd bin/
Now download the Ncat installation package:
wget -O ncat.rpm `curl -s 'https://nmap.org/download.html' | grep -E -o 'https://nmap.org/dist/ncat[0-9.-]+.x86_64.rpm' | head -n 1`
If you have Red Hat Enterprise Linux (RHEL), Fedora, CentOS, Suse and their derivatives, then simply extract the downloaded file:
rpm2cpio ncat.rpm | cpio -idv
Move the executable file and do the cleaning:
mv usr/bin/ncat ncat
rm -rf ncat.rpm usr/
If you have Debian, Ubuntu and their derivatives, then you also need to unpack the downloaded file. The problem is that by default the rpm2cpio package may not be installed and therefore you need to choose another option. The .rpm files can be unpacked in various ways, but most likely you will have to do it on your home computer and upload the file (you only need one file from the package: ./usr/bin/ncat) to the hosting. On your Linux computer (Debian, Ubuntu, Kali Linux, Linux Mint), you can unpack it by installing the rpm2cpio package:
sudo apt install rpm2cpio
And then:
rpm2cpio ncat.rpm | cpio -idv
You can also unpack using the 7z or the alien program.
2. Run proxy
If the Ncat program is installed on your hoster and you missed the first step, then create the bin folder and go to it:
mkdir bin
cd bin/
Make a test launch of the proxy and check its performance:
ncat -l PORT --proxy-type http
In the previous command, replace the PORT with the desired value. Additionally, use the following options so that unauthorized persons cannot use your proxy:
      --proxy-auth <user>:<password>
      --allow                Allow only given hosts to connect to Ncat
      --allowfile            A file of hosts allowed to connect to Ncat
      --deny                 Deny given hosts from connecting to Ncat
      --denyfile             A file of hosts denied from connecting to Ncat
Don’t hope that no one will stumble on your proxy – be sure to choose a way to close access from outsiders. If you have a permanent IP or your IP is always in a certain range, then restrict access to this range. Or set a difficult to guess username and password.
When you create the ncat launch command, configure restrictions from outsiders and check everything, then run it as follows:
nohup YOUR COMMAND &
For example, my startup command is as follows:
ncat --allow IP -l PORT --proxy-type http
Then I need to run it like this:
nohup ncat --allow IP -l PORT --proxy-type http &
This complex command is used so that the command does not quit even after closing the console window.
If you need to stop the program launched this way (and CTRL+c in this case does not help), then this can be done via its PID, using, for example:
ps -A -f
Or so:
test=`ps -A -f`; echo "$test" | grep -E 'ncat'
When you get the PID of this process, you can close it like this:
kill PID
3. Adding a job to Cron to check the proxy and restart the proxy in case of fail
In full-fledged SSH, the process started in the manner shown should remain constantly running. But, as I have already said, my hosting uses some web interface as SSH, so in my case, after about 20 minutes, the ncat process terminates.
This situation can be corrected by adding the corresponding task to Cron.
To do this, in the current ~/bin folder, create the file checkProxy.sh and copy something like the following into it:
#!/bin/bash

test=`ps -A -f`;
if [[ -z "`echo $test | grep -E 'ncat'`" ]]; then
        nohup ncat --allow IP -l PORT  --proxy-type http &
fi
Pay attention to the part ncat --allow IP -l PORT --proxy-type http: you need to edit it according to your proxy launch command.
This script checks if the ncat process is already running; if it is not running, then a launch is made; if running, then nothing is done.
Add permission to execute:
chmod +x checkProxy.sh
Now we need to know the absolute path to this file:
readlink -e checkProxy.sh
Example output:
/home/host000000/bin/checkProxy.sh
Now in the hosting control panel, go to the Cron tab and add a new entry:
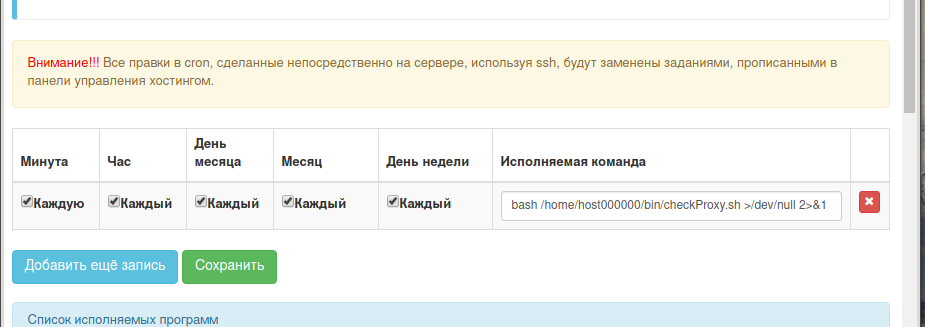
The record should be of the following form:
bash /path/to/file/checkProxy.sh >/dev/null 2>&1
For example, in my case:
bash /home/host000000/bin/checkProxy.sh >/dev/null 2>&1
Conclusion
A proxy configured in this way, even in the event of an unexpected shutdown, will be automatically restarted in less than a minute.
Let me remind you that Ncat supports only HTTP proxies as a proxy server.
You can run the ncat command without nohup and & (that is, without detach it from the terminal), but with the -vvv options to increase the verbality. This way you can analyze HTTP requests. By the way, a hosting or server is unnecessary for this – you can do it on the local computer, launching a proxy in one console:
ncat -vvv -l 34567 --proxy-type http
and in another console request through this proxy:
curl -s --proxy localhost:34567 'https://hackware.ru'
Related articles:
- How to make proxy with Tor in Windows (54.9%)
- How to install VeraCrypt on Linux (50%)
- Why in Tails the history of the entered commands is not saved. How to make so that the history of the last Bash commands are saved (50%)
- Errors in Kali Linux ‘W: Failed to fetch’ and ‘W: Some index files failed to download. They have been ignored, or old ones used instead.’ (SOLVED) (50%)
- Guide to GPS Metadata in Photos (50%)
- How to install Python and PIP on Windows 10. How to set up Python as a web server module (RANDOM - 11.2%)