How to find out which USB devices were plugged to Linux
How to find out that someone else was copying files from a computer
Devices with a USB connector are the most common – they can be information storage devices (flash drives, external drives), keyboards, computer mice, phones, printers, sound cards and headphones, and even specially programmed devices for, for example, bypassing password entry to unlock the screen and so on Further.
In any case, unauthorized connection of any device means that your computer also has a “private life” that you do not know about. It is possible that this means unauthorized access to copy your personal files.
This article is about the usbrip program. It helps to understand the history of plugging USB devices to a computer on Linux in recent months. Perhaps you already know about this program and its limitations – but do not rush to go away – in this article I will show how you can process the syslog even on computers where syslog is not configured to work with the date format that requires usbrip (by default on most distributions), as well as how to use usbrip on computers where there is no syslog at all (for example, in Arch Linux and derivative distributions, where syslog is absent by default, and all of its functions are performed by systemd's journal).
Error ‘Wrong timestamp format found in "/var/log/syslog"’
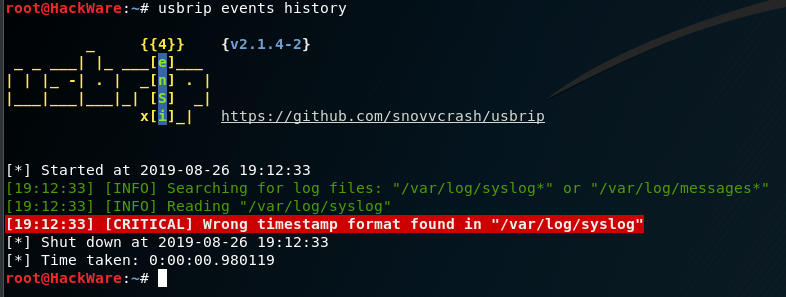
The situation is as follows: usbrip uses the files /var/log/syslog* or /var/log/messages* in its work. After recent usbrip updates, this program can only work with a detailed time format that needs to be specially configured for syslog.
It turns out that you need to delete the old logs and you can analyze only the data from the moment you configure syslog, and the information for the last couple of months will be lost.
Another disadvantage of this approach is that it is impossible to analyze files from other computers where this setting has not been previously made.
In theory, the problem can be fixed by installing a version that worked with the default date format:
sudo pip3 install usbrip==2.1.3
But this does not solve the problem of analyzing the syslog on distributions where syslog is not installed. Of course, I don’t really like the way with the old version. Therefore, I wrote commands that convert the date from the old format to the new one. That is, it is not necessary to change the format of syslog files, you can use syslog logs from other computers and the latest version of usbrip will work successfully with them!
But let's start, after all, with the usbrip installation.
How to install usbrip
Please note that usbrip can be installed in several ways and you do NOT need to install the program in each of them – select one.
Installation on Kali Linux
The easiest installation option:
sudo pip3 install usbrip
But with this option, some features of the program will not be available. To get usbrip with all the functions, the installation must be done as follows:
sudo apt install python3-venv p7zip-full -y
git clone https://github.com/snovvcrash/usbrip
cd usbrip/
chmod +x ./installers/install.sh
sudo -H ./installers/install.sh -s
cd
usbrip -h
If you want, you can configure the date format in syslog specifically for usbrip. The date will become more detailed (for example, a year will appear there). If you configure this, usbrip will be able work directly with the /var/log/syslog* or /var/log/messages* log files without the need to convert them. How to do this is described in the section ‘System Log Structure’.
Installation in BlackArch
sudo pip3 install termcolor terminaltables tqdm
sudo pacman -S usbrip
sudo usbrip ids download
In BlackArch and ArchLinux, syslog is generally absent by default, so there is no place to change the date format. But this will not be a problem – we can as well find out when and which USB was connected to our system.
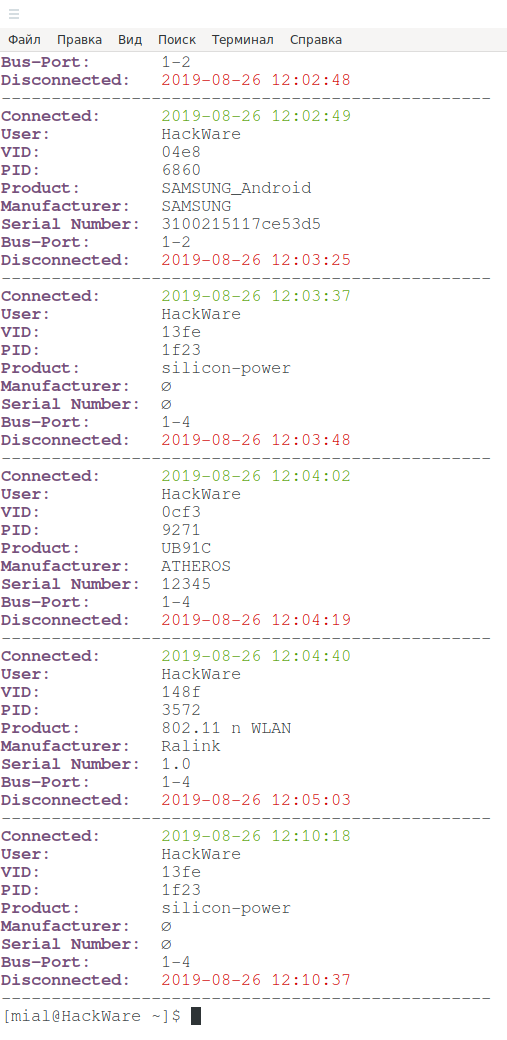
How to see the USB connection history on Linux
So, if you changed the date format for syslog, then just run the program as follows:
usbrip events history
The program itself will find the log files and, if everything is alright (the log files are found, they have the correct date format and there are events with USB devices), then it will output:
[?] How would you like your event history list to be generated?

    1. Terminal stdout
    2. JSON-file

[>] Please enter the number of your choice (default is 1):
It asks if we want to output the data to standard output (to the screen) or save it to a JSON file. If you want to display data on the screen, then just press ENTER, since the first option is selected by default.
The following table will be displayed:
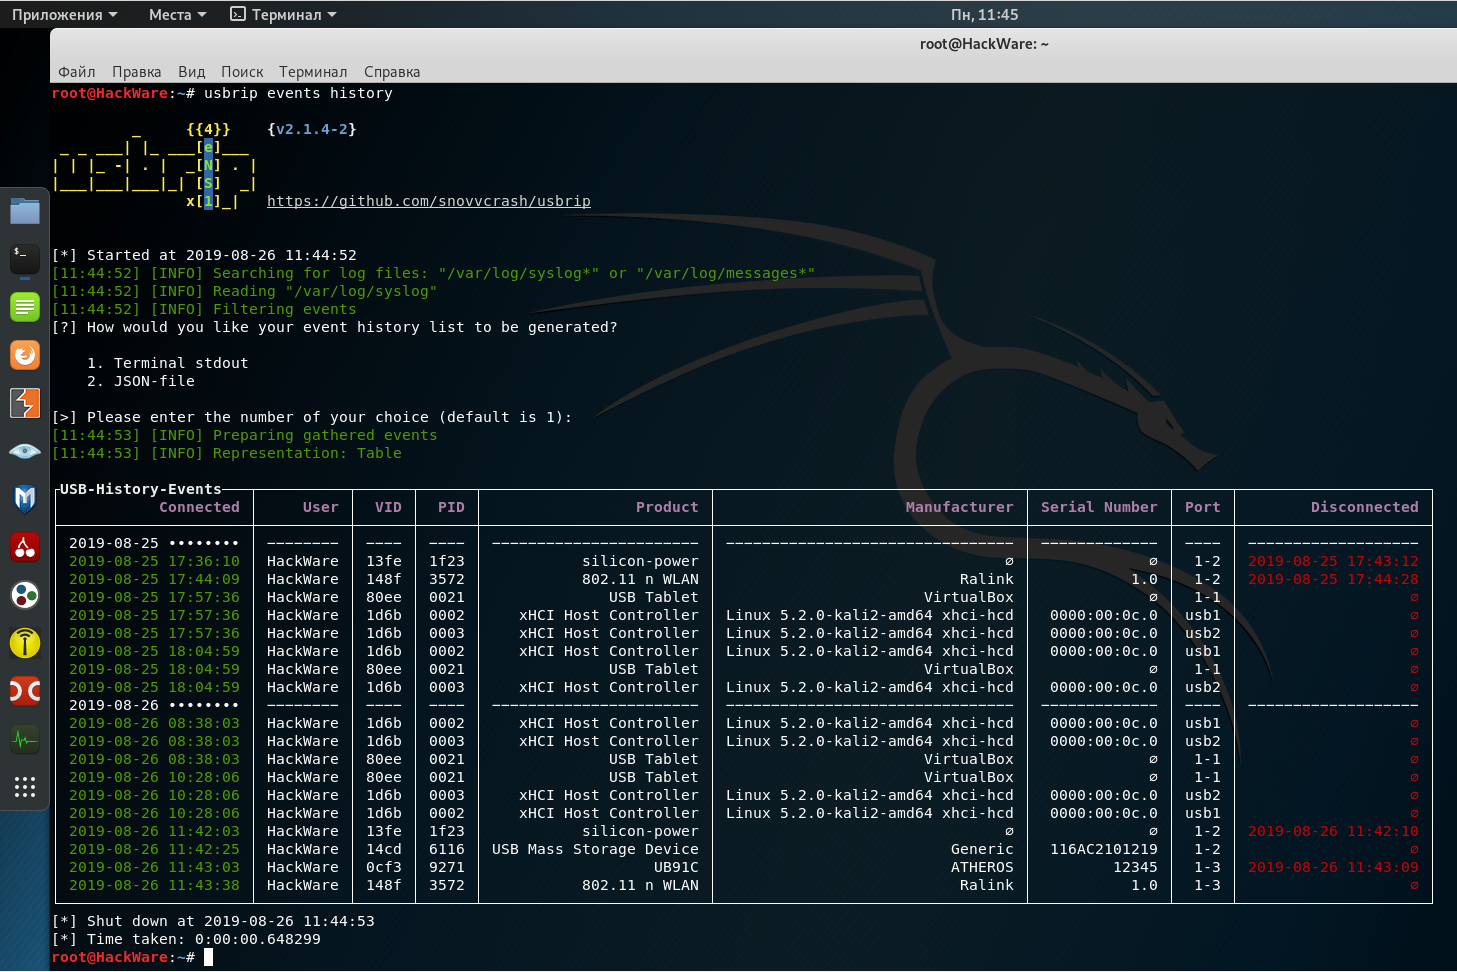
Fields in it mean the following:
- Connected (date and time of device connection)
- User (apparently, the system user is meant, but I have the hostname here)
- VID (vendor ID)
- PID (product ID)
- Product
- Manufacturer (device manufacturer)
- Serial Number
- Port (USB port to which you are connected)
- Disconnected (date and time the device was disconnected)
How to convert date in syslog file for usbrip
A more detailed date format differs from the default one in that it indicates the year and milliseconds. I think you already know about the year (especially since, for example, in my system the log data is stored only for the last 2-3 months, although I did not delete it). As for the milliseconds, it is hardly likely that anyone needs it.
For this reason, you can easily convert the file to a format that usbrip will support.
In the following command, I convert the /var/log/syslog file and save the new result in usb2.0.txt – if desired, adjust this data in the following command:
cat /var/log/syslog | awk '{system( "date -d\"" $1 " " $2 " " $3 "\" -Ins | tr -d \"\\n\" | sed 's/,0000/.0/'" ); $1=$2=$3=""; print $0}' | sed 's/ / /' > usb2.0.txt
A usb2.0.txt file will be created that can be opened by usbrip.
How to use usbrip in Arch Linux, BlackArch and their derivatives
As already mentioned, syslog is absent in these systems, its functions are absorbed by the journalctl program. For this reason there is no sense to install and run syslog (although, of course, this is possible). It is enough to convert the output of the journalctl program.
New method:
Save journalctl program output to usb.txt file:
journalctl -o short-iso-precise > usb.txt
We convert the file into an understandable format for usbrip (i.e., to the system log):
cat usb.txt | awk '{print $1,$2,$3,"[]",$4,$5,$6,$7,$8,$9,$10,$11,$12,$13,$14,$15,$16,$17,$18,$19,$20}' | sed 's/00 /:00 /' > usb2.0.txt
This is a new conversion method suggested by the user. It is very fast and takes seconds even for large files.
Please note that the data is read from the usb.txt file and saved in the usb2.0.txt file – if desired, edit these values to your own.
Previous method (do not use it):
There is another option using the date utility. This option is pretty slow:
The journalctl program displays the names of the months in your national language (if you have your national locale set). Neither usbrip nor the date utility understands this format. Therefore, you need to start by installing the English locale with the following command:
export LANG=en_US.utf-8
No need to worry that everything will be in English for you – the changes apply only to the terminal window in which you executed the command. And after rebooting the OS, switching the locale will not be saved.
Now we save the output of journalctl to the usb.txt file:
journalctl > usb.txt
And then we convert the file to usbrip-friendly format (i.e. in syslog):
cat usb.txt | awk '{system( "date -d\"" $1 " " $2 " " $3 "\" -Ins | tr -d \"\\n\" | sed 's/,0000/.0/'" ); print "",$4,$5,"[]",$6,$7,$8,$9,$10,$11,$12,$13,$14,$15,$16,$17,$18,$19,$20}' > usb2.0.txt
Please note that the data is read from the usb.txt file and saved to the usb2.0.txt file – if desired, edit these values to your own.
A file of 147 megabytes in size (1,233,656 lines) was processed on my system for a very long time – 1-2 hours, although the central processor was almost idle. That is, if you have a large file, then be patient.
How to check file from another system in usbrip
In usbrip you can specify the file from which you want to take data for analysis, the -f option is used for this, for example, I want to find the events of connecting and disconnecting to the USB interface in the usb2.0.txt file:
usbrip events history -f usb2.0.txt
If you took the file for analysis from another system where the supported date format is not configured, then you need to first convert this file as shown just above.
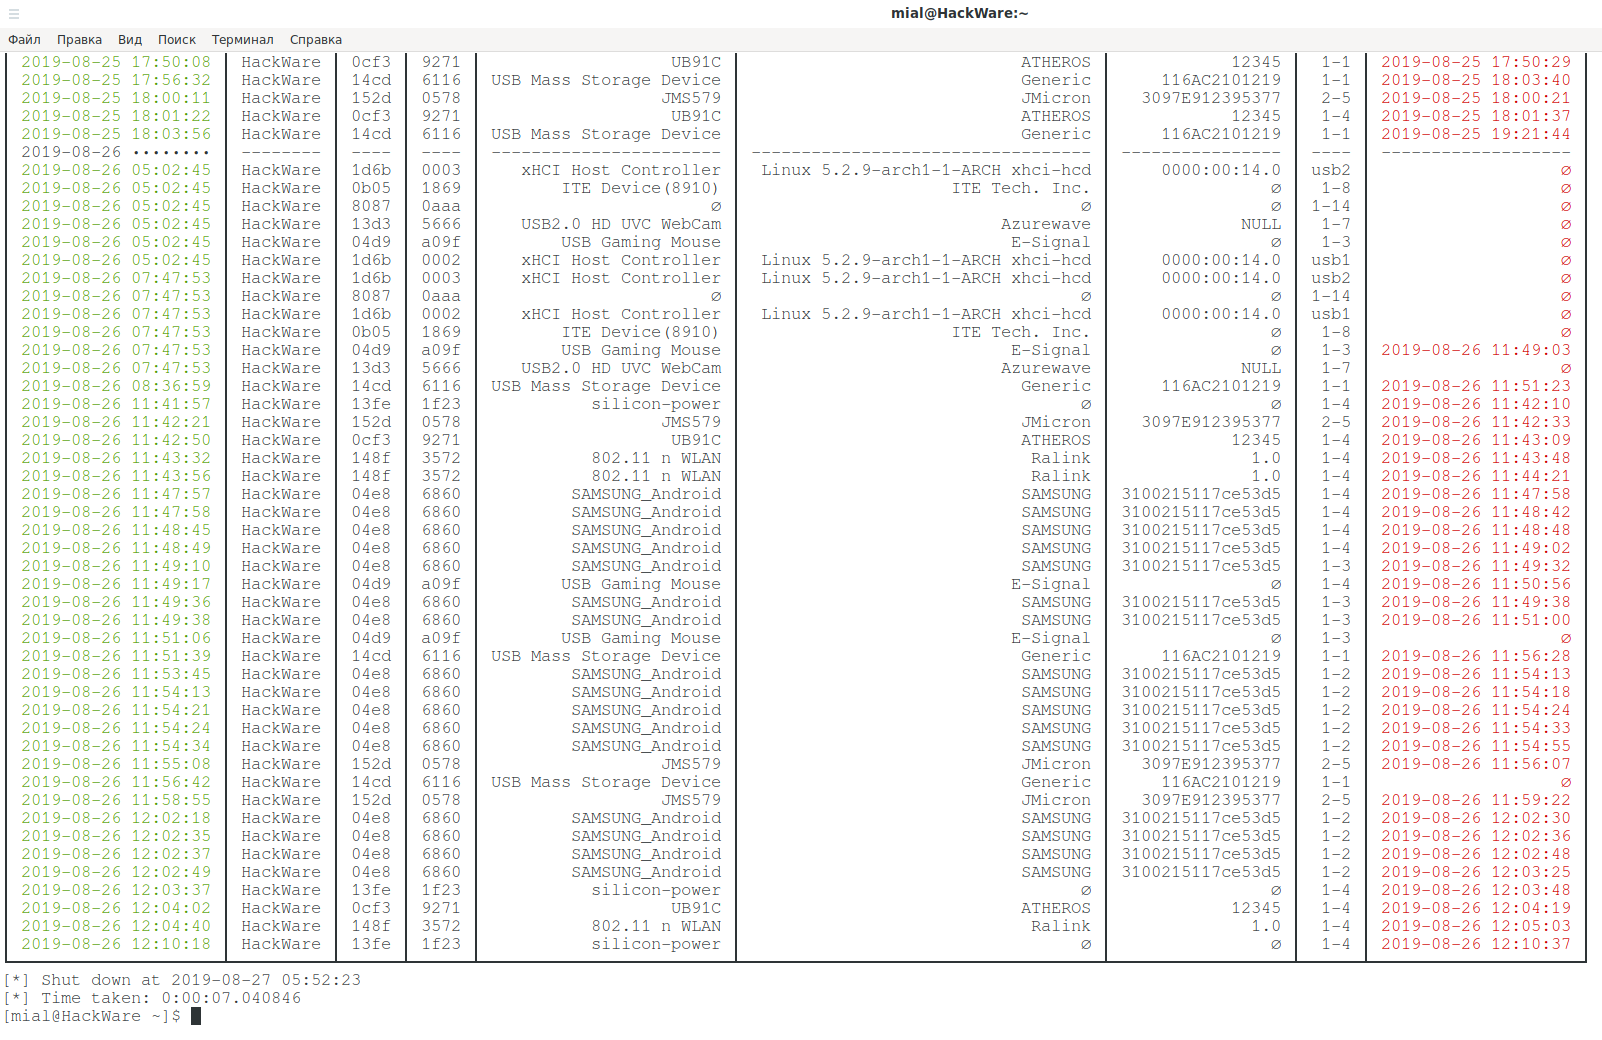
Below is the very end of the data from journalctl on my home system:
How to find out the type of USB device and its manufacturer
Suppose I was interested in the following device:
┌USB-History-Events───┬──────────┬──────┬──────┬─────────────────────────┬────────────────────────────────────┬──────────────────┬──────┬─────────────────────┐
│           Connected │     User │  VID │  PID │                 Product │                       Manufacturer │    Serial Number │ Port │        Disconnected │
├─────────────────────┼──────────┼──────┼──────┼─────────────────────────┼────────────────────────────────────┼──────────────────┼──────┼─────────────────────┤
│ 2019-08-26 11:42:21 │ HackWare │ 152d │ 0578 │                  JMS579 │                            JMicron │   3097E912395377 │  2-5 │ 2019-08-26 11:42:33 │
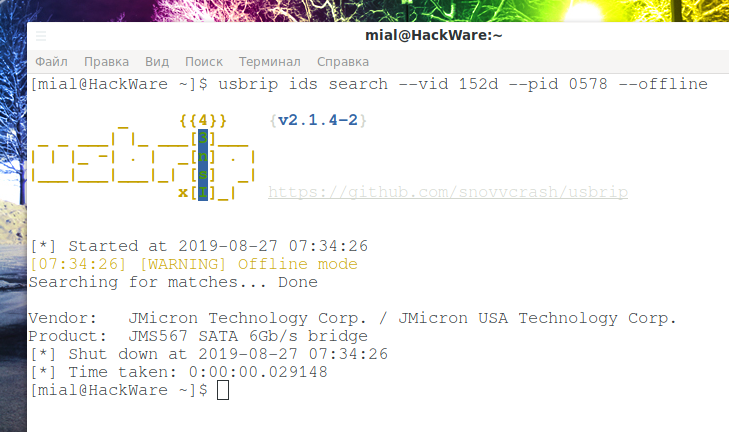
With usbrip, I can search the database by VID and PID.
Let's start by downloading the database:
sudo usbrip ids download
Using the --vid option, a search by vendor identifier is performed, using the --pid option a search is performed by product identifier. Every time you start the search, usbrip will update/download the database that already exists in the system – this takes extra time, so we will specify the --offline flag so that the local database is used during the search:
usbrip ids search --vid 152d --pid 0578 --offline
Significant lines:
Vendor:   JMicron Technology Corp. / JMicron USA Technology Corp.
Product:  JMS567 SATA 6Gb/s bridge
The --vid and --pid options do not have to be used at the same time – you can search for any of them separately.
Output Settings
Using the -q option will suppress banner output, informational messages, and the program will not ask you any questions (like how to output: console or JSON). The data can be shown not in the form of a table, but in the form of a list, use the -l option is for this. Finally, with the -n option, you can limit the output to only a certain number of recent entries. An example of using all of these options:
usbrip events history -ql -n 100 -f usb2.0.txt
How to filter removable devices, specific USB devices or event on specific days
The usbrip program supports the following types of filters:
1. Display only removable devices. In fact, it’s hard to say with 100% certainty which devices are disconnectable. But you can do it cunningly – if this device has already been unplugged, it means it is easily disconnected! It is obvious. Easily disconnected devices, such as removable disk drives and flash drives are of most interest in the case of unauthorized access.
To enable this filter, the -e option is used:
usbrip events history -e -f usb2.0.txt
2. Filtering by table fields, options: --user, --vid, --pid, --product, --manufacturer, --serial, --port.
Example:
usbrip events history --vid 152d --pid 0578 -f usb2.0.txt
That is, you can combine several options to filter data. Or you can use the options one at a time. The name of the options speaks for itself, if something is not clear to you, then see the detailed help on them on the page: https://en.kali.tools/?p=988. After any option, you can specify several values separated by spaces.
3. Sort by date. To do this, use the -d option:
usbrip events history -c conn vid pid disconn serial -d '2019-08-24' '2019-08-25' -f usb2.0.txt
Please note that when specifying two days, no ranges are created! That is, if you specify two days, then the data will be taken only for these two days!
Show only certain information
In the previous example, the -c option was used, after which the conn vid pid disconn serial columns are listed – this leads to the fact that only information on these columns will be displayed.

The name of all columns (you must specify them without quotation marks, space separated): "conn", "user", "vid", "pid", "prod", "manufact", "serial", "port", "disconn".
Creating a list of trusted devices
If you (like me) are analyzing a real log of a home computer, then you have already noticed that there is a lot of data and it is problematic to deal with them by naked eye. Therefore, if someone connected a USB flash drive to a computer a month ago (or will connect it in the future), then it is rather difficult to find out.
In this situation, a list of trusted devices can help. The concept is quite simple: it creates a list of your devices that you trust. Then the log is compared with this list — if there is information about devices that are not in the list of trusted ones, then the corresponding information will be displayed.
You can make a list of trusted devices with the usbrip events gen_auth command in several ways. Consider the required options.
First, you need to specify the file where this list will be saved, in my case, the path to the ~/auth.json file. Then you need to specify the attributes to be included in the list of authorized devices, this is done with the -a option, after which one or more fields can be specified through a space without quotes: "vid", "pid", "prod", "manufact", "serial".
Next, you need to specify the devices that we want to add. You can use the above filters. For example, I will add devices by their VID, for this I specify the --vid option and after it I list all the space separated vendor identifiers that I want to add.
The result command:
usbrip events gen_auth ~/auth.json -a vid pid serial --vid 04d9 0b05 1d6b 13d3 8087 13fe 148f 0cf3 04e8 152d 14cd -f usb2.0.txt
You can use the date as a filter – that is, you can check on which days only trusted devices were connected and list these days:
usbrip events gen_auth ~/auth.json -a vid pid serial -d '2019-08-24' '2019-08-24' '2019-08-26' -f usb2.0.txt
Detecting unauthorized USB devices plugging in Linux
For verification, the usbrip events violations command is used, after which it is enough to specify a file with a list of trusted devices:
usbrip events violations ~/auth.json -f usb2.0.txt
Example output in my case:
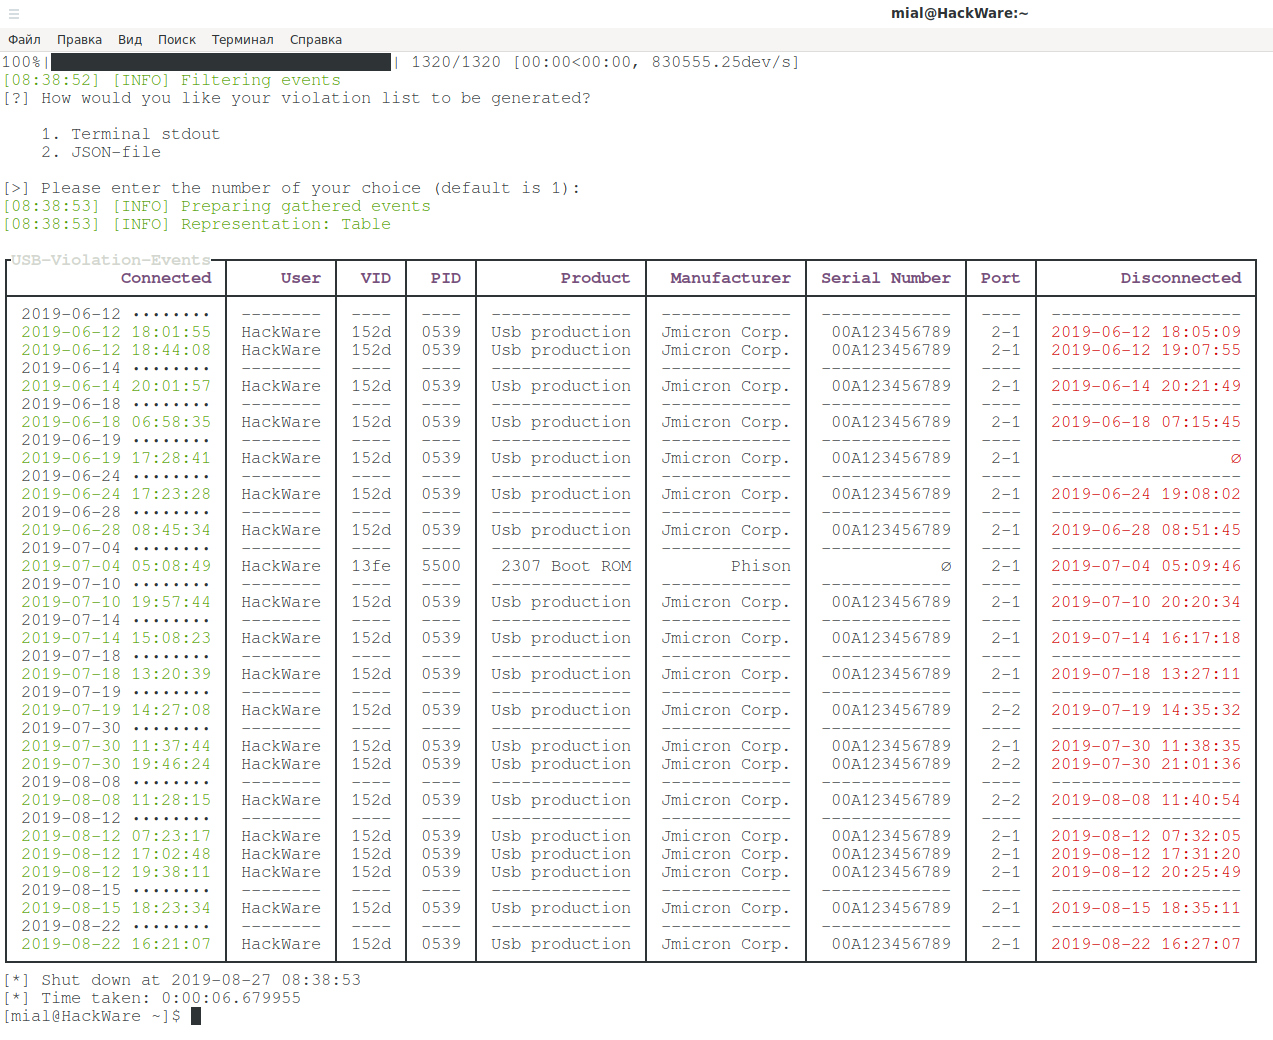
At first I strained a little, but then I remembered my other devices. One that is a multiple “intruder” is another external USB drive (more precisely, a regular drive connected to a laptop via a SATA-USB adapter).
The command helped refresh the memory:
usbrip ids search --vid 152d --pid 0539 --offline
Its result:
Vendor:   JMicron Technology Corp. / JMicron USA Technology Corp.
Product:  JMS539/567 SuperSpeed SATA II/III 3.0G/6.0G Bridge
On that box, it’s also written, “SuperSpeed”.
The second device, which is 2307 Boot ROM and Phison puzzled me a bit more. It turned out to be not USB headphones and not even a touchpad laptop. It turned out to be my flash drive, on which the EFI partition was created to update the BIOS on my laptop. Perhaps it was recognized in such an unusual way due to the fact that the computer was loaded with it or for some other reason. Moral: do not be confused too much of unexpected results.
And the second moral: VID and PID can change under certain conditions or the system can see them differently, again, under certain conditions. The serial number of USB devices can also be spoofed, at least for some devices.
Saving Results to a File
If you select the second option when processing the file:
2. JSON-file
That program will offer to enter the path to the file (or accept the default value) – the received data will be saved in JSON format.
You can also redirect the program output to a file (do not forget the -q option to disable the request to the user):
usbrip events history -f usb2.0.txt -q -t > usb.info
The program also has a special storage command, which allows you to save the results. First of all, storage is convenient for working with Cron, but you can also launch it manually.
The usbrip storage command allows you to save/update/view information about the history and violations of USB devices. For details, see the help https://en.kali.tools/?p=988
Information will be archived. You can set a password for the archive.
An example of adding a service to Cron can be found in /usr/usbrip/cron/usbrip.cron.
Analysis of only recent entries
If you analyze logs from other computers and you have to convert them for this, then you can limit to the last lines only. For example, to create a file in which only the last 1000 lines from the source file will be copied, you can use a command of the form:
cat source_file | tail -n 1000 > new_file
If you are converting data from journalctl, then you can also set the date after which you want to receive the data.
You should always start by switching the locale (otherwise the resulting file will not be understood by the programs):
export LANG=en_US.utf-8
If I want to receive information about events after a certain date, then ones need to use the -S option, after which ones need to specify a date in the format YYYY-MM-DD, for example:
journalctl -S 2019-08-27 > usb.txt
Next, use the familiar command to convert to syslog format:
cat usb.txt | awk '{system( "date -d\"" $1 " " $2 " " $3 "\" -Ins | tr -d \"\\n\" | sed 's/,0000/.0/'" ); print "",$4,$5,"[]",$6,$7,$8,$9,$10,$11,$12,$13,$14,$15,$16,$17,$18,$19,$20}' > usb3.0.txt
And run usbrip with the -f option, specifying the prepared file:
usbrip events history -f usb3.0.txt
Conclusion
So, the usbrip program seemed very interesting to me – it squeezes everything that is possible from the system logs on events related to the USB interface (if, for example, some USB device does not have a serial number, then the system also does not know it). My helper commands to convert files make usbrip very versatile.
For other options and subcommands, see https://en.kali.tools/?p=988.
Related articles:
- How to install and run Apache Real Time Logs Analyzer System (ARTLAS) (65.4%)
- How to find all passwords (web browsers, email programs, etc.) in Windows and Linux (61.9%)
- How to see and change timestamps in Linux. How to perform timestamps-based searching (61.9%)
- Indicators of Man-in-the-middle attacks (61.4%)
- How to extract all web site passwords stored in web bowser (60.5%)
- Fast and simple method to bypass Captive Portal (hotspot with authorization on the web-interface) (RANDOM - 1%)