How to scan wireless networks with a regular Wi-Fi adapter
This is another article about what you can do using a regular Wi-Fi receiver on Linux, other articles:
- How to hack Wi-Fi with a normal adapter without monitor mode (Pixie Dust attack against Access Points with WPS)
- How to get passwords of Wi-Fi hot-spots nearby (without monitor mode)
How to scan Wi-Fi with a regular dongle
The method described in this article will help you collect information about Wi-Fi networks in your area using any Wi-Fi device.
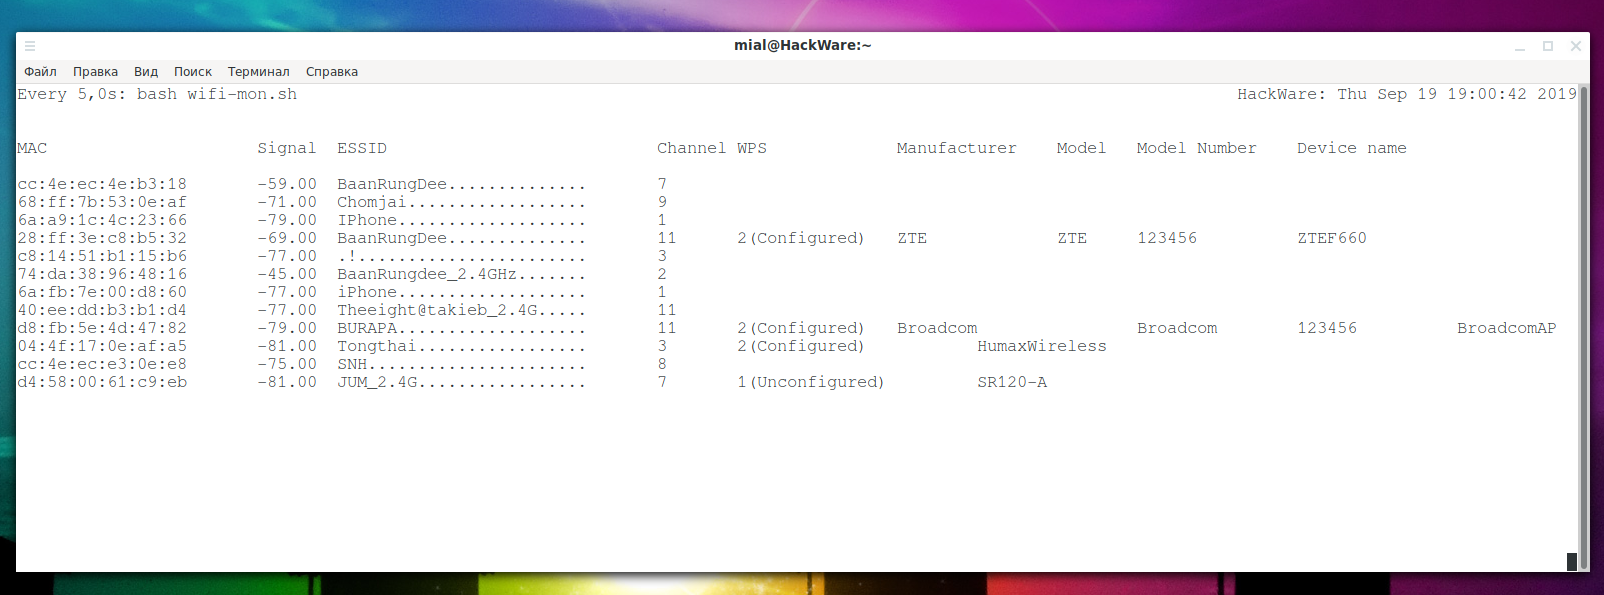
The following screenshot is not airodump-ng – it is the result of a tiny Linux script:
The described method is not just a restricted scanner (airodump-ng of a poor man), but even has several advantages:
- during the scan, you do not need to disconnect from the Internet – that is, you can simultaneously use the Internet via Wi-Fi and scan wireless networks;
- I already wrote about the second advantage – absolutely any Wi-Fi adapter is suitable;
- you can collect more information about WPS than other programs usually show.
There are also enough shortcomings – it is impossible to capture a Wi-Fi handshake, and also to get information about quantity of transmitted data by access points and the number of wireless clients.
How to collect information about Access Points without monitor mode
So, in Linux, we find out the name of the wireless interface:
iw dev
I have two interfaces, their names are wlo1 (built-in wireless card) and wlp0s20f0u2 (USB adapter), in Kali Linux it will most likely be wlan0.
If the interface is in the down state (if it is not used by other programs, for example, to connect to the Internet), then activate it with a command of the form:
sudo ip link set INTERFACE up
For me, this is a command:
sudo ip link set wlp0s20f0u2 up
Now we can scan the networks:
sudo iw dev INTERFACE scan
For my case:
sudo iw dev wlp0s20f0u2 scan
This is an example of information about one single wireless network – roughly the same will be shown about all networks within reach:

And if you specify the -u option, then additional information will be displayed that even the system itself does not understand:
sudo iw dev wlp0s20f0u2 scan -u
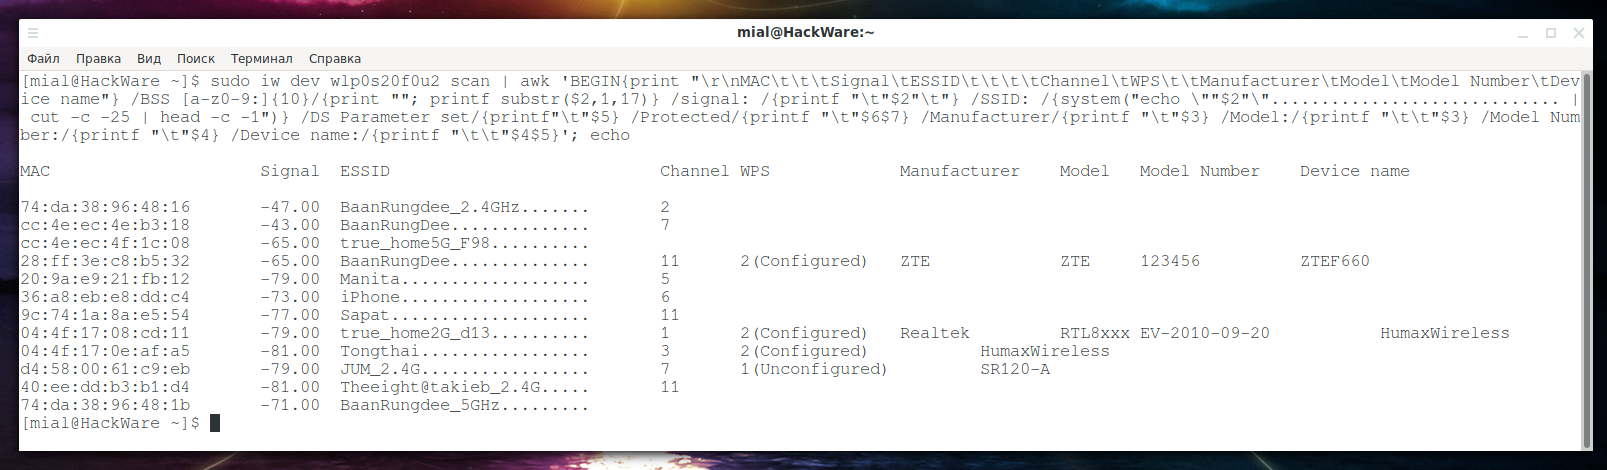
It is evident that there is a lot of information – you just need to present it in a convenient form. The following command scans and displays a table with the results. In this command, replace wlp0s20f0u2 with the name of your wireless interface:
sudo iw dev wlp0s20f0u2 scan | awk 'BEGIN{print "\r\nMAC\t\t\tSignal\tESSID\t\t\t\tChannel\tWPS\t\tManufacturer\tModel\tModel Number\tDevice name"} /BSS [a-z0-9:]{10}/{print ""; printf substr($2,1,17)} /signal: /{printf "\t"$2"\t"} /SSID: /{system("echo \""$2"\"............................. | cut -c -25 | head -c -1")} /DS Parameter set/{printf"\t"$5} /Protected/{printf "\t"$6$7} /Manufacturer/{printf "\t"$3} /Model:/{printf "\t\t"$3} /Model Number:/{printf "\t"$4} /Device name:/{printf "\t\t"$4$5}'; echo
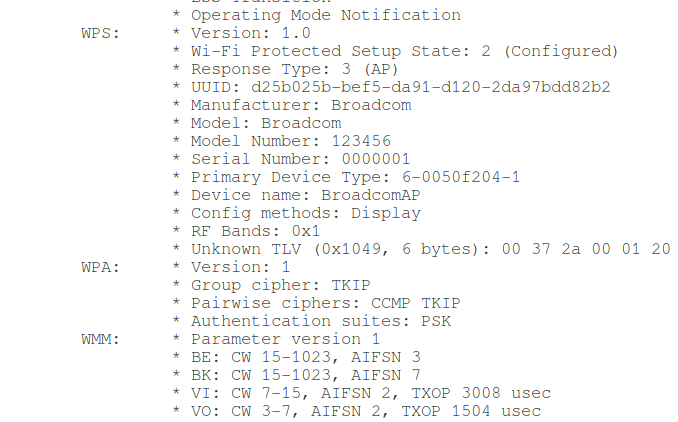
As you can see, I drew attention to the WPS properties, but did not specify anything about WPA – for the reason that for almost all APs, the information about WPA is very similar:
	WPA:	 * Version: 1
		 * Group cipher: TKIP
		 * Pairwise ciphers: TKIP
		 * Authentication suites: PSK
Sometimes it happens like this:
	WPA:	 * Version: 1
		 * Group cipher: CCMP
		 * Pairwise ciphers: CCMP
		 * Authentication suites: PSK
PSK are pre-shared keys, that is, the same keys (passwords) on the access point and for each user. There is no particular practical value in this information, but if you wish, you can edit the command yourself and add this data to the table.
This script can be saved to a file:
gedit wifi-mon.sh
Copy there:
#!/bin/bash

IFACE=wlan0

sudo iw dev $IFACE scan | awk '
	BEGIN{print "\r\nMAC\t\t\tSignal\tESSID\t\t\t\tChannel\tWPS\t\tManufacturer\tModel\tModel Number\tDevice name"}
	/BSS [a-z0-9:]{10}/{print ""; printf substr($2,1,17)}
	/signal: /{printf "\t"$2"\t"}
	/SSID: /{system("echo \""$2"\"............................. | cut -c -25 | head -c -1")}
	/DS Parameter set/{printf"\t"$5}
	/Protected/{printf "\t"$6$7}
	/Manufacturer/{printf "\t"$3}
	/Model:/{printf "\t\t"$3}
	/Model Number:/{printf "\t"$4}
	/Device name:/{printf "\t\t"$4$5}';
echo
In line
IFACE=wlan0
replace wlan0 with the name of your wireless interface.
You need to run it like this:
sudo bash wifi-mon.sh
An interesting effect can be achieved together with the watch command:
sudo watch -n 5 bash wifi-mon.sh
As a result, the information will be constantly updated, approximately as in Airodump-ng:
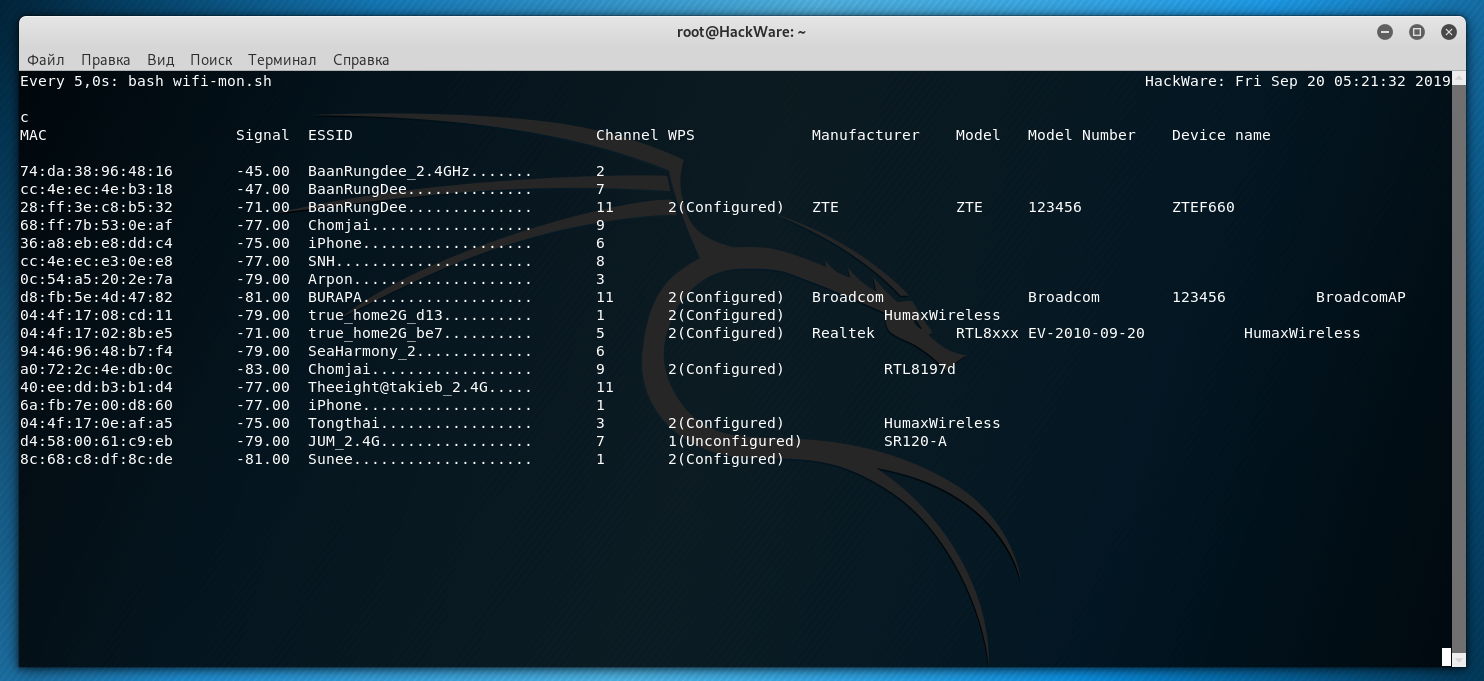
After each scan, if any access point is no longer visible, it will disappear from the list, and new ones will be added. The shown command is quite simple, if you wish, you can make some improvements: set up sorting (for example, by signal strength or by the name of a Wi-Fi network), you can create a database for storing records about APs there, etc.
The operation of this script does not interfere with the Internet connection on the same card to the wireless Access Point.
In addition, see the article “How to detect all Wi-Fi devices in the area?”.
Related articles:
- How to detect all Wi-Fi devices in the area? (100%)
- How to detect IP cameras (72.5%)
- How to find out the exact model of a router (wireless access point) (53.8%)
- How to hack Wi-Fi in Windows (53.8%)
- 3WiFi: open database of Wi-Fi Access Points passwords (53.8%)
- Automatic handshake and PMKID capture from all access points (RANDOM - 22.5%)