Wi-Fi device tracking
trackerjacker
Many programs can display Access Points within the range of accessibility of your Wi-Fi adapter. Specialized programs can display advanced information about APs and Clients. I wrote a small script that conveniently shows APs, clients connected to them, for all of them it determines vendors and some other information that may well come in handy. You can find the mentioned script and examples of its launch at the link “How to detect all Wi-Fi devices in the area?”.
In this article, I will talk about the trackerjacker tool, which not only displays a list of devices nearby, but also knows how to perform various actions under given conditions. For example, a script can notify you when new devices appear in the immediate vicinity, it can notify you or take actions if devices have begun to actively transfer information, can monitor certain devices from the list, and can attack devices of a certain vendor (for example, cameras of a certain brand).
How to install trackerjacker
Installing trackerjacker on Kali Linux, Debian, Linux Mint, Ubuntu and any other distribution is done as follows:
sudo pip3 install trackerjacker
In Arch Linux, the previous command also works.
When installing trackerjacker in BlackArch, you need to keep in mind that this program is present in the standard repository and you can install it like this:
sudo pacman -S python-trackerjacker
But the problem is that it will not work, since trackerjacker needs scapy versions of exactly 2.4.0, and in BlackArch (as in Arch Linux) all packages are always the latest version. Therefore, if you need the program to work, then additionally run this command:
sudo pip3 install scapy==2.4.0
For other distributions, this is not required, since when installing using pip3, scapy==2.4.0 is automatically installed as a dependency.
Trackerjacker tutorial
This program has 2 main modes of use: map mode (information about all devices in the district is gathered) and track mode.
In the following commands, you need to specify the name of your wireless interface – insert it instead of wlp0s20f0u1 (this is the name of the Wi-Fi interface on my system).
sudo trackerjacker -i wlp0s20f0u1 --map
In standard output, the program will show information about switching channels and detected devices.
![]()
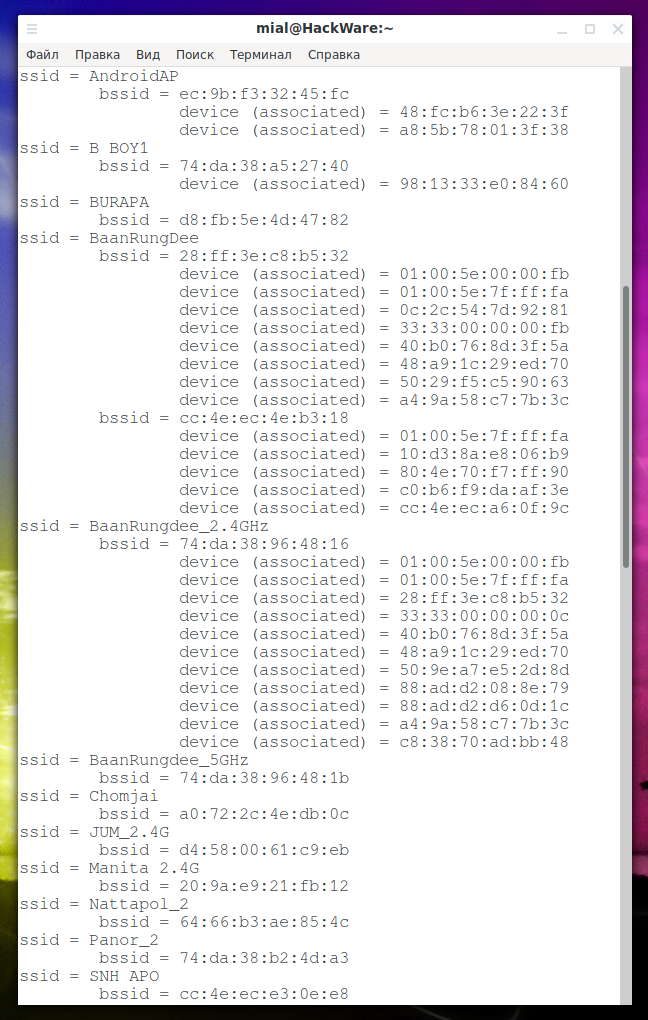
Of primary interest is the “map”, which is saved in a YAML file. This is a map of all nearby Wi-Fi networks and their users. By default, the file name is wifi_map.yaml (the name and location of the file can be changed with the --map-file option). An example of such a file:

Information about AP and its clients:
![]()
Since this is a YAML format, you can easily use it as input for other scripts of your development. There is a simple parse_trackerjacker_wifi_map.py script. Depending on the installation method, this script may not be available to download it:
wget https://raw.githubusercontent.com/calebmadrigal/trackerjacker/master/helpful_scripts/parse_wifi_map.py
Launch:
python3 ./parse_wifi_map.py
An example of script output:
Tracking mode in trackerjacker
The tracking mode allows you to specify a number of MAC addresses for monitoring and to warn you or to execute the specified program if the threshold of transmitted data is exceeded. An example of running a command:
sudo trackerjacker --track -i wlp0s20f0u1 -m 3c:2e:ff:31:32:59 --t 4000 --trigger-command "./alert.sh" --channels-to-monitor 10,11,12,44
In it:
- --track – enable tracking mode
- -i wlp0s20f0u1 – wireless interface to use
- -m 3c:2e:ff:31:32:59 – the MAC address to track. You can specify multiple addresses separated by commas or a file with a list of addresses (one MAC per line) – this is implemented in one of the plugins
- --t 4000 – threshold in bytes, when exceeded, warnings are displayed and the specified command is executed
- --trigger-command "./alert.sh" – a command to be executed in case of an event (exceeding the specified threshold)
- --channels-to-monitor 10,11,12,44 – channels to be monitored
In this particular example, the author of the trackerjacker program watched a security camera to determine when it was uploading a video (this indicates that it noticed movement). This, by the way, was the reason for the appearance of the project: monitoring third-party cameras, to which there is no other access, this made it possible to remotely determine that the cameras noticed someone.
Foxhunt plugin
The foxhunt plugin displays a list of all found Wi-Fi devices in descending order of signal strength. Whenever possible, information about manufacturers is displayed. The plugin can be specified with the option --trigger-plugin after which you need to specify the name of the plugin (if it is in the corresponding subdirectory of the program), or the path to the plugin file. Example launch using the foxhunt plugin:
sudo trackerjacker -i wlp0s20f0u1 --track --trigger-plugin foxhunt
The following will be displayed:
![]()
Trackerjacker plugins
Please note that foxhunt is a built-in plugin. The built-in plug-ins, in fact, are just one. There are also several examples of plugins that, depending on the installation, may not get into the system.
You will find these examples on the page (you can also download them there): https://github.com/calebmadrigal/trackerjacker/tree/master/plugin_examples
The following is a brief description of each plugin:
- foxhunt.py
Displays an ordered list of Wi-Fi devices sorted based on their signal strength.
- count_apples.py
Counts Apple devices.
wget https://raw.githubusercontent.com/calebmadrigal/trackerjacker/master/plugin_examples/count_apples.py
sudo trackerjacker -i wlp0s20f0u1 --track --trigger-plugin count_apples.py
- count_manufacturers.py
Counting devices from different manufacturers.
Launch Example:
wget https://raw.githubusercontent.com/calebmadrigal/trackerjacker/master/plugin_examples/count_manufacturers.py
sudo trackerjacker -i wlp0s20f0u1 --track --trigger-plugin count_manufacturers.py
![]()
- deauth_attack.py
Deauthenticates Wi-Fi devices, that is, constantly disconnects them from wireless access points, as a result of which they cannot work normally. For this, the aircrack-ng program is used. The attack occurs on the basis of the established mac_to_deauth (one or more addresses for deauthentication) or vendor_to_deauth (that is, the vendor – as a result all devices from the specified manufacturer are disconnected from the network.
Be careful with vendor_to_deauth – a deauthentication attack is performed against each device of a certain manufacturer, this is determined based on its MAC address.
Launch example:
sudo trackerjacker --track --plugin plugin_examples/deauth_attack.py --plugin-config "{'vendor_to_deauth': 'Apple'}"
- find_nearby_strangers.py
Find all the strangers. All new devices that appeared near you will be reported.
- monitor_device_list.py
Monitors the MAC addresses from the list specified in the file.
Launch Example:
sudo trackerjacker --track --plugin plugin_examples/monitor_device_list.py --plugin-config "{'device_list': 'deepsec_devices.txt'}"
In this file (deepsec_devices.txt), the list should have one MAC address per line.
Keep track of new devices in close proximity
The already mentioned find_nearby_strangers.py plugin can be used in various interesting scenarios. Let's say we want to learn about devices that suddenly appeared next to us.
Download the plugin.
wget https://raw.githubusercontent.com/calebmadrigal/trackerjacker/master/plugin_examples/find_nearby_strangers.py
![]()
Open the downloaded file:
gedit find_nearby_strangers.py
In it you will find a number of settings:
DEVS_TO_IGNORE = {'ff:ff:ff:ff:ff:ff', '00:00:00:00:00:00'}
POWER_THRESHOLD = -50
TIME_THRESHOLD = 15 * 60 # 15 минут
SAVE_PERIOD = 30 # секунд
SAVE_FILE = 'find_nearby_strangers.pkl'
First of all, pay attention to the variable POWER_THRESHOLD. You can choose the power experimentally, depending on your conditions. This must be a negative number greater than -100. To show those who are really close (in approximately the same room), set to -30.
You can also add to the list DEVS_TO_IGNORE – devices must be separated by commas.
To reset the database, delete the find_nearby_strangers.pkl file.
Launch Example:
sudo trackerjacker -i wlp0s20f0u1 --track --trigger-plugin find_nearby_strangers.py
Note: the option --power (power threshold) does not work with the plugin.
Track the appearance of a specific device
It has already been shown above how to track when a particular device or devices begin to intensively transfer data. Also, described is a plugin for monitoring the list of devices (monitor_device_list.py). But suppose we are interested in one particular device – when it appears, when it coming closer, moves away or disappears, etc.
Example command to monitor a device with a MAC address of 8c:77:16:45:1d:c3:
sudo trackerjacker -i wlp0s20f0u2 --track -m 8c:77:16:45:1d:c3 --power -70 --channels-to-monitor 1,2,3,4,5,6,7,8,9,10,11,12,13,14
![]()
Using the --trigger-cooldown option, you can specify the time after which information will be displayed (if there are conditions for the trigger to fire). That is, if the target device is in the availability range, then information about its power will be displayed every minute. Using this option, you can set other time intervals.
By the way, in the information displayed in this case there is really not enough time – if you add time, then you can monitor a certain phone/tablet/computer for days and make an approximately schedule (work-home-toilet-balcony).
The value --power (the threshold of the device’s power at which information about it will be displayed) is optional; it depends on the usage scenario.
Configuring trackerjacker using a configuration file
Settings from the command line can be set to the configuration file and run trackerjacker with the -c option, after which you need to specify the path to the configuration file:
sudo trackerjacker -c my_config.json
An example of such a my_config.json file:
{
    "iface": "wlan0",
    "devices_to_watch": [
        {"mac": "5f:cb:53:1c:8a:2c", "name": "Bob's iPhone"},
        {"mac": "32:44:1b:d7:a1:5b", "name": "Alice's iPhone"},
        {"mac": "f2:43:2b:e5:c3:6d", "name": "Security camera", "threshold": 20000},
        "44:61:32:C6:34:8F"],
    "aps_to_watch": {"c6:23:ef:33:cc:a2": 500},
    "threshold_window": 10,
    "channels_to_monitor": [1, 6, 11, 52],
    "channel_switch_scheme": "round_robin"
}
Notes on this file:
- threshold_bytes is the default byte threshold, if the data exchange reaches it, the warning function is called
- threshold_window - this is the period of time over which threshold_bytes are analyzed (that is, whether the number reached threshold_bytes during threshold_window time)
- devices_to_watch is a list that can contain either strings (representing MAC addresses) or Python Dictionaries (you can specify name and threshold for this device in this format)
- name is just that inscription that you want to be displayed when this device is seen
- threshold - in "Security camera" this is how many bytes must be seen for the trigger to be called
- channels_to_monitor - A list of 802.11 Wi-Fi channels for monitoring. When trackerjacker starts up, a list of channels that your Wi-Fi card supports is printed. By default, all supported channels are monitored.
- channel_switch_scheme - default, round_robin or traffic_based options. If traffic_based is selected, then the channels with the greatest amount of transmitted traffic are determined and more time is allocated to them. With round_robin, an equal amount of time is allocated to all channels.
The following command will show the default options as a configuration file. You can use this command to generate a configuration file, which you can take as a basis for your configuration:
sudo trackerjacker --print-default-config
The following will be shown:
{
    "aps_to_watch": [],
    "beep_on_trigger": false,
    "channel_switch_scheme": "default",
    "channels_to_monitor": null,
    "devices_to_watch": [],
    "display_all_packets": false,
    "display_matching_packets": false,
    "do_map": true,
    "do_track": false,
    "iface": null,
    "log_level": "INFO",
    "log_path": null,
    "map_file": "wifi_map.yaml",
    "map_save_interval": 10,
    "plugin_config": null,
    "power": null,
    "remove_unseen_devices": false,
    "threshold": null,
    "threshold_window": 10,
    "time_per_channel": 0.5,
    "trigger_command": null,
    "trigger_cooldown": 30,
    "trigger_plugin": null
}
Enabling and disabling monitor mode, switching the Wi-Fi adapter to a specific channel
Trackerjacker comes with several other simple features related to Wi-Fi hacking. One of them is the ability to turn on monitor mode on a specified wireless interface.
To enable monitor mode:
sudo trackerjacker --monitor-mode-on -i wlan0
To disable monitor mode:
sudo trackerjacker --monitor-mode-off -i wlan0
Please note that trackerjacker will automatically enable/disable monitor mode as needed. This functionality is useful if you just want to enable monitor mode on the wireless interface for use with other applications (or to run trackerjacker faster if you plan to start/exit many times to test something).
Switching the wireless adapter to a specific channel:
sudo trackerjacker --set-channel 11 -i wlan0
Note that trackerjacker will automatically switch channels as needed during normal map/track actions. This option is useful if you want to switch the interface to a specific channel for use with other applications.
Trackerjacker options
Other trackerjacker options you can find in the program card: https://en.kali.tools/?p=1025
Recommended hardware
Trackerjacker recommends the following Wi-Fi adapters:
-
Panda PAU07 N600 Dual Band
(nice, small, 2.4GHz and 5GHz)
-
Panda PAU09 N600 Dual Band
(Higher Power, 2.4GHz and 5GHz)
-
Alfa AWUS052NH Dual-Band 2x 5dBi
(High Power, 2.4GHz and 5GHz, Large)
-
TP-Link N150
(works well, but only supports 2.4GHz)
From my own experience I can add that any adapters from this list will do the job. For maximum sensitivity, I recommend that you choose adapters with an external antenna (or multiple antennas). Moreover, the larger the antenna, the better the sensitivity.
Related articles:
- How to detect IP cameras (59.9%)
- How to find out the exact model of a router (wireless access point) (54.1%)
- How to hack Wi-Fi in Windows (54.1%)
- 3WiFi: open database of Wi-Fi Access Points passwords (54.1%)
- How to detect all Wi-Fi devices in the area? (52.2%)
- Hacking WPA/WPA2 passwords with Aircrack-ng: dictionary attack, cooperation with Hashcat, maskprocessor, statsprocessor, John the Ripper, Crunch, hacking in Windows (RANDOM - 24.5%)
I am new to this, but would try this to open a gate for people part of the household. Can I use a normal access point connected to the Ethernet network, or do I need access to a build-in (say notebook) WiFi card? Thanks.