Comprehensive Guide to John the Ripper. Part 3: How to start cracking passwords in John the Ripper (how to specify masks, dictionaries, hashes, formats, modes)
Table of contents
1. Introducing and Installing John the Ripper
2. Utilities for extracting hashes
3.1 Quick start with John the Ripper
3.2 How to view cracked passwords
3.3 Mask attack in John the Ripper
3.3.3 Special characters in masks
3.4 How to view generated passwords. How to create a dictionary
3.5 Hash formats and sub-formats (dynamic formats)
3.6 How to use all CPU cores for cracking. John the Ripper multithreaded launch
3.7 Hot to View John the Ripper Job Status
3.8 How to recover an interrupted John the Ripper session
3.9 How to start password cracking in John the Ripper on a video card
3.10 How to use John the Ripper on Windows
4. Practical examples of John the Ripper usage
6. How to brute force non-standard hashes
7, Johnny – GUI for John the Ripper
8.
9.
Quick start with John the Ripper
General view of the password cracking command in John the Ripper:
john OPTIONS HASH-FILE
There are two the most frequently used options: --mask (the mask by which passwords are generated) and --wordlist (the path to the dictionary with passwords).
If you are familiar with the Hashcat mask syntax, feel free to use it, since John the Ripper fully supports this syntax, but also has additional features, which will be discussed later in this part.
HASH-FILE – this is the file in which the hash is saved. The hash is extracted using one of the utilities from “Part 2: Utilities for extracting hashes”.
To launch a dictionary attack, you need a dictionary. If you haven't, download rockyou:
wget https://kali.tools/files/passwords/leaked_passwords/rockyou.txt.bz2
7z e rockyou.txt.bz2
Next, generate a hash of the file whose password you want to crack. For example, I'll get a VNC hash:
./vncpcap2john '/home/mial/VNC.pcapng' > vnc.hash
Let's see the contents of the vnc.hash file:
cat vnc.hash
There I have it (for tests, you can create your own file named vnc.hash and copy the following into it):
192.168.0.101-5900 to 192.168.0.89-57454:$vnc$*894443629F4A9675809CFF5DA2E84651*271D94EB610B5C42588DC53506419E6A
To launch a dictionary attack, run a command like this:
./john --wordlist='DICTIONARY' HASH-FILE
I have DICTIONARY and HASH-FILE in the same folder as the executable john, then my command is as follows:
./john --wordlist='rockyou.txt' vnc.hash
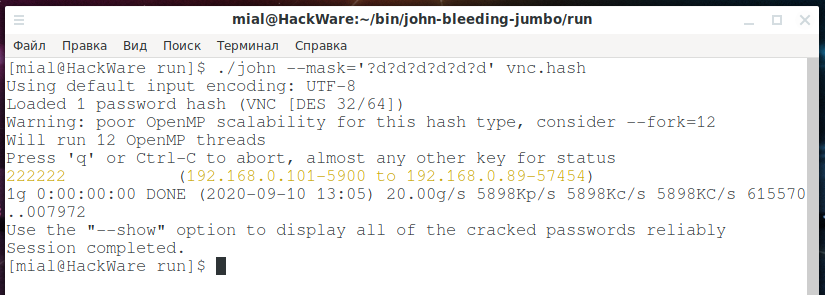
The password was cracked very quickly:
Pay attention to the line where the cracked password is “222222”:
222222 (192.168.0.101-5900 to 192.168.0.89-57454)

To launch a mask attack, use a command like:
./john --mask='MASK' HASH-FILE
For example:
./john --mask='?d?d?d?d?d?d' vnc.hash
The password was cracked again quite quickly:
How to view cracked passwords
All cracked hashes and the chosen passwords are saved to the john.pot file – look for this file in the folder with the john executable file (if it is compiled from the source code) or in the ~/.john/ folder.
You can also use the --show option, but remember that it requires you to specify the HASH-FILE from which hashes were taken to crack passwords:
./john --show HASH-FILE
For example:
./john --show vnc.hash
Output:
192.168.0.101-5900 to 192.168.0.89-57454:222222
Mask attack in John the Ripper
The authors of Hashcat consider a Mask attack to be the most basic one, capable of replacing full brute force. Indeed, this attack mode and dictionary attack are used most often.
John the Ripper supports many more useful modes, but even a brief discussion of them will take a long time – therefore, a separate part will be devoted to password cracking modes. For most users, at first, a dictionary attack will be enough – which is quite simple, it is enough to specify a dictionary file, and a mask attack, which we will deal with right now.
The mask attack allows creation of a mask of character classes which can be in specific positions when building a candidate to test.
Mask mode is a fast way to produce password candidates given a “mask” that describes what the words should look like.
A mask may consist of:
- Static letters.
- Ranges in [aouei] or [a-z] syntax. Or both, [0-9abcdef] is the same as [0-9a-f].
- Placeholders that are just a short form for ranges, like ?l which is 100% equivalent to [a-z].
- ?l lower-case ASCII letters
- ?u upper-case ASCII letters
- ?d digits
- ?s specials (all printable ASCII characters not in ?l, ?u or ?d)
- ?a full 'printable' ASCII. Note that for formats that don't recognize case (eg. LM), this only includes lower-case characters which is a tremendous reduction of keyspace for the win.
- ?B all 8-bit (0x80-0xff)
- ?b all (0x01-0xff) (the NULL character is currently not supported by core).
- ?h lower-case HEX digits (0-9, a-f)
- ?H upper-case HEX digits (0-9, A-F)
- ?L lower-case non-ASCII letters
- ?U upper-case non-ASCII letters
- ?D non-ASCII "digits"
- ?S non-ASCII "specials"
- ?A all valid characters in the current code page (including ASCII). Note that for formats that don't recognize case (eg. LM), this only includes lower-case characters which is a tremendous reduction of keyspace.
- Placeholders that are custom defined, so we can e.g. define ?1 to mean [?u?l]
- ?1 .. ?9 user-defined place-holder 1 .. 9
- Placeholders for Hybrid Mask mode:
- ?w is a placeholder for the original word produced by the parent mode in Hybrid Mask mode.
- ?W is just like ?w except the original word is case toggled (so PassWord becomes pASSwORD).
Mask Mode alone produces words from the mask, for example ?u?l?l will generate all possible three-letter words, with first character uppercased and the remaining in lowercase.
Hybrid Stacked Mask
Hybrid (a.k.a Stacked) Mask means we use e.g. a wordlist with or without rules (or any other cracking mode), and then apply the mask to each word. So with a mask of ?w?d?d and an input word (from the parent cracking mode) of “pass”, it will produce "pass00", "pass01" and so on until "pass99". Hybrid Mask can be stacked upon any other mode except single. Hybrid Mask can even be applied after hybrid regex, eg “prince → regex → mask”.
For most fast GPU formats, mask mode (including hybrid) is several orders of magnitude faster than any other cracking mode, as the mask (or part of it) is applied on GPU side. Hybrid mask can thus be used as a GPU accelerator for any mode except single. To benchmark the speed of such format using a mask, use “--test --mask” (using some default mask) or optionally with a specific mask, eg. “--test --mask=?a?a”. You can list all formats featuring internal mask using “--list=formats -format=mask”.
External filters can be applied too, and will be applied last of all. The “longest” chain is thus “wordlist → rules → regex → mask → filter”. Using external filters with “GPU side mask” will cause a somewhat undefined behavior though: The filter will be applied before the GPU-side mask has finished the word!
You can define custom placeholders for ?1 .. ?9 using command line e.g. -1=?l?u or in john.conf section [Mask].
Variable length masks
There is a default mask in john.conf too (defaulting to same as hashcat). This should be used with -max-len (and possibly -min-len) to do any good.
The -max-len=N option will truncate the mask so no words longer than N are produced.
The -min-len=N option will skip generation of words shorter than N.
If not in “hybrid mask” mode, and either -min-len or -max-len option was used, we will iterate lengths (as in “incremental mask”) from -min-len to -max-len (or format's min or max length, if one was not given). So to produce all possible words from 3 to 5 letters, use -mask=?l -min-len=3 -max-len=5. In case the specified mask is shorter, the last part of it will be expanded, for example “-mask=?u?l -max-len=5” will use an effective mask of ?u?l?l?l?l. Whenever using incremental mask, the ETA at any given time shows estimated time to complete the current length, as opposed to the whole run.
Special characters in masks
You can escape special characters with \. So to produce a literal “?l” you could say \?l or ?\l and it will not be parsed as a placeholder. Similarly, you can escape dashes or brackets to prevent them from being parsed as specials. To produce a literal backslash, use \\.
There is also a special hex notation, \xHH for specifying any character code. For example, \x41 is “A” and \x09 is the code for TAB.
Examples:
| Mask | Custom mask / hybrid input | Output | Num candidates |
|---|---|---|---|
| pass | pass | 1 | |
| pw?d | pw3 | 10 | |
| ?w?d?d?d | password | password123 | 1000x |
| ?w?s?w | Bozo | Bozo#Bozo | 33x |
| ?w?s?W | Bozo | Bozo#bOZO | 33x |
| 0x?1?1:?1?1:?1?1 | -1=[0-9a-f] | 0xde:ad:ca | 16777216 |
| ?3?l?l?l | -3=?l?u | Bozo, hobo | 913952 |
| [Pp][Aa@][Ss5][Ss5][Ww][Oo0][Rr][Dd] | P@55w0rD | 1296 |
We have on-device mask mode support for most fast hash types for which we have OpenCL support at all. Further, such on-device mask support can be used along with a host-provided stream of partial candidate passwords to form a variety of hybrid modes. For example, these are all valid:
- Test any 7-character printable ASCII strings, with a reasonable number of the mask positions being processed on device (JtR decides to optimally split the mask between host and device):
--mask='?a?a?a?a?a?a?a'
Ditto:
--mask='?a' --min-length=7 --max-length=7
Ditto, but for range of lengths 1 to 8:
--mask='?a' --min-length=1 --max-length=8
Can also use length ranges with more complex masks, where the last mask component would be the one extended to higher lengths:
--mask='start?l?d' --min-length=7 --max-length=14
Other, more complex examples of using the mask will be considered in a separate part, which is completely devoted to the modes of generating, changing and processing passwords.
How to view generated passwords. How to create a dictionary
With the --stdout option, you can show the generated password candidates instead of starting the cracking. This can be useful when checking composed masks and when generating dictionaries.
For example, to show all the password candidates for the '?d?d?d?d' mask:
./john --mask='?d?d?d?d' --stdout
To save all passwords for mask '?d?d?d?d' (all four digits words) to a file:
./john --mask='?d?d?d?d' --stdout > 4d.txt
To create a dictionary containing all numbers from 1 to 9999 and save it to 1-4d.txt file:
./john --mask='?d?d?d?d' --min-length=1 --max-length=4 --stdout > 1-4d.txt
To create a file with passwords (phone numbers) starting with “8905143”:
./john --mask='8905143?d?d?d?d' --stdout > beeline.txt
You can print out only password candidates limited by LENGTH, use an option like--stdout=LENGTH.
Hash formats and sub-formats (dynamic formats)
The following command calculates the MD5 hash for the word “mial” and saves it to the hash.txt file:
echo -n mial | md5sum | awk '{ print $1 }' > hash.txt
hash.txt file content:
cat hash.txt
Output:
563fad4d8604ab2f515dc9feee0097d7
How to crack this MD5 hash?
If you run something like this:
./john --mask='?l' --min-length=1 --max-length=8 hash.txt
Then the error will be received:
Can't set max length larger than 7 for LM format
It says that it is impossible to set a maximum length greater than 7 for the LM format. But we have the MD5 format – it is obvious that John the Ripper made a mistake with the definition of the hash format.
Some hashes JtR can determine independently, without specifying the type, but if necessary, you can explicitly specify the type of hash that you want to crack.
From the previous parts, we remember that all possible formats can be viewed with the command:
./john --list=formats
To make it easier to navigate the resulting output, we can use a command of the form:
./john --list=formats | grep -i --color 'FORMAT TO SEARCH'
For example, I want to find the exact name of the MD5 format, then I run this command:
./john --list=formats | grep -i --color md5
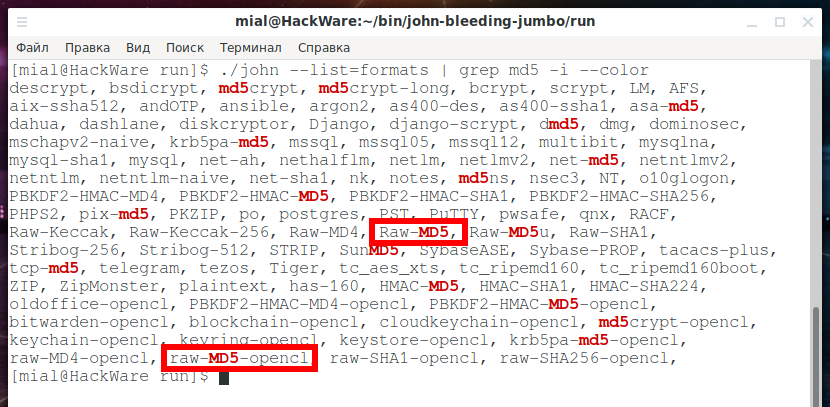
Two found formats are interesting at once:
- Raw-MD5
- raw-MD5-opencl
Many hashes, for example, for encrypting passwords of various websites content management systems (CMS), etc., take various functions for calculating checksums (MD5, SHA1, etc.) as a basis and use them in combination with salt and iterations. In relation to these types of hashing, MD5, SHA1 and others are "elementary", that is, more basic, well, or "raw".
That is, “raw” in the names of these two formats means that this is a regular MD5. And “opencl” means that a video card can be used to crack the hash.
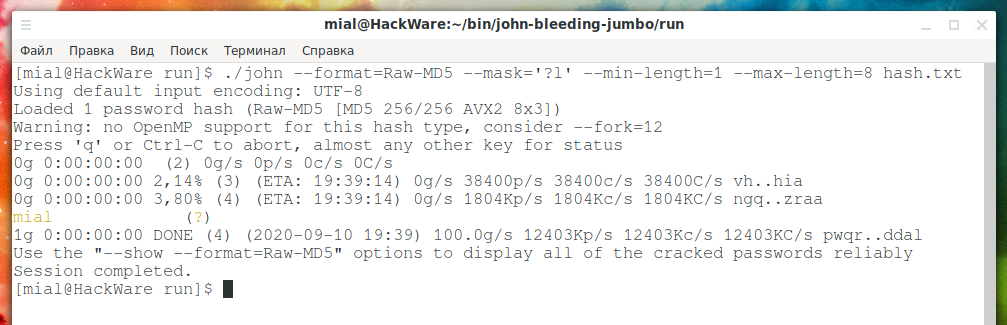
When you have found the required format, then look at its name – in this case we need a format called “Raw-MD5”. This name must be specified with the already familiar option --format=FORMAT. So the format is called Raw-MD5, so I add --format=Raw-MD5 to the command line and now my command looks like this:
./john --format=Raw-MD5 --mask='?l' --min-length=1 --max-length=8 hash.txt
Hash successfully cracked:
We also need to be aware that JtR supports sub-formats (or dynamic format). In fact, subformats are a great feature that allows you to compute iterated and various combined algorithms that are not provided by the original set of algorithms.
A separate section will be devoted to subformats. Now we will just learn to look at the name of the format we need. To do this, use a command of the form:
./john --list=subformats | grep -i --color 'FORMAT TO SEARCH'
I'm still interested in MD5, so I run a command like this:
./john --list=subformats | grep -i --color md5

A lot of things were found, first of all, I'm interested in the line:
Format = dynamic_0 type = dynamic_0: md5($p) (raw-md5)
raw-md5 means "just md5" – exactly what I need. So that I am sure not to be mistaken, the function (formula) for calculating it is given: md5($p). Here $p stands for the password, and md5() calculates the MD5 hash of the passed string.
When you find the format you want, look at its name – in this case, the format is called “dynamic_0”.
This name must be specified with the already familiar option --format=FORMAT. What's new for us is that this option can be used not only with format names, but also with subformat names.
So the format is called dynamic_0, so I add --format=dynamic_0 to the command line and now my command looks like this:
./john --format=dynamic_0 --mask='?l' --min-length=1 --max-length=8 hash.txt
The hash is successfully cracked again:

How to use all CPU cores for cracking. John the Ripper multithreaded launch
Let's take a hash that is slightly more difficult to crack:
echo -n hackware | md5sum | awk '{ print $1 }' > hash.txt
Let's see the contents of the hash.txt file:
cat hash.txt
In this MD5 file, the MD5 hash of the string “hackware”.
53ab0dff8ecc7d5a18b4416d00568f02
Let's run the command for hacking:
./john --format=dynamic_0 --mask='?l' --min-length=1 --max-length=8 hash.txt
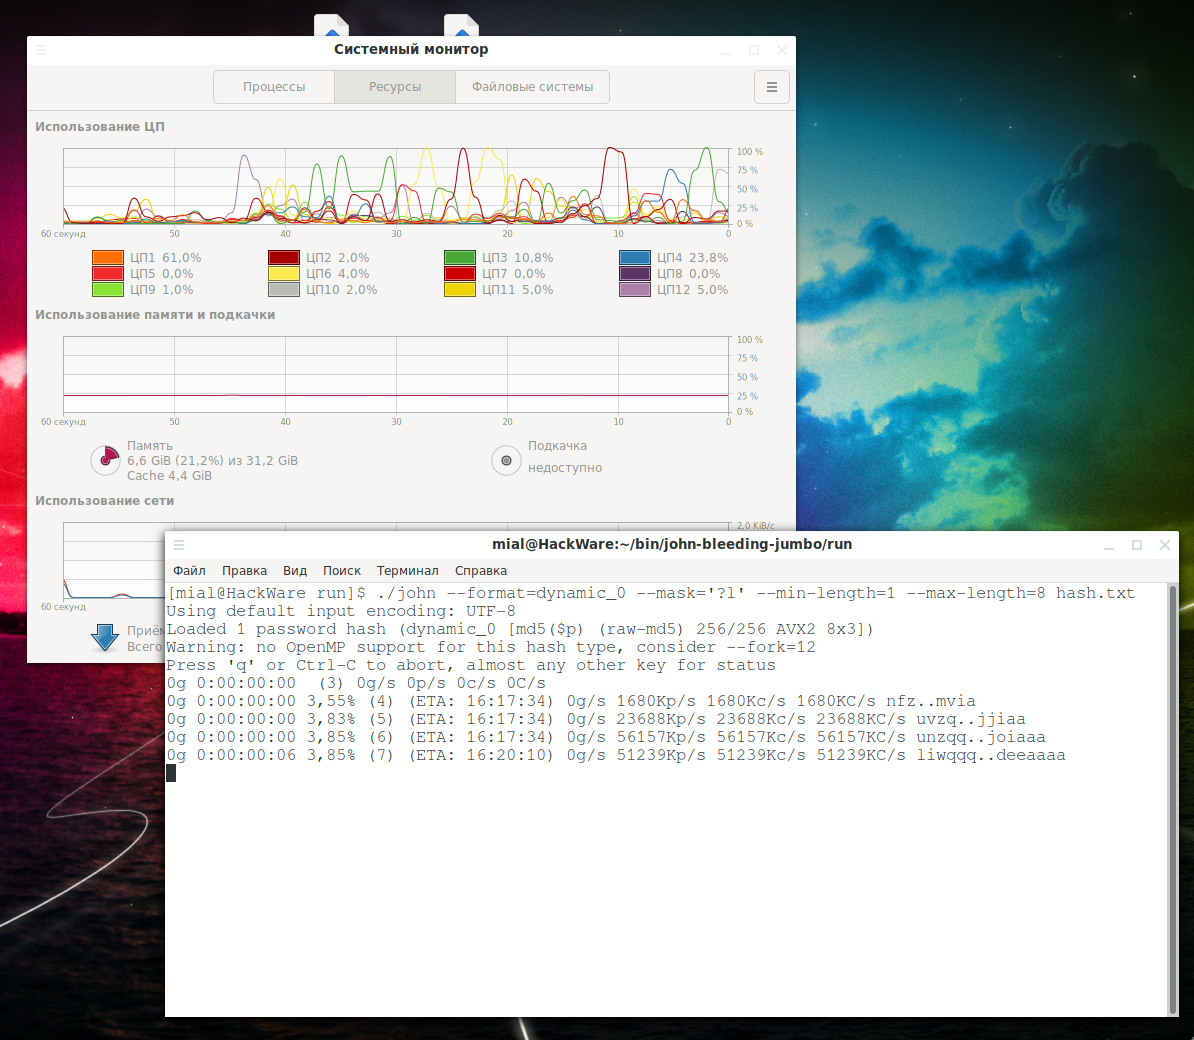
It's clear that:
- CPU is not fully utilized
- Search speed 52034Kp/s
To significantly speed up the cracking speed, use the --fork=NUMBER option, set the number of logical CPU cores on your computer as a number. For example, if there are 12 logical cores, then you need to use the --fork=12 option:
./john --format=dynamic_0 --mask='?l' --min-length=1 --max-length=8 --fork=12 hash.txt
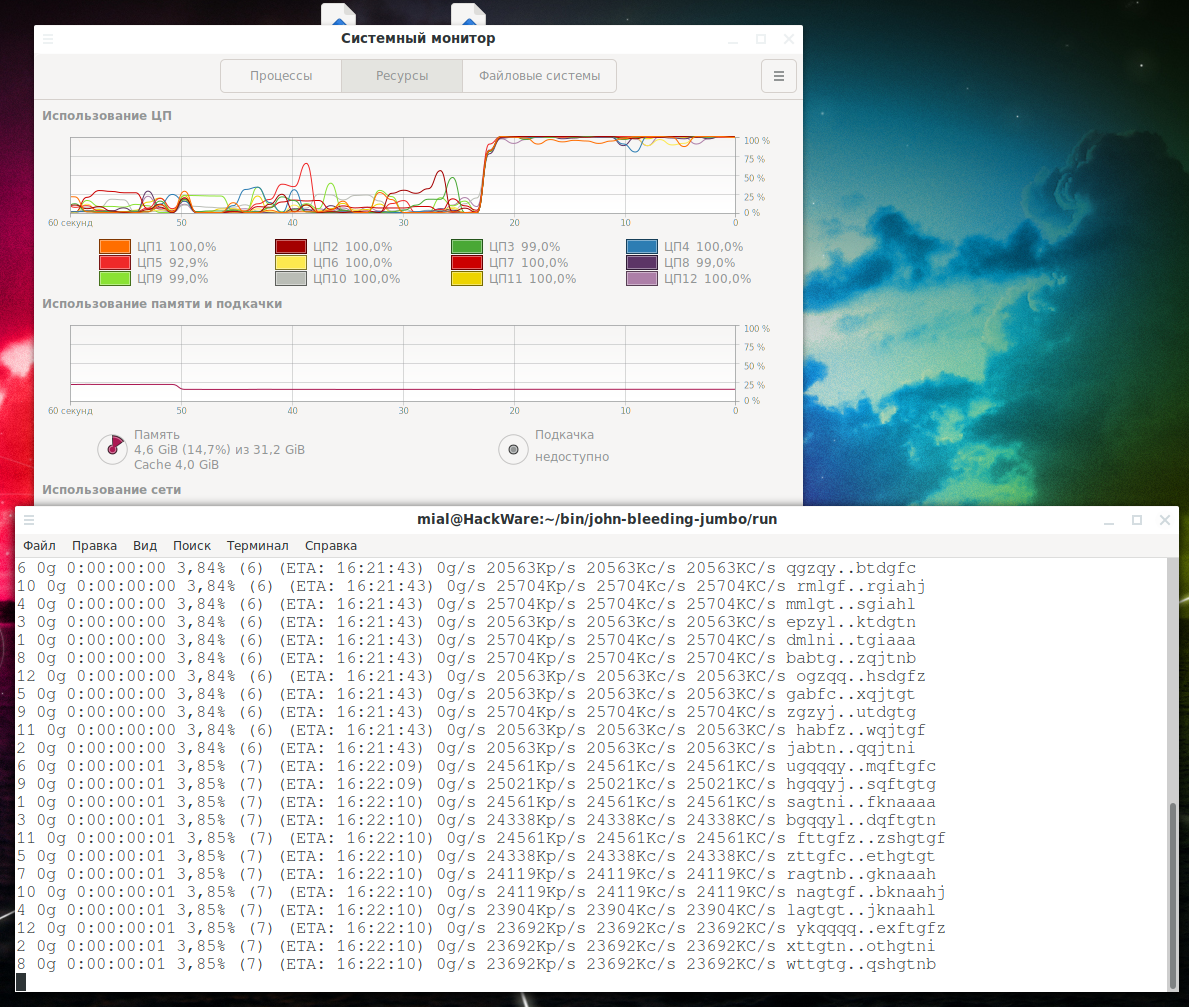
As a result:
- CPU is fully used
- The search speed has become 24338Kp/s per thread, but 12 threads are running. That is, it increased by 24338 / 52034 * 12 = 5.6 times.
You can try to specify the number of not logical, but physical cores as the value of the --fork option – perhaps this will be more efficient on your system.
There is no need to worry that the system will become unresponsive – by default John the Ripper uses only free processor resources – you can continue to work on your computer as usual, there will be no “hangs” and “freezes”.
Hot to View John the Ripper Job Status
The JtR progress status includes the percentage of work completed, ETA (completion time), brute-force password candidates, current candidate. If the program is run in several threads, then this information is displayed for each of them – this can be seen in the previous screenshots. The John the Ripper work status is displayed when switching to a longer mask, and also at certain intervals. If you want to display the progress of work done, then press Enter at any time and the status of the work will be displayed immediately.
How to recover an interrupted John the Ripper session
By default, John the Ripper saves the crack progress for the last session. That is, if the work of JtR ended abruptly, for example, due to an unexpected restart of the computer, then use the --restore option to continue the last session:
./john --restore
You do not need to specify options or a file with hashes – all settings are saved in the session file.
If you want, you can use named sessions, so you can resume any of them, not just the most recent one, for this add the --session=NAME option.
To restore an interrupted named session, use the --restore=NAME option. That is, you need to specify the session name that you used with the --session option.
How to start password cracking in John the Ripper on a video card
Hacking on a graphics card is very similar to hacking on a CPU. The main difference is that you need to specify a different format with the --format option. Not all algorithms support GPU cracking (OpenCL). It is necessary that the name of the required algorithm contains the string “-opencl”. The above command is suitable for searching:
./john --list=formats | grep -i --color 'FORMAT TO SEARCH'
We run the already familiar command:
./john --list=formats | grep -i --color md5
The required algorithm is called raw-MD5-opencl, we use it with the --format option:
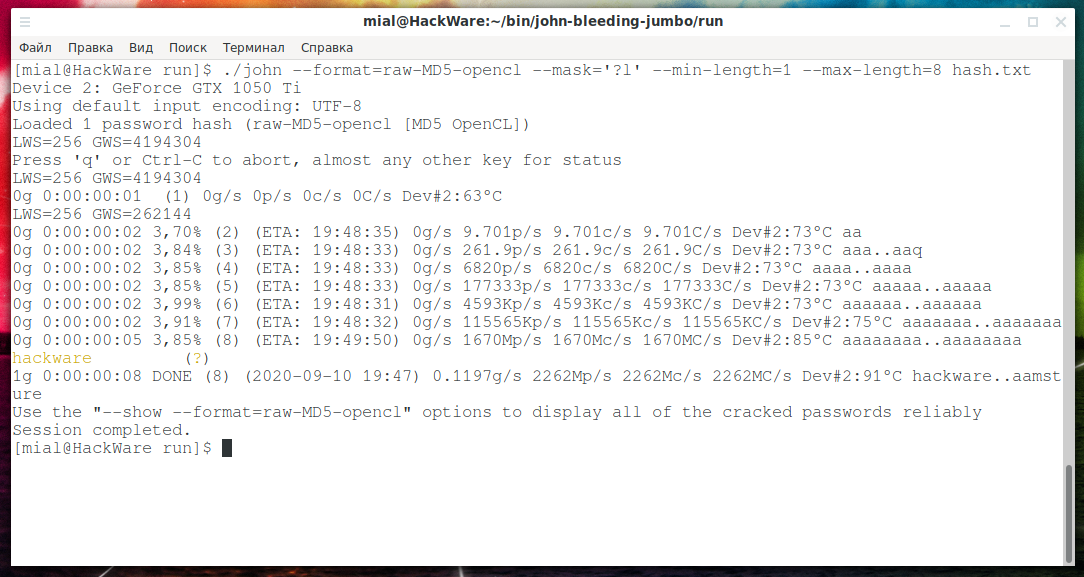
./john --format=raw-MD5-opencl --mask='?l' --min-length=1 --max-length=8 hash.txt
Hacking speed reached 1670Mp/s! On the central processor, when running on all 12 cores, the speed was 292Mp/s.
Of course, at this speed, the hash is cracked very quickly:
How to use John the Ripper on Windows
The password dictionary file used in this article can be downloaded from the link: https://kali.tools/files/passwords/leaked_passwords/rockyou.txt.bz2
Most of the scripts that are used to extract hashes from password files can also be run on Windows. But for this you need to install Python, Ruby and Perl. You can find detailed instructions in the respective articles:
- How to install Python and PIP on Windows 10. How to set up Python as a web server module
- How to install and use Ruby on Windows
In addition to scripts, John the Ripper ships with compiled (binaries) files for extracting hashes. They should run smoothly in Cygwin.
In John the Ripper's Windows startup commands, you may need to replace single quotes with double quotes (or vice versa if a syntax error occurs).
Perhaps, in Windows, it not necessary to use quotes in some cases (for masks, for example). But this is only if you are running JtR not in Cygwin, but in the CMD (or PowerShell) of Windows.
If you have any errors when working with JtR and related tools in Windows, then write these errors in the comments. Examples of errors might be: missing dependency for a Python script, or “file not found” due to a Cygwin file system or a syntax error. All of this can most likely be resolved, so ask.
While you can now fully use John the Ripper and crack passwords, this is far from the end of the JtR tutorial. More material is being prepared to reveal all the capabilities of this powerful brute force. Therefore, share the link to this guide to speed up new parts.
Related articles:
- Comprehensive Guide to John the Ripper. Part 4: Practical examples of John the Ripper usage (90.6%)
- Comprehensive Guide to John the Ripper. Part 6: How to brute force non-standard hashes (90.6%)
- Comprehensive Guide to John the Ripper. Part 7: Johnny – GUI for John the Ripper (90.6%)
- Advanced wordlist generating techniques (88.4%)
- How to create dictionaries that comply with specific password strength policies (using Rule-based attack) (85%)
- Tor tips and usage examples (RANDOM - 1.3%)
hello
Than you for your time. In my case I've tryed all the switches
--dev=gpu
--dev=1,2,3,4 (see bellow) => john assigned GPU devices:
CPU is dev=0 !!
================================================
john --list=opencl-devices
Platform #0 name: NVIDIA CUDA, version: OpenCL 1.2 CUDA 11.2.162
Device #0 (1) name: GeForce GTX 1080
Device vendor: NVIDIA Corporation
Device type: GPU (LE)
Device version: OpenCL 1.2 CUDA
Driver version: 460.73.01 [recommended]
Native vector widths: char 1, short 1, int 1, long 1
Preferred vector width: char 1, short 1, int 1, long 1
Global Memory: 8119 MiB
Global Memory Cache: 960 KiB
Local Memory: 48 KiB (Local)
Constant Buffer size: 64 KiB
Max memory alloc. size: 2029 MiB
Max clock (MHz): 1759
Profiling timer res.: 1000 ns
Max Work Group Size: 1024
Parallel compute cores: 20
CUDA cores: 2560 (20 x 128)
Speed index: 4503040
Warp size: 32
Max. GPRs/work-group: 65536
Compute capability: 6.1 (sm_61)
Kernel exec. timeout: no
NVML id: 0
PCI device topology: 01:00.0
PCI lanes: 1/16
Fan speed: 37%
Temperature: 26C
Utilization: 23%
Device #1 (2) name: GeForce GTX 1070 Ti
Device vendor: NVIDIA Corporation
Device type: GPU (LE)
Device version: OpenCL 1.2 CUDA
Driver version: 460.73.01 [recommended]
Native vector widths: char 1, short 1, int 1, long 1
Preferred vector width: char 1, short 1, int 1, long 1
Global Memory: 8119 MiB
Global Memory Cache: 912 KiB
Local Memory: 48 KiB (Local)
Constant Buffer size: 64 KiB
Max memory alloc. size: 2029 MiB
Max clock (MHz): 1683
Profiling timer res.: 1000 ns
Max Work Group Size: 1024
Parallel compute cores: 19
CUDA cores: 2432 (19 x 128)
Speed index: 4093056
Warp size: 32
Max. GPRs/work-group: 65536
Compute capability: 6.1 (sm_61)
Kernel exec. timeout: no
NVML id: 1
PCI device topology: 03:00.0
PCI lanes: 1/16
Fan speed: 0%
Temperature: 29C
Utilization: 0%
Device #2 (3) name: GeForce GTX 1080 Ti
Device vendor: NVIDIA Corporation
Device type: GPU (LE)
Device version: OpenCL 1.2 CUDA
Driver version: 460.73.01 [recommended]
Native vector widths: char 1, short 1, int 1, long 1
Preferred vector width: char 1, short 1, int 1, long 1
Global Memory: 11178 MiB
Global Memory Cache: 1344 KiB
Local Memory: 48 KiB (Local)
Constant Buffer size: 64 KiB
Max memory alloc. size: 2794 MiB
Max clock (MHz): 1632
Profiling timer res.: 1000 ns
Max Work Group Size: 1024
Parallel compute cores: 28
CUDA cores: 3584 (28 x 128)
Speed index: 5849088
Warp size: 32
Max. GPRs/work-group: 65536
Compute capability: 6.1 (sm_61)
Kernel exec. timeout: no
NVML id: 2
PCI device topology: 05:00.0
PCI lanes: 1/16
Fan speed: 0%
Temperature: 22C
Utilization: 4%
Device #3 (4) name: GeForce GTX 1080 Ti
Device vendor: NVIDIA Corporation
Device type: GPU (LE)
Device version: OpenCL 1.2 CUDA
Driver version: 460.73.01 [recommended]
Native vector widths: char 1, short 1, int 1, long 1
Preferred vector width: char 1, short 1, int 1, long 1
Global Memory: 11178 MiB
Global Memory Cache: 1344 KiB
Local Memory: 48 KiB (Local)
Constant Buffer size: 64 KiB
Max memory alloc. size: 2794 MiB
Max clock (MHz): 1645
Profiling timer res.: 1000 ns
Max Work Group Size: 1024
Parallel compute cores: 28
CUDA cores: 3584 (28 x 128)
Speed index: 5895680
Warp size: 32
Max. GPRs/work-group: 65536
Compute capability: 6.1 (sm_61)
Kernel exec. timeout: no
NVML id: 3
PCI device topology: 06:00.0
PCI lanes: 1/16
Fan speed: 0%
Temperature: 22C
Utilization: 29%
Platform #1 name: Portable Computing Language, version: OpenCL 1.2 pocl 1.6, None+Asserts, LLVM 9.0.1, RELOC, SLEEF, DISTRO, POCL_DEBUG
Device #0 (5) name: pthread-Intel(R) Core(TM) i5-4440 CPU @ 3.10GHz
Device vendor: GenuineIntel
Device type: CPU (LE)
Device version: OpenCL 1.2 pocl HSTR: pthread-x86_64-pc-linux-gnu-haswell
Driver version: 1.6
Native vector widths: char 16, short 16, int 8, long 4
Preferred vector width: char 16, short 16, int 8, long 4
Global Memory: 13907 MiB
Global Memory Cache: 6 MiB
Local Memory: 256 KiB (Global)
Constant Buffer size: 256 KiB
Max memory alloc. size: 4 GiB
Max clock (MHz): 3300
Profiling timer res.: 1 ns
Max Work Group Size: 4096
Parallel compute cores: 4
Speed index: 52800
Hello! If the topic has not changed, please continue the conversation in the comments under the same article.
In your case, the CPU is number 5 (you need to look at the value in parentheses).
On my computer, I did some JtR benchmarks and got the following result: even if the calculations are performed on the video card, one CPU core is always fully loaded. I have one video card and 6 cores (12 logical) at the CPU.
Googling for the phrase “high cpu load while using cuda” yielded several topics:
The topics are quite old, it is difficult to say how relevant they are today.
Among other things, the answer is something like this:
That is, one video card needs one processor core for auxiliary work, you have four video cards and 4 processor cores, for this reason it is completely loaded.
You can test this hypothesis by running calculations on one or two video cards and checking the CPU utilization.
Hello again,
I believe we've got distracted by the amount of exchanged info.
The core problem was excessive CPU usage (cca 100% x 4 cores) when using exclusevly GPU calculations.
I know that SOME of the calculations are done on CPU with a low footprint.
I belive there is a bug in the latest JtR release
If there is a swith that I do not know about to minimize CPU load please let me know.
Thanks,
Hello
Yes you've got it - yes no work just a POWER consumer.
However to implment the no spin CPU directive I have to create a NEW JtR binaries
Who should I talk to in order to address this problem?
Thanks
You can report your issue here: https://github.com/openwall/john/issues
Can you help me please .
I want to search for a 14-character password
But I just want to work in uppercase and lowercase and digit and [@] and [.]
Can you write the command line for me?
Thank you .
Hello! Your command will be based on a custom character set that includes uppercase and lowercase letters, numbers, and the “@” and “.” symbols. This custom character set is denoted as -1='?l?u?d@.'
A mask of fourteen characters from the custom character set is denoted as --mask='?1?1?1?1?1?1?1?1?1?1?1?1?1?1'
The following command will list all possible password candidates (we use it to check that we have compiled the custom character set and mask correctly):
The following command starts brute-force attack against hashes placed in the HASH-FILE:
As FORMAT, you can specify the format of your hash:
PS: This is all more theoretical in nature, since you are unlikely to wait until the end of brute-force. It is unlikely that it will be possible to wait for at least the output of all the password candidates or write them to disk, since the number of them is too large.
It Works
Thank You
How do you specify a varible mask within 2 fixed masks.
so like this - the password would be something like - 'www.i need this to be tested as variable mask.com'
prefix of the password is http://www. and the suffix of the password is .com
I do not know the length of the password within those two static masks.
So if i would like to test all lower case of 8 characters within the www. and .com