How to enable DNS over HTTPS and what it is for
Table of contents
1. What is DNS over HTTPS (DoH)?
2. How DNS over HTTPS, DNSSEC, DNSCrypt, DNS over TLS compare
3. How to enable DNS over HTTPS (DoH)
4. Public name servers with DNS support over HTTPS
5. How to enable DNS over HTTPS (DoH) in web browsers
6. How to enable DNS over HTTPS (DoH) for all applications
6.1 DNS over HTTPS (DoH) software
6.2 How to enable DNS over HTTPS (DoH) at the operating system level in Windows
6.2.1 How to enable DNS over HTTPS (DoH) at the operating system level in Windows (in OS settings)
6.3 How to enable DNS over HTTPS (DoH) at the operating system level in Linux
6.3.1 How to install dnscrypt-proxy on Kali Linux
6.3.2 How to install dnscrypt-proxy on Arch Linux, BlackArch and their derivatives
6.3.3 Protecting the /etc/resolv.conf file from changes
7. How to set up dnscrypt-proxy
8. Checking dnscrypt-proxy operation
9. Configuring dnscrypt-proxy for use with IPv6
Companies like Microsoft, Google and Mozilla are promoting DNS over HTTPS (DoH). This technology will encrypt DNS lookups, improving online privacy and security. Let's take a closer look at the DNS Over HTTPS technology, find out what it is for and how to enable it. It is possible that you are already using DNS over HTTPS without even knowing it!
What is DNS over HTTPS (DoH)?
The Internet strives to have encryption everywhere by default. At the moment, most of the websites you access are probably using HTTPS encryption. Modern web browsers like Chrome now flag any site that uses standard HTTP as “insecure”. HTTP/3, a new version of the HTTP protocol, has built-in encryption.
This encryption ensures that no one can tamper with the web page while you are viewing it or monitor what you are doing on the Internet. For example, if you connect to Wikipedia.org, the network operator – be it the company's public Wi-Fi hotspot or your ISP – can only see that you are connected to wikipedia.org. They cannot see which article you are reading, and they cannot modify the Wikipedia article while it travels to your computer.
But in the pursuit of encryption, DNS is left behind. The domain name system makes it so that we can connect to websites through their domain names rather than using numeric IP addresses. You enter a domain name such as google.com and your system will contact the DNS server specified in the system settings to get the IP address associated with google.com. Then your computer or phone will connect to that IP address.
Until now, these DNS queries have not been encrypted. When you connect to a website, your system sends a request that you are looking for an IP address associated with a specific domain. Any data intermediary – maybe your ISP, but maybe just a public Wi-Fi hotspot logging traffic – can log which domains you connect to. Because of this, the DNS spoofing attack is possible.
DNS over HTTPS makes this oversight impossible. When using DNS over HTTPS, your system will establish a secure, encrypted connection to your DNS server and transmit the request and response over that connection. Anyone in between will not be able to see what domain names you are looking for, or interfere with the response sent.
Most people today use DNS servers provided by their ISP. However, there are many third party DNS servers such as Google Public DNS, Cloudflare, and OpenDNS. These third-party vendors were among the first to include support for DNS over HTTPS on the server side. To use DNS over HTTPS, you need both a DNS server and a client (such as a web browser or operating system) that supports it.
How DNS over HTTPS, DNSSEC, DNSCrypt, DNS over TLS compare
Several protocols are available to encrypt DNS requests. DNS over HTTPS (DoH) is currently the best supported on client software, which is what this article is about. To navigate in terms, consider brief characteristics of each of the protocols.
DNS over HTTPS (DoH) is a protocol for performing remote Domain Name System (DNS) resolution via the HTTPS protocol. A goal of the method is to increase user privacy and security by preventing eavesdropping and manipulation of DNS data by man-in-the-middle attacks by using the HTTPS protocol to encrypt the data between the DoH client and the DoH-based DNS resolver.
DNS over TLS (DoT) is a security protocol for encrypting and wrapping Domain Name System (DNS) queries and answers via the Transport Layer Security (TLS) protocol. The goal of the method is to increase user privacy and security by preventing eavesdropping and manipulation of DNS data via man-in-the-middle attacks.
The Domain Name System Security Extensions (DNSSEC) is a suite of Internet Engineering Task Force (IETF) specifications for securing certain kinds of information provided by the Domain Name System (DNS) as used on Internet Protocol (IP) networks. It is a set of extensions to DNS which provide to DNS clients (resolvers) cryptographic authentication of DNS data, authenticated denial of existence, and data integrity, but not availability or confidentiality.
DNSCrypt is a network protocol that authenticates and encrypts Domain Name System (DNS) traffic between the user's computer and recursive name servers. It was originally designed by Frank Denis and Yecheng Fu.
Although multiple client and server implementations exist, the protocol was never proposed to the Internet Engineering Task Force (IETF) by the way of a Request for Comments (RFC).
DNSCrypt wraps unmodified DNS traffic between a client and a DNS resolver in a cryptographic construction in order to detect forgery. Though it doesn't provide end-to-end security, it protects the local network against man-in-the-middle attacks.
It also mitigates UDP-based amplification attacks by requiring a question to be at least as large as the corresponding response. Thus, DNSCrypt helps to prevent DNS amplification attacks.
DNSCurve is a proposed secure protocol for the Domain Name System (DNS), designed by Daniel J. Bernstein.
How to enable DNS over HTTPS (DoH)
You can enable encrypted DNS queries in two ways – at the web browser level and at the operating system level. Each of these methods has its own advantages.
Enabling secure DNS at the web browser level is very simple, just check the box in the settings. Moreover, in Google Chrome and Firefox (but only for US users), this setting is already enabled by default. The disadvantage of this method is that all other applications using an Internet connection will not be able to use DNS over HTTPS. Such applications can be programs for downloading files, instant messengers, software and operating system update services, and so on.
Enabling DoH at the system level makes it so that all programs will make DNS queries exclusively over an encrypted channel. But this requires the installation of a program – a caching DNS server. In fact, the installation is very simple and the program will consume a minimum of system resources. At the same time, your own DNS will cache the received data, thereby slightly increasing the network speed.
Which option to choose is entirely at your discretion. This tutorial will cover both methods and you will see how simple it is when choosing any method of encrypting DNS requests.
Public name servers with DNS support over HTTPS
To use DNS over HTTPS, the name server must support this technology. Currently the most popular public DNS servers support it. Their addresses are the same for DoH or regular DNS queries.
| ISP | IP Address | Filters |
|---|---|---|
| Cloudflare |
1.1.1.1 1.0.0.1 2606:4700:4700::1111 2606:4700:4700::1001 |
None |
| Google Public DNS |
8.8.8.8 8.8.4.4 2001:4860:4860::8888 2001:4860:4860::8844 |
None |
| CleanBrowsing |
185.228.168.168 185.228.169.168 2a0d:2a00:1:: 2a0d:2a00:2:: |
Adult |
| Adguard |
176.103.130.130 176.103.130.131 2a00:5a60::ad1:0ff 2a00:5a60::ad2:0ff |
Ads |
| Quad9 |
9.9.9.9 149.112.112.112 2620:fe::fe 2620:fe::9 |
Malicious domains (phishing, malware, exploit kit domains) |
| OpenDNS |
208.67.222.222 208.67.220.220 2620:119:35::35 2620:119:53::53 |
None |
Regardless of whether you enable DoH in browsers or for the entire system, you can use any DNS server from this list. I personally prefer Google's DNS servers.
How to enable DNS over HTTPS (DoH) in web browsers
Google chrome
Google Chrome on Windows already has DNS over HTTPS enabled. You can check it by going to “Settings” → “Privacy and Security” → “Security” → “Advanced” → “Use secure DNS”. To quickly find this setting, enter “chrome://settings/security/” in the address bar and scroll to the bottom.

You can select any DoH-enabled DNS server from the list or specify your own.

At the time of writing, this option is not available in Google Chrome on Linux.
Firefox
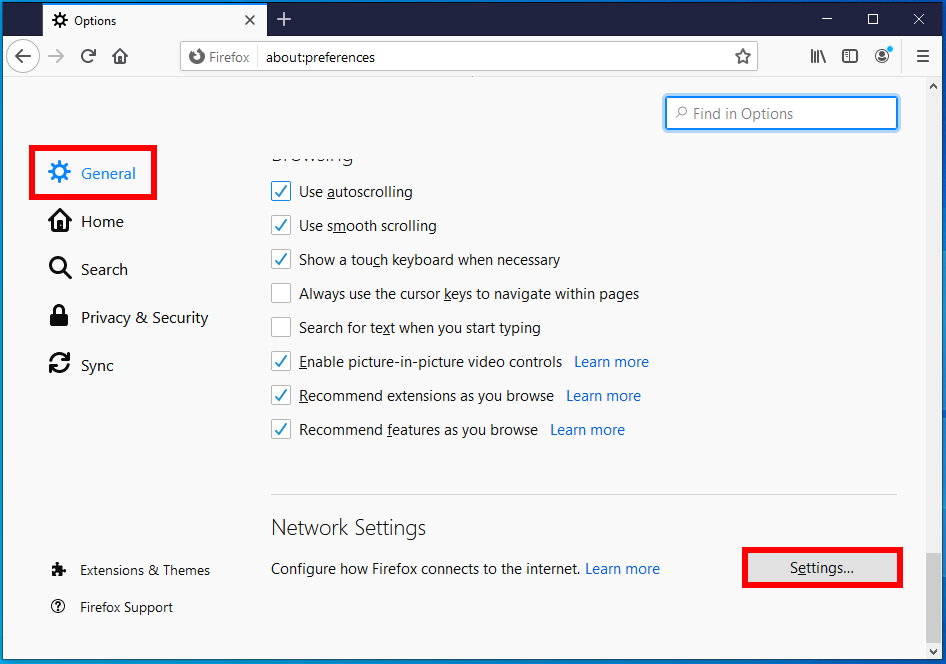
Go to Settings → General. Scroll down to find the “Network Settings” button.
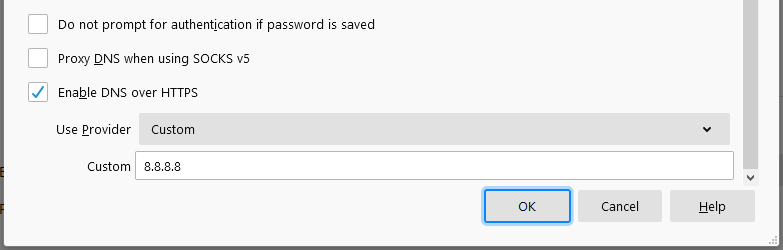
Check the box “Enable DNS over HTTPS” and select a provider from the list or enter custom IP address:
Opera
Go to the settings (the gear at the bottom of the left sidebar or the button “Easy setup” → “Go to full browser settings”).
Then go to “Advanced” → “System”.
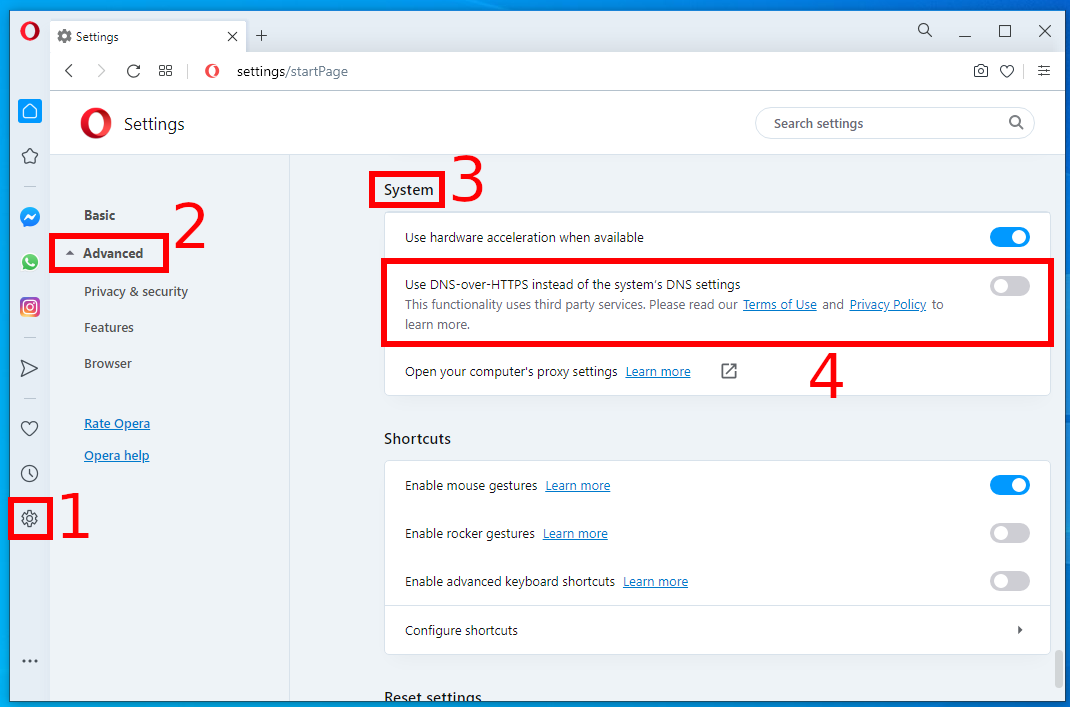
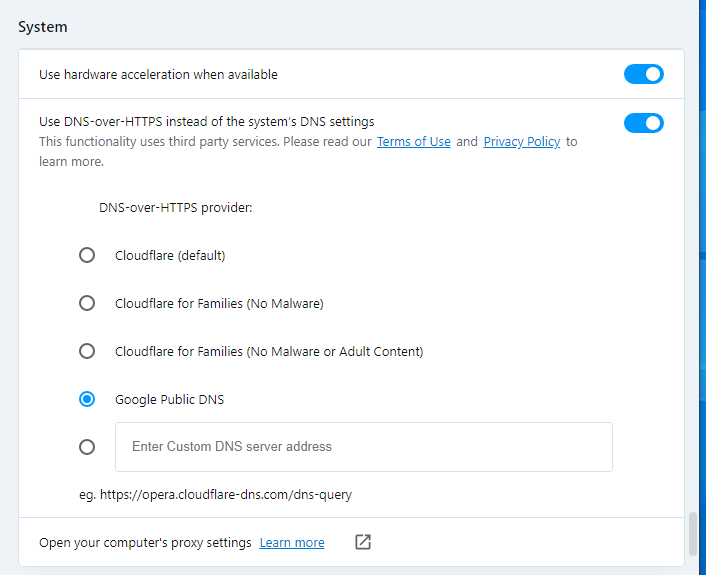
Enable the checkbox “Use DNS-over-HTTPS instead of system's DNS settings” and select the desired DNS server.
Microsoft Edge
At the time of writing, the default Internet Explorer (Microsoft Edge) does not know about DNS over HTTPS at all. If you download the latest version of Microsoft Edge, you can enable this setting there using a flag.
Enter edge://flags#dns-over-https in the address bar
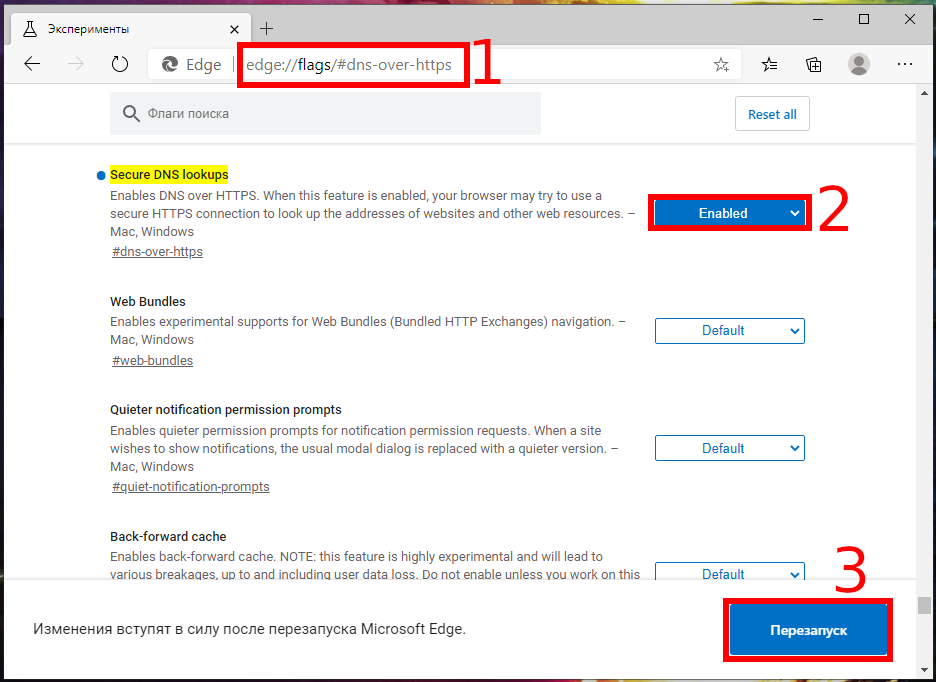
Enable the experimental flag and restart your web browser.
Ummm … it seems like I still need to enter the DNS server settings, but I could not find where to do it in Microsoft Edge. Who cares about Microsoft Edge – who even uses it ?!
How to enable DNS over HTTPS (DoH) for all applications
DNS over HTTPS (DoH) software
dnscrypt-proxy
dnscrypt-proxy is a flexible DNS proxy, with support for modern encrypted DNS protocols such as DNSCrypt v2, DNS-over-HTTPS and Anonymized DNSCrypt.
Available as source code and pre-built binaries for most operating systems and architectures.
Features
- DNS traffic encryption and authentication. Supports DNS-over-HTTPS (DoH) using TLS 1.3, DNSCrypt and Anonymized DNS
- Client IP addresses can be hidden using Tor, SOCKS proxies or Anonymized DNS relays
- DNS query monitoring, with separate log files for regular and suspicious queries
- Filtering: block ads, malware, and other unwanted content. Compatible with all DNS services
- Time-based filtering, with a flexible weekly schedule
- Transparent redirection of specific domains to specific resolvers
- DNS caching, to reduce latency and improve privacy
- Local IPv6 blocking to reduce latency on IPv4-only networks
- Load balancing: pick a set of resolvers, dnscrypt-proxy will automatically measure and keep track of their speed, and balance the traffic across the fastest available ones.
- Cloaking: like a HOSTS file on steroids, that can return preconfigured addresses for specific names, or resolve and return the IP address of other names. This can be used for local development as well as to enforce safe search results on Google, Yahoo, DuckDuckGo and Bing
- Automatic background updates of resolvers lists
- Can force outgoing connections to use TCP
- Compatible with DNSSEC
- Includes a local DoH server in order to support ECHO (ESNI)
DNS-over-HTTPS
DNS-over-HTTPS is a client and server software to query DNS over HTTPS, using Google DNS-over-HTTPS protocol and IETF DNS-over-HTTPS (RFC 8484).
How to enable DNS over HTTPS (DoH) at the operating system level in Windows
How to enable DNS over HTTPS (DoH) at the operating system level in Windows (in OS settings)
This method is convenient because you do not need to install additional software. But the disadvantage of this method is that as a DNS server you can use only the one provided by Windows – there are only about 5 providers. Another limitation is that this method only works starting with Windows 11.
First, choose a free DNS with DoH support – there are already a lot of them now
Starting with the release of Windows 11, DNS over HTTPS in Windows 11 only works with a certain hard-coded list of free DNS services (you can see the list yourself by running
netsh dns show encryption
in the terminal window).
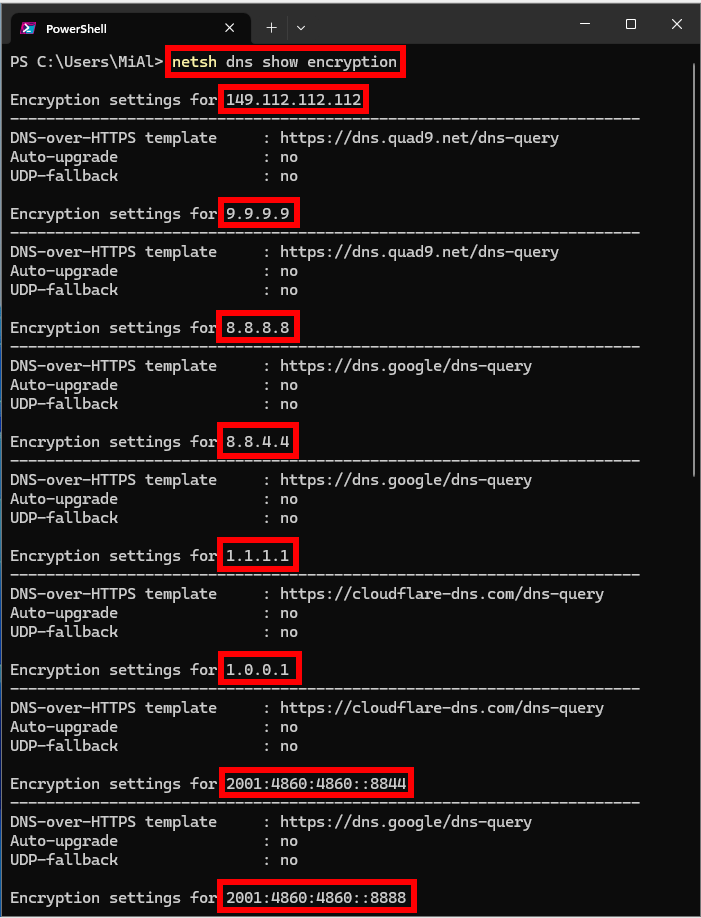
Here is the current list of supported IPv4 DNS server addresses as of October 2022:
- Primary Google DNS: 8.8.8.8
- Additional Google DNS: 8.8.4.4
- Cloudflare Primary DNS: 1.1.1.1
- Secondary DNS Cloudflare: 1.0.0.1
- Primary DNS Quad9: 9.9.9.9
- Secondary DNS Quad9: 149.112.112.112
For IPv6, list of supported DNS server addresses:
- Primary Google DNS: 2001:4860:4860::8888
- Google Secondary DNS: 2001:4860:4860::8844
- Cloudflare primary DNS server: 2606:4700:4700::1111
- Additional Cloudflare DNS: 2606:4700:4700::1001
- Primary DNS Quad9: 2620:fe::fe
- Secondary DNS Quad9: 2620:fe::fe:9
When it comes time to enable DoH in the section below, you will need to select two pairs of these DNS servers – primary and secondary for IPv4 and IPv6 – to use with your Windows 11 PC. As a bonus, using them will likely speed up your Internet experience.
Enable DNS over HTTPS in Windows 11
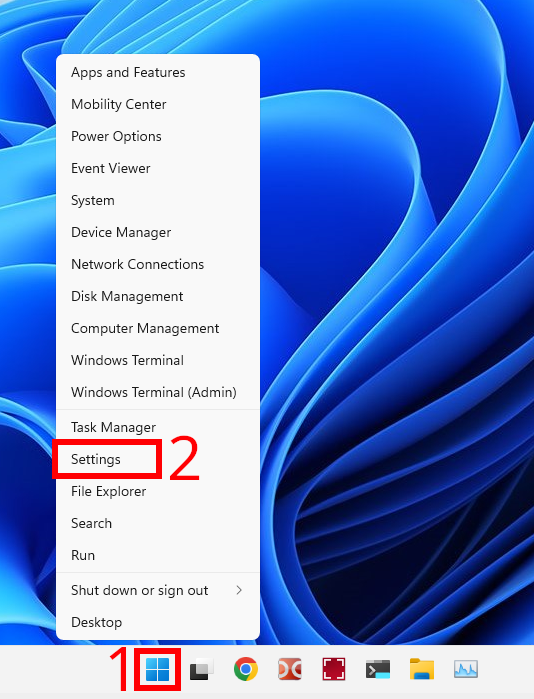
To start configuring DNS over HTTPS, open the Settings app by pressing Win+i on your keyboard. Alternatively, you can right-click the Start button and select “Settings” from the special menu that appears.
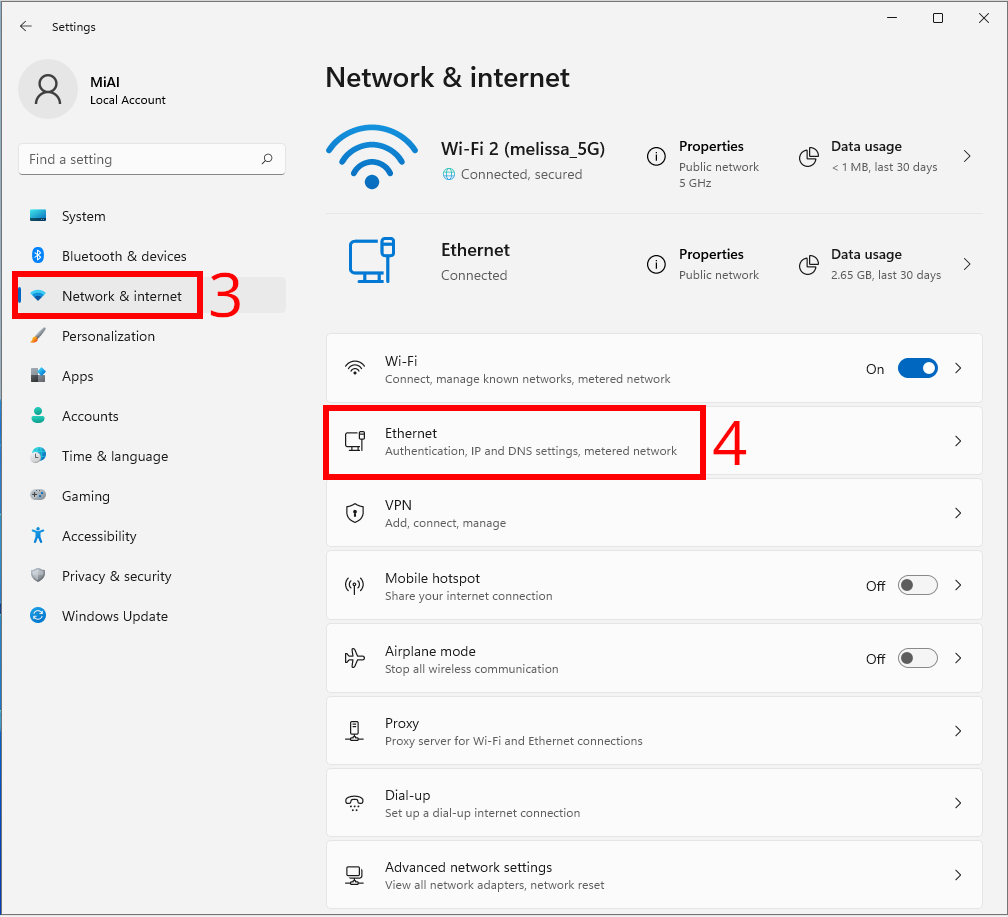
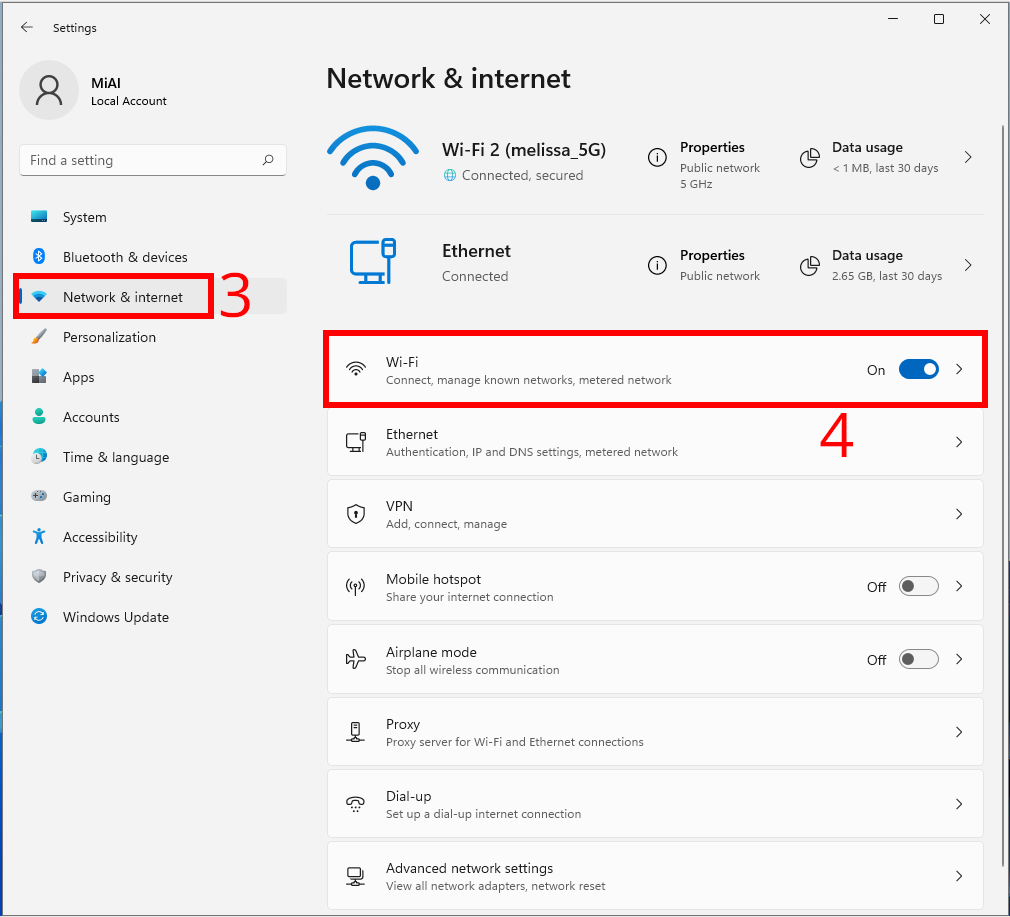
In Settings, click “Network & internet” in the sidebar.
For “Wi-Fi” and “Ethernet”, the procedure for setting up DNS over HTTPS is slightly different.
Configuring DNS over HTTPS for Ethernet (Wired)
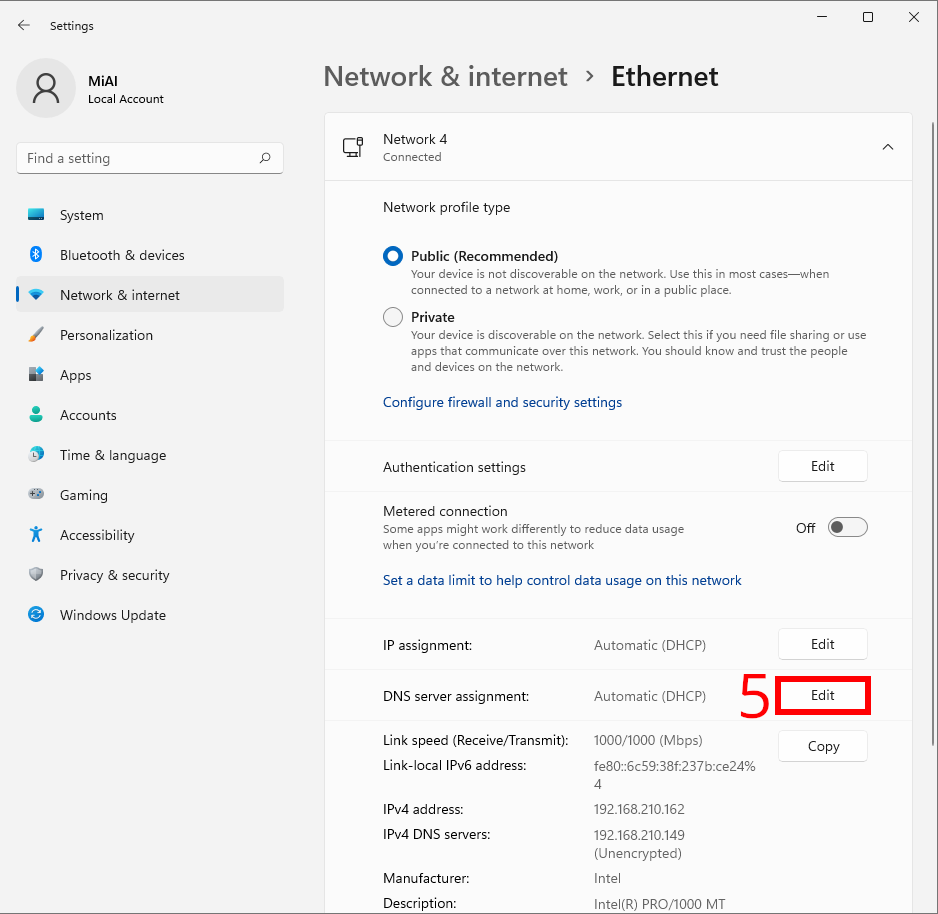
In Network & internet, click the name of your primary Internet connection in the list, such as “Ethernet”.
On the Ethernet properties page, find the “DNS server assignment” setting and click the “Edit” button next to it.
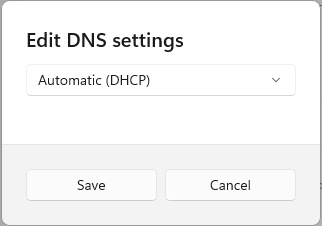
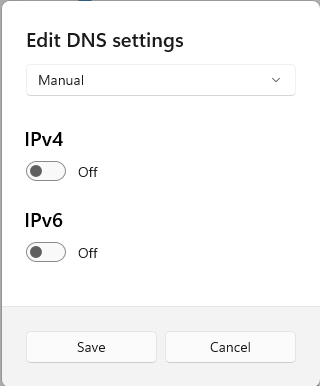
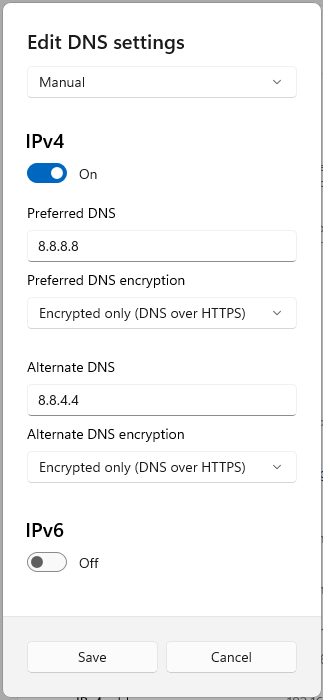
In the window that appears, select “Manual” DNS settings from the drop-down menu.
Then turn the “IPv4” switch to the “On” position.
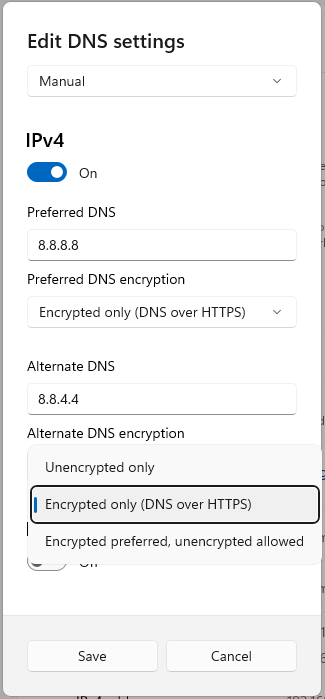
In the IPv4 section, enter the primary DNS server address you selected in the section above in the “Preferred DNS” field (for example, “8.8.8.8”).

The drop-down list “Preferred DNS encryption” will become active. In this list, select “Encrypted only (DNS over HTTPS)”.

Similarly, enter the address of the secondary DNS server in the “Alternate DNS” field (for example, “8.8.4.4”). The drop-down list “Preferred DNS encryption” will become active. In this list, select “Encrypted only (DNS over HTTPS)”.
If your ISP supports IPv6, then repeat this process with IPv6. If your ISP does NOT support IPv6, then you DO NOT need to enable IPv6 DNS servers. If you're unsure, it's best not to enable IPv6 DNS.
Switch the IPv6 switch to the On position, and then copy the primary IPv6 address from the section above and paste it into the “Preferred DNS” field. Then copy the appropriate secondary IPv6 address and paste it into the “Alternate DNS” field.
After that, set both “Preferred DNS encryption” options to “Encrypted only (DNS over HTTPS)”.

Finally, click “Save”.
Back on the Ethernet hardware properties page, you'll see a list of your DNS servers with “(Encrypted)” marked next to each one.

Configuring DNS over HTTPS for Wi-Fi (Wireless)
In Network & internet settings, click the name of your primary Internet connection in the list, such as Wi-Fi.
On the Wi-Fi properties page, go to the “Hardware properties” section.

On the next window, locate the “DNS server assignment” option and click the “Change” button next to it.

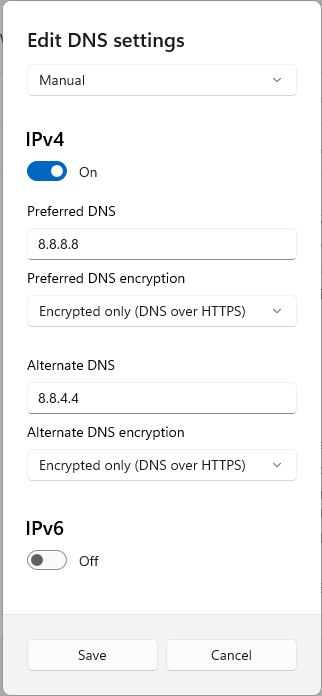
In the window that appears, select “Manual” DNS settings from the drop-down menu. Then turn the “IPv4” switch to the “On” position.
In the IPv4 section, enter the primary DNS server address you selected in the section above in the “Preferred DNS” field (for example, “8.8.8.8”).
The drop-down list “Preferred DNS encryption” will become active. In this list, select “Encrypted only (DNS over HTTPS)”.
Tip: If you don't see the “Preferred DNS encryption” settings, then you are editing the DNS settings for a specific Wi-Fi connection and not for the wireless adapter as a whole. Make sure you have selected the connection type in Settings → Network & internet, then click “Hardware properties” first.
Similarly, enter the address of the secondary DNS server in the “Alternate DNS” field (for example, “8.8.4.4”).
If your ISP supports IPv6, then repeat this process with IPv6. If your ISP does NOT support IPv6, then you DO NOT need to enable IPv6 DNS servers. If you're unsure, it's best not to enable IPv6 DNS.
Switch the IPv6 switch to the On position, and then copy the primary IPv6 address from the section above and paste it into the “Preferred DNS” field. Then copy the appropriate secondary IPv6 address and paste it into the “Alternate DNS” field.
After that, set both “Preferred DNS encryption” options to “Encrypted only (DNS over HTTPS)”.
Finally, click “Save”.
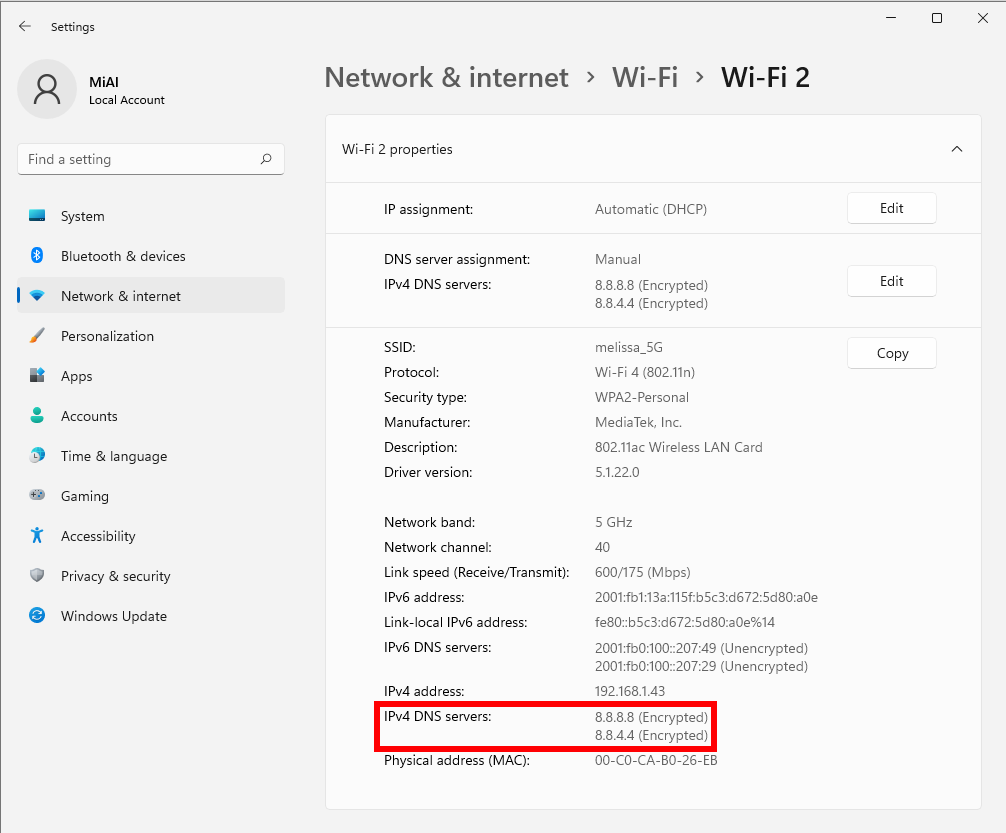
Back on the Wi-Fi hardware properties page, you'll see a list of your DNS servers with “(Encrypted)” marked next to each one.
Note. If you're having network problems after changing these settings, make sure you've entered the correct IP addresses. An incorrect IP address can cause DNS servers to be unavailable. If the addresses are entered correctly, try disabling the “IPv6” switch in the list of DNS servers. If you are configuring IPv6 DNS servers on a computer that is not connected to IPv6, this can cause connectivity issues.
How to enable DNS over HTTPS (DoH) at the operating system level in Windows (using dnscrypt-proxy)
For the Windows operating system, we can only use dnscrypt-proxy, since this program is cross-platform.
To download dnscrypt-proxy for Windows, go to the official page https://github.com/DNSCrypt/dnscrypt-proxy/releases and download a file like dnscrypt-proxy-win64-*.zip
Unpack the downloaded archive – there is a “win64” folder in it. Rename this folder to “dnscrypt-proxy” and move it to the root of the C:\ drive. Thus, the folder and all files are located in the C:\dnscrypt-proxy\ path.
Open a command prompt with administrator privileges. To do this, press Win+x and select “PowerShell (administrator)”.
Run the commands there:
cd C:\dnscrypt-proxy\
cp example-dnscrypt-proxy.toml dnscrypt-proxy.toml
./dnscrypt-proxy
At startup, nscrypt-proxy loads lists of encrypted DNS servers, tests the availability and delay of encrypted DNS servers.
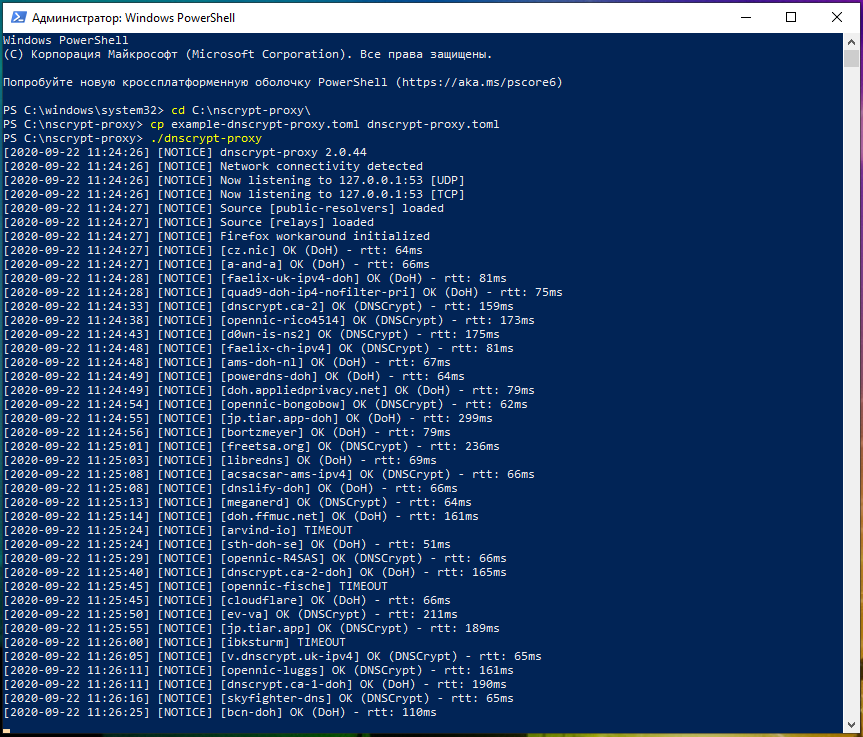
If everything started fine, then continue, here are some tips for those who have an error:
- dnscrypt-proxy.toml: no such file or directory: copy the example configuration file as dnscrypt-proxy.toml as documented above.
- listen udp 127.0.0.1:53: bind: permission denied: you are not using an elevated PowerShell (see step 1).
- listen udp 127.0.0.1:53: bind: address already in use: something is already listening to the DNS port. Maybe something else, maybe a previous instance of dnscrypt-proxy that you didn't stop before starting a new one.
No errors? Fine!
Don't close the terminal yet. Soon we will install dnscrypt-proxy as a system service, and we will not need to start it on the command line every time. But until we do this, dnscrypt-proxy will only work until the console window is open.
Now we will change the system DNS settings.


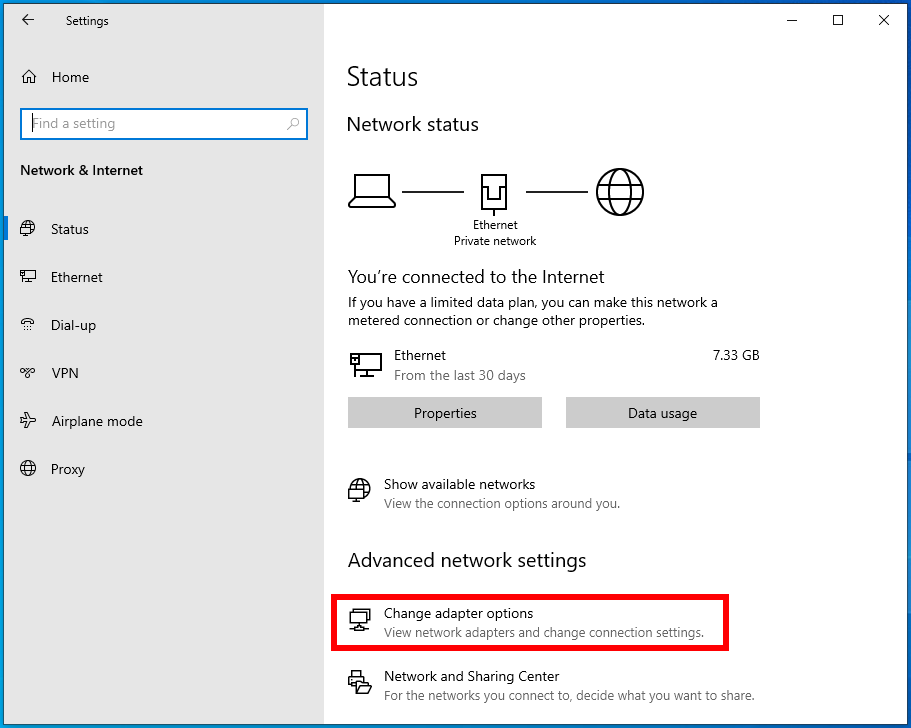
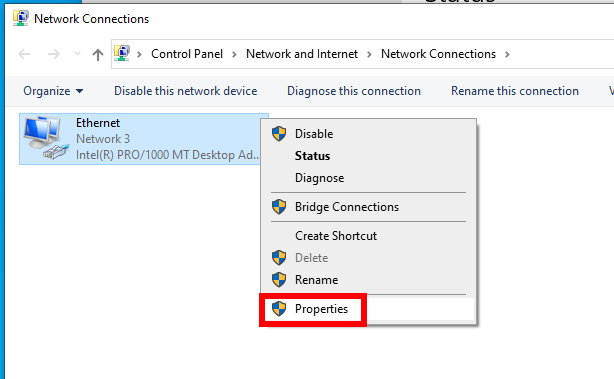
Right-click on the network adapter that is used to connect to the Internet and select “Properties”.
Find and double click on “Internet Protocol Version 4 (TCP/IPv4)”.
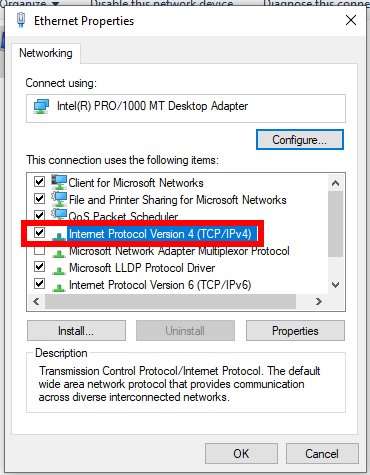
In the window that opens, put the switch on “Use the following DNS server addresses” and enter 127.0.0.1:
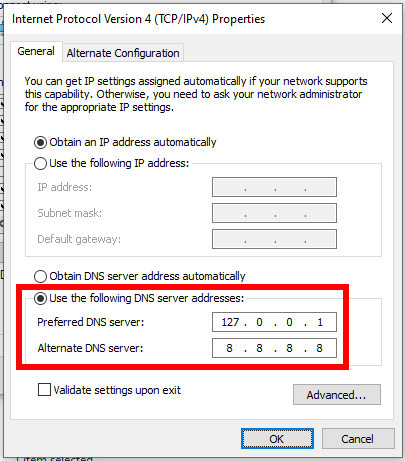
Enter “8.8.8.8” as the alternate DNS server.
If your ISP supports IPv6, then repeat the same procedure for “Internet Protocol Version 6 (TCP/IPv6)”, but use “::1” and “2001:4860:4860::8888” as IPv6 addresses.
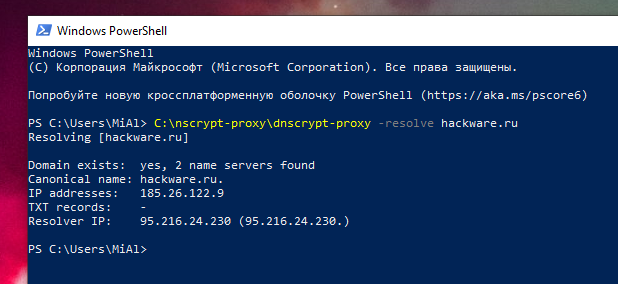
Open another command prompt window and run there:
C:\dnscrypt-proxy\dnscrypt-proxy -resolve hackware.ru
Also, on the command line, check the IP address of the domain using the nslookup utility:
nslookup hackware.ru
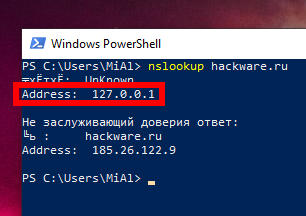
Pay attention to the line:
Address: 127.0.0.1
It means that the IP address of the DNS server is 127.0.0.1.
Test your operating system – open websites, download files, use your system as usual to check that there are no DNS issues.
If something went wrong and you want to return everything back, then open the settings of the network adapter, as shown just above and switch to “Obtain the DNS server address automatically”.
If everything is fine, then press Ctrl+c in the first terminal where dnscrypt-proxy is running to stop the DNS proxy.
Now register it as a system service (this command must be executed in an elevated window, that is, with administrator rights):
C:\dnscrypt-proxy\dnscrypt-proxy -service install
If there are no errors, then that's great! This means that your version of Windows is compatible with the built-in installer.
Now that the service is installed, start it:
C:\dnscrypt-proxy\dnscrypt-proxy -service start
All is ready! When you restart your computer, this service will start automatically.
If you need to stop the service, then run:
C:\dnscrypt-proxy\dnscrypt-proxy -service stop
To restart a running service (for example, after changing the configuration file) run:
C:\dnscrypt-proxy\dnscrypt-proxy -service restart
To remove the service, run:
C:\dnscrypt-proxy\dnscrypt-proxy -service uninstall
To check the DNS server use the command:
C:\dnscrypt-proxy\dnscrypt-proxy -resolve example.com
To completely remove the dnscrypt-proxy server run:
C:\dnscrypt-proxy\dnscrypt-proxy -service uninstall
And then delete the folder C:\dnscrypt-proxy – done!
How to update dnscrypt-proxy
To install the new version, stop the service, replace the executable file (dnscrypt-proxy) with the new version, and start the service again.
Dnscrypt-proxy has many options, but they will be covered in the next section.
How to enable DNS over HTTPS (DoH) at the operating system level in Linux
How to install dnscrypt-proxy on Kali Linux
This guide should also work with Linux Mint, Ubuntu and similar, with minimal modifications. If you have this distribution, then try this section and if something does not work out, then write your errors in the comments.
Install the dnscrypt-proxy package:
sudo apt install dnscrypt-proxy
WARNING: If you received the error “Unable to locate package dnscrypt-proxy” while running the previous command, then skip this section and refer to the article Error “E: Unable to locate package dnscrypt-proxy” in Kali Linux and Debian (SOLVED).
Check that port 53 is not busy:
ss -lp 'sport = :domain'
There should be only one line in the output, namely the header:
Netid State Recv-Q Send-Q Local Address:Port Peer Address:Port Process
If the output contains more than one first line of column names, the service that uses port 53 must be disabled. One common culprit is systemd-resolved.service (NetworkManager), but other network managers may have similar components. In general, whatever the service is (you may have already installed another caching DNS server), it needs to be stopped and removed from startup. If there are no processes listening on port 53, then you can continue.
Check to make sure dnscrypt-proxy is working:
/usr/sbin/dnscrypt-proxy -resolve example.com
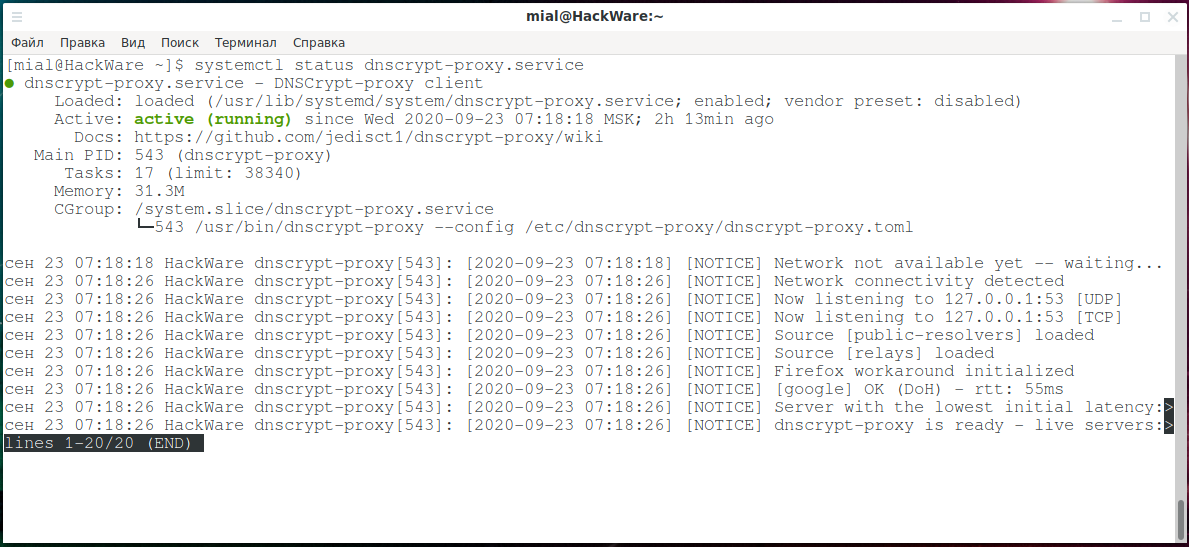
Start the dnscrypt-proxy service and check its status:
sudo systemctl start dnscrypt-proxy.service
systemctl status dnscrypt-proxy.service
If everything is ok, add the service to startup:
sudo systemctl enable dnscrypt-proxy.service
Open the file /etc/NetworkManager/NetworkManager.conf:
sudo gedit /etc/NetworkManager/NetworkManager.conf
and in section
[main]
add
dns=none

Restart NetworkManager:
sudo systemctl restart NetworkManager
Make a backup copy of the /etc/resolv.conf file:
sudo cp /etc/resolv.conf /etc/resolv.conf.backup
And then remove /etc/resolv.conf (this is important because it might be a link to a file, not the actual file):
sudo rm -f /etc/resolv.conf
And create a file /etc/resolv.conf
sudo gedit /etc/resolv.conf
with the following content:
nameserver 127.0.2.1
# nameserver ::1 # for IPv6
options edns0 single-request-reopen
EDNSPayloadSize 4096
How to install dnscrypt-proxy on Arch Linux, BlackArch and their derivatives
Install the dnscrypt-proxy package:
sudo pacman -S dnscrypt-proxy
Check that port 53 is not busy:
ss -lp 'sport = :domain'
There should be only one line in the output, namely the header:
Netid State Recv-Q Send-Q Local Address:Port Peer Address:Port Process
If the output contains more than one first line of column names, the service that uses port 53 must be disabled. One common culprit is systemd-resolved.service (NetworkManager), but other network managers may have similar components. In general, whatever the service is (you may have already installed another caching DNS server), it needs to be stopped and removed from startup. If there are no processes listening on port 53, then you can continue.
Check to make sure dnscrypt-proxy is working:
dnscrypt-proxy -resolve example.com
Start the dnscrypt-proxy service and check its status:
sudo systemctl start dnscrypt-proxy.service
systemctl status dnscrypt-proxy.service
If everything is ok, add the service to startup:
sudo systemctl enable dnscrypt-proxy.service
Open the file /etc/NetworkManager/NetworkManager.conf:
sudo gedit /etc/NetworkManager/NetworkManager.conf
and check if the following lines are there:
[main]
dns=none
If they are not there, then add them and restart NetworkManager:
sudo systemctl restart NetworkManager
Make a backup copy of the /etc/resolv.conf file:
sudo cp /etc/resolv.conf /etc/resolv.conf.backup
And then remove /etc/resolv.conf (this is important because it might be a link to a file, not the actual file):
sudo rm -f /etc/resolv.conf
And create a file /etc/resolv.conf
sudo gedit /etc/resolv.conf
with the following content:
nameserver 127.0.0.1
# nameserver ::1 # for IPv6
options edns0 single-request-reopen
EDNSPayloadSize 4096
Protecting the /etc/resolv.conf file from changes
Above, we added the NetworkManager setting so that this service does not change the contents of the /etc/resolv.conf file, as it does without warning. In fact, NetworkManager is indeed the most common reason for resetting /etc/resolv.conf, but not the only one. For details, as well as how to determine which program is changing the /etc/resolv.conf file and how to securely block this file from being changed by any programs, see the article “How to prevent NetworkManager and other programs from modifying the /etc/resolv.conf file”.
How to set up dnscrypt-proxy
Dnscrypt-proxy is configured using the dnscrypt-proxy.toml file. On Windows, this file is located at C:\dnscrypt-proxy\dnscrypt-proxy.toml, and on Linux, it is /etc/dnscrypt-proxy/dnscrypt-proxy.toml. Regardless of the operating system, the setup is the same.
Open this file with any text editor, for example, on Linux:
sudo gedit /etc/dnscrypt-proxy/dnscrypt-proxy.toml
The content of this file depends on your distribution: sometimes there is a complete default file, sometimes already configured by the package maintainers.
For the changes to take effect after editing the dnscrypt-proxy.toml file, run the following command.
- For Windows:
C:\dnscrypt-proxy\dnscrypt-proxy -service restart
- For Linux:
sudo systemctl restart dnscrypt-proxy.service
To understand what to configure, little information about how dnscrypt-proxy works. To map hostnames to IP addresses, dnscrypt-proxy downloads a large list of DNS servers and checks their availability and response speed in the background. Queries are made to different DNS servers depending on the response speed and load balancing algorithms. This can be changed – for example, you can select a specific name or several names and specify it (or them) in the server_names directive. If the server_names directive is empty, then all servers will be used. If one or more DNS server names are specified in the server_names directive, then only these servers will be used.
For example, I prefer Google's DNS server, then the content of my directive is:
server_names = ['google']
If you want several DNS servers at once, then specify them using the following syntax:
server_names = ['scaleway-fr', 'google', 'yandex', 'cloudflare']
To find out which servers are selected to use, run the command.
- On Windows:
C:\dnscrypt-proxy\dnscrypt-proxy -list
- On Kali Linux:
/usr/sbin/dnscrypt-proxy -list -config /etc/dnscrypt-proxy/dnscrypt-proxy.toml
- On Arch Linux, BlackArch:
dnscrypt-proxy -list -config /etc/dnscrypt-proxy/dnscrypt-proxy.toml
The listen_addresses directive sets the port and IP address for listening. Usually, there is no need to change anything here. For working with sockets, the following value is set:
listen_addresses = []
Set fallback_resolvers to
fallback_resolvers = ['8.8.8.8:53', '8.8.4.4:53']
If for some reason you need to keep a log of the requests made, then find and uncomment the following lines:
[query_log]
file = '/var/log/dnscrypt-proxy/query.log'
How to add a DNS server to the exception
Let's say you want to use a complete list of DNS servers, but want to exclude some of them. For example, as it was said in the comments, at the moment the rdns.faelix.net server has an expired certificate, which leads to the display of warnings from antivirus software. For this reason, we want to exclude this server from the list of used ones.
This can be done using the disabled_server_names directive, as its value you need to list the server names that should be avoided even if they meet all the criteria.
First of all, we need to know the name of the problematic DNS server. To do this, go to https://dnscrypt.info/public-servers
At the bottom, find the “Rows per page” drop-down list and select “All” there.

Press Ctrl+f in your web browser to search the page. We know that the problematic address is rdns.faelix.net, let's try to search for the part of the name “faelix”:

So, the IPv4 DNS server names are faelix-ch-ipv4 and faelix-uk-ipv4.
In the settings file find disabled_server_names and add the names there:
disabled_server_names = ['faelix-ch-ipv4', 'faelix-uk-ipv4']
If you are using an IPv6 connection, add the IPv6 names to the exceptions list as well.
Save the configuration file and restart the dnscrypt-proxy service.
Checking dnscrypt-proxy operation
I already mentioned that due to caching, repeated DNS requests are processed faster. To check, you can run the command two times in a row:
time dig kali.tools +short
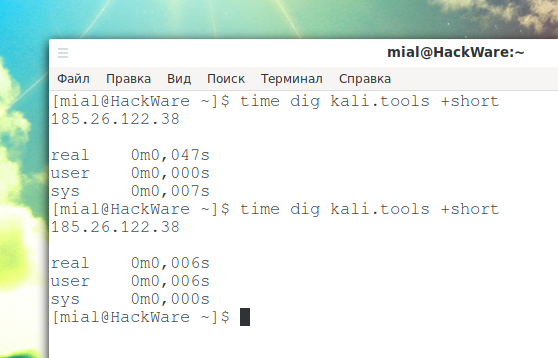
The first response was received in 0.047s, and the second in just 0.006s. Of course, it's only a split second, but it's still good. In addition, you will less often encounter a situation when the browser “hangs” during a request due to the fact that for some reason some DNS responses take too long or are completely lost.
You can check how long the request goes “directly”, without DoH:
time dig kali.tools +short @8.8.8.8
In my case, it is 0.058s-0.094s with periodic timeouts, apparently, the DPI delay. Apparently, encrypted traffic is passed “as is”, and unencrypted traffic undergoes some kind of processing, such as checking domains/IPs against the registry of censored websites, etc. More encryption – more speed!
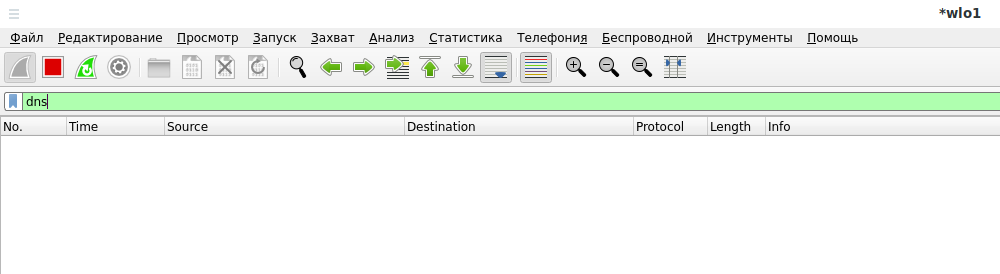
Launch Wireshark and start capturing traffic. Check after a while using a filter
dns
It should be empty at all.
Also, using a filter, let's look at the packets that go to and return from the DNS server:
ip.addr == 8.8.8.8
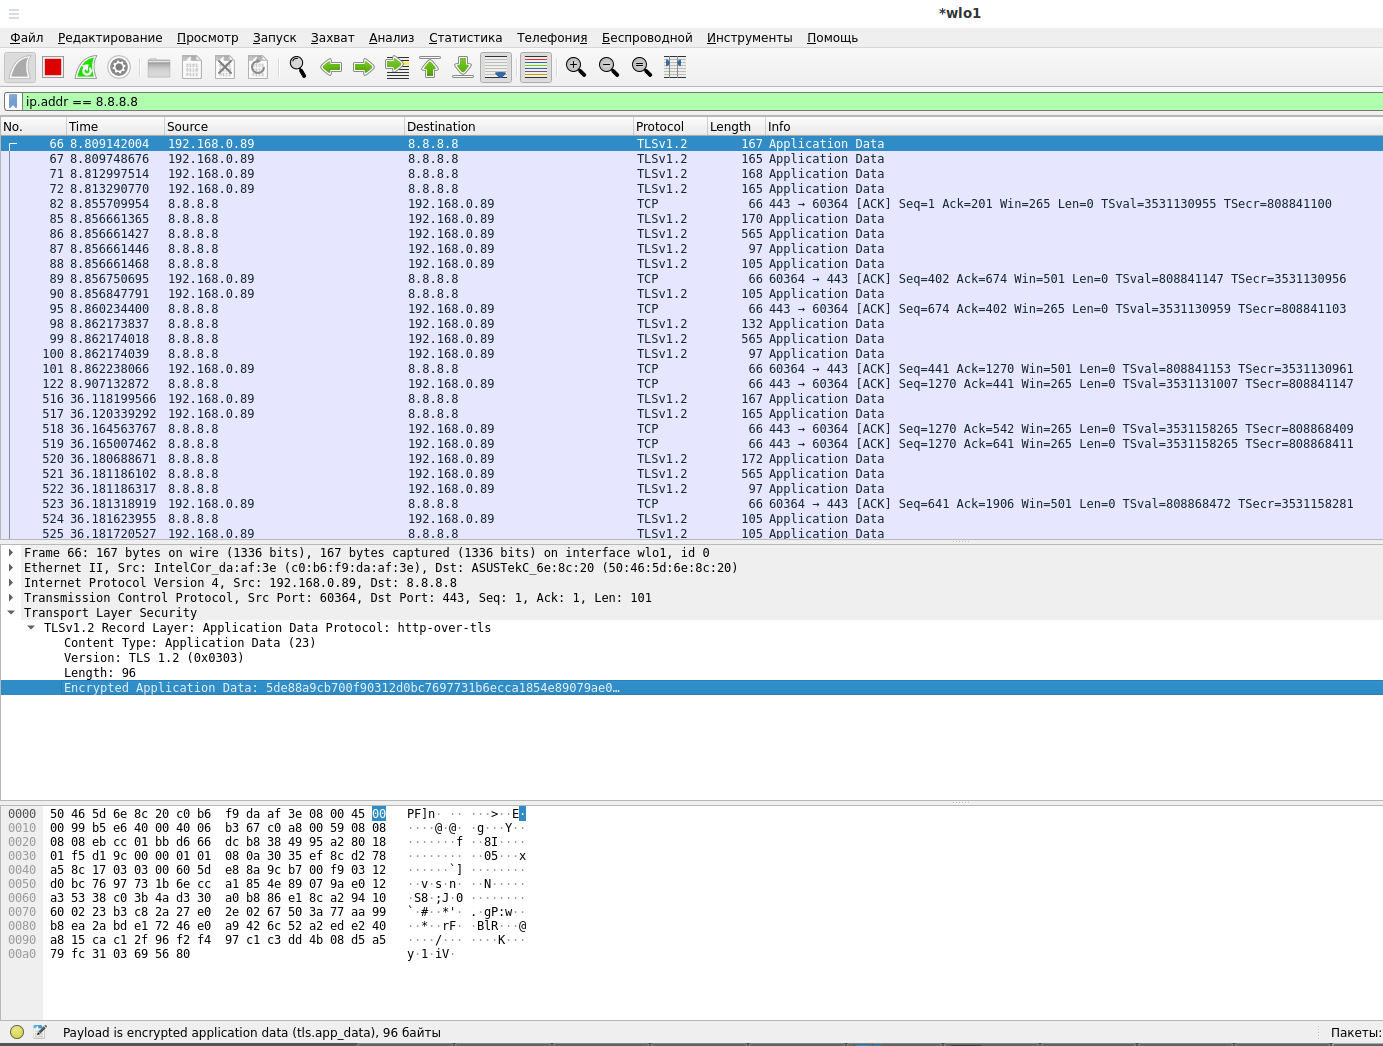
As you can see in the screenshot, everything is encrypted, now the ISP and other intermediaries have no way to find out or change the contents of DNS requests and responses.
See also “Wireshark Filters”.
Configuring dnscrypt-proxy for use with IPv6
First, change your /etc/resolv.conf file
sudo gedit /etc/resolv.conf
there should be lines
nameserver 127.0.2.1
nameserver ::1
options edns0 single-request-reopen
EDNSPayloadSize 4096
In the dnscrypt-proxy.toml file
sudo gedit /etc/dnscrypt-proxy/dnscrypt-proxy.toml
You need to set listening on the IPv6 interface:
listen_addresses = ['127.0.0.1:53', '[::1]:53'])
Replace
ipv6_servers = false
with
ipv6_servers = true
Remember, google server is IPv4 server and google-ipv6 is IPv6 server. Therefore, if you set the server_names value, then do not forget to enter the IPv6 server there, for example:
server_names = ['google-ipv6', 'google']
Related articles:
- Error “E: Unable to locate package dnscrypt-proxy” in Kali Linux and Debian (SOLVED) (72.7%)
- Configuring programs and operating systems to work through a proxy (70.7%)
- Examples of using HTTP headers for “hidden” data transfer (59.5%)
- Errors in Kali Linux ‘W: Failed to fetch’ and ‘W: Some index files failed to download. They have been ignored, or old ones used instead.’ (SOLVED) (53.2%)
- How to create and configure a Squid proxy server (53.2%)
- How NOT to do phishing attacks (CASE) (RANDOM - 50%)
Added section 6.2.1 How to enable DNS over HTTPS (DoH) at the operating system level in Windows (in OS settings)
Now you can enable DNS over HTTPS (DoH) in Windows 11 without installing additional software, but there are limitations – you can only choose from the proposed DNS servers.