Reverse engineering of network traffic
Reverse engineering is the study of a device or the operation of something not based on documentation, drawings, etc., but through disassembly, analysis of components, analysis of work. The same principles apply to software. For example, if the network protocol is proprietary and there is no documentation or source code for it, then you can examine the requests and responses sent to write a client (or even a server) that supports the protocol. This can be used to port programs to another platform or to write an open source client. Reverse engineering is also used to analyze malware.
In addition to getting acquainted with basic examples of network traffic analysis (using the Wireshark program), we will learn how to send "raw" data in UDP and TCP. That is, not using HTTP, HTTPS or any other application layer protocols, but using only transport layer protocols. And also we will consider a fairly simple, but at the same time quite effective “obfuscation” of traffic to protect against analysis in Wireshark.
As objects of study, I was interested in the CMS program and the IP camera. The CMS program (as far as I understand) is popular with the owners of IP cameras. And, again, as far as I understand, not so many clients are used to control IP cameras from phones, for example, Yoosee, CamHi, CiSee, XMeye.
And for the computer, this very CMS program is used, which supports many cameras from various manufacturers. For example, I tested the R80X20-PQ camera, which, judging by the MAC address, is manufactured by HangZhou KuoHeng Technology. This is quite interesting, given the zoo of manufacturers of IP cameras - it turns out that all these cameras are united by some one protocol.
The CMS software is the official client of Polyvision cameras. In the program itself, when adding a camera, you can choose from four options:
- Polyvision
- Hikvision
- Dahua
- Onvif
First I added the camera as “Onvif” and then as Polyvision. We are already familiar with the ONVIF protocol from the article “IP camera security audit”: this protocol allows you to control an IP camera, get the address of a media stream, sometimes it is possible to use this protocol without entering a password. But the ONVIF protocol is bad in that it does not allow access to the storage of video files.
By connecting as Polyvision, you can control the camera and plus access to the video storage on the IP camera's memory card.
It was this Polyvision “protocol” that interested me - it turns out that cameras from different manufacturers use it. When communicating, this protocol uses port 34567, which reminded me of the article “IP Camera Security Horror”.
How CMS searches for cameras
The ONVIF Device Manager and CMS software, considered in the previous article, quickly detect IP cameras without even asking for network settings. A cursory analysis showed that they do not scan IP and ports on the local subnet, then how do they do it?
Let's launch Wireshark and start searching for new devices in the CMS. When the search is complete, stop capturing traffic in Wireshark.
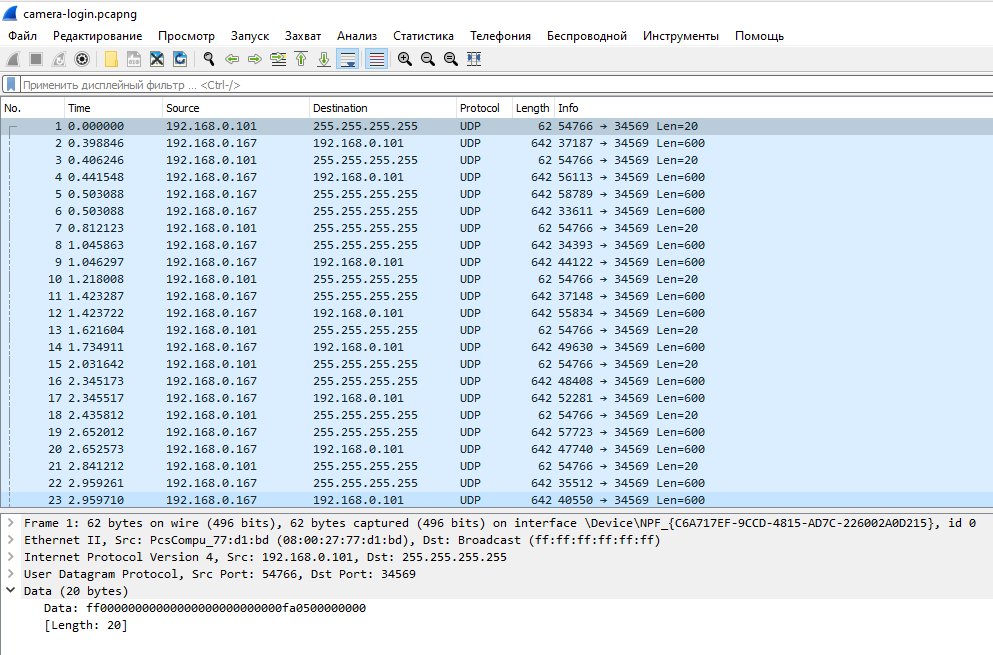
There were few requests and almost all of them were the same. The first type of requests was executed several times in a row on UDP port 34569 of IP address 255.255.255.255, the hexadecimal string “ff00000000000000000000000000fa0500000000” was transmitted. Although, perhaps, it is more correct to write it like this: “\xff\x00\x00\x00\x00\x00\x00\x00\x00\x00\x00\x00\x00\x00\xfa\x05\x00\x00\x00\x00”.
The address 255.255.255.255 is a restricted broadcast address. Such a packet is delivered to all hosts on the local network, but is not routed outside the local network.
The second type of requests was performed only once on UDP port 3702 of IP address 239.255.255.250.
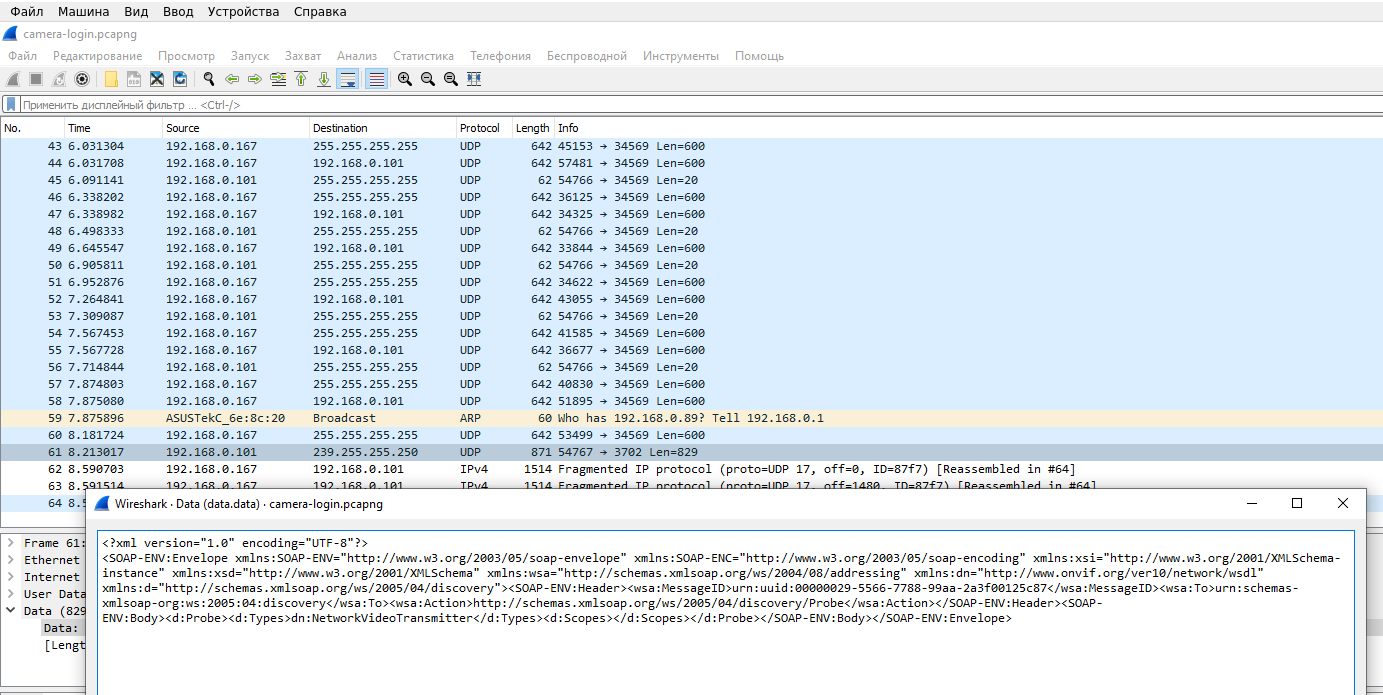
The address 239.255.255.250 is a multicast address, that is, it is used for multicast broadcasting.
The following data is transmitted:
<?xml version="1.0" encoding="UTF-8"?>
<SOAP-ENV:Envelope xmlns:SOAP-ENV="http://www.w3.org/2003/05/soap-envelope" xmlns:SOAP-ENC="http://www.w3.org/2003/05/soap-encoding" xmlns:xsi="http://www.w3.org/2001/XMLSchema-instance" xmlns:xsd="http://www.w3.org/2001/XMLSchema" xmlns:wsa="http://schemas.xmlsoap.org/ws/2004/08/addressing" xmlns:dn="http://www.onvif.org/ver10/network/wsdl" xmlns:d="http://schemas.xmlsoap.org/ws/2005/04/discovery"><SOAP-ENV:Header><wsa:MessageID>urn:uuid:00000029-5566-7788-99aa-2a3f00125c87</wsa:MessageID><wsa:To>urn:schemas-xmlsoap-org:ws:2005:04:discovery</wsa:To><wsa:Action>http://schemas.xmlsoap.org/ws/2005/04/discovery/Probe</wsa:Action></SOAP-ENV:Header><SOAP-ENV:Body><d:Probe><d:Types>dn:NetworkVideoTransmitter</d:Types><d:Scopes></d:Scopes></d:Probe></SOAP-ENV:Body></SOAP-ENV:Envelope>
As you might guess, this is the familiar ONVIF protocol. We will not dwell on this protocol in this article, just remember that you do not need to scan the subnet to search for ONVIF - you can use the broadcast address and SSDP protocol.
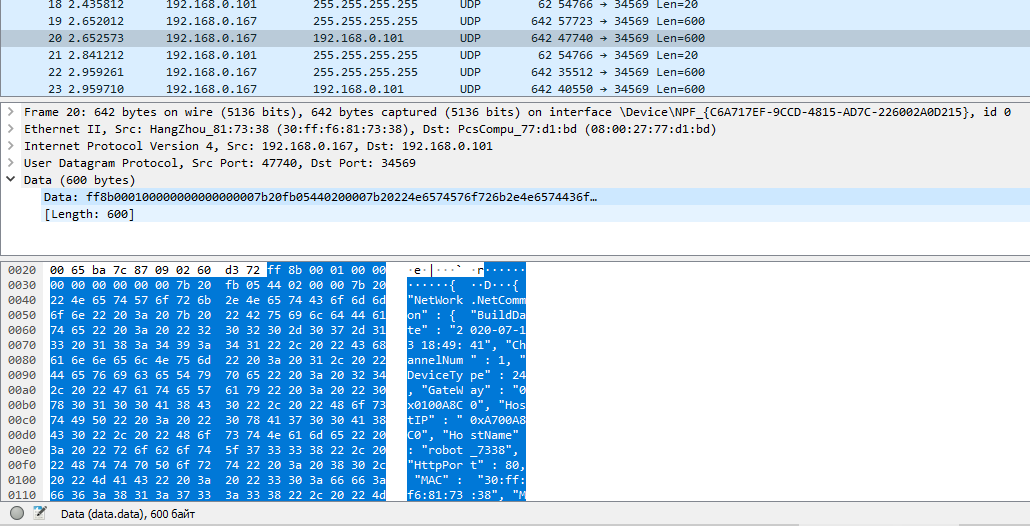
Let's look at the answers that the camera sent. For Polyvision, these are:
For ONVIF:
At first glance, the data is unreadable, possibly binary or encrypted. At least Wireshark didn't recognize any protocols in them.
How to send and receive raw TCP and UDP data using Ncat / Netcat / nc
As we have already found out, for the cameras to respond, we need to transmit the following hexadecimal data to UDP port 34569 of IP address 255.255.255.255: “ff00000000000000000000000000fa0500000000”. Moreover, we need to do this without using application-level protocols (without HTTP, FTP, SMTP, RDP, SNMP, DHCP, RTSP, DNS, and others).
Ncat, Netcat, nc programs are able to transfer raw TCP and UDP data.
Related article: How to use netcat (nc), ncat
In order not to just make a connection when data is entered manually (entering hexadecimal data manually is difficult for us), but to connect and immediately transfer data, you can use a command of the form:
cat FILE | ncat -u -C IP-ADDRESS PORT
The -u option means to use UDP protocol (TCP is used by default).
Let's start by saving the data we need to the hello-camera.bin file. To do this, we'll use the Bless hex editor:
bless
Related article: Bless manual (hex editor)
In the program that opens, in the hexadecimal area, enter:
ff00000000000000000000000000fa0500000000
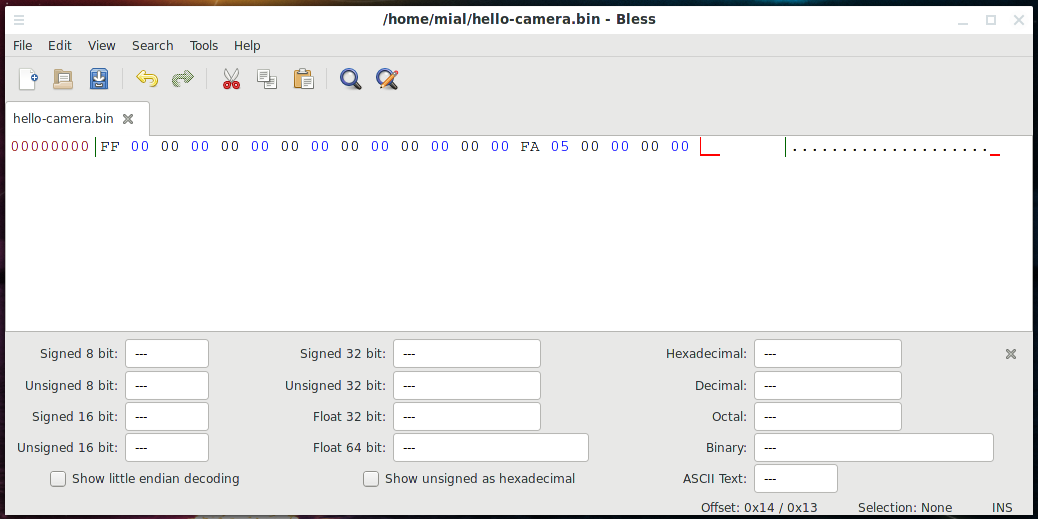
Then save the file as hello-camera.bin.
Now we can send data to the broadcast address with the command:
cat hello-camera.bin | ncat -u -C 255.255.255.255 34569

And… didn't work? In fact, it is impossible to answer whether it worked or not - we sent data, but the UDP protocol does not wait for a response, it ends the connection. To send a response from the remote host, it starts a new UDP connection, but the fact is that to connect it, we must listen on the port. The answer will come to UDP port 34569. You can also listen on the port with the ncat command. To do this, use a command of the form:
ncat -u -l IP-ADDRESS PORT
In this command, the -u option means to use UDP protocol (TCP is used by default). The -l option means listen for incoming connections. IP-ADDRESS is the IP of the network interface on the local machine where the ncat utility is running. PORT is the listening port.
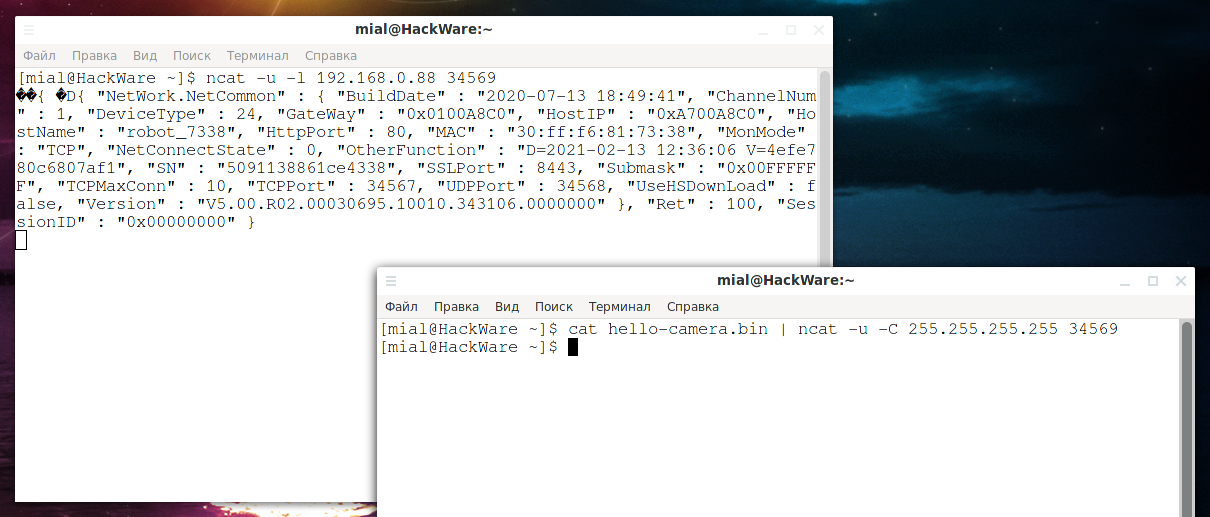
The IP address of the computer where ncat will be launched, 192.168.0.88, we need to listen on port 34569, then the command is as follows:
ncat -u -l 192.168.0.88 34569

Nothing seems to be happening, but the program does not exit - it just waits for an incoming connection.
Without closing this terminal window, open another console and send the request to the broadcast address again:
cat hello-camera.bin | ncat -u -C 255.255.255.255 34569
After that, the received response will be shown in the first console:
To save the submitted response (instead of displaying it on the screen), you can use the following command to listen for incoming connections:
ncat -u -l 192.168.0.88 34569 > response.bin
As a result, the sent response will be saved in the response.bin file, open it in the Bless editor:
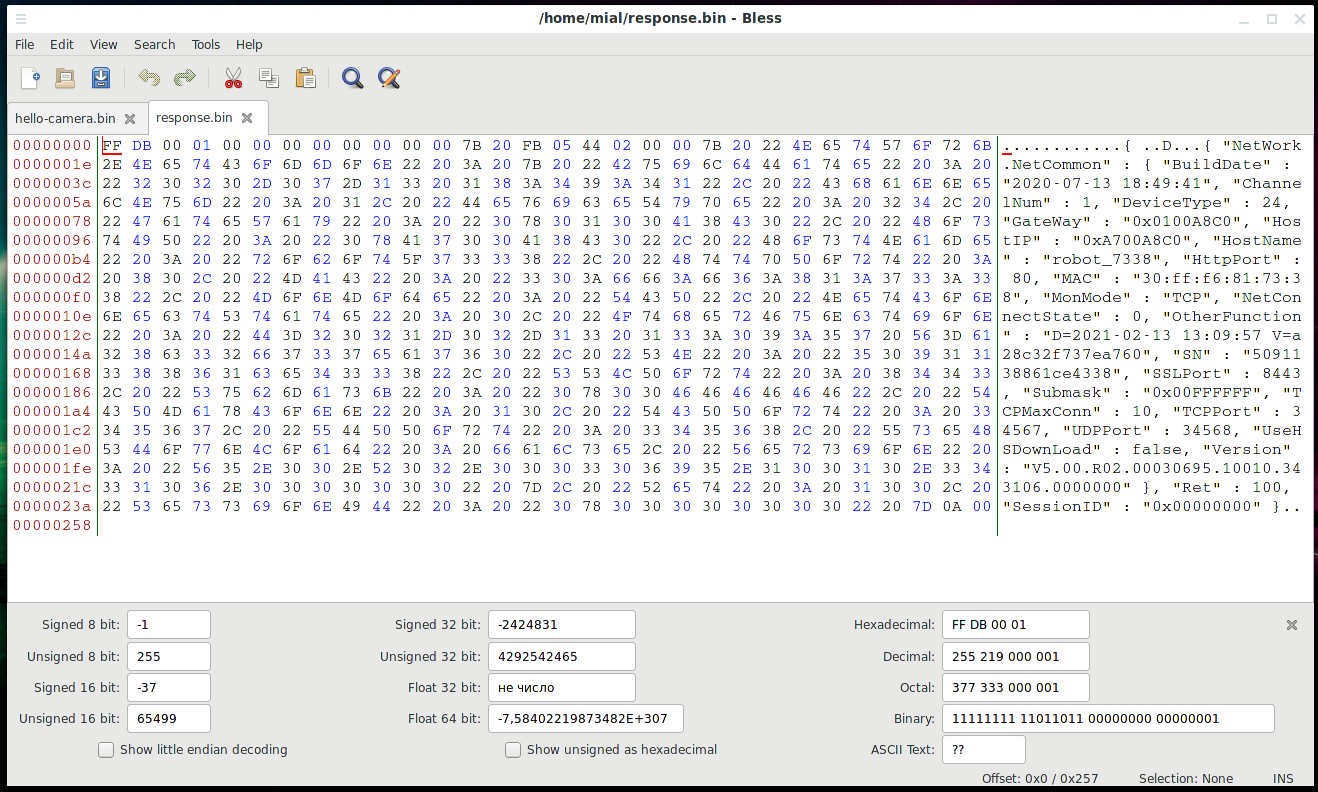
Most of the data is plain text, but due to the binary data in front of it, Wireshark was unable to parse the information.
Let's look at them:
{ "NetWork.NetCommon" : { "BuildDate" : "2020-07-13 18:49:41", "ChannelNum" : 1, "DeviceType" : 24, "GateWay" : "0x0100A8C0", "HostIP" : "0xA700A8C0", "HostName" : "robot_7338", "HttpPort" : 80, "MAC" : "30:ff:f6:81:73:38", "MonMode" : "TCP", "NetConnectState" : 0, "OtherFunction" : "D=2021-02-13 13:09:57 V=a28c32f737ea760", "SN" : "5091138861ce4338", "SSLPort" : 8443, "Submask" : "0x00FFFFFF", "TCPMaxConn" : 10, "TCPPort" : 34567, "UDPPort" : 34568, "UseHSDownLoad" : false, "Version" : "V5.00.R02.00030695.10010.343106.0000000" }, "Ret" : 100, "SessionID" : "0x00000000" }
Let's pay attention to the lines:
"HostIP" : "0xA700A8C0"
"TCPPort" : 34567
They contain the IP address, port and transport protocol. If you are confused by the form of recording the IP address, then see: IP address converter.
That is, the CMS program sends data to the broadcast address, and all cameras respond by sending information about themselves. This information is used to further connect to the camera.
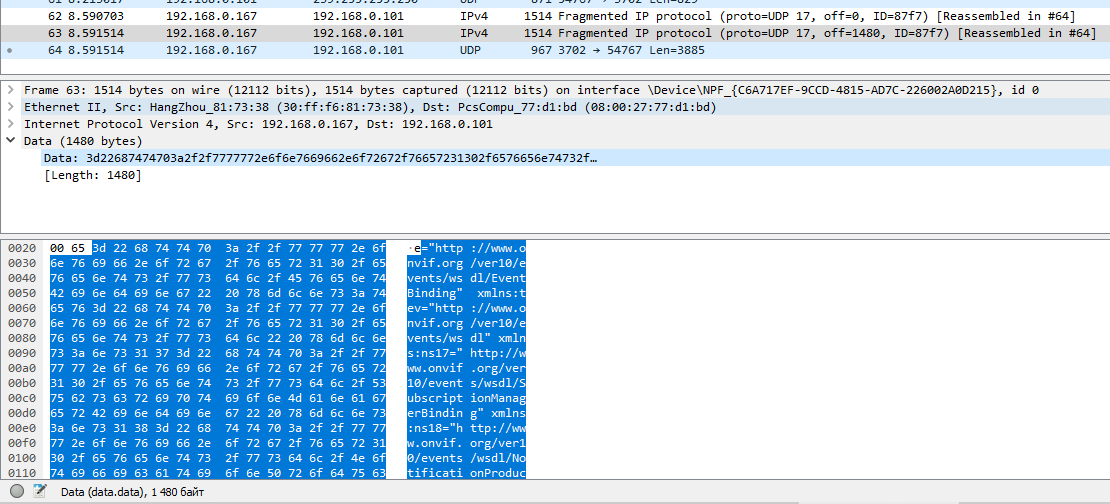
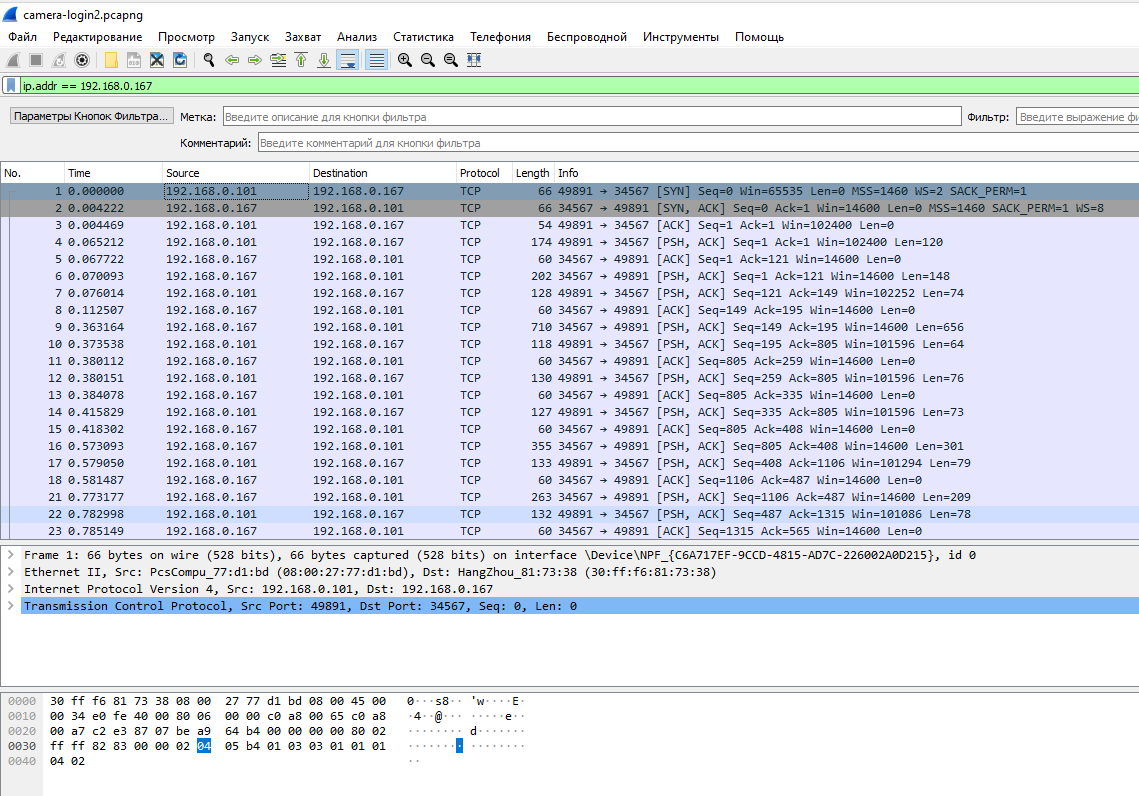
Let's enter the camera in the CMS program, before that, restart data capturing in Wireshark. Let's analyze the captured traffic.
Since the capture took longer than the first time, then among the captured traffic there is not related to the camera. Let's filter it using the Wireshark filter:
ip.addr == 192.168.0.167
Related article: Wireshark Filters
Note that Wireshark again did not recognize any protocol and shows the transmitted data as raw TCP traffic.
Right-click on the first packet in the context menu, select “Follow” → “TCP Stream”.

The full dialogue opens:
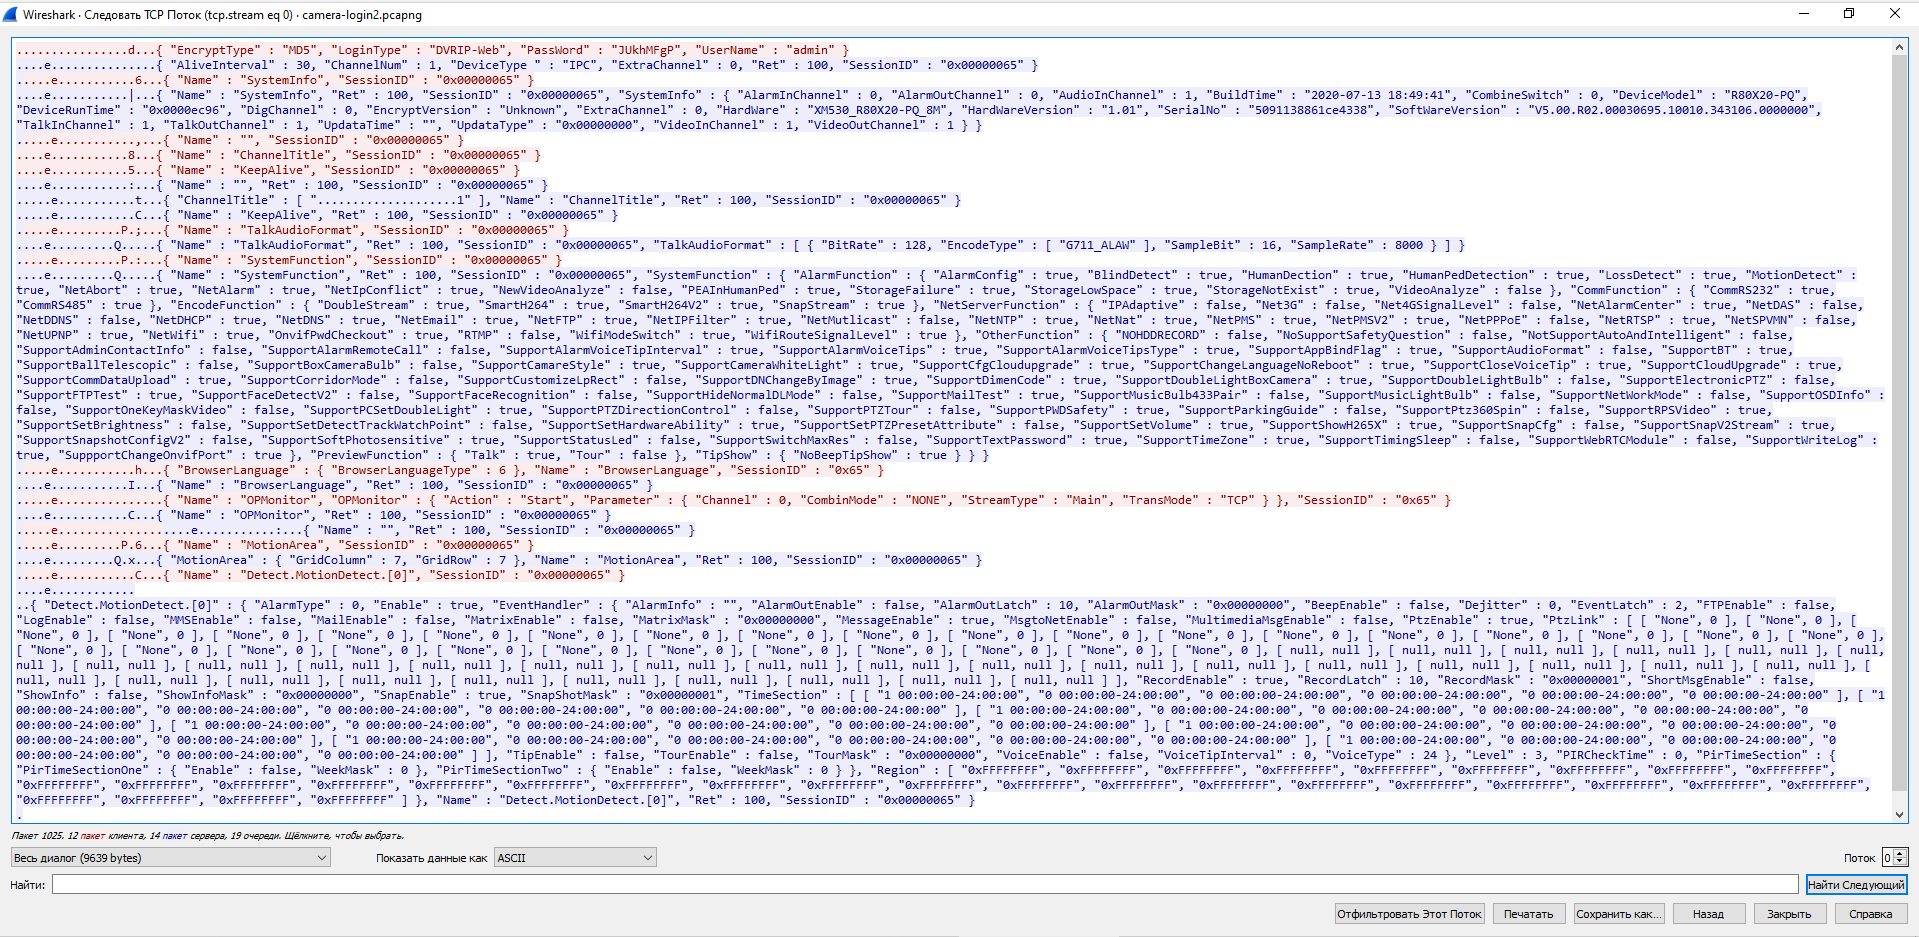
The data is in plain text, but there is binary garbage in front of it, so Wireshark again failed to parse it.
We can see the hash of the password. Thanks to the DVRIP-Web line, I found the article https://habr.com/ru/post/484518/. This article says that “the protocol, supposedly invented by the Chinese, which is used to communicate with surveillance cameras”, it is called either DVRIP, or Sofia, or NetSurveillance. In the same article, you can find the algorithm by which the password hash is calculated. If I remember correctly, the password can contain no more than 8 (or exactly 8) characters.
Now, in the “Show data as” field, I select the “Raw” option.
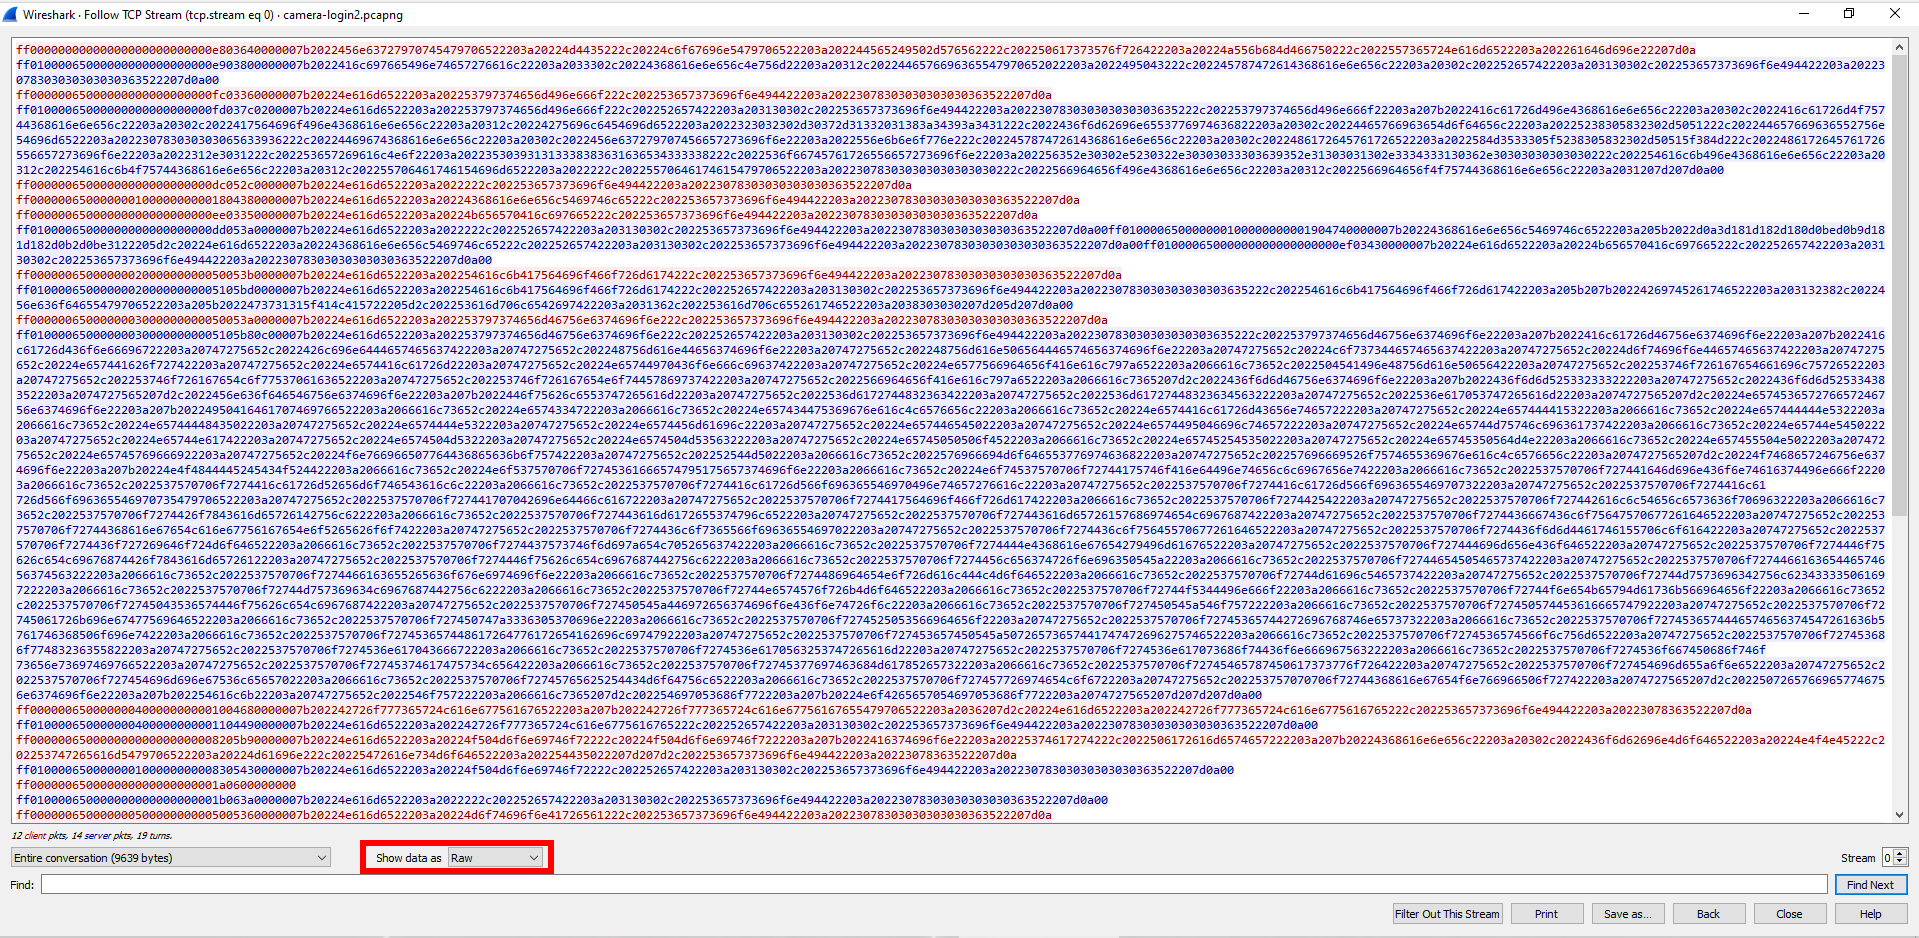
Login and password are sent in hexadecimal string:
ff00000000000000000000000000e803640000007b2022456e63727970745479706522203a20224d4435222c20224c6f67696e5479706522203a202244565249502d576562222c202250617373576f726422203a20224a556b684d466750222c2022557365724e616d6522203a202261646d696e22207d0a
In Bless, I create a file named "hex" and write this line into it.
Now data is sent by TCP. To simply send raw data over TCP to ncat, remove the -u option. But in this case, you will not receive a response. In order to send data and receive a response, you need to use the construction:
{ cat FILE; cat; } | ncat -C IP-ADDRESS PORT
In this command:
- FILE is a file containing data to send
- IP-ADDRESS - IP of the remote host where we want to send data
- PORT - the port of the remote host to which we want to send data
Example command:
{ cat hex; cat; } | ncat -C 192.168.0.167 34567
As you can see, we have received a response.
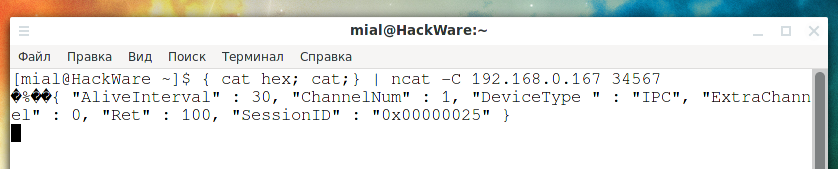
I recorded all the binary lines that the CMS program sent to the camera into separate files named hex1, hex2, and so on up to hex12. To play a complete dialogue with the camera, you can use the command of the form:
{ cat hex{1..12}; cat; } | ncat -C 192.168.0.167 34567

As you can see in the screenshot, the full “dialogue” between the CMS and the camera, which we saw before in Wireshark, is reproduced. More precisely, only the answers are shown, but they are the same.
You may have noticed the SessionID - its value increases by one each time we login the camera. Nevertheless, I did not change this value in the sent data - I was sending the same value all the time, this did not bother the camera. Although, to get the video, you probably need the correct SessionID value. Also, binary data before text data is not just garbage - they duplicate the session number, as well as information about the type of data sent/received, and in general it is necessary to take into account and substitute the session identifier sent to us in the first response.
Conclusion
So, this article shows an example of network traffic analysis for reverse engineering purposes. Continuing with the analysis, you can get information to write your own camera control client. For example, you can write a client that uses an intercepted hash instead of a password. By the way, you can use the following Wireshark filter to find the password hash:
tcp contains Admin
In fact, having learned the name of the protocol used, it was possible to find ready-made implementations and even documentation. The finished implementation is written in Python 3, called python-dvr.
Documentation there: https://github.com/NeiroNx/python-dvr/tree/master/doc
The python-dvr utility (or library) allows you to record videos from cameras, take JPG snapshots, create users, change passwords, and many other things. In terms of security auditing of IP surveillance cameras, python-dvr can be used to brute force camera credentials. This will be the subject of the next article “How to brute-force DVR-IP, NetSurveillance, Sofia”.
python-dvr article: “How to manage cameras via DVR-IP, NetSurveillance, Sofia protocol (NETsurveillance ActiveX plugin XMeye SDK)”. This article briefly talks about using DeviceManager.py. It is a powerful program for detecting IP surveillance cameras on the local network. If you look at the source code, you can see all the techniques used, among them there is the one that we “revealed” in this article.

Other articles on surveillance cameras can be found under the corresponding tag “surveillance cameras”.
Related articles:
- How to find out the type of a file without an extension (in Windows and Linux) (52%)
- How to analyze and split compound files (firmware, multi partition disk images) (52%)
- How to deobfuscate JavaScript code (50%)
- How to see JavaScript code written using unprintable characters (50%)
- Bless manual (hex editor) (50%)
- SMB and Samba Security Audit Tools (RANDOM - 0.7%)
Hello, I bought a Wifi PTZ Camera from Aliexpress (https://www.aliexpress.com/item/1005001394120900.html) and when it came I try to update the firmware, but nothing is happened and after reboot the camera is gone away. I only see it in the AP mode I connect on it network but can't connect on it by ICsee. I trye everything but nothing has happend. Can I somehow install a new firmware or it is dead?