Active Directory comprehensive guide, from installation and configuration to security auditing. Part 5: Join computers to Active Directory. Check and unjoin from Active Directory
Table of contents
1. Introduction to Active Directory (concepts, usage, difference from Workgroup)
2. Install Windows Server 2022 and Windows Server Core 2022
3. Windows Server 2022 and Windows Server Core 2022 configuration tools
4. Install Active Directory Domain Services in Windows Server 2022
5. Join computers to Active Directory. Check and unjoin from Active Directory
5.1 Consequences of joining an Active Directory Domain
5.2 Configuring DNS server on workstations
5.2.1 How to set up a DNS server on Windows 11
5.2.2 How to set up a DNS server in Windows Admin Center
5.2.3 How to set up a DNS server in PowerShell
5.2.4 How to check DNS settings on Windows
5.3 How to join a computer to a Windows domain
5.3.1 How to join a domain via Computer Settings
5.3.2 How to join a domain using the “Join a Domain or Workgroup” Wizard
5.3.3 How to join a domain in Windows Admin Center
5.3.4 How to join a domain in PowerShell
5.4 How to log into a Windows Domain
5.4.1 Login on a computer joined to a domain
5.4.2 How to log in with a local user account
5.5 How to check if a computer is part of a domain
5.5.1 How to check if a computer is part of a domain via Computer Settings
5.5.2 How to check if a computer is part of a domain in Windows Admin Center
5.5.3 How to check in PowerShell if a computer is part of a domain
5.6.1 How to unjoin a domain through Computer Settings
5.6.2 How to unjoun a domain in Windows Admin Center
5.6.3 How to unjoin a domain in PowerShell
6. Active Directory configuration tools and snap-ins
7. Understanding the AD infrastructure
8. Group Policies
9. Managing Users, Computers, Groups and Organizational Units in Active Directory
10. Setting up trust and site domains
11. Other services and roles of Active Directory
12. Configuring Samba (Active Directory for Linux)
13. Active Directory security auditing tools
From a theoretical point of view, the order of chapters should be slightly different: before studying joining a domain, you need to study the Active Directory hierarchy, tools for creating and managing users, and groups. Believe me, you can get stuck in this theoretical material… Given that in practical terms, we just need to create a domain user on the server in the graphical interface and, in fact, everything is ready to join the domain! Therefore, we will run a little ahead and connect to the domain, and then we will plunge into the theory – it will already be tied to some practical experience of interacting with Active Directory and it will be easier for us to understand it.
Consequences of joining an Active Directory Domain
In the very first part, some of the consequences of joining a computer to the Domain have already been described. Let's dwell on this in a little more detail, so that in the future you do not have to reinstall the OS on the workstation in order to leave the domain and so as not to lose important files for you.
1. DNS settings
The workstation must use the Domain Controller as its DNS server. Therefore, if you turn on the workstation when the Domain Controller is not available (offline), it can lead to problems with network connections.
2. Log out of the domain
The workstation must have a local administrator account; when exiting, you are prompted for the login and password of a domain user who has the authority to unjoin from the domain!
3. User files
Depending on the user's settings, the files created by the domain user can be stored both on the local workstation and on the server.
In general, if you are setting up an Active Directory test environment and joining your work computer to the domain, then unjoin from the domain before deleting the test environment, otherwise you may encounter difficulties later.
Configuring DNS server on workstations
Many Active Directory protocols rely heavily on a DNS server, so it is unlikely that you can use a third-party DNS server (such as BIND). We have already configured the DNS role in Windows Server, that is, we actually started the DNS server. Now you need to make the workstations use the Windows Server IP address as the DNS server.
Let's look at how to change the DNS server settings in different ways. You need to choose one of the options that suits you.
In my Active Directory setup, the DNS server computer (domain controller) has an IP address of 192.168.1.60. Therefore, my task is to set this IP address as the primary DNS server. You can choose any other as the secondary DNS server.
How to set up a DNS server on Windows 11
Right-click on the Internet Access icon, then click on “Network and Internet settings”:

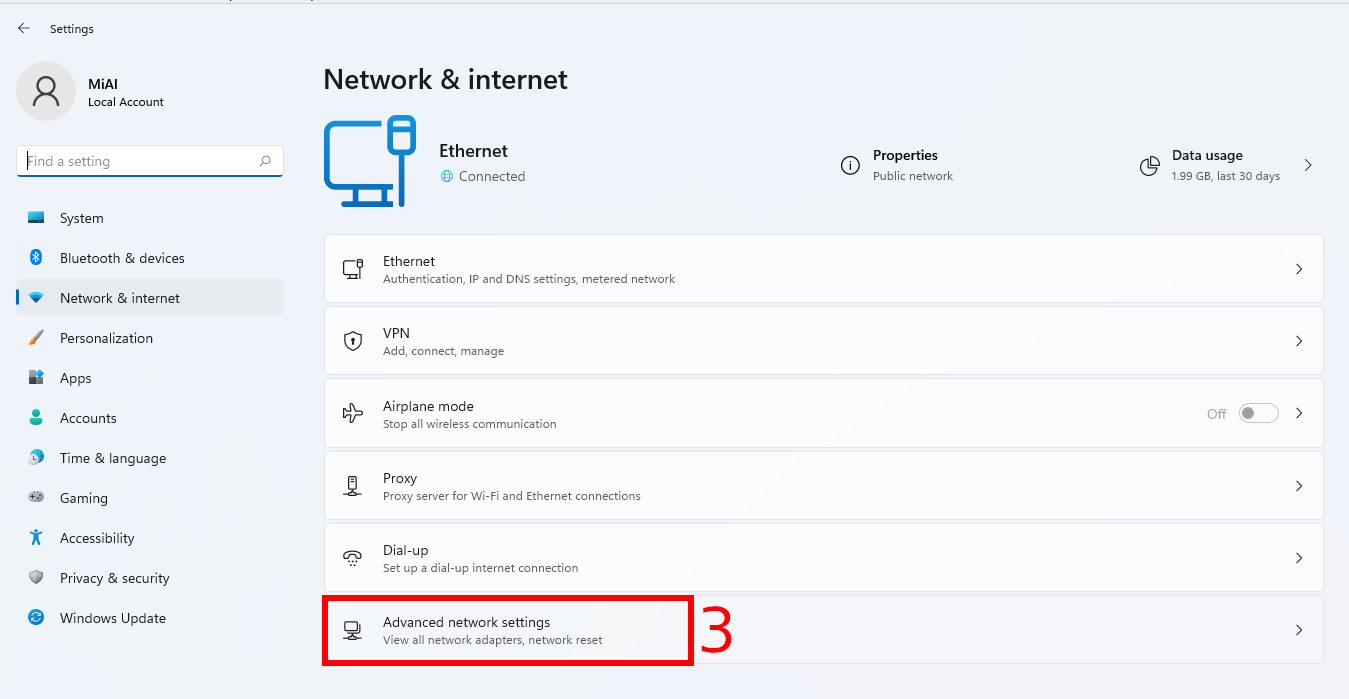
Click on “Advanced network settings”:
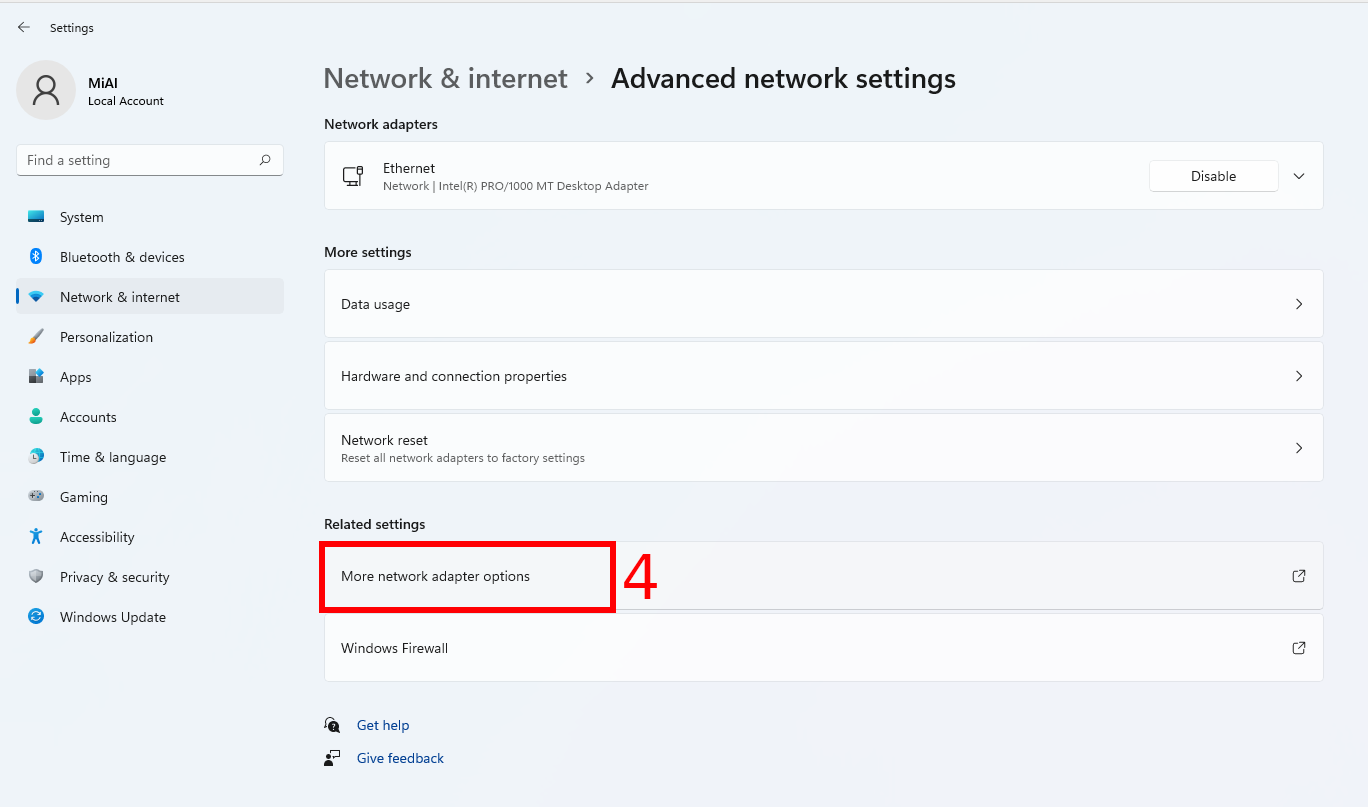
Then click on “More network adapter options”:
(Another quick way to get here is by typing “control netconnections” or “control ncpa.cpl” at the command line).
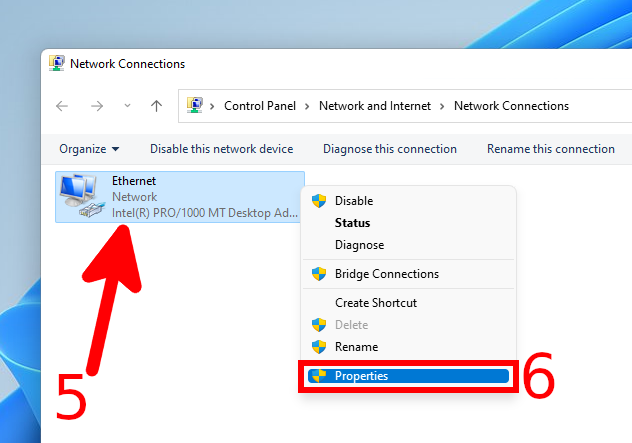
Right-click on the adapter whose settings you want to change, and in the context menu that opens, select “Properties”.
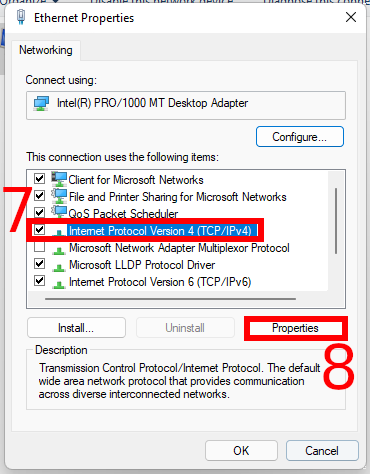
Select “Internet Protocol Version 4 (TCP/IPv4)” and click the “Properties” button.
Select “Use the following DNS server addresses” and enter the IPs.

When everything is ready, click “OK” and close the windows.
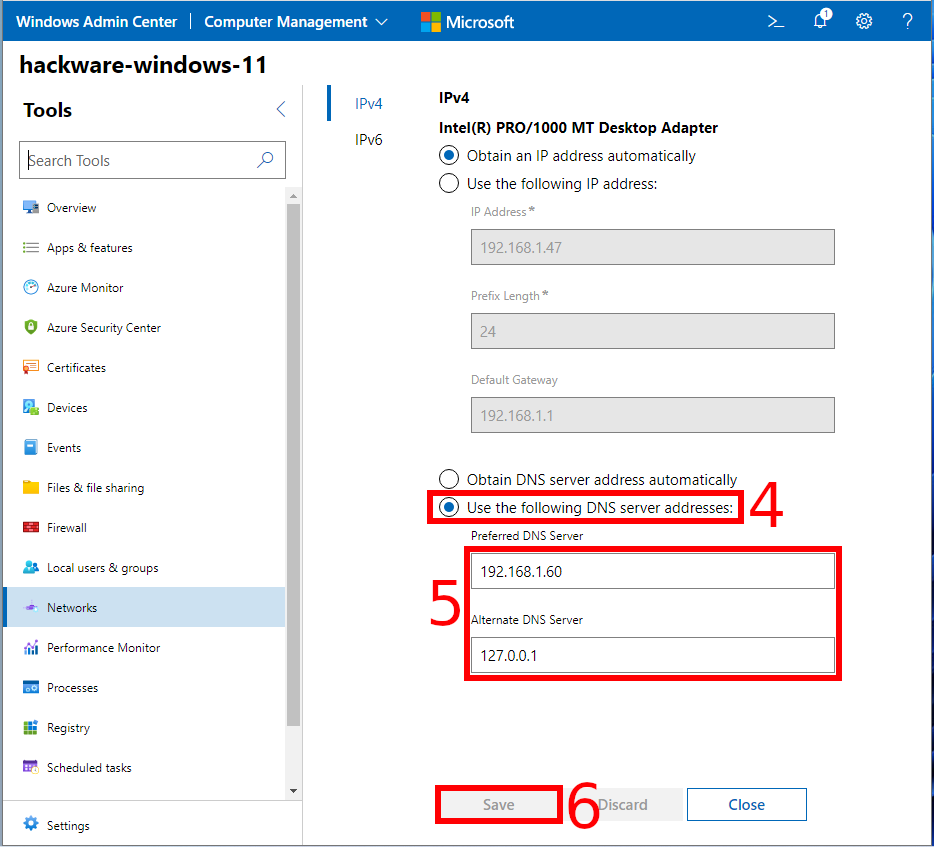
How to set up a DNS server in Windows Admin Center
Go to the “Networks” tab and select the network adapter whose settings you want to change and click the “Settings” button.

Switch to “Use the following DNS server addresses”, enter the desired DNS address settings and click the “Save” button.
How to set up a DNS server in PowerShell
If you want to specify one DNS server, then use a command like:
Set-DnsClientServerAddress -InterfaceIndex 6 -ServerAddresses IP_DNS
Use the syntax to specify two DNS servers:
Set-DnsClientServerAddress -InterfaceIndex INTERFACE_INDEX -ServerAddresses ("IP_DNS_1","IP_DNS_2")
For example:
Set-DnsClientServerAddress -InterfaceIndex INTERFACE_INDEX -ServerAddresses ("192.168.1.60","127.0.0.1")
How to check DNS settings on Windows
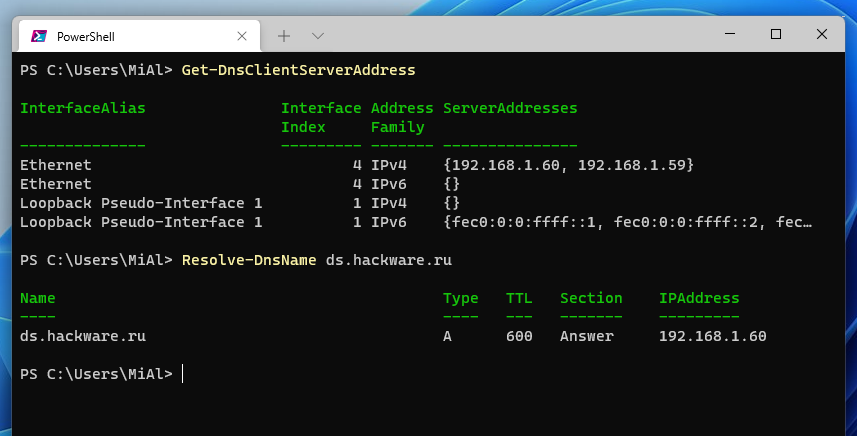
To verify that the DNS server is running and that it is the domain controller that is being used as DNS, run the command:
nslookup suip.biz

We have received the IP address of this site – this means that the DNS server is working. The line “Address: 192.168.1.60” contains the IP address of the DNS server, as we can see, this is a domain controller.
The following command will print the IP address of the Windows Domain:
nslookup IP_DOMAIN
For example:
nslookup ds.hackware.ru
Lines with Addresses also contain the local IP address of the domain:
Addresses:  fd28:62f2:dde3:0:f46c:b244:b1c3:9613
          192.168.1.60

If you want to do only with PowerShell and do not use a third-party utility, then you can check the DNS server settings, and also find out the IP address of the domain with the following commands:
Get-DnsClientServerAddress
Resolve-DnsName ds.hackware.ru
How to join a computer to a Windows domain
Now that everything is ready, we will join the workstation to the domain.
In addition to the changes already made, we need:
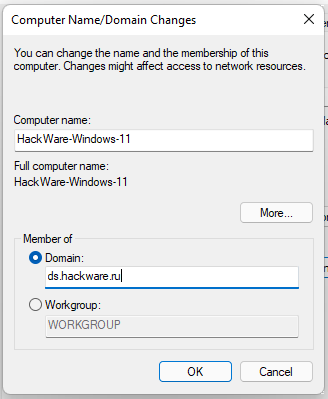
- Domain name (in my case it is ds.hackware.ru)
- Credentials (username and password) of the user who has permissions to join the Domain. In this case, we will use the credentials of the Administrator server user.
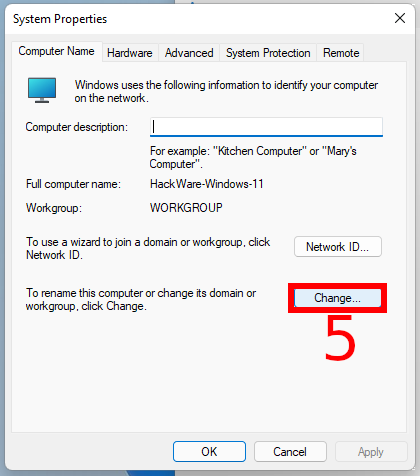
How to join a domain via Computer Settings
To join a domain, open the Settings app (Win+i) → “System” tab.
Scroll down and find “About” button.
Then find the item “Domain and workgroup”:

(Another quick way to get here is by typing “SystemPropertiesComputerName” at the command line).
Click the “Change” button to join the domain.
Set the radio button to “Member of domain” and enter the domain name, click “OK”.
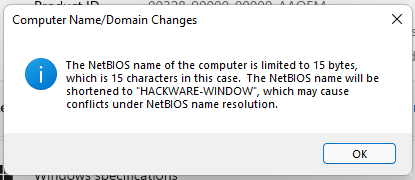
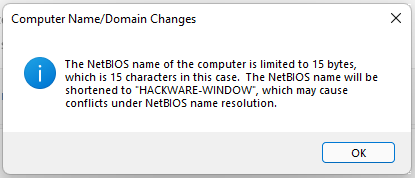
If the computer name is longer than 15 characters, you will be shown a warning that the NetBIOS name will be shortened. This must be remembered for the following reasons:
- The shortened name may no longer be unique – perhaps computers with this name already exist in the local network, or such names will appear when the names of other workstations are shortened
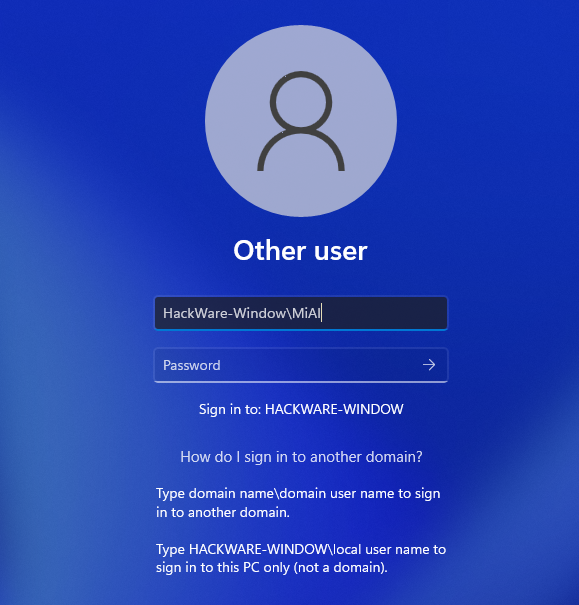
- When logging into the workstation as a local user, you will need to specify the NetBIOS name, which usually coincides with the computer name, but if it was truncated, then these are different names. If you forget this, then you will have problems with authorization. For example, the computer name is “HackWare-Windows-11” and the shortened NetBIOS name has become “HackWare-Window”. Username “MiAl”. You might think that you need to specify “HackWare-Windows-11\MiAl” to log in as a local user – but this is incorrect and will generate a “username or password incorrect” error. It is correct to specify “HackWare-Window\MiAl” as the username.
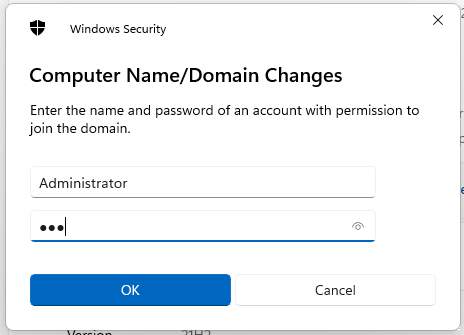
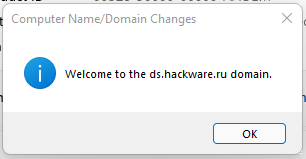
Enter your server administrator credentials.
If everything went well, you will see a welcome message.
You will also be informed that in order for the changes to take effect, you must restart your computer.

How to join a domain using the “Join a Domain or Workgroup” Wizard
To join a domain, open the Settings app (Win+i) → “System” tab.
Scroll down and find “About” button.
Then find the item “Domain and workgroup”:
(Another quick way to get here is by typing “SystemPropertiesComputerName” at the command line).
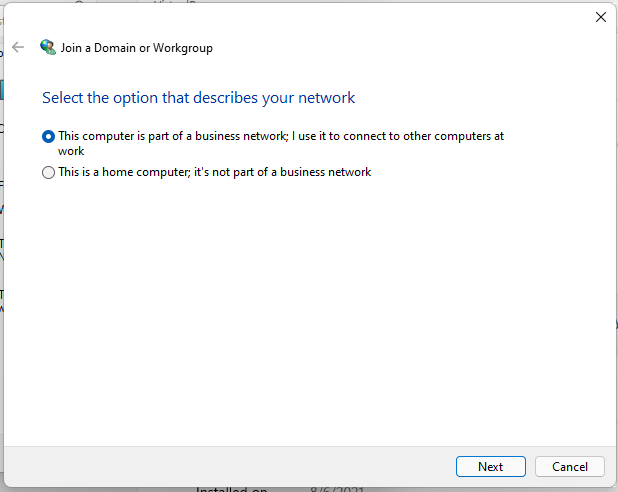
To join the domain, click the button “Network ID…”.

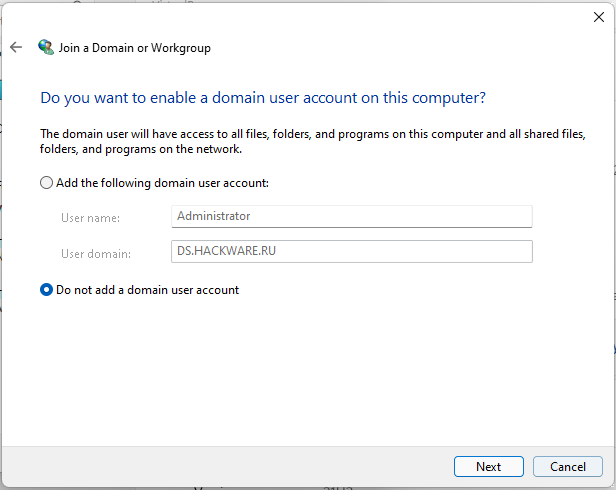
Select the option “This computer is part of the business network; I use it to connect to other computers at work.”
Select “My company uses a network with a domain”.
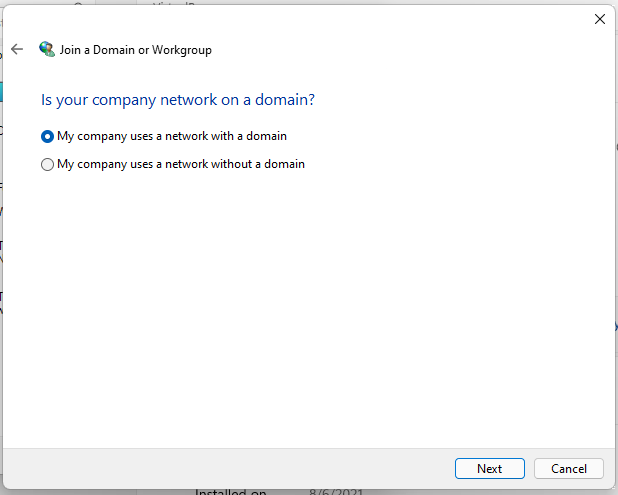
Click “Next”.
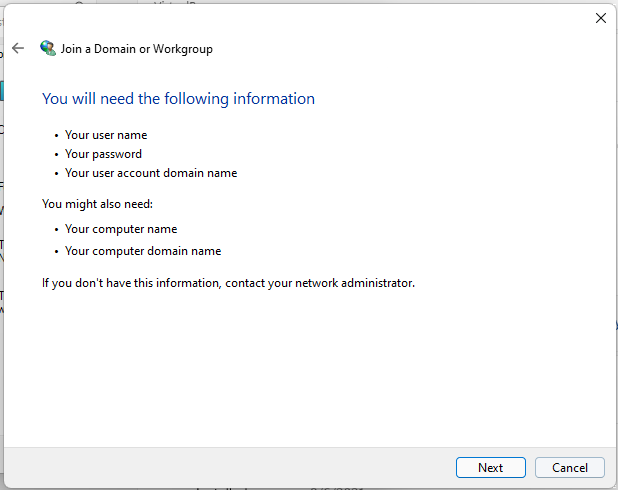
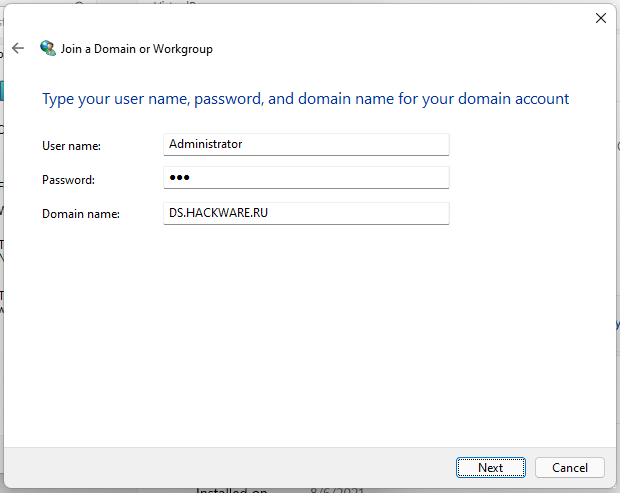
Enter the domain administrator name and password, as well as the domain address and click “Next”.
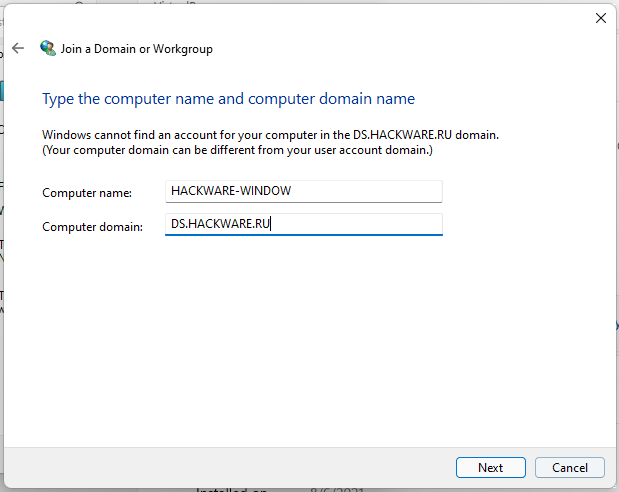
If the computer is joining the domain for the first time, you will see the following message and a prompt to enter the computer name and domain.
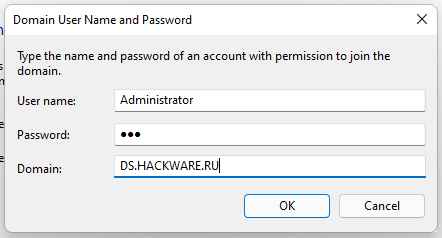
Re-enter the server administrator login and password, as well as the domain address.
It is not entirely clear what this window is responsible for.
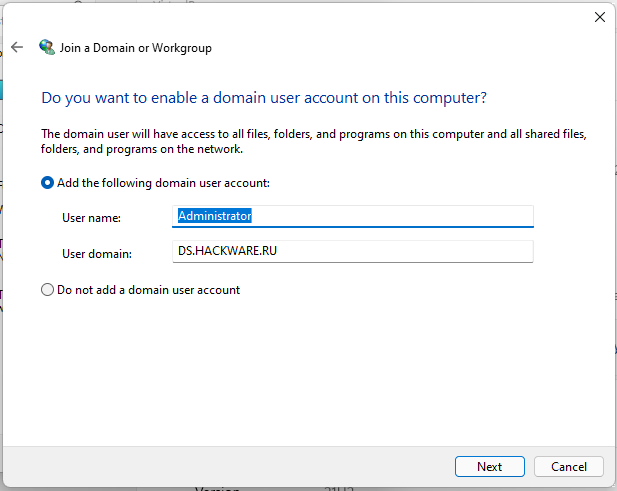
I didn't add.
Restart your computer for the changes to take effect.

How to join a domain in Windows Admin Center
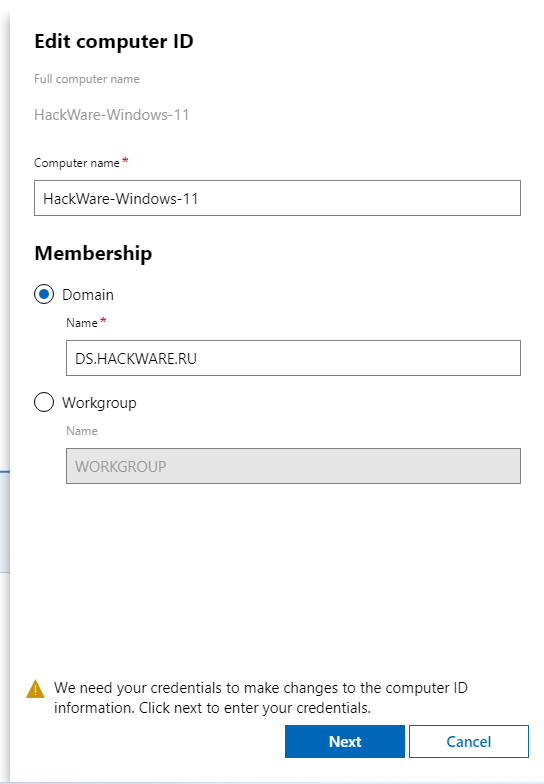
Open Windows Admin Center, connect to the computer that needs to join the domain, go to the “Overview” tab.

Click “Edit Computer ID”.
Switch “Membership” to “Domain” and enter the domain name. Click “Next”.
Enter the credentials of the domain administrator, click the “Save” button.
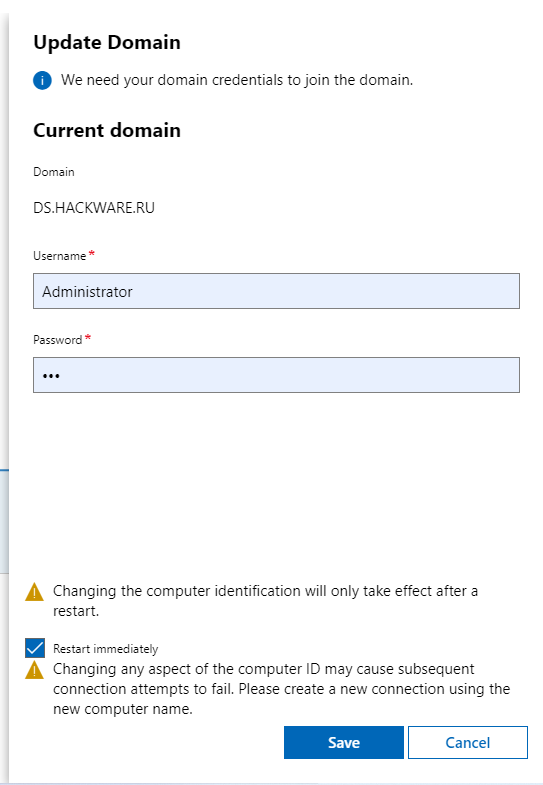
You will need to restart your computer for the changes to take effect.
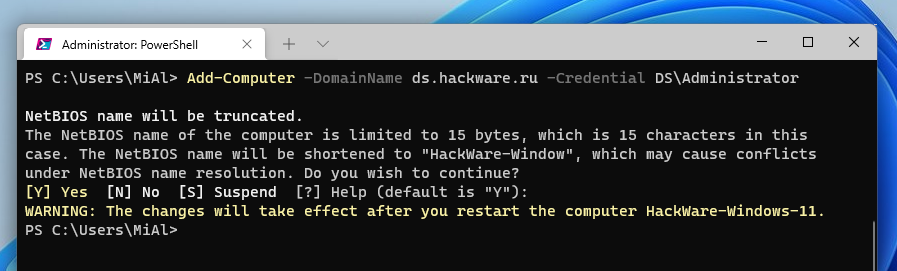
How to join a domain in PowerShell
Add-Computer cmdlet is used to add to a domain or workgroup. It is present in PowerShell 5, but removed from PowerShell 7 and no one knows how to replace it, see the article “Analogue of Add-Computer in PowerShell 7” for details.
If you have already installed PowerShell 7, then to switch to PowerShell 5, run:
powershell
An example of a command that adds the local computer to the domain and restarts the computer:
Add-Computer -DomainName DOMAIN_NAME -Credential DOMAIN_NAME\Administrator -Restart -Force
In this command:
- DOMAIN_NAME – the domain to which the computer is joined
- Administrator – the name of the server administrator
This command must be run with administrator rights.
Example:
powershell
Add-Computer -DomainName ds.hackware.ru -Credential DS\Administrator -Restart -Force
You will be prompted for the domain controller administrator password:

For the changes to take effect (unless you specified the “-Restart -Force” options), you will need to manually restart your computer.
The command for adding a remote computer to a domain looks like this:
Add-Computer -ComputerName COMPUTER_NAME -DomainName DOMAIN_NAME -Credential DOMAIN_NAME\Administrator -LocalCredential COMPUTER_NAME\Administrateur -Restart -Force
In this command:
- COMPUTER_NAME – the remote computer to be joined to the domain. Instead of the name, you can specify the IP address or NetBIOS name
- DOMAIN_NAME – the domain to which the computer is attached
- Administrator – the name of the server administrator
- Administrateur – the name of the workstation administrator
For example:
Add-Computer -ComputerName HackWare-Win -DomainName ds.hackware.ru -Credential DS\Administrator -LocalCredential HackWare-win\Администратор -Restart -Force
This command will prompt you to enter credentials twice – first the domain administrator password, then the workstation administrator password.
In my tests, the command to add a remote computer to the domain always failed with the error “The RPC server is unavailable. (Exception from HRESULT: 0x800706BA)”:
Add-Computer : Cannot establish the WMI connection to the computer 'HackWare-Win' with the following error message:
The RPC server is unavailable. (Exception from HRESULT: 0x800706BA).
At line:1 char:1
+ Add-Computer -ComputerName HackWare-Win -DomainName ds.hackware.ru -C ...
+ ~~~~~~~~~~~~~~~~~~~~~~~~~~~~~~~~~~~~~~~~~~~~~~~~~~~~~~~~~~~~~~~~~~~~~
    + CategoryInfo          : OperationStopped: (HackWare-Win:String) [Add-Computer], InvalidOperationException
    + FullyQualifiedErrorId : AddComputerException,Microsoft.PowerShell.Commands.AddComputerCommand
At the moment, I have not coped with the error.

How to log into a Windows Domain
Login on a computer joined to a domain
When the computer boots up, we are greeted by a splash screen.

Hold down the left mouse button and swipe up.
By default, it is suggested to log in as a local user (if your local user does not have a password, then just press Enter to log in).
To log into the domain, click “Other user”.
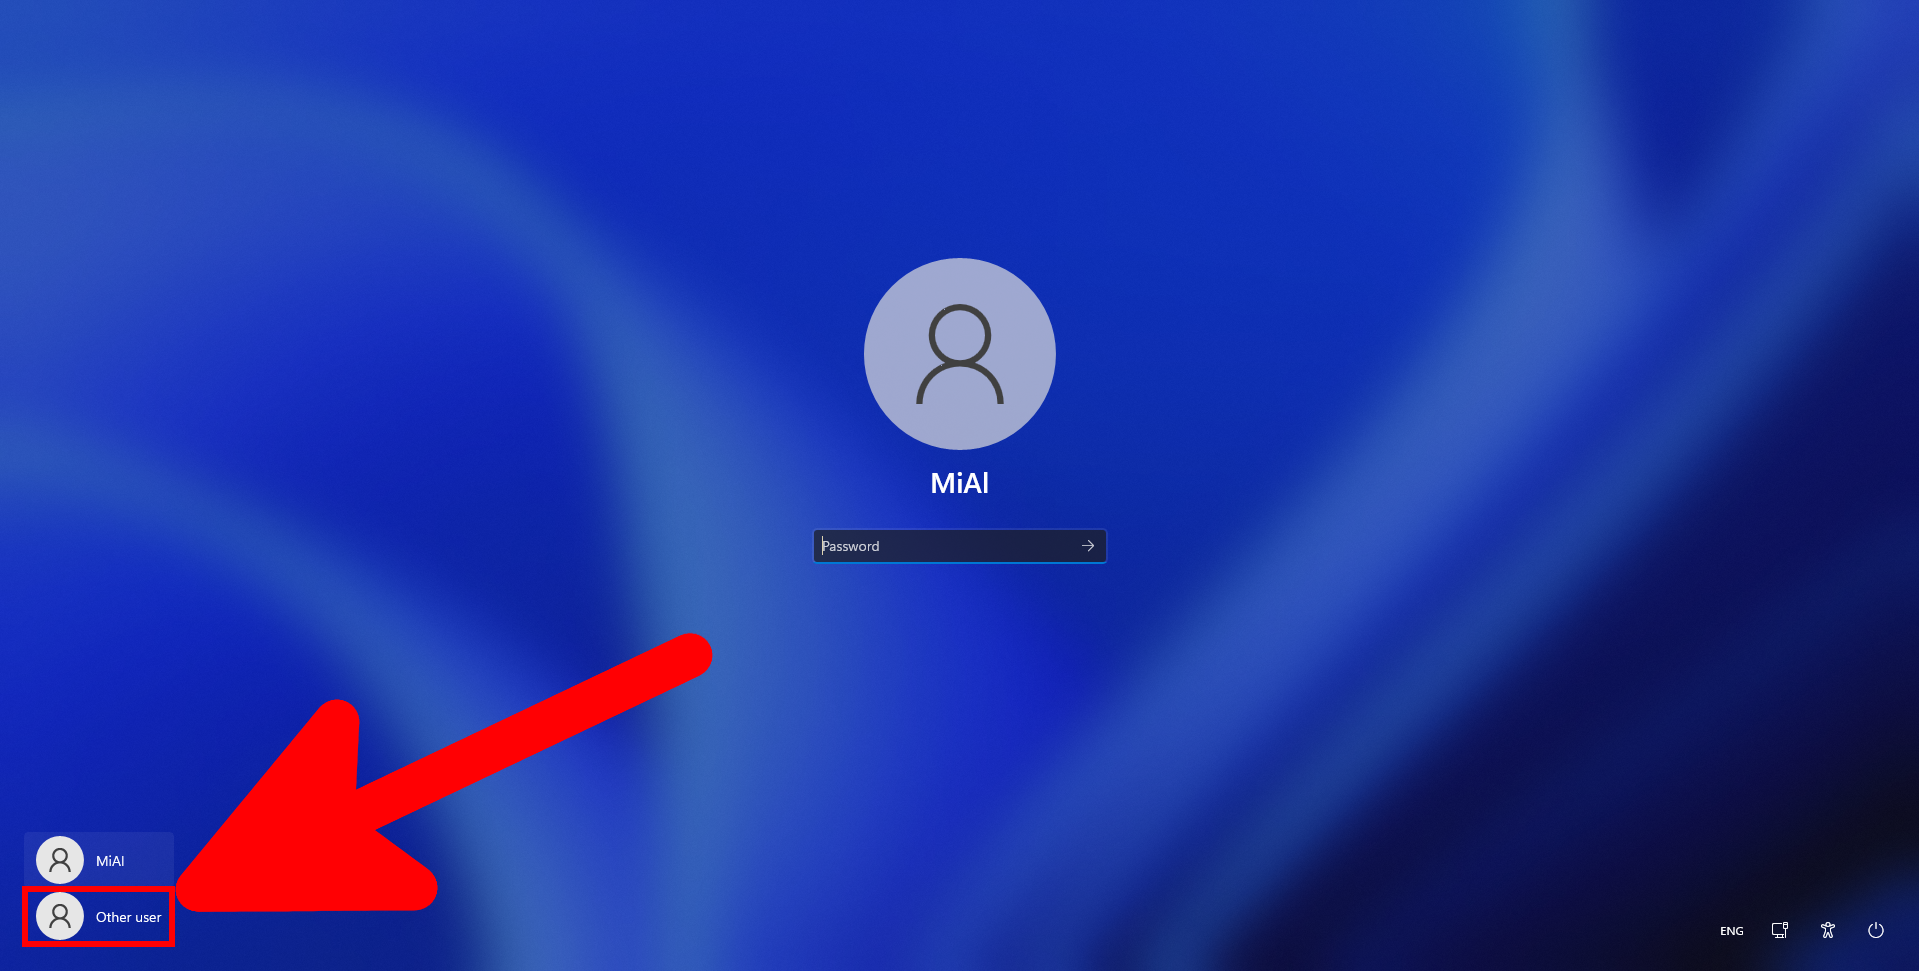
Enter your domain username and password.

How to create users in a Windows domain will be shown in the next part. However, you can already log on to the workstation with a domain administrator account. That is, we enter the username (Administrator) and the password of the server administrator (yes, although we log on to the workstation, not the server).
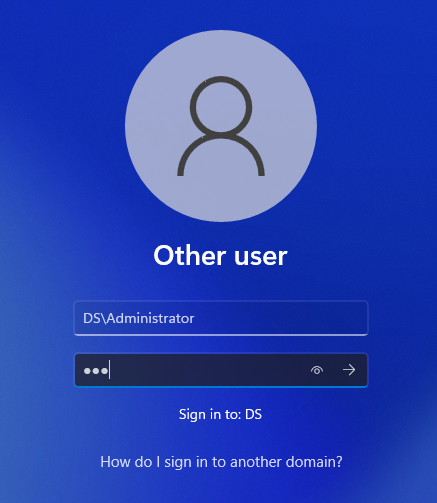
Please note that if there is a user on the local computer with the same name as in the domain, then to log in, you must specify the name as follows: “DOMAIN\USER”. Otherwise, you will be logged in as a local user.
Note: if your usual keyboard shortcut for changing the keyboard layout stops working, then use Win+Space, this is a universal keyboard change combination that always works.
Let's check the username and computer name:
Get-ComputerInfo -Property CsUserName
Get-ComputerInfo -Property CsDNSHostName
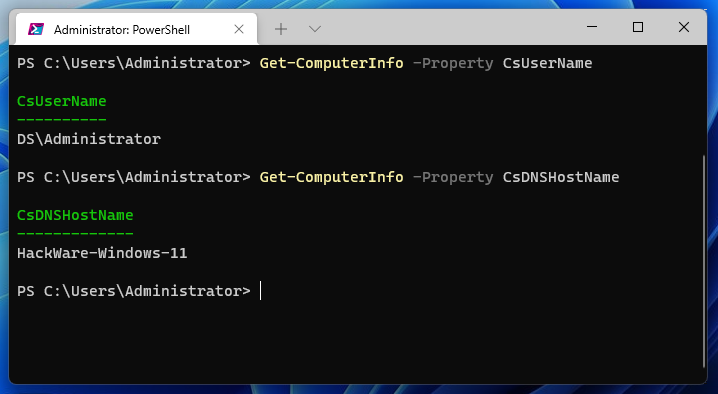
The current user is DS\Administrator, and the computer name is HackWare-Windows-11 (that is, this is a workstation, not a server).
How to log in with a local user account
Let's consider how to log in under a local user account on a computer that is joined to a Windows Domain.
When you turn on your computer, click “Other user”.
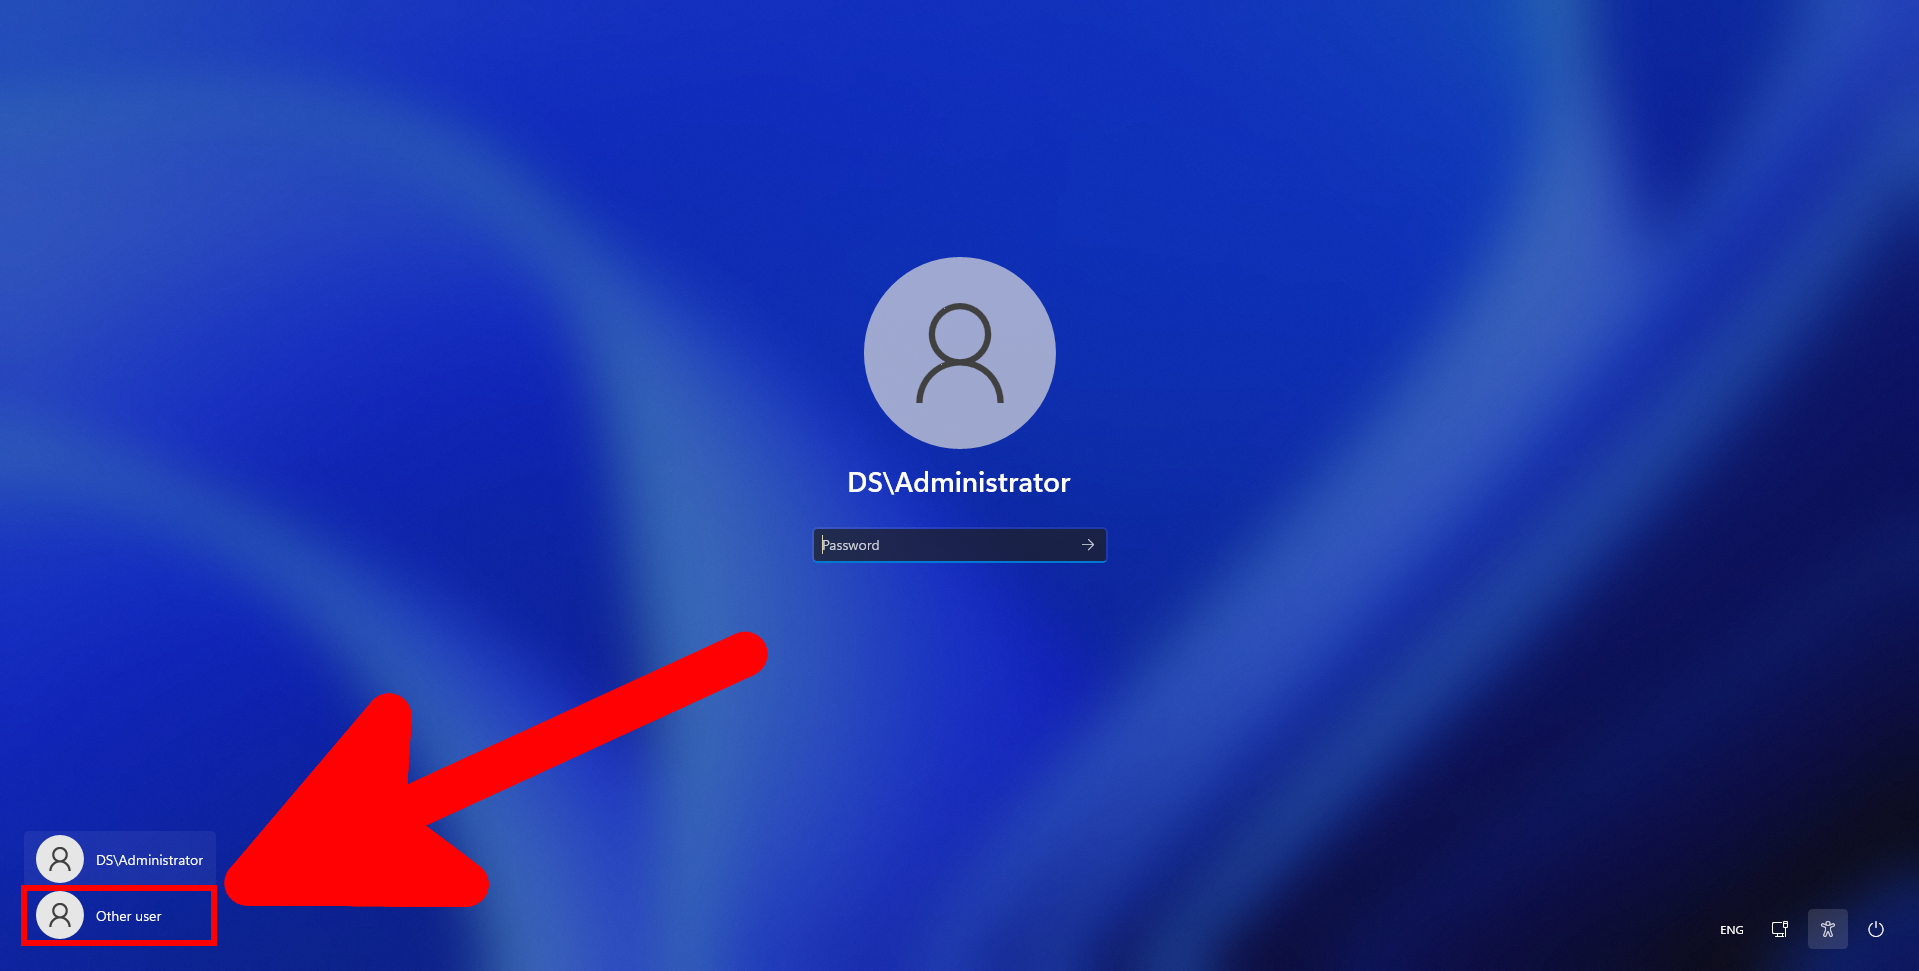
To log on to this computer only (not the domain), enter your username as follows:
COMPUTER_NAME\USER
For example:
HackWare-Win\MiAl
To log into the PC locally, you can also use “.\” + “Username”, so you don't need to know the exact PC name.
How to check if a computer is part of a domain
How to check if a computer is part of a domain via Computer Settings
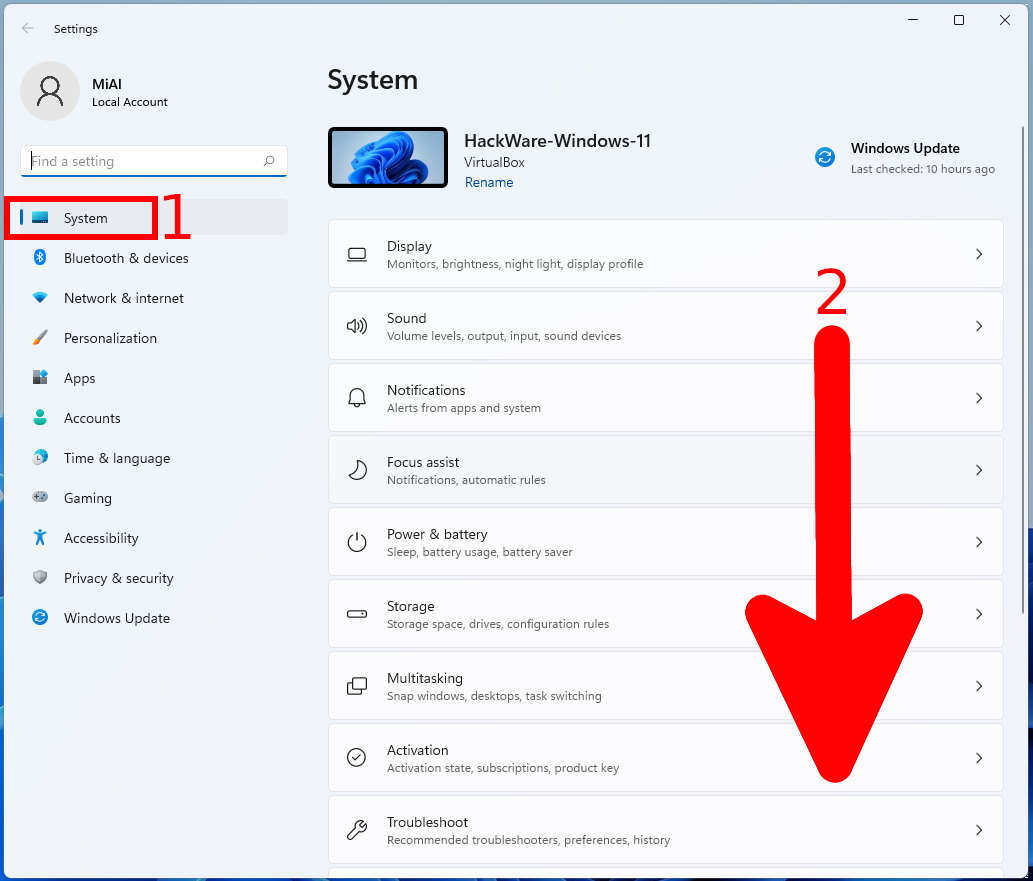
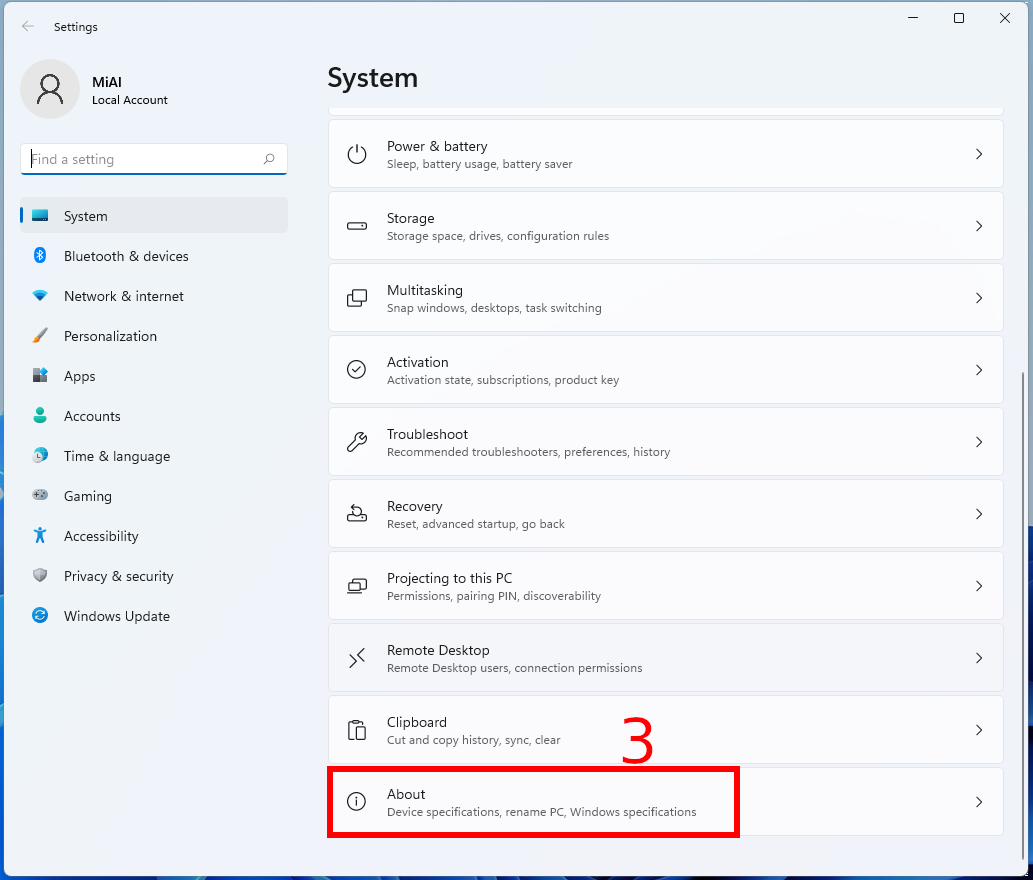
To get information about a domain, open the Settings app (Win+i) → “System” tab.
Scroll down and find “About” button.
Then find the item “Domain and workgroup”:
(Another quick way to get here is by typing “SystemPropertiesComputerName” at the command line).
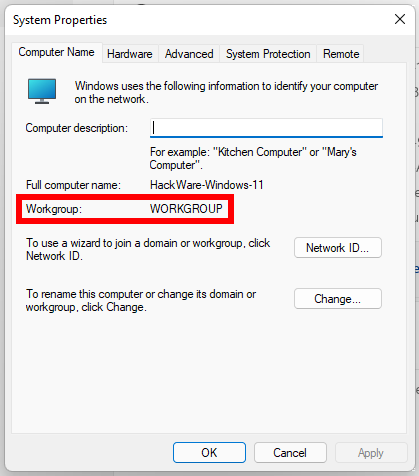
Here you will be able to see if the computer is part of a domain and what the domain name is.
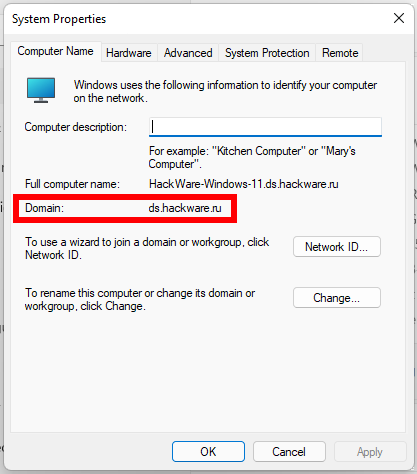
If the computer is not joined to a domain, then it belongs to the workgroup.
How to check if a computer is part of a domain in Windows Admin Center
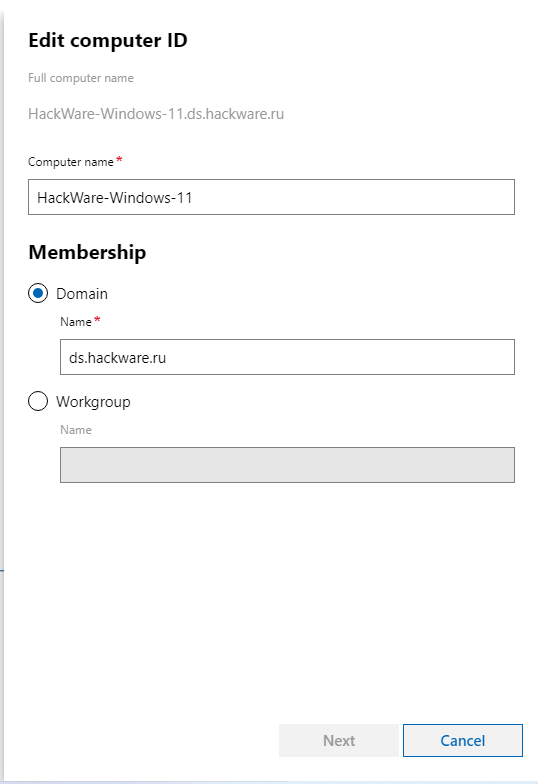
Open Windows Admin Center, connect to the computer that needs to join the domain, go to the “Overview” tab.
Click “Edit Computer ID”.
If the “Membership” radio button is selected to “Domain”, then the computer is joined to a domain.
How to check in PowerShell if a computer is part of a domain
1. Getting system properties
If you want to find out in PowerShell whether a given computer is part of a domain or a workgroup, use the following script:
$ComputerSystem = Get-CimInstance -Class Win32_ComputerSystem;
$ComputerName = $ComputerSystem.DNSHostName
if ($ComputerName -eq $null) {
    $ComputerName = $ComputerSystem.Name
}

$fqdn = ([System.Net.Dns]::GetHostByName($ComputerName)).HostName

$ComputerSystem | Microsoft.PowerShell.Utility\Select-Object `
@{ Name = "ComputerName"; Expression = { $ComputerName }},
@{ Name = "Domain"; Expression = { if ($_.PartOfDomain) { $_.Domain } else { $null } }},
@{ Name = "DomainJoined"; Expression = { $_.PartOfDomain }},
@{ Name = "FullComputerName"; Expression = { $fqdn }},
@{ Name = "Workgroup"; Expression = { if ($_.PartOfDomain) { $null } else { $_.Workgroup } }}
You can copy it in full and paste it into the PowerShell console.
Output example:
ComputerName     : HackWare-Win
Domain           :
DomainJoined     : False
FullComputerName : HackWare-Win
Workgroup        : WORKGROUP
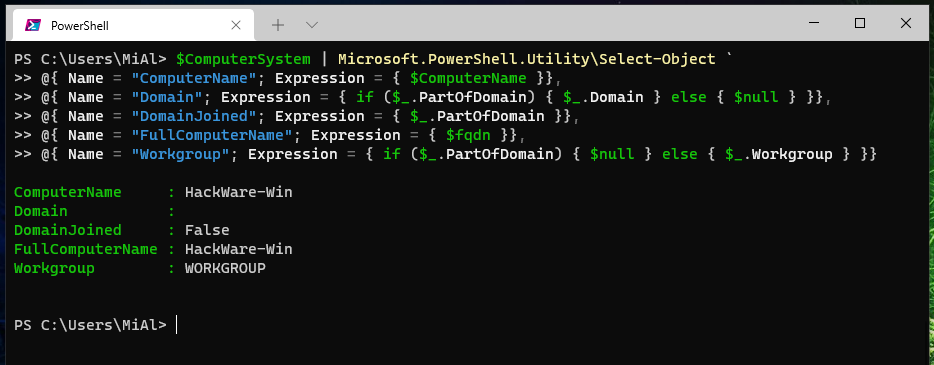
In this case, the computer name is HackWare-Win and it is not attached to the domain (“DomainJoined: False”). Instead, the computer is part of a workgroup called WORKGROUP.
Sample output on another computer:
ComputerName     : HackWare-Server-2022
Domain           : ds.hackware.ru
DomainJoined     : True
FullComputerName : HackWare-Server-2022.ds.hackware.ru
Workgroup        :
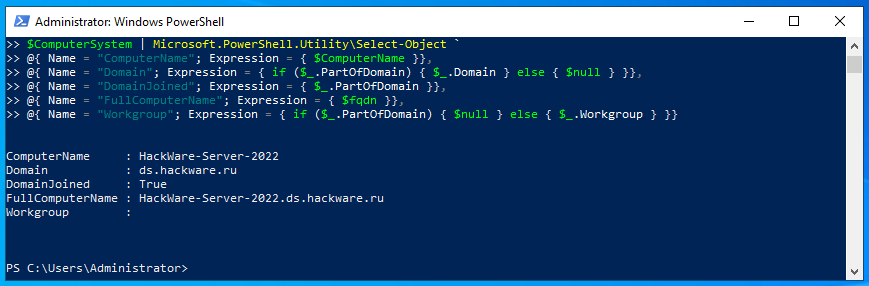
The computer name is HackWare-Server-2022, it is part of a domain (“DomainJoined: True”) called ds.hackware.ru.
2. Determination of ownership by domain or workgroup name
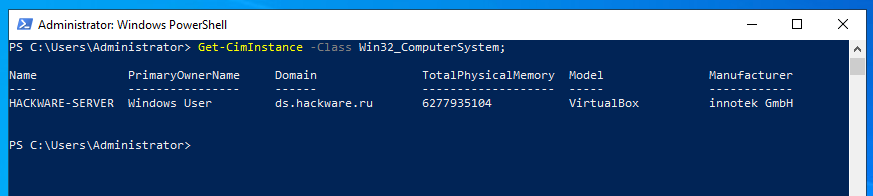
The following command prints out the domain/workgroup name:
Get-CimInstance -Class Win32_ComputerSystem;
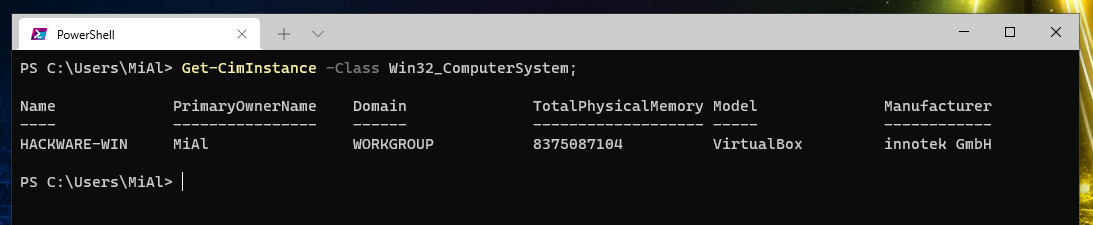
If you know the rule that a domain name must include at least two lines separated by a dot, then you can determine that WORKGROUP cannot be a domain name, therefore, this is the name of a workgroup. And ds.hackware.ru is the domain name.
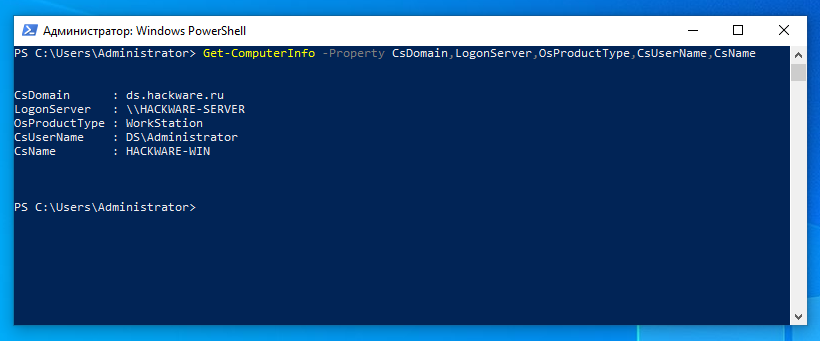
3. Viewing computer properties in the Get-ComputerInfo cmdlet
The Get-ComputerInfo cmdlet displays information about a computer. By filtering out the information you want, you can make decisions about whether the computer is joined to a domain or to a workgroup.
Show domain or workgroup name:
Get-ComputerInfo -Property CsDomain
Show the logon server (for computers in the domain, this is the server, for computers in the workgroup, this is the local computer):
Get-ComputerInfo -Property LogonServer
Show product type, for example DomainController or WorkStation:
Get-ComputerInfo -Property OsProductType
Username (has the form DOMAIN\USER or WORKGROUP\USER):
Get-ComputerInfo -Property CsUserName
Local computer name:
Get-ComputerInfo -Property CsName
Output all information at a time:
Get-ComputerInfo -Property CsDomain,LogonServer,OsProductType,CsUserName,CsName
The computer is joined to the domain:
The computer is part of a workgroup:

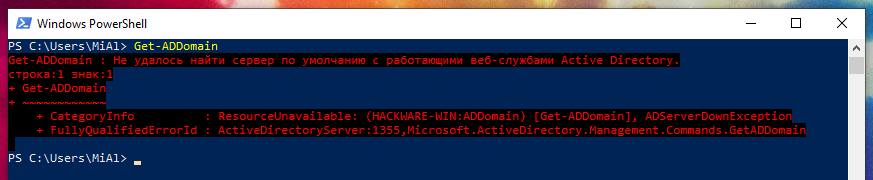
4.Using Get-ADDomain
To see if a computer is joined to a domain in PowerShell, run the following command:
Get-ADDomain
If the computer is part of a workgroup and not a domain, then PowerShell 5 will display the following error:
Get-ADDomain : Unable to find a default server with Active Directory Web Services running.
строка:1 знак:1
+ Get-ADDomain
+ ~~~~~~~~~~~~
    + CategoryInfo          : ResourceUnavailable: (HACKWARE-WIN:ADDomain) [Get-ADDomain], ADServerDownException
    + FullyQualifiedErrorId : ActiveDirectoryServer:1355,Microsoft.ActiveDirectory.Management.Commands.GetADDomain
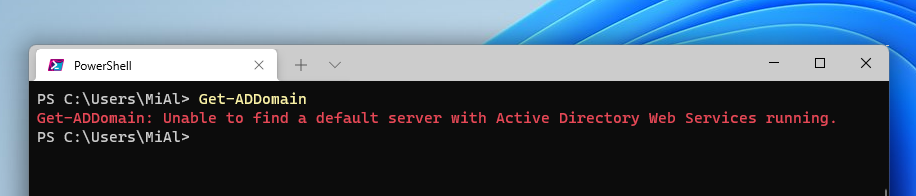
If the computer is not joined to a domain, then the latest versions of PowerShell will show an error:
Get-ADDomain: Unable to find a default server with Active Directory Web Services running.
If the computer is part of a domain, then information about the domain to which the workstation is joined will be displayed:

The following errors are also possible.
In PowerShell 5:
Get-ADDomain : Сервер отклонил учетные данные клиента.
строка:1 знак:1
+ Get-ADDomain
+ ~~~~~~~~~~~~
    + CategoryInfo          : Ошибка безопасности: (HACKWARE-WIN:ADDomain) [Get-ADDomain], AuthenticationException
    + FullyQualifiedErrorId : ActiveDirectoryCmdlet:System.Security.Authentication.AuthenticationException,Microsoft.A
   ctiveDirectory.Management.Commands.GetADDomain
In PowerShell 7:
Get-ADDomain: Authentication failed on the remote side (the stream might still be available for additional authentication attempts).
These errors occur in a situation where the computer is, in principle, connected to a domain, but logged on to the workstation as a local user.
How to unjoin a domain
How to unjoin a domain through Computer Settings
To disconnect your computer from the domain, open the Settings app (Win+i) → “System” tab.
Scroll down and find “About” button.
Then find the item “Domain and workgroup”:
(Another quick way to get here is by typing “SystemPropertiesComputerName” at the command line).
To leave the domain, click the “Change” button.
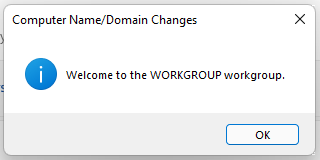
Switch to “Member of workgroup”, enter its name, for example “WORKGROUP” and click “OK”.
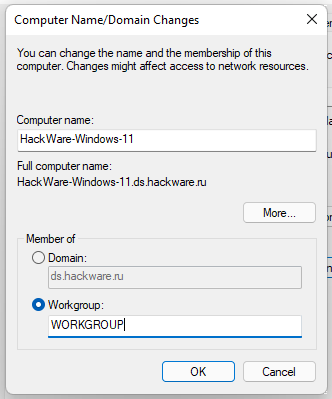
If the computer name is longer than 15 characters, you will be shown a warning that the NetBIOS name will be shortened.
We are warned that a local administrator password is required to log into this computer.
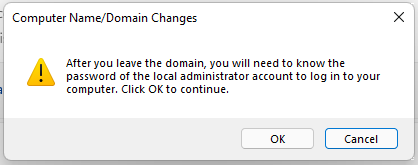
Enter the name and password of an account with permission to remove this computer from the domain – this can be the credentials of a local administrator.

If everything went well, then you will see an invitation to the working group.
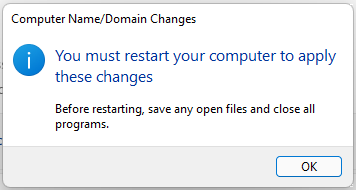
We are informed that the changes will take effect after restarting the computer.
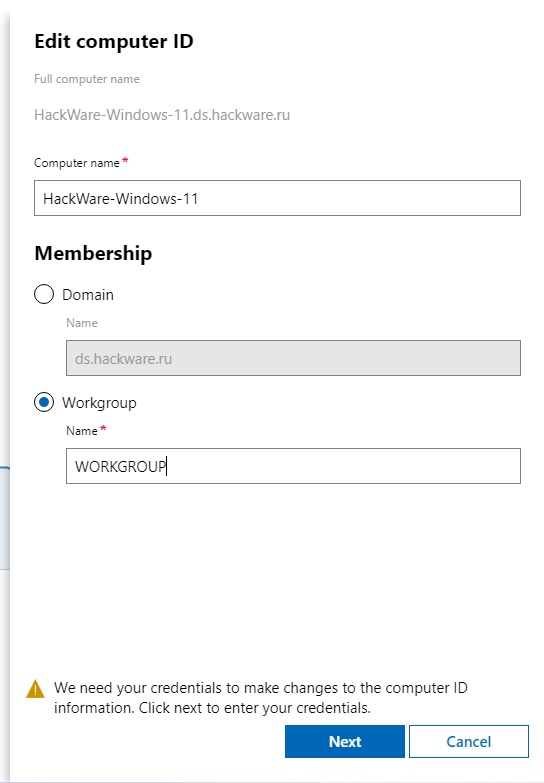
How to unjoun a domain in Windows Admin Center
Open Windows Admin Center, connect to the computer that needs to join the domain, go to the “Overview” tab.
Click “Edit Computer ID”.
Switch “Membership” to “Workgroup” and enter a name for the workgroup, for example “WORKGROUP”. Click the “Next” button.
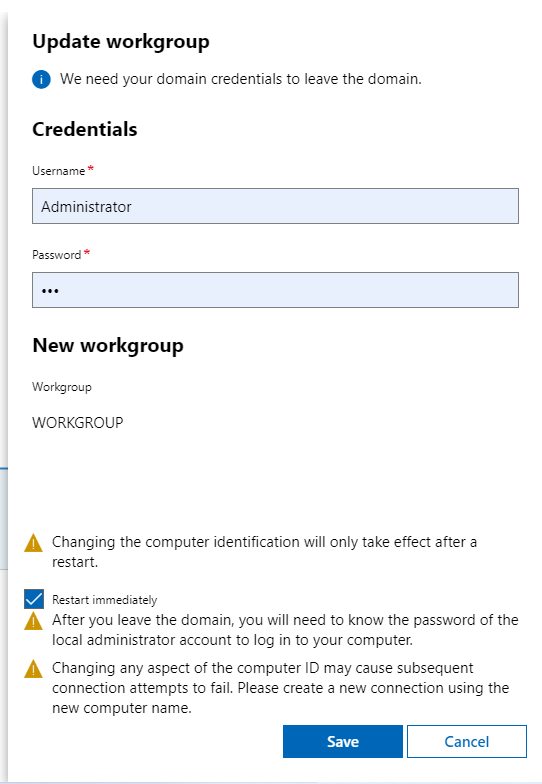
Enter the domain administrator name and password.
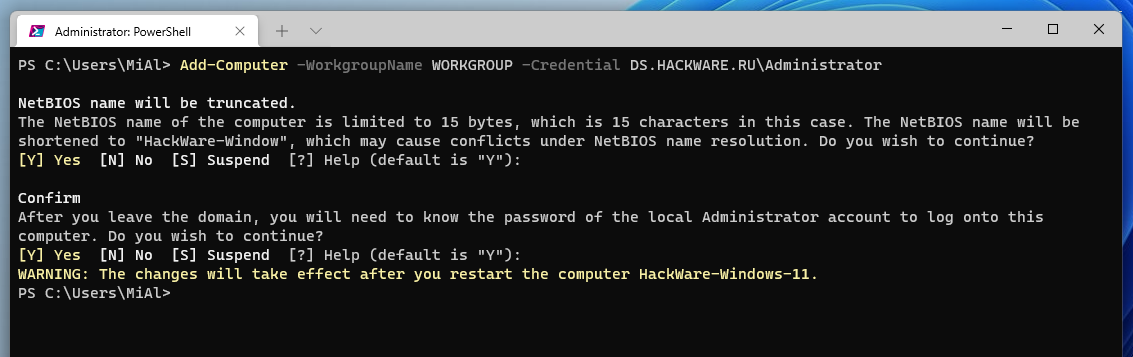
How to unjoin a domain in PowerShell
To remove a computer from the domain, more precisely, to switch to the workgroup, is performed by the Add-Computer command, that is, all the notes mentioned in section “5.3.4 How to join a domain in PowerShell” apply to leaving the domain.
To remove the local computer from the domain and add it to the WORKGROUP, run the following command:
powershell
Add-Computer -WorkgroupName WORKGROUP
The transition to the workgroup will take effect after restarting the computer.
The previous command will work if you are logged in as a domain administrator, otherwise you need to provide the credentials of the domain administrator (or another administrator who has the permission to leave the domain):
Add-Computer -WorkgroupName WORKGROUP -Credential DOMAIN\Administrator
For example:
Add-Computer -WorkgroupName WORKGROUP -Credential DS.HACKWARE.RU\Administrator
The command to add a remote computer to a workgroup and, therefore, log out of the domain is as follows:
Add-Computer -ComputerName COMPUTER_NAME -WorkgroupName WORKGROUP -UnjoinDomainCredential DOMAIN_NAME\Administrator -LocalCredential COMPUTER_NAME\Administrateur -Restart -Force
In this command:
- COMPUTER_NAME – the remote computer to be removed from the domain. Instead of a name, you can specify an IP address or NetBIOS name
- WORKGROUP – the workgroup to which the computer is joined
- Administrator – the name of the server administrator
- Administrateur – the name of the workstation administrator
To move from one domain to another, use the command:
Add-Computer -ComputerName COMPUTER_NAME -WorkgroupName WORKGROUP -UnjoinDomainCredential OLD_DOMAIN\Administrator -Credential NEW_DOMAIN\Administrator -LocalCredential COMPUTER_NAME\Administrateur -Restart -Force
Related articles:
- Active Directory comprehensive guide, from installation and configuration to security auditing. Part 3: Windows Server 2022 and Windows Server Core 2022 configuration tools (100%)
- Active Directory comprehensive guide, from installation and configuration to security auditing. Part 1: Introduction to Active Directory (concepts, usage, difference from Workgroup) (72%)
- Active Directory comprehensive guide, from installation and configuration to security auditing. Part 6: Active Directory configuration tools and snap-ins (72%)
- Active Directory comprehensive guide, from installation and configuration to security auditing. Part 4: Install Active Directory Domain Services in Windows Server 2022 (71.6%)
- Active Directory comprehensive guide, from installation and configuration to security auditing. Part 2: Install Windows Server 2022 and Windows Server Core 2022 (60.2%)
- Script for installing BlackArch in a VirtualBox (RANDOM - 50%)