Active Directory comprehensive guide, from installation and configuration to security auditing. Part 6: Active Directory configuration tools and snap-ins
Table of contents
1. Introduction to Active Directory (concepts, usage, difference from Workgroup)
2. Install Windows Server 2022 and Windows Server Core 2022
3. Windows Server 2022 and Windows Server Core 2022 configuration tools
4. Install Active Directory Domain Services in Windows Server 2022
5. Join computers to Active Directory. Check and unjoin from Active Directory
6. Active Directory configuration tools and snap-ins
6.1 Active Directory Management Tools
6.2 How to Install Active Directory Management Tools on a Windows Workstation
6.2.1 How to install the Microsoft Management Console (MMC) snap-in to manage Active Directory
6.2.2 How to manage Active Directory in Windows Admin Center
6.2.3 How to install the Active Directory Module for Windows PowerShell
6.3 How to use Active Directory management tools
6.3.1 How to use the Microsoft Management Console Active Directory snap-in
6.3.2 How to use the Active Directory Administrative Center
6.3.3 How to use Windows Admin Center
6.3.4 How to use the Windows PowerShell Active Directory Module
7. Understanding the AD infrastructure
8. Group Policies
9. Managing Users, Computers, Groups and Organizational Units in Active Directory
10. Setting up trust and site domains
11. Other services and roles of Active Directory
12. Configuring Samba (Active Directory for Linux)
13. Active Directory security auditing tools
Active Directory Management Tools
You can control the Windows server either directly from sitting in front of it, or remotely. The server can be controlled remotely both from another server and using workstations, but in order for workstations to be used to manage the server, additional steps for installing components may be required.
Server management is carried out through:
- Snap-ins in the Microsoft Management Console (MMC). On the server, these tools are available by default, and on workstations, to obtain this snap-in, you must first install the remote administration tools. The snap-ins are listed below.
- Active Directory Administrative Center, dsac.exe, as shown in the screenshot below, is a universal location that is used to manage Windows Server directory services.
- Windows Admin Center. Both on the server and on the workstations, you need to install the Windows Admin Center itself, and then the plug-in for Active Directory.
- Active Directory Module for Windows PowerShell. On Windows servers, this module is installed automatically during the deployment of Active Directory Domain Services. It needs to be installed separately on Windows workstations.

The following snap-ins are available in the Microsoft Management Console (MMC), mmc.exe:
- Active Directory Users and Computers, dsa.msc, is used to manage users, computers, groups, organizational units, and other Active Directory objects.
- Active Directory Domains and Trusts, domain.msc, is used to manage domains, trusts between domains.
- Active Directory Sites and Services, dssite.msc, is used to manage replication and services between sites.
A total of four sets of tools for managing Active Directory will be considered. It may seem that so many options are redundant. Especially when you consider that the Active Directory Administrative Center and Windows Admin Center are just graphical wrappers for PowerShell, which is also available as the Active Directory Module for Windows PowerShell. However, the difference between them is not only in the interface of the tools, there is a more significant practical difference between them.
| Tool | Allows you to manage from a computer that is not part of a domain | Suitable for local configuration of Windows Server Core |
|---|---|---|
| Snap-ins in Microsoft Management Console (MMC) | No | No |
| Active Directory Administrative Center | No | No |
| Windows Admin Center | Yes | No |
| Active Directory Module for Windows PowerShell | Yes | Yes |
Only two tools have the same characteristics in the table, but they differ in the interface.
How to Install Active Directory Management Tools on a Windows Workstation
Let's start by looking at what needs to be done to manage the Windows server from a Windows computer that is not a server. Subsequently, work with all tools, regardless of whether it is performed locally or remotely, will be similar.
How to install the Microsoft Management Console (MMC) snap-in to manage Active Directory
To install and use this snap-in, you need a Pro or Enterprise version of Windows. Unlike other tools, this snap-in can only be used by logging into a domain, that is, from a computer that is part of the domain that you want to manage.
Install remote administration tools on a personal computer in order to use a graphical interface to manage the roles available on the server.
On Windows 11
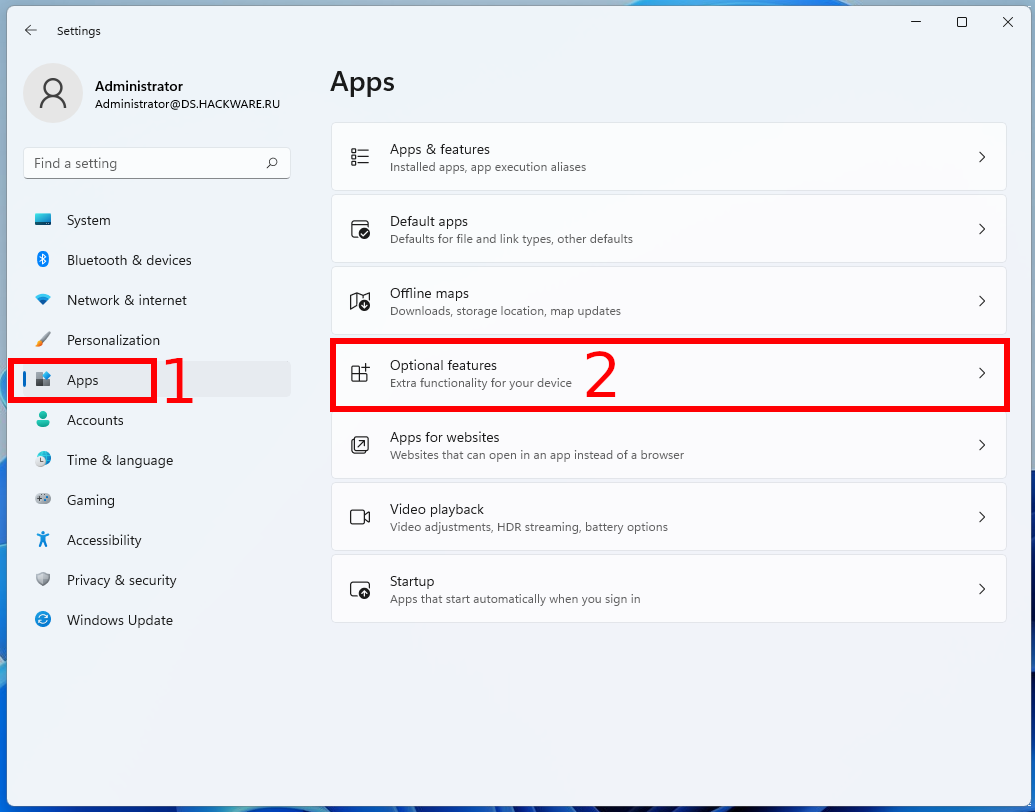
In Windows 11, open “Settings” by pressing Win+i and select the “Apps” tab, then go to “Optional Features”.
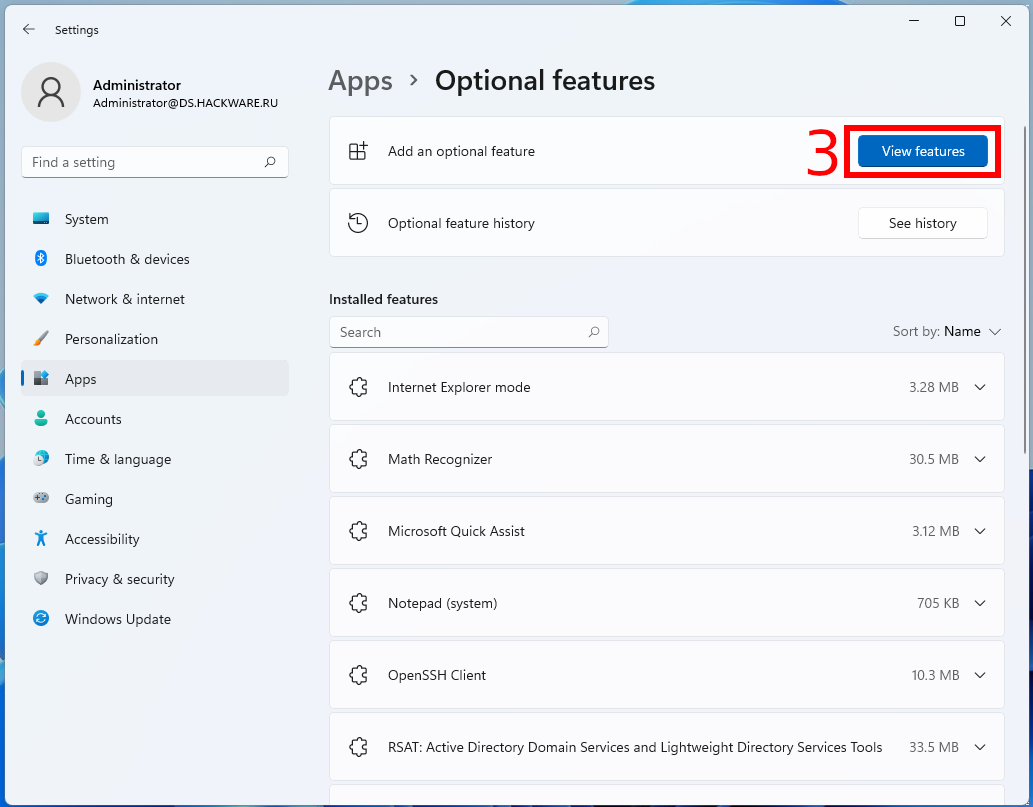
Now select “View features” under “Add an optional feature”.
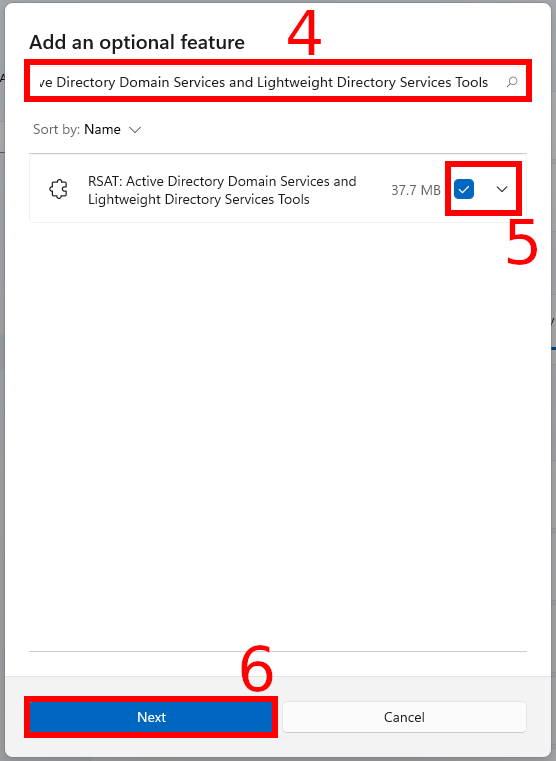
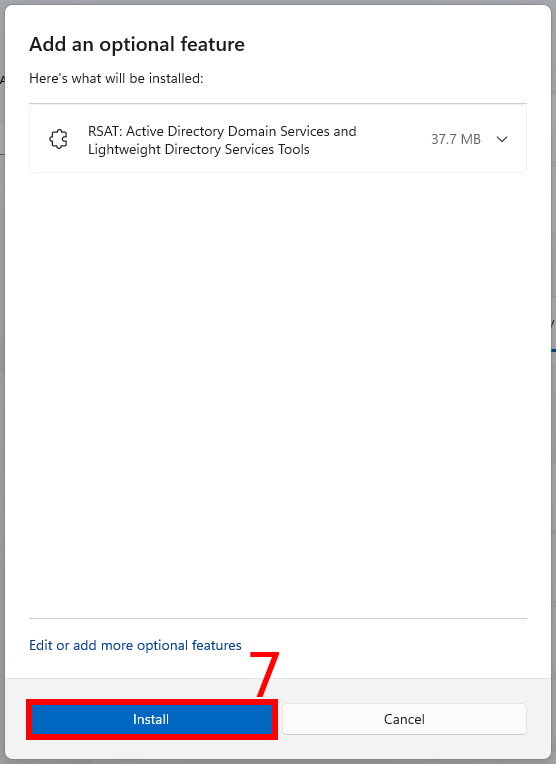
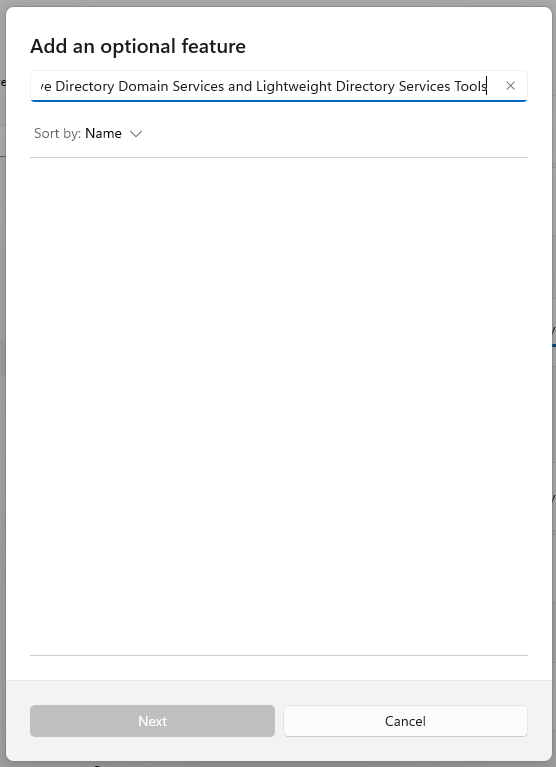
To install the Active Directory Remote Administration Tools, search for “RSAT: Active Directory Domain Services and Lightweight Directory Services Tools”, check the box and click “Next”,
then click “Install”.
Note: if, when searching for a particular component, you cannot find it, then, probably, this component is already installed.
To verify this, in the search bar under “Installed features” enter the name of the component you are looking for.
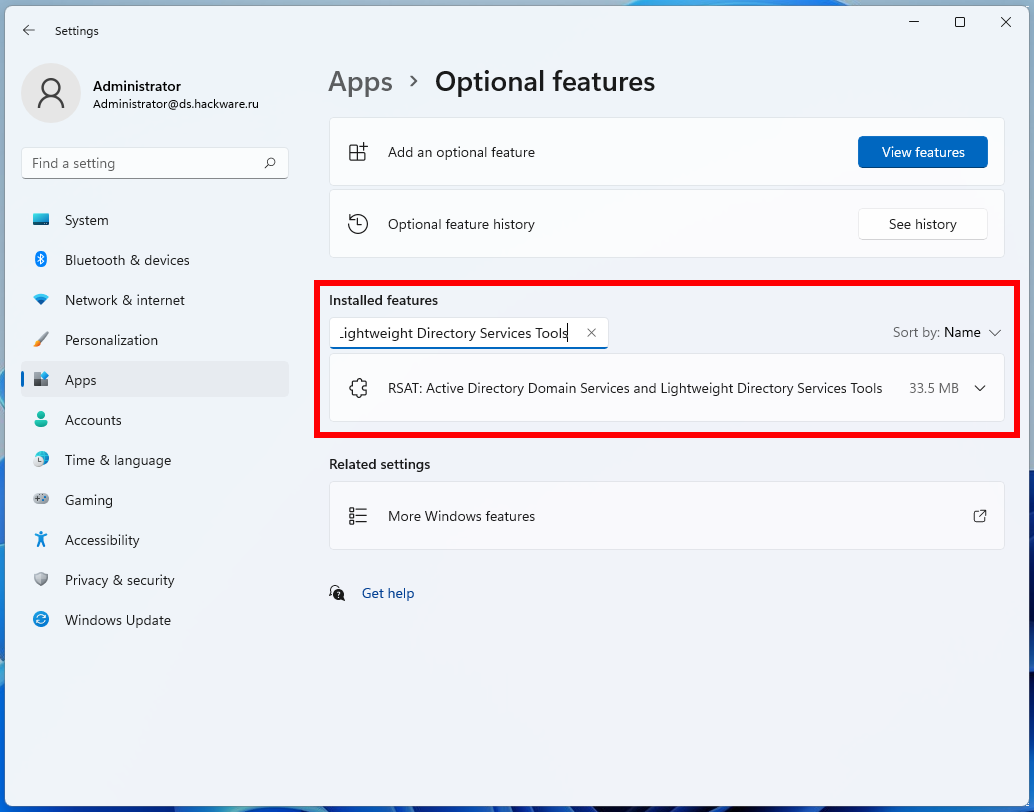
Also, remember that English and localized versions of Windows have different names for these components!
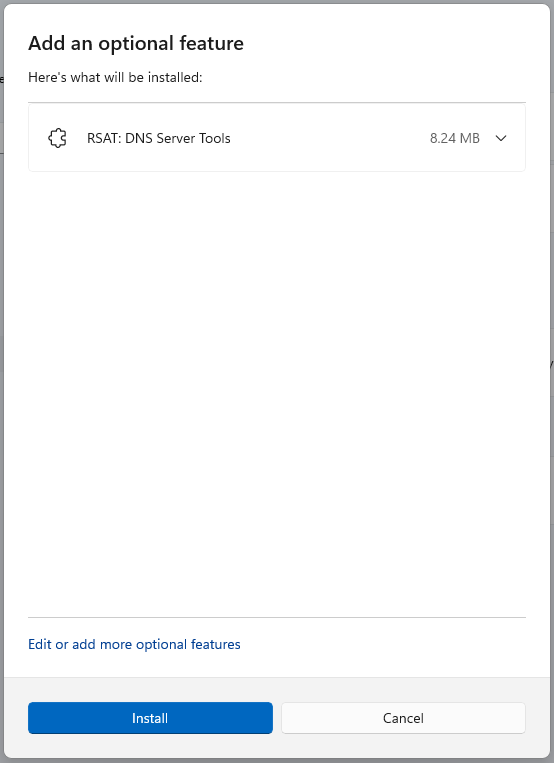
To install the remote DNS administration tools, click again “Add an optional feature” and find “RSAT: DNS Server Tools”, check the box and click on the “Next” button ),

then click “Install”.
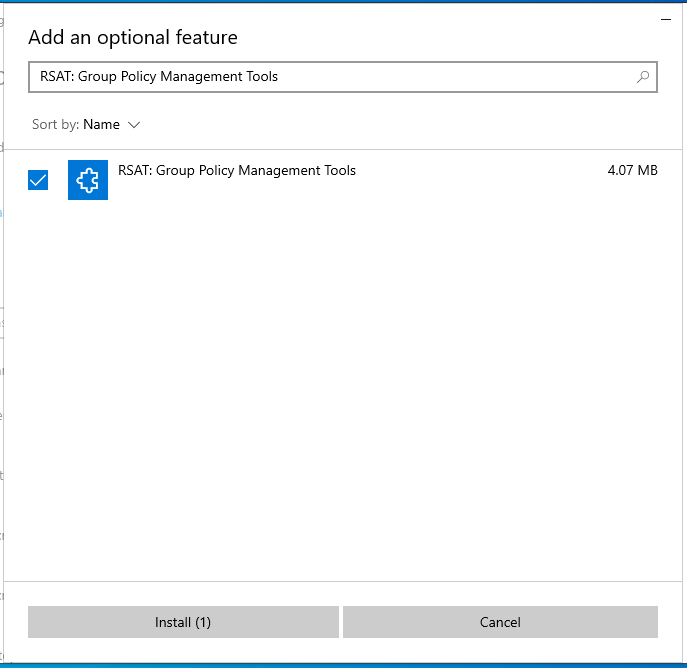
To install the Group Policy Remote Administration Tools, search for “RSAT: Group Policy Management Tools”
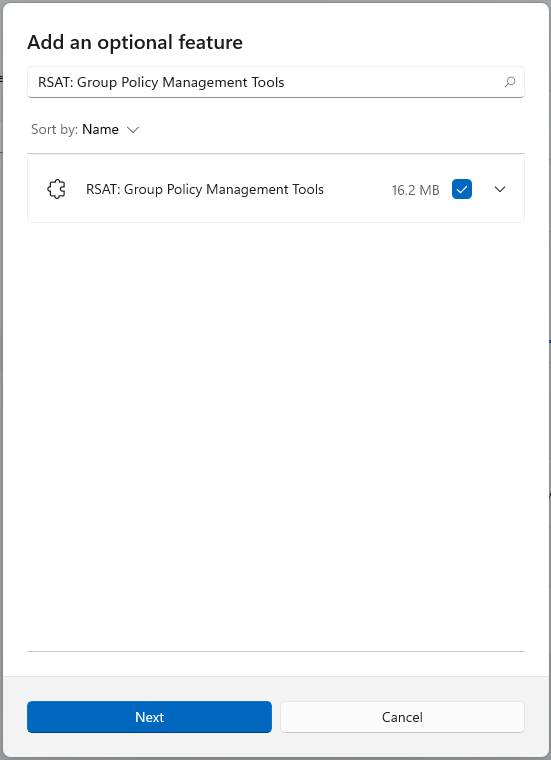
check the box and click the “Next” button, then click “Install”.
As you can see, the additional RSAT components are now installed.

You will now be able to manage Active Directory using a graphical interface.
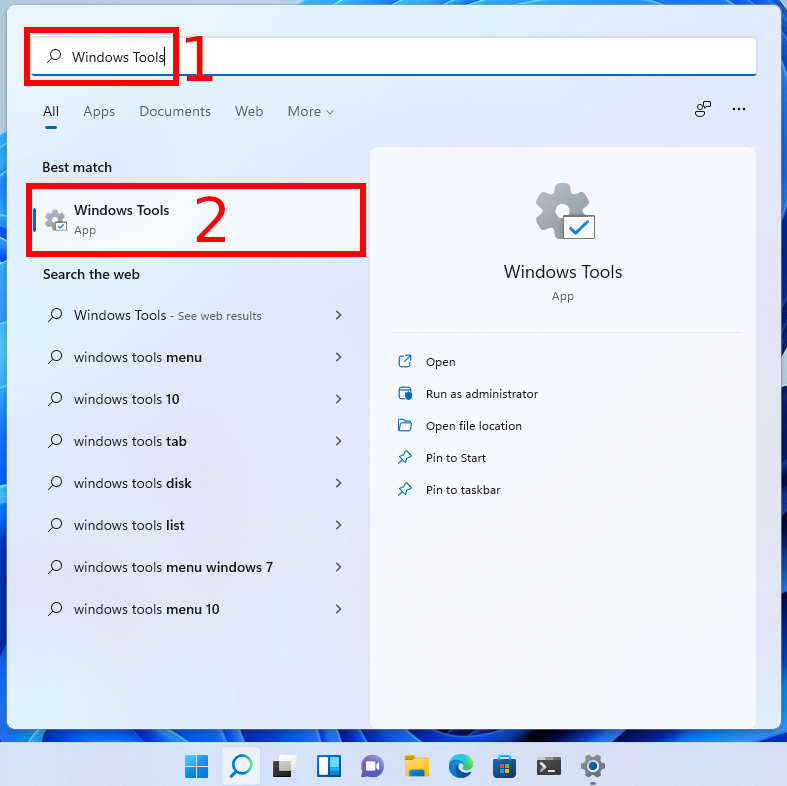
Installed remote administration tools can be found in the Start menu, use the phrase “Windows Tools” to search.
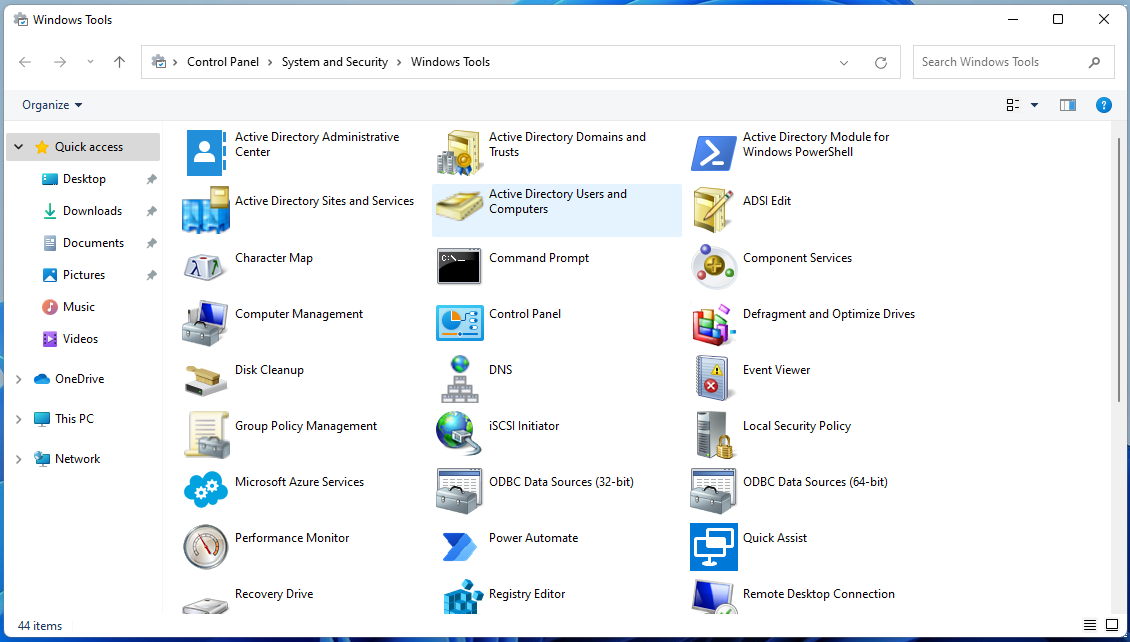
You can also navigate to these tools directly in Explorer by entering the path “Control Panel\System and Security\Windows Tools”.
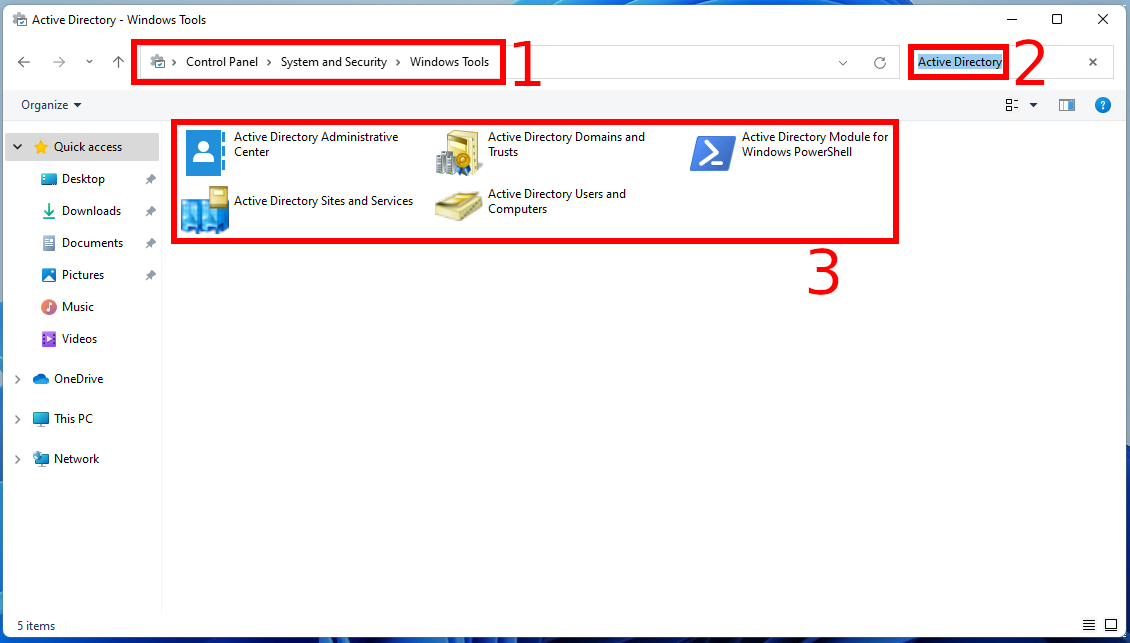
Searching for the phrase “Active Directory” will allow you to filter the tools that are discussed on this page.
On Windows 10
Please note that in Windows 10 (version 1903 and newer), the installation of the RSAT (Remote Server Administration Tools) components can be performed through the Windows graphical interface (as will be shown below). If you are using an earlier version of Windows 10, then you need to download the RSAT installer from the link.
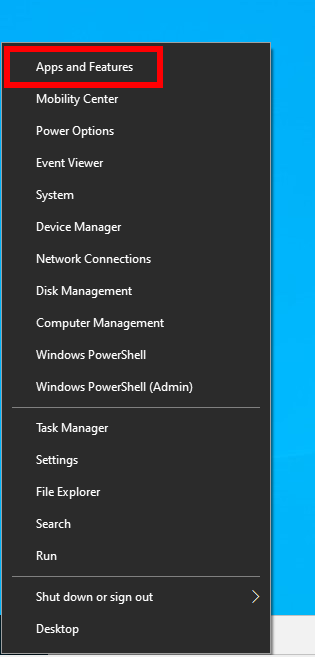
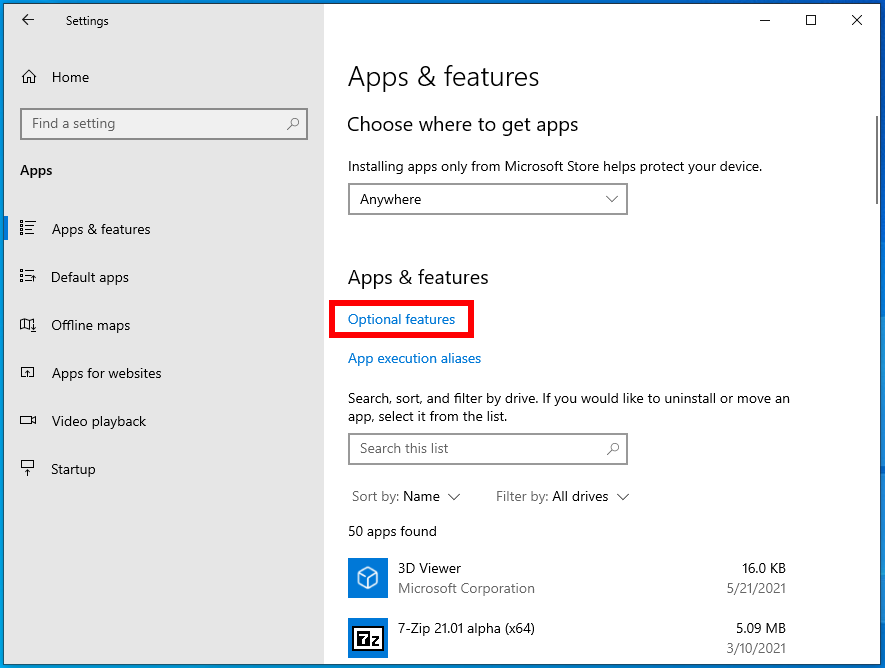
On the computer from which you will manage the server, press Win+x, then select “Apps and Features” from the menu that opens.
Next, select “Optional Features”.
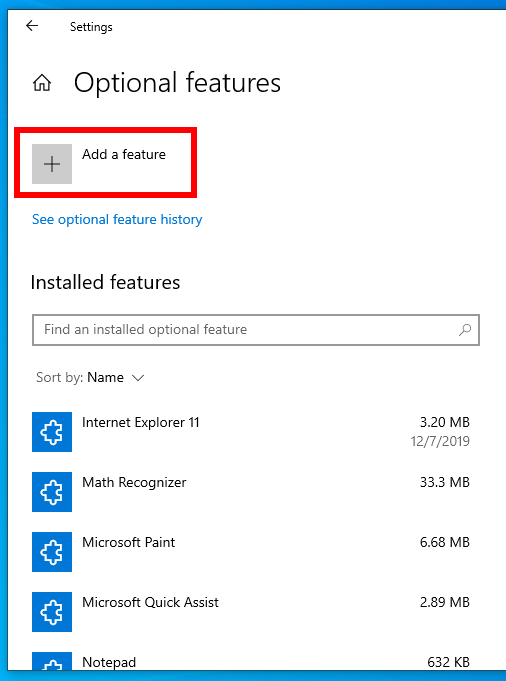
Now select “Add a feature”.
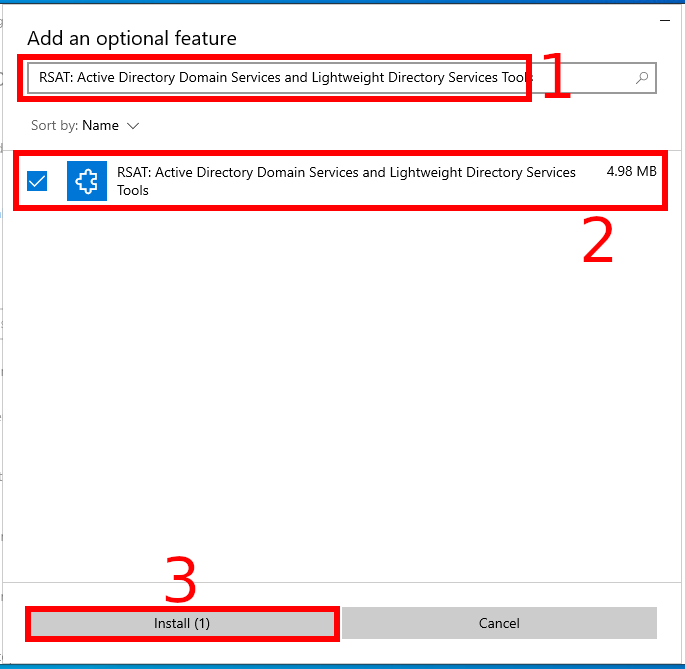
To install the Active Directory Remote Administration Tools, select “RSAT: Active Directory Domain Services and Lightweight Directory Services Tools” and click the “Install” button.
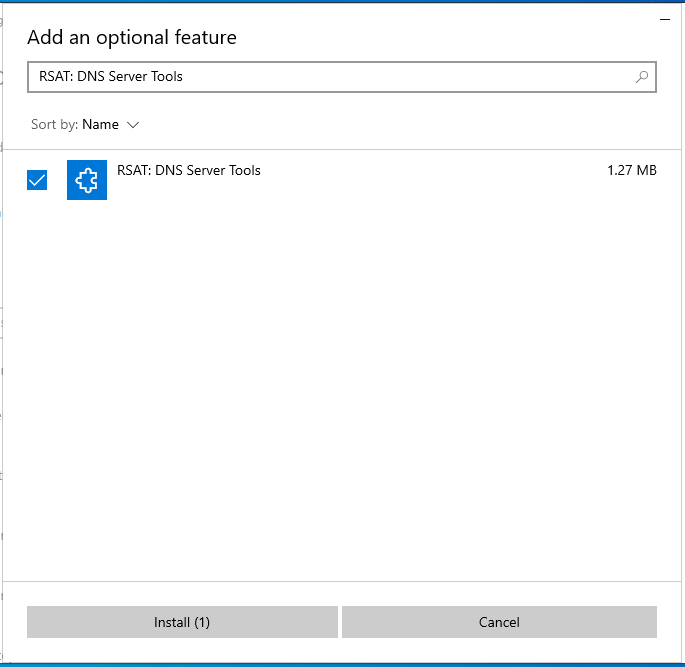
To install the remote DNS administration tools, select “RSAT: DNS Server Tools” and click on the “Install” button.
To install the Group Policy Remote Administration Tools, select “RSAT: Group Policy Management Tools” and click the “Install” button.
You will now be able to manage Active Directory using a graphical interface.

Installed remote administration tools can be found in the Start menu under “Windows Administrative Tools”.
How to manage Active Directory in Windows Admin Center
To enable Windows Admin Center to manage Active Directory, you need to install the appropriate plugin.
To manage Active Directory in Windows Admin Center, go to “Settings”, then to the “Extensions” tab, select “Active Directory” and click the “Install” button.
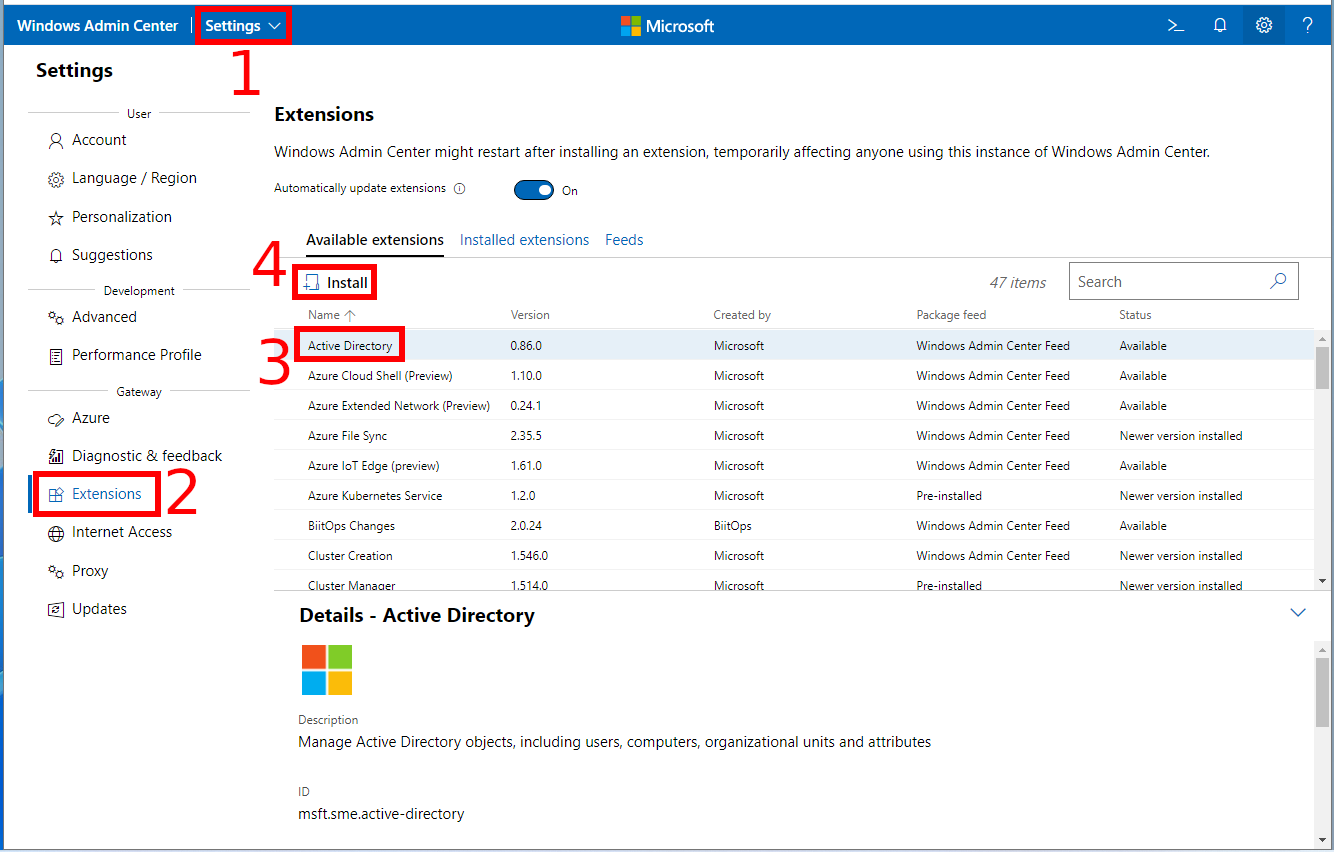
Wait for the installation to complete:

How to install the Active Directory Module for Windows PowerShell
Active Directory Module for Windows PowerShell is used to manage Windows Server Directory Services using cmdlets. You can access the Microsoft Scripting Center at https://devblogs.microsoft.com/scripting/ and the PowerShell gallery at https://www.powershellgallery.com/. Both are well-known repositories of free and open source PowerShell scripts, including a significant collection of scripts related to AD and DNS.
If you have already installed the Active Directory Domain Services role, this means that the Active Directory Powershell module is already activated and you do not need to take any additional steps.
You do not need to deploy Active Directory Domain Services to get this module on Windows Server. You can also install the module from the PowerShell console using the command:
Install-WindowsFeature -Name "RSAT-AD-PowerShell" -IncludeAllSubFeature
The RSAT-AD-PowerShell module can be installed not only on Windows Server, but also on workstations.
On Windows 11 or Windows 10, run this PowerShell command to install the Active Directory module:
Add-WindowsCapability -online -Name "Rsat.ActiveDirectory.DS-LDS.Tools"
To install the Active Directory PowerShell module in a GUI on Windows 11 and Windows 10, follow the installation instructions for “RSAT: Active Directory Domain Services and Lightweight Directory Services Tools” which are given above.
How to use Active Directory management tools
To do something more or less meaningful with these tools, you need to understand the Active Directory infrastructure, which will be covered in the next part. After that, we will study practical examples of configuring computers and users of Active Directory, and in this part, as an example of work, we will limit ourselves to creating a new user in each of the programs under consideration.
How to use the Microsoft Management Console Active Directory snap-in
Microsoft Management Console, MMC is a component of the Windows 2000 and later Windows operating systems. It allows system administrators and power users to configure and monitor the system through a flexible interface.
The Management Console provides more advanced options for managing your computer. The basic principle of operation is in snap-ins – small programs that allow you to customize different aspects of the operating system.
You can also get advanced functions for managing users and groups from the management console, and you can configure many parameters (for example, the title of Internet Explorer windows). The deeper built-in Windows management tool is the Registry Editor.
A complete list of snap-ins can be found in the following places:
- for Windows 11: You can navigate to these tools directly in Explorer by entering the path “Control Panel\System and Security\Windows Tools”.
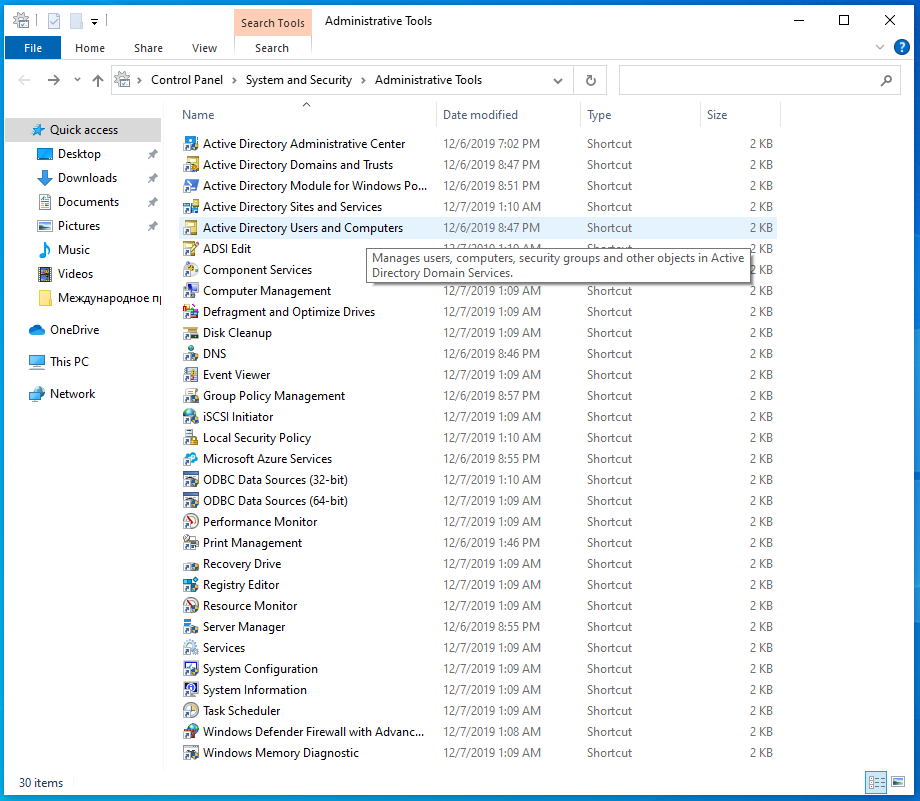
- for Windows 10: “Control Panel\System and Security\Administrative Tools” (this string without quotes can be inserted directly into Explorer.
Installed remote administration tools can be found in the "Start" menu, to search use the phrase
- in Windows 11: “Windows Tools”.
- in Windows 10: “Windows Administrative Tools”.
Searching for the phrase “Active Directory” will allow you to filter the ones discussed on this page.
Alternatively, you can open the desired page on the command line by running:
control /name Microsoft.AdministrativeTools
On the command line, you can immediately open the snap-in you need:
- Active Directory Users and Computers:
dsa.msc
- Active Directory Domains and Trusts:
domain.msc
- Active Directory Sites and Services:
dssite.msc
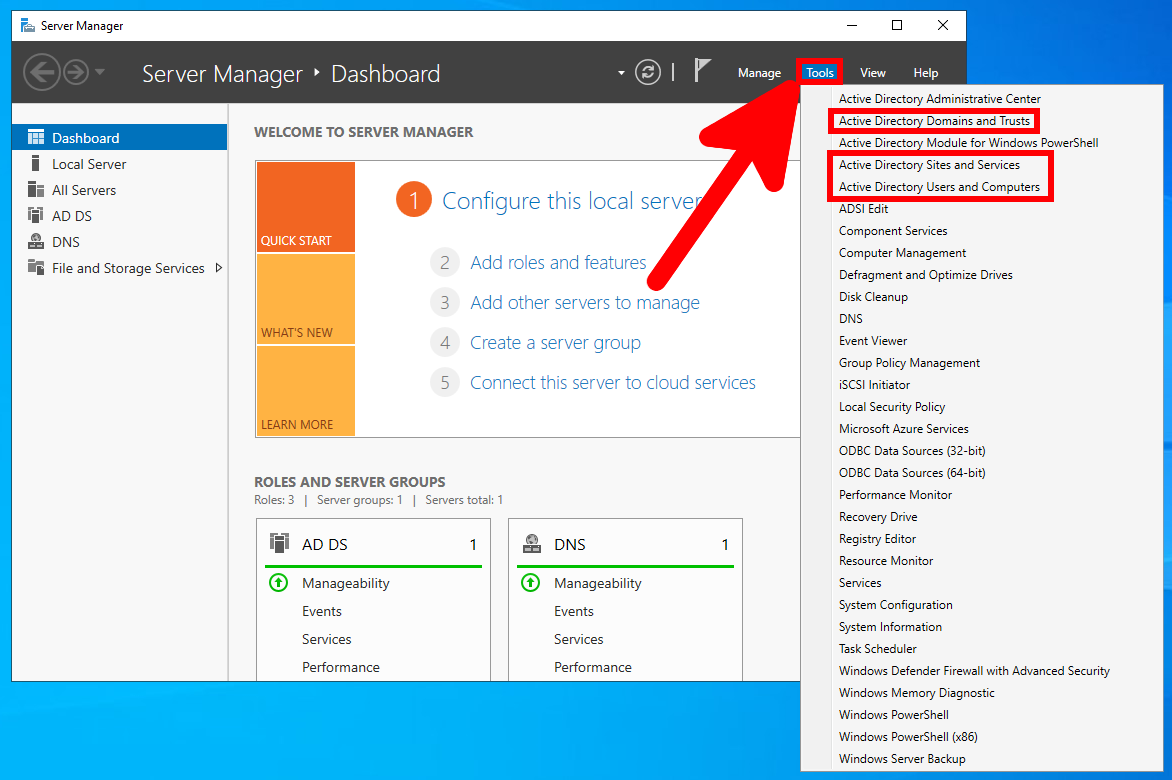
The above methods to open the Active Directory snap-in work on both the server and the workstation. On the server, in addition to these, you can open the required snap-in through the Server Manager. To do this, click on “Tools” in the menu:
To create a new user, open the “Active Directory Users and Computers” snap-in:
dsa.msc
Right-click the Users container and select “New” → “User”.

Enter the required user information and then click “Next”:
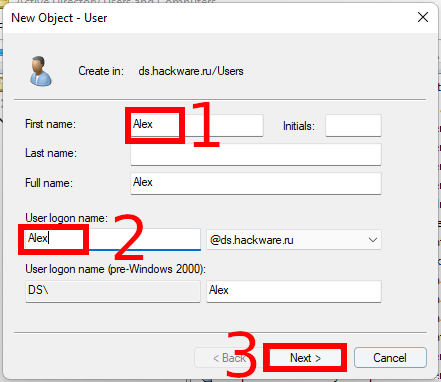
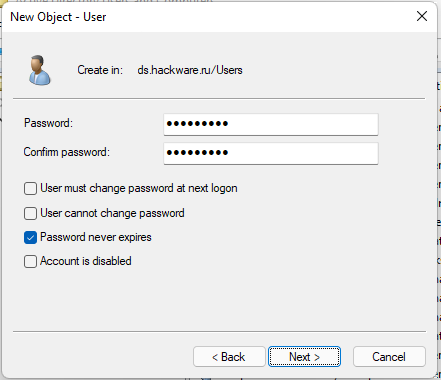
Enter the password for this user and set other settings, for example, you can leave the checkbox “User must change password at next logon”.
Review the information and click “Finish”.
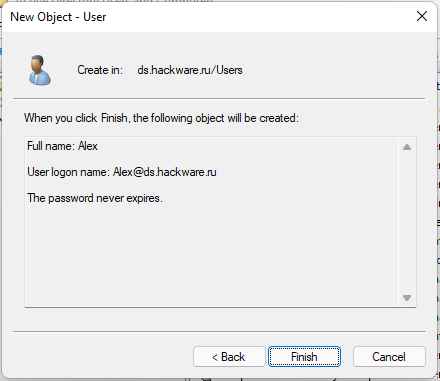
The new user will appear in the list.

Now you can log in under this user on any computer connected to this domain.
Please note that in order to use these tools to manage a remote computer, the machine on which they are running must be part of a domain, otherwise you will receive an error message:
To manage users and groups on this computer, use Local Users and Groups.
To manage users, groups and computers in a domain, log on as a user with domain administration rights.
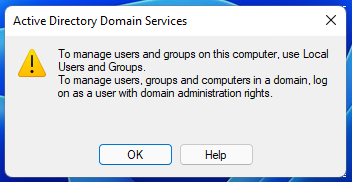
That is, the computer must be part of a domain, and you must also log on as a user who has rights to manage the domain.
How to use the Active Directory Administrative Center
You can open the Active Directory Administrative Center in several ways:
1. On the Server Manager menu
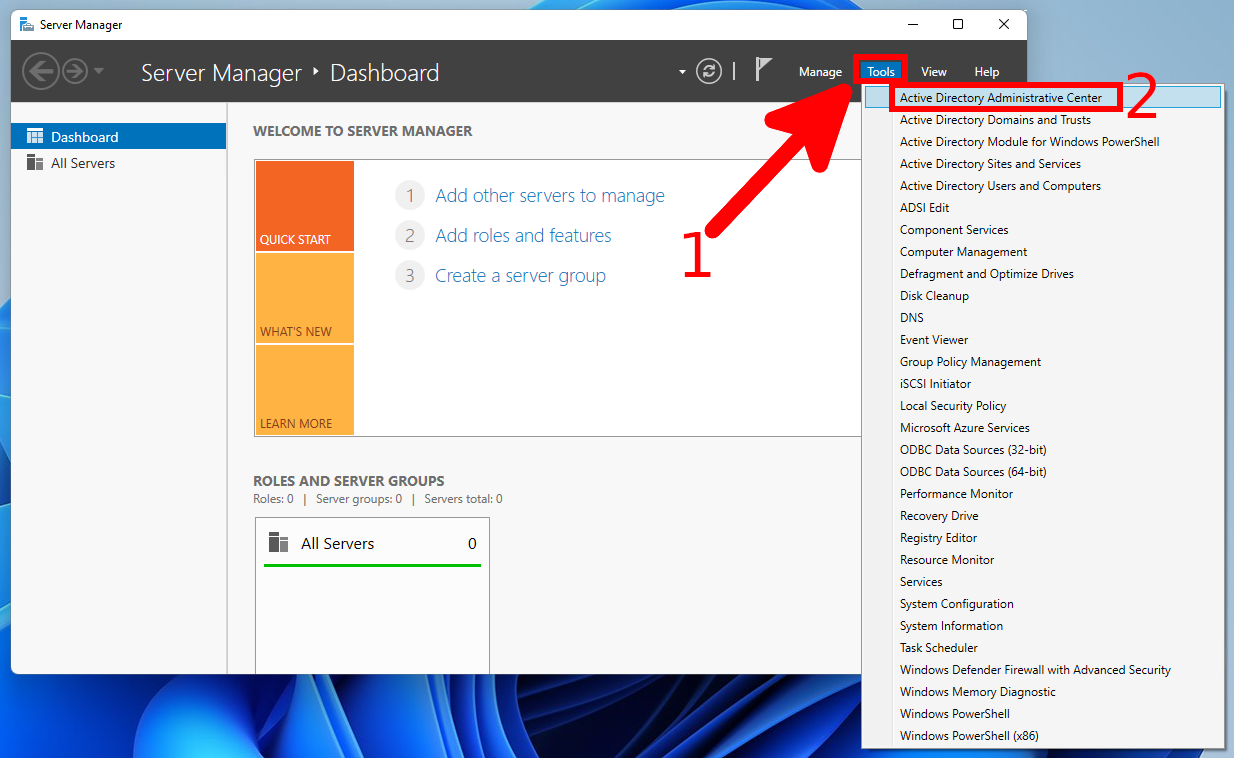
2. Through the “Start” button, search, for this in the search enter “Active Directory Administrative Center”.

3. At the command line, to do this, run
dsac.exe
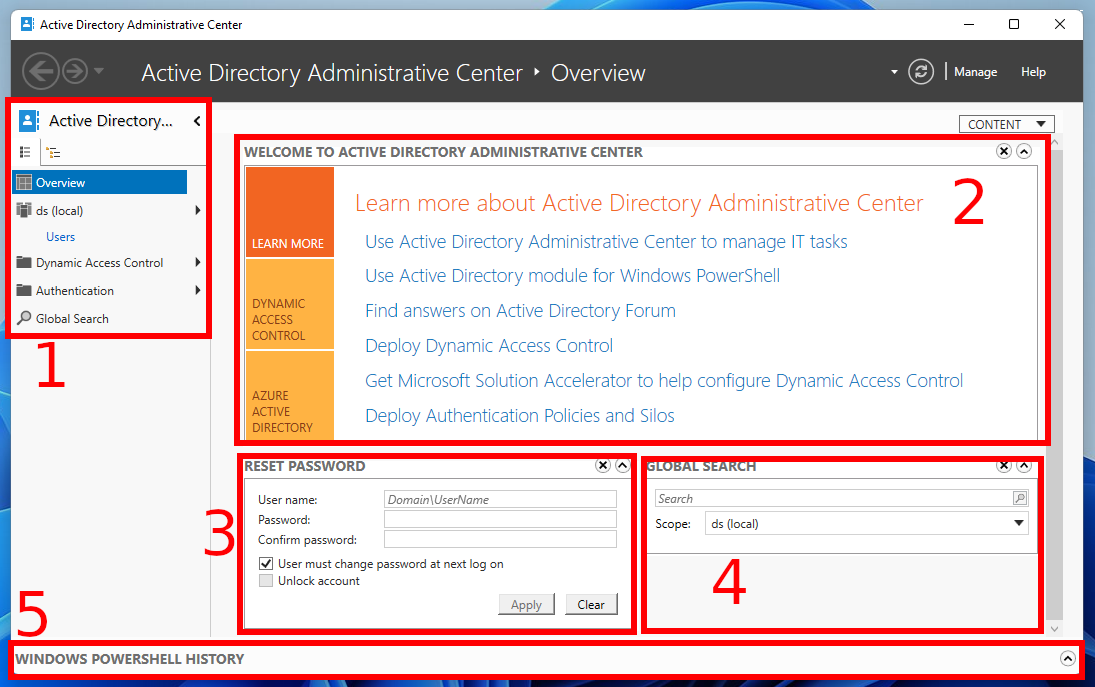
The main window of the Active Directory Administrative Center contains the following sections:
1. Tabs for selecting a domain and navigating to its users and computers, as well as for configuring dynamic access control, checking access control and global search (for example, you can find a user by his name).
2. The central part, it contains the selected content, by default the “Overview” tab is open, with three sections:
1) Learn more – links to help
2) Dynamic Access Control – a list of actions in and out of Active Directory
3) Azure Active Directory
3. In the “Reset Password” window, you can select a user and set a new password for him, force a user to change his password the next time the user logs on, or unlock the user.
4. In the “Global Search” window, you can search by computers, users and other domain objects.
5. Windows PowerShell history – this is where you will see which PowerShell commands were run during the actions you performed. That is, in fact, the Active Directory Administrative Center is a graphical wrapper for PowerShell cmdlets. By the way, the same applies to Windows Admin Center.
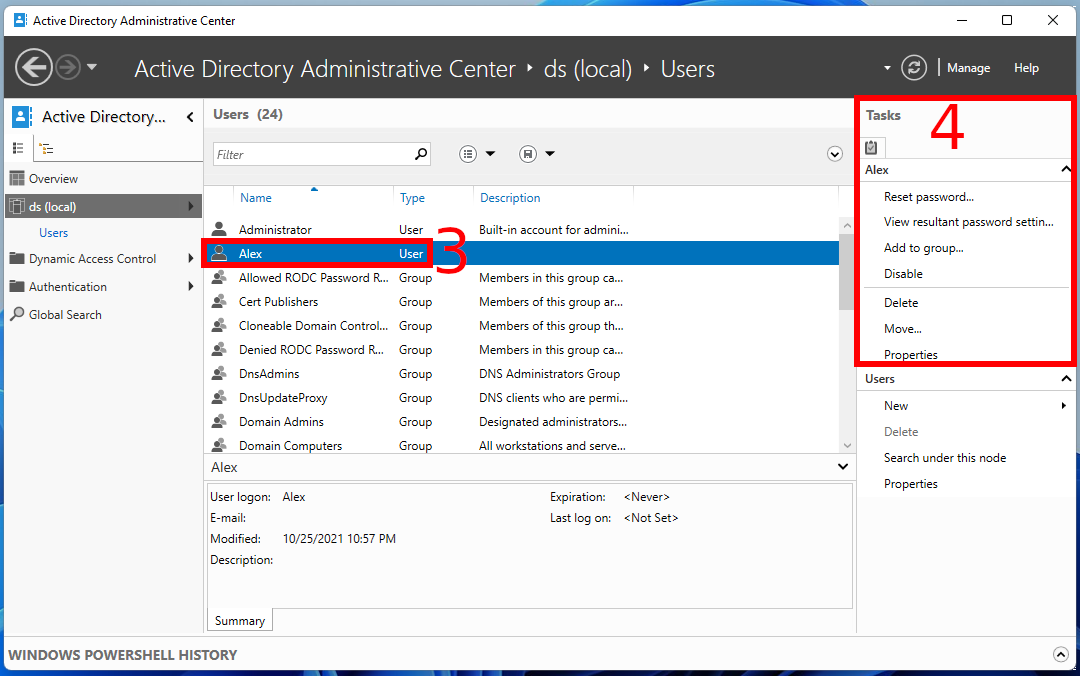
To manage users in the Active Directory Administrative Center, select a domain, click “Users”

click on the user you want to manage and in the “Tasks” window, click on the action you want to do:
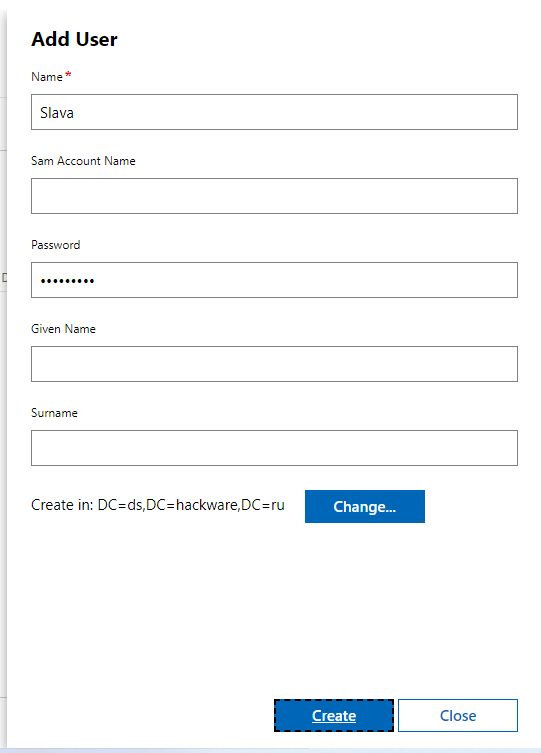
To create a user, in the “Users” window, click “New” → “User”:

Enter user data – the required fields are “Full name” (that is, what will be displayed as a username) and “User SamAccountName logon” (that is, the account name that the user will specify when logging into the computer connected to domain).
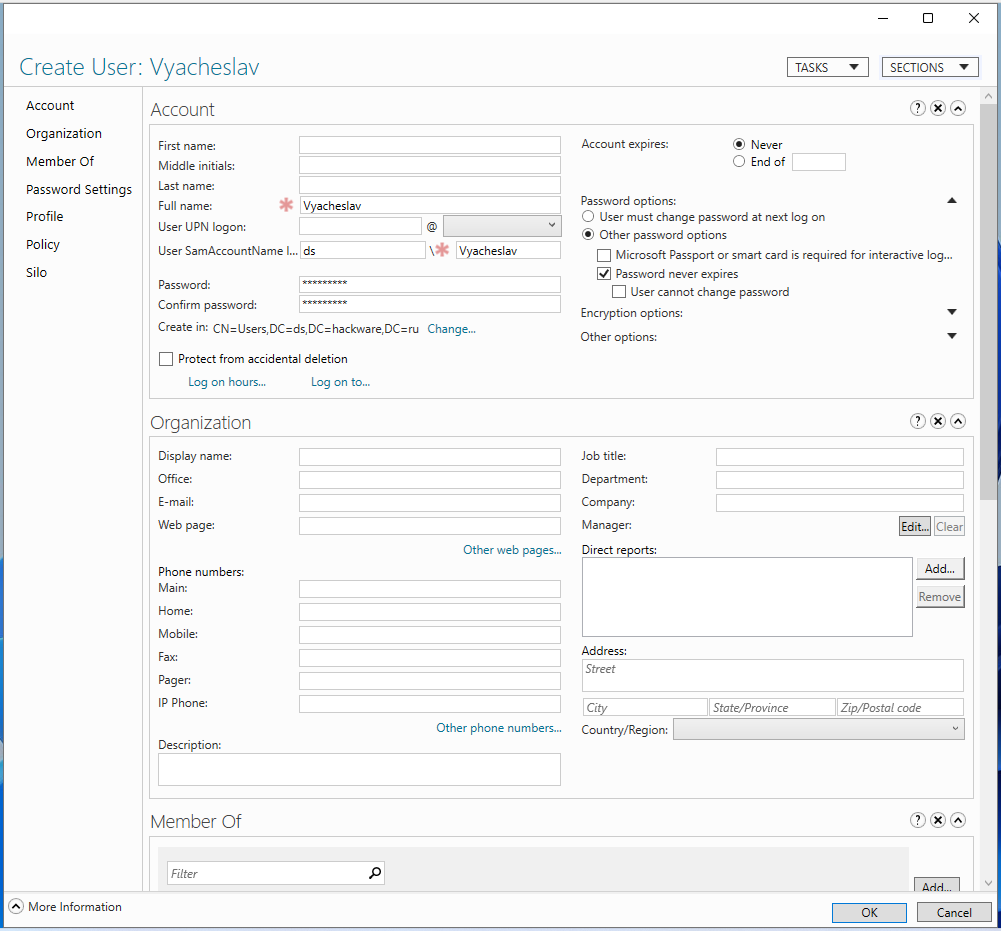
If you wish, you can specify other data. When everything is ready, click “OK”.
Please note that in order to use this tool to control a remote computer, the machine on which it is running must be part of a domain, otherwise you will receive an error message:
Your account or computer is not joined to any domain. Join to a domain and try again.
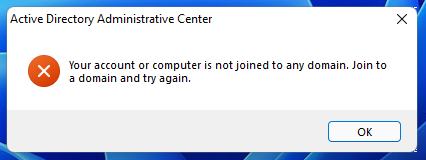
That is, the computer must be part of a domain, and you must also log in as a user who has rights to manage the domain.
How to use Windows Admin Center
A special feature of Windows Admin Center is that the computer running Windows Admin Center does not have to be part of a domain to manage Active Directory. You can manage it from any workstation – you just need to have a domain administrator login and password.
Start Windows Admin Center, log on to the computer you want to manage (Windows Server with Active Directory Domain Services), and go to the “Active Directory” tab.
To view the list of properties and select a particular section, click the “Browse” button:

To create a new user, click on “Create” button located on “Overview” or “Browse” tab:

The required Name is the Full name (it will also be the login, if you do not specify the “SAM Account Name” separately). When everything is ready, click the “Create” button.
How to use the Windows PowerShell Active Directory Module
The following sequence of PowerShell commands will create a MiAl domain user, complete the login setup, configure the account, set the password for the account, and activate it.
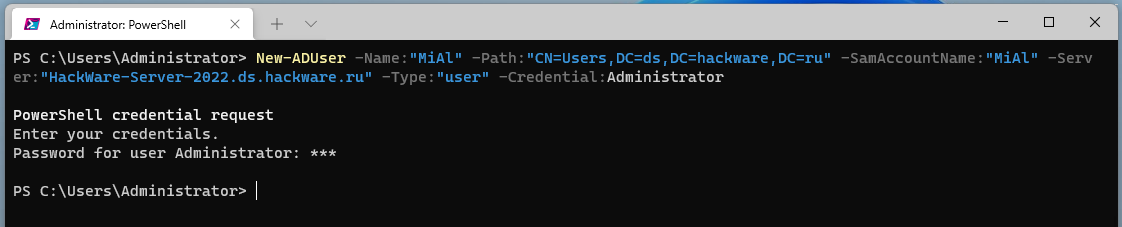
An example PowerShell command to create a new domain user on a remote computer:
New-ADUser -Name:"MiAl" -Path:"CN=Users,DC=ds,DC=hackware,DC=ru" -SamAccountName:"MiAl" -Server:"HackWare-Server-2022.ds.hackware.ru" -Type:"user" -Credential:Administrator
In this command:
- -Name:"MiAl" is the display name of the user “MiAl”
- -Path:"CN=Users,DC=ds,DC=hackware,DC=ru" means that the user will be created in the “Users” container, in the “hackware.ru” domain. That is, the domain name is written in parts: those parts that are separated by a dot are written as “DC=PART1,DC=PART2,DC=PART3”, this is called "X.500 path"
- -SamAccountName:"MiAl" is the login name that must be entered when log on the domain, in this case it is “MiAl”
- -Server:"HackWare-Server-2022.ds.hackware.ru" is the full computer name, represents the record “COMPUTER_NAME-DOMAIN”
- -Type:"user" means a user is created
- -Credential:Administrator is the name of the domain administrator, the password will need to be entered in the command line. If you run the command to create a user on the domain server and are already logged in as a domain administrator, then you can skip this option
Note that the previous command created a user, but that user is not configured or even activated. Additional commands are required for configuration and activation.
The following command configures the user's logon options:
Set-ADUser -ChangePasswordAtLogon:$false -Identity:"CN=MiAl,CN=Users,DC=ds,DC=hackware,DC=ru" -Server:"HackWare-Server-2022.ds.hackware.ru" -SmartcardLogonRequired:$false -Credential:Administrator

In this command:
- -ChangePasswordAtLogon:$false means the user does not need to change the password at the next logon. You can set the value to $true – in this case, the user must change the password upon login
- -Identity:"CN=MiAl,CN=Users,DC=ds,DC=hackware,DC=ru" is identification of the “MiAl” user
- -Server:"HackWare-Server-2022.ds.hackware.ru" is the remote domain server
- -SmartcardLogonRequired:$false means that no smart card is required
- -Credential:Administrator is the name of the domain administrator, the password will need to be entered in the command line. If you run the command to create a user on a domain server and are already logged in as a domain administrator, then this option can be skipped
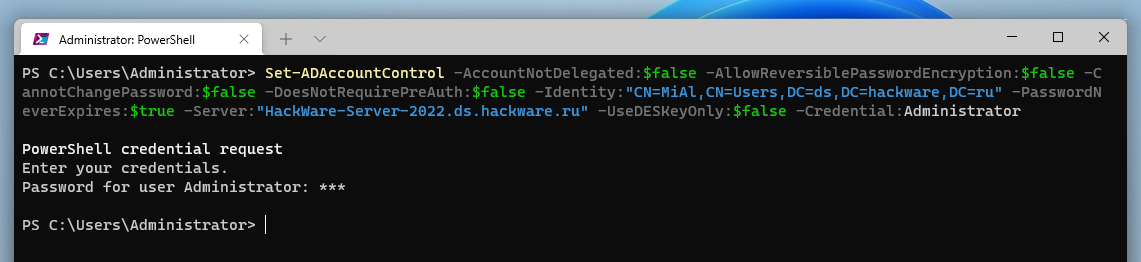
The following command sets up account properties:
Set-ADAccountControl -AccountNotDelegated:$false -AllowReversiblePasswordEncryption:$false -CannotChangePassword:$false -DoesNotRequirePreAuth:$false -Identity:"CN=MiAl,CN=Users,DC=ds,DC=hackware,DC=ru" -PasswordNeverExpires:$true -Server:"HackWare-Server-2022.ds.hackware.ru" -UseDESKeyOnly:$false -Credential:Administrator
In this command (from new options):
- -AccountNotDelegated:$false
- -AllowReversiblePasswordEncryption:$false
- -CannotChangePassword:$false means the user can change the password
- -DoesNotRequirePreAuth:$false
- -PasswordNeverExpires:$true — means the password never expires
- -UseDESKeyOnly:$false
A more detailed description of these options can be found on the page: https://docs.microsoft.com/en-us/powershell/module/activedirectory/set-adaccountcontrol?view=windowsserver2022-ps
The following command sets the password for the specified user:
Set-ADAccountPassword -Identity:"CN=MiAl,CN=Users,DC=ds,DC=hackware,DC=ru" -Reset:$true -Server:"HackWare-Server-2022.ds.hackware.ru" -Credential:Administrator
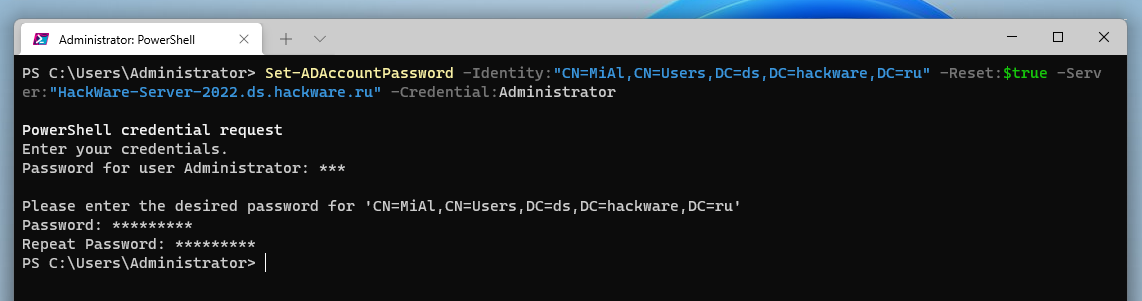
In this command (only new options):
- -Reset:$true indicates that you need to reset the password
When running the command, you will need to enter the domain administrator password first, and then the password that you want to set for the specified user.
The following command will activate the account:
Enable-ADAccount -Identity:"CN=MiAl,CN=Users,DC=ds,DC=hackware,DC=ru" -Server:"HackWare-Server-2022.ds.hackware.ru" -Credential:Administrator
All options of the previous command are already familiar from the above cmdlets.
If you encounter an error:
Enable-ADAccount: The password does not meet the length, complexity, or history requirement of the domain.
# OR
Set-ADAccountPassword: The password does not meet the length, complexity, or history requirement of the domain.
then it means that the password set using the Set-ADAccountPassword cmdlet is not valid. In the default policy, the password must contain at least one uppercase and lowercase letter, as well as a number; the password itself must be at least seven characters long.
After completing all these commands, you can log on as the created user.
Please note that in the commands discussed, you need to replace the value of the line
CN=MiAl
to the name of the created and configured user.
Also notice the line
DC=ds,DC=hackware,DC=ru
in it you need to specify your domain.
Related articles:
- Active Directory comprehensive guide, from installation and configuration to security auditing. Part 7: Understanding the AD infrastructure (83.9%)
- Active Directory comprehensive guide, from installation and configuration to security auditing. Part 1: Introduction to Active Directory (concepts, usage, difference from Workgroup) (70.4%)
- Active Directory comprehensive guide, from installation and configuration to security auditing. Part 3: Windows Server 2022 and Windows Server Core 2022 configuration tools (70.4%)
- Active Directory comprehensive guide, from installation and configuration to security auditing. Part 5: Join computers to Active Directory. Check and unjoin from Active Directory (70.4%)
- Active Directory comprehensive guide, from installation and configuration to security auditing. Part 4: Install Active Directory Domain Services in Windows Server 2022 (70.1%)
- How to add Kali Linux repositories to another Linux distribution (RANDOM - 50%)