OpenVPN advanced usage examples
Table of contents
1. Script to automate the creation of OpenVPN configuration files
1.1 Re-running the OpenVPNassistent script
2. How to use .ovpn files with OpenVPN server and clients
3. How to connect to OpenVPN from Android
4. How to use OpenVPN to access network services on computers behind NAT (with private IP)
5. How to make static IPs for OpenVPN clients
6. Bypassing Captive Portals with OpenVPN
7. Bypassing Captive Portals from the phone
8. Access to public resources of the OpenVPN server
9. How to capture and analyze VPN traffic with Wireshark
10. Migrating from OpenVPN 2.4.* to OpenVPN 2.5.*
11. How to use OpenVPN with TCP protocol
12. Comparison of performance (data transfer rate) of OpenVPN over UDP and TCP
13. Simultaneous use of multiple OpenVPNs on one server
15. Managing OpenVPN Connections on Linux
15.1 How to manage VPN Settings in Cinnamon
15.2 How to manage VPN Settings in Xfce
15.3 How to manage VPN Settings in GNOME 3
16. How to connect to VPN via proxy or Tor
17. How to connect to Tor with OpenVPN
18. Script to connect and disconnect from OpenVPN depending on server availability
Many people use OpenVPN to hide their real IP and bypass censorship in the Internet. But the possibilities of VPN technology are not limited to this. According to its concept (Virtual Private Network), using OpenVPN, you can configure virtual private networks, thus organizing a closed space from the outside with convenient access to local resources for those who are connected to these networks. Moreover, these resources are “local” inside a virtual private network, that is, in fact, a remote computer can be connected to the Internet at the other end of the world through two NATs, but we can connect to its web server or file storage directly inside virtual network. That is, this approach allows you to solve other problems: access to the resources of a computer that is behind NAT (which does not have a static public IP), encryption of transmitted data, access to the Internet hiding your real IP, and others.
In the previous article, I showed you how to configure the OpenVPN server and clients. Now I propose to continue studying OpenVPN and consider different tips of not quite standard use of OpenVPN: bypassing intercepting portals, bypassing NAT restrictions, using the advantages of a virtual private network.
By the way, if you need a VPS server so that you can install OpenVPN on it and repeat what I'm showing, then try this one.
Script to automate the creation of OpenVPN configuration files
If you looked at the guide “How to set up OpenVPN server and clients”, you might have noticed that it is very large. By the way, some time ago I supplemented and corrected this instruction (in terms of installation on Debian, Ubuntu, Linux Mint, Kali Linux).
To make life a little easier, I wrote an OpenVPNassistent script that helps automate the process of generating configuration files and keys for the OpenVPN server and clients. Moreover, this script creates configuration files with built-in certificates (there are 5 for the server, and 4 for each client). The script, as much as possible, automates all processes.
The script supports Debian derivatives (Ubuntu, Kali Linux, Linux Mint), as well as Arch Linux derivatives (BlackArch, Manjaro). I've tested it on Kali Linux, Arch Linux/BlackArch, Ubuntu.
Download the script:
git clone https://github.com/Mi-Al/OpenVPNassistent
cd OpenVPNassistent
Launch the script:
sudo bash openvpnassistent.sh
When launched, the script will check if OpenVPN is installed, if not installed, it will ask for permission and install.
Next, it will check if a Certificate Authority (CA) has been created – if not, it will offer to create it, confirm it.

Think up, enter and (most importantly) remember the certificate authority password. Then confirm this same password:
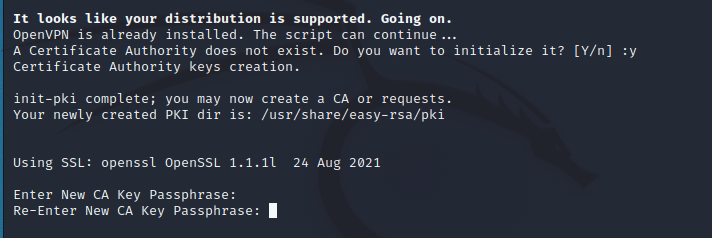
You will be asked for the name of the CA, it is not necessary to change anything, just press Enter:
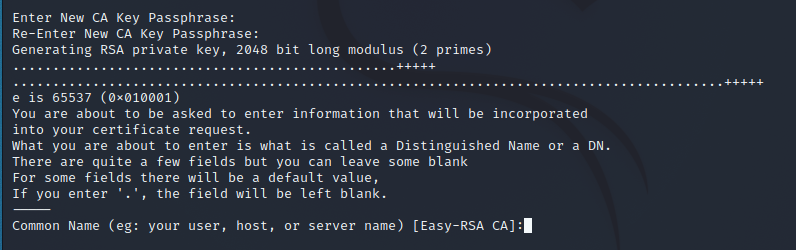
The CA public-private key pair will be generated and saved.
Now the script asks the question for how many clients you need to create configuration files (for each of them its own file with its own certificates will be created).
Also, the script will ask for the IP address of the OpenVPN server. If you do not know it, then leave the field blank – but then you will have to manually add it to each client config file.
The script also asks which port OpenVPN will use. The default port is 1194. You can select any unoccupied port, for example, I use 53 – then I will show how OpenVPN on port 53 helps bypass Captive Portals (hotspots with authorization on the web interface).

Next, the script proceeds to create certificates. First, we are asked for the name of the server, just press Enter:
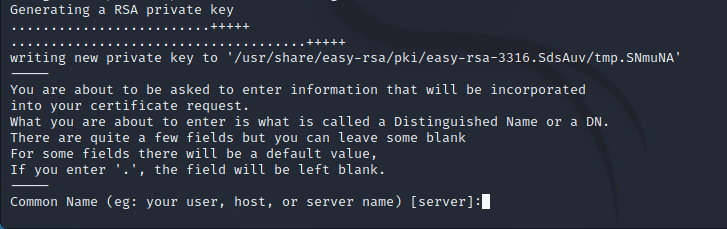
If everything went well, a message will appear that a private key (.key file) has been created and a request file (.req) has been created.
Keypair and certificate request completed. Your files are:
req: /usr/share/easy-rsa/pki/reqs/server.req
key: /usr/share/easy-rsa/pki/private/server.key
To obtain a certificate (public key), you need to sign the request file – this is where the script goes immediately. We are asked if we want to sign the key for, we type “yes”:
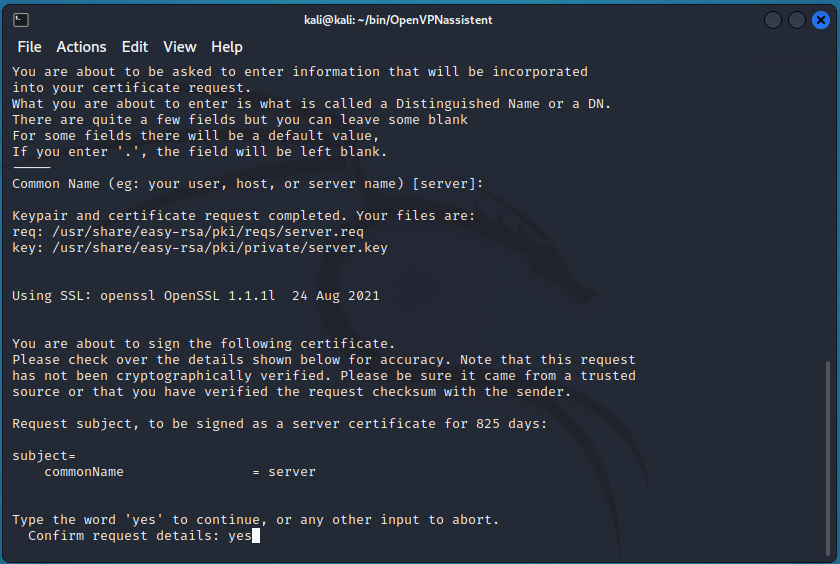
Enter the certification authority password:
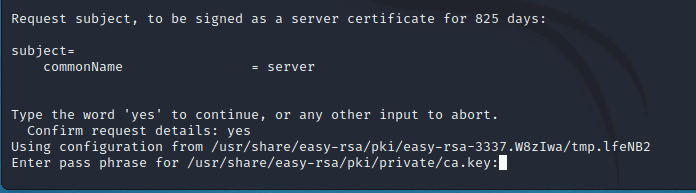
If everything is fine, then the output will be:
Check that the request matches the signature
Signature ok
The Subject's Distinguished Name is as follows
commonName            :ASN.1 12:'server'
Certificate is to be certified until Feb 25 10:13:31 2024 GMT (825 days)

Write out database with 1 new entries
Data Base Updated

Certificate created at: /usr/share/easy-rsa/pki/issued/server.crt
Immediately after that, the creation of two more keys will begin – this happens completely automatically.
Now let's move on to creating keys for clients. When the script asks for customer names, just hit Enter:
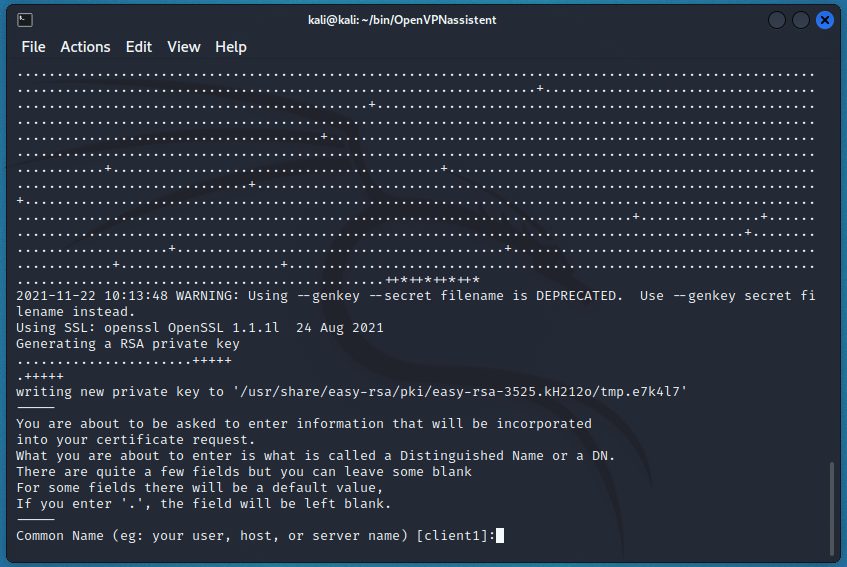
Further, it is similar to creating a private-public server key pair. That is, all files are created automatically, you only need to enter “yes” at the CA request, as well as the password from the CA:
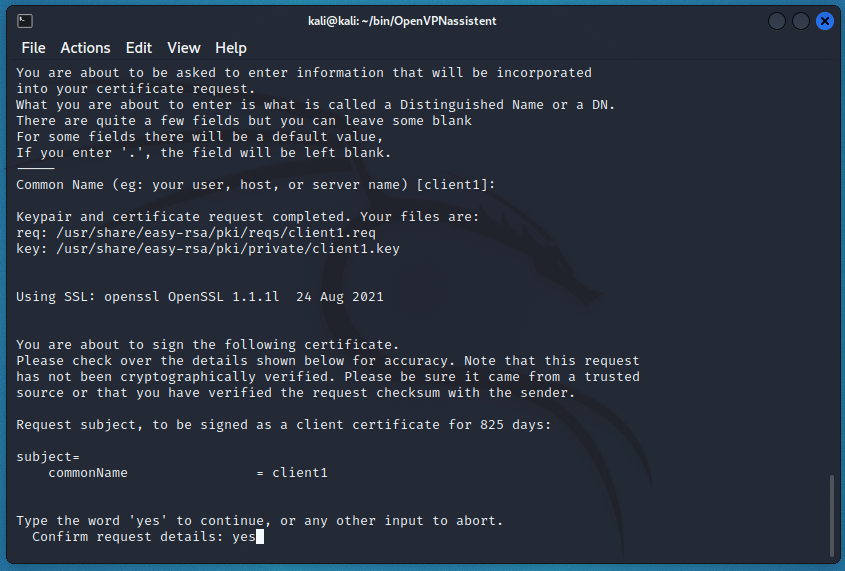
This needs to be done for each client.
When the script completes, it will display information about the files created:
Configuration files are created, they are located in the folder :/home/kali/bin/OpenVPNassistent/configs/
total 36
-rw-r--r-- 1 root root 8310 Nov 22 10:16 client1.ovpn
-rw-r--r-- 1 root root 8310 Nov 22 10:16 client2.ovpn
-rw-r--r-- 1 root root 8974 Nov 22 10:13 server.conf
These files are located in the script folder in the configs subfolder. All certificates are already embedded inside the configuration files – this is very convenient, you do not need to place them, write paths. Moreover, the created configuration files are universal – you can use them to connect to the OpenVPN server from Linux, Windows, Android.
Re-running the OpenVPNassistent script
When you restart it, nuances appear. First, if you don't change the server and client names, the script will ask if you need to overwrite existing files? Second, if you use the same client and server file names, then creating a signed certificate for them will always fail with the error that such a certificate already exists in the database. This “database” is a series of plain text files that list previously generated certificates. This is very similar to a bug, as there is no way to sign a certificate for the same name. Therefore, to “work around” this problem, in case ones need to re-create certificates for the server and clients with the same names (server, client1, client2, client3, etc.), we simply delete the CA and you can just delete the CA and then re-create it.
To remove a CA in Debian and derivatives (along with the keys of the CA itself, as well as all other keys generated in the CA):
sudo rm -rf /usr/share/easy-rsa/pki/
To remove a CA on Arch Linux and derivatives (along with the keys of the CA itself, as well as all other keys generated in the CA):
sudo rm -rf /etc/easy-rsa/pki/
If you have your own settings and your own infrastructure there, then do not do this!!! If you create a CA just to sign keys for the OpenVPN server/clients, then there is nothing wrong with that – the exact same CA can be initialized with one command as many times as you like.
And this is not some kind of problem with my script – this is an easy-rsa problem for which my script is a wrapper. That is, if you manually enter the commands to create each certificate, you will face exactly the same problems.
How to use .ovpn files with OpenVPN server and clients
Since this can be confusing, let's go back to the theory behind the basics of how OpenVPN server and clients work.
To run OpenVPN server you need:
- config file
- 5 certificates
In the previous article on configuring OpenVPN, we placed the necessary certificates, then we wrote the path to each of these certificates in the configuration file, and only then we started the OpenVPN server pointing to our configuration file.
For OpenVPN, certificate files can be embedded into the configuration file. I described how to do this in the supplement to that article.
At the previous stage, using a script, we created configuration files in which all the necessary certificates are already embedded – that is, we do not need to install them separately on the server and clients. All you need to do is copy the server.conf file to the server, and scatter the client1.ovpn, client2.ovpn, etc. files among the appropriate clients.
The server.conf file can be uploaded to the server using the scp and sftp utilities, using FTP or a web file manager – in general, as you can. Moreover, if you have SSH access, you can simply create a text file on the server using nano/vim and copy-paste the contents of the server.conf file, since this file is in plain text.
To check, I run OpenVPN on the server in the console (the server.conf file is located in the current folder):
sudo openvpn server.conf

An inscription appeared
Initialization Sequence Completed
This means that the OpenVPN server has started successfully.
Now, on the client side, I run (the file with the settings is located in the bin/OpenVPNassistent/configs/client1.ovpn path):
sudo openvpn bin/OpenVPNassistent/configs/client1.ovpn
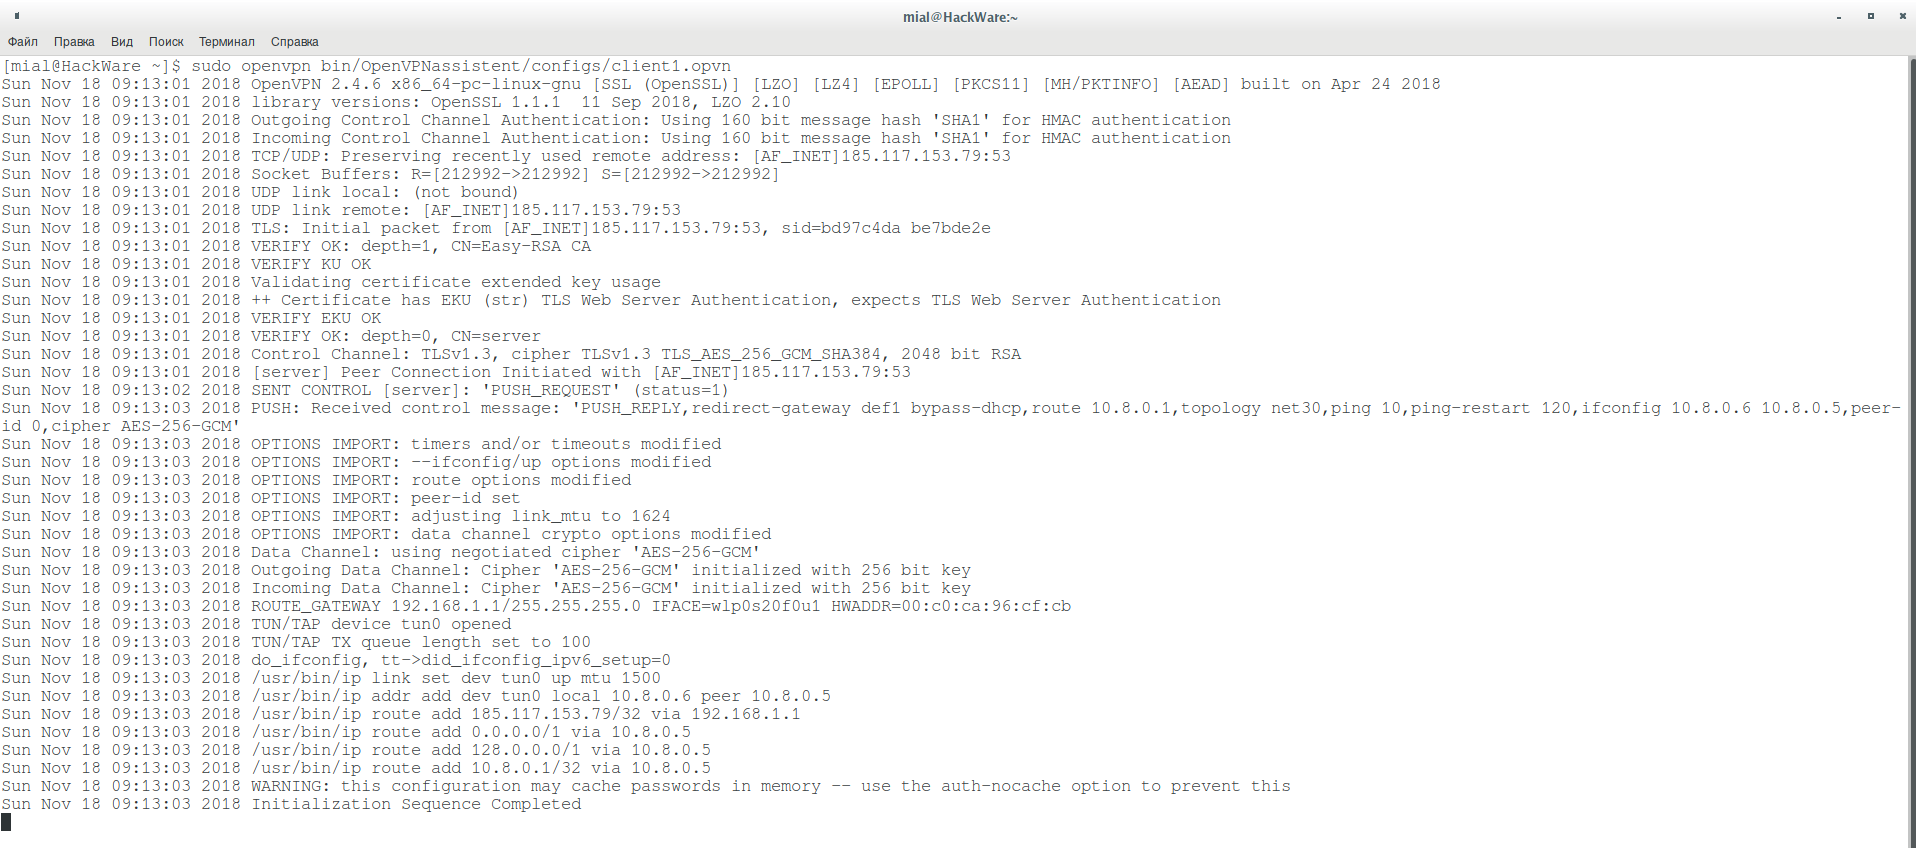
Similarly, the inscription
Initialization Sequence Completed
indicates that we have successfully connected to the OpenVPN server.
By the way, to access the Internet through the OpenVPN network, you need to configure routing on the server.
Let’s look at the OpenVPN server window again:

There are numerous messages that the packet was dropped:
Sun Nov 18 09:13:29 2018 us=592651 client1/IP:48143 MULTI: bad source address from client [192.168.1.47], packet dropped
Sun Nov 18 09:13:31 2018 us=358682 client1/IP:48143 MULTI: bad source address from client [192.168.1.47], packet dropped
Sun Nov 18 09:13:32 2018 us=308208 client1/IP:48143 MULTI: bad source address from client [192.168.1.47], packet dropped
Sun Nov 18 09:13:33 2018 us=158781 client1/IP:48143 MULTI: bad source address from client [192.168.1.47], packet dropped
Sun Nov 18 09:13:39 2018 us=987556 client1/IP:48143 MULTI: bad source address from client [192.168.1.47], packet dropped
Sun Nov 18 09:13:47 2018 us=230574 client1/IP:48143 MULTI: bad source address from client [192.168.1.47], packet dropped
Sun Nov 18 09:13:50 2018 us=281534 client1/IP:48143 MULTI: bad source address from client [192.168.1.47], packet dropped
Sun Nov 18 09:13:56 2018 us=199194 client1/IP:48143 MULTI: bad source address from client [192.168.1.47], packet dropped
One would think that there are problems, but, in fact, the OpenVPN network works, on the client you can check:
traceroute ya.ru
traceroute to ya.ru (87.250.250.242), 30 hops max, 60 byte packets
 1  10.8.0.1 (10.8.0.1)  267.816 ms  268.462 ms  269.124 ms
 2  rbr01-sklk-vlan130.marosnet.net (94.142.138.129)  293.287 ms  294.046 ms  299.076 ms
 3  94.142.138.39 (94.142.138.39)  310.788 ms  320.332 ms  330.794 ms
 4  styri.yndx.net (195.208.208.116)  343.901 ms  360.920 ms  395.540 ms
 5  ya.ru (87.250.250.242)  406.716 ms  417.901 ms  428.535 ms
The traffic goes through node 10.8.0.1 – this is the gateway of our virtual private network, that is, everything is working fine. For some reason, local packets (maybe they are broadcast packets?) end up on the OpenVPN server. On the one hand, there is nothing particularly terrible in this – they are simply discarded. But, on the other hand, this is wrong – you need to figure out the routing – I'll come back to this sometime later.
If everything is alright for you, then the server.conf file can be placed in the /etc/openvpn/server/ folder:
sudo mv ~/server.conf /etc/openvpn/server/
and start the background OpenVPN service:
sudo systemctl start openvpn-server@server.service
check its status:
systemctl status openvpn-server@server.service

and then add it to startup:
sudo systemctl enable openvpn-server@server.service
How to connect to OpenVPN from Android
I'll show you how to connect with the .ovpn file that was created using my script at the beginning of this article.
Download the official OpenVPN client on Google Play. Run the program, select OVPN Profile there:

Upload the .ovpn file to your phone and find it with OpenVPN client. Then highlight and press the IMPORT button:
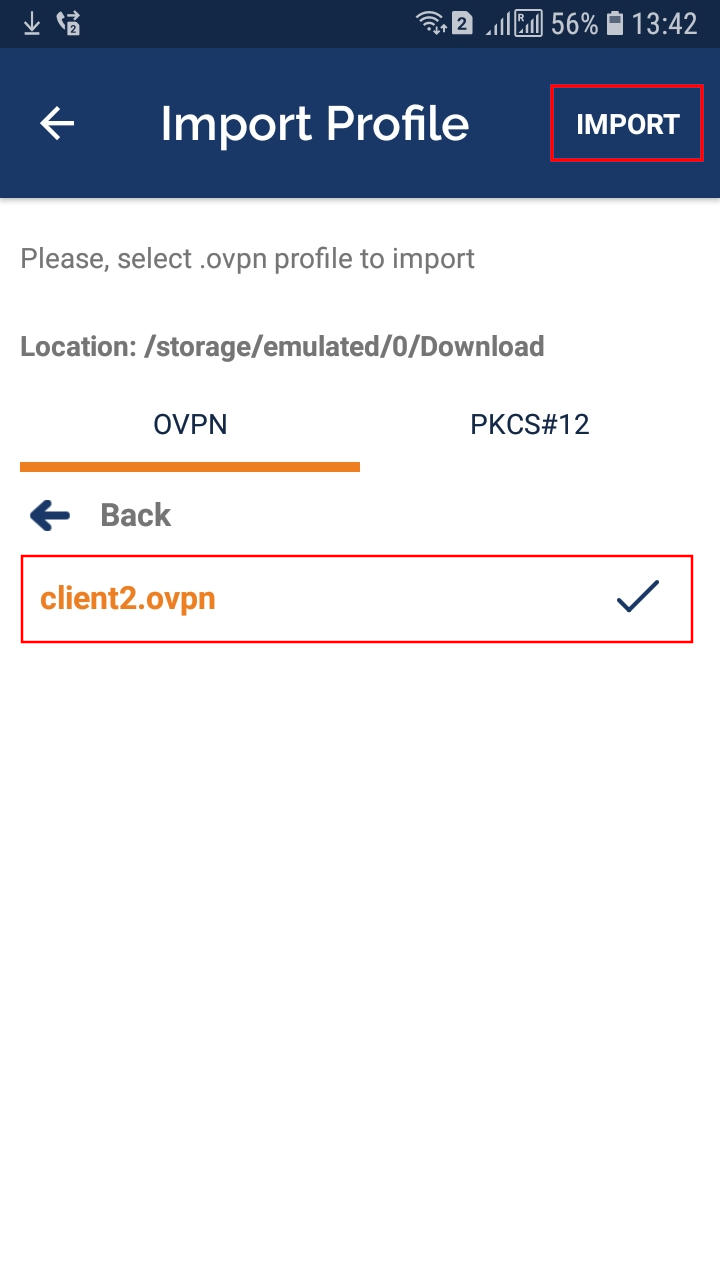
It will be written that the import was successful, and you can also set any name for your connection:

The new connection will appear in the list of all connections. Here you can activate (enable) or perform other actions:

For example, you can make a shortcut on the main screen and then you can connect to the OpenVPN network with one tap on the icon:

At any time, you can view the connection status and traffic statistics:

How to use OpenVPN to access network services on computers behind NAT (with private IP)
Now that everything is set up and ready, we can finally have fun (it took a few minutes for you from the beginning of the article – it took several days for me: while I wrote the script, debugged it on several systems, figured out various technical issues, corrected commands in the article on setting up OpenVPN and finally got to this point).
VPN – virtual private network – has its own address space, by default it is 10.8.0.0/24. Each device (computer, phone) is assigned an IP address from this space. These addresses are local (private). And by addressing this address, you can get access to resources (network services, files) of a computer that does not have a public IP.
For example, I connected a new device to my local network – a Linux system with a running web server. Let's see the list of network interfaces:
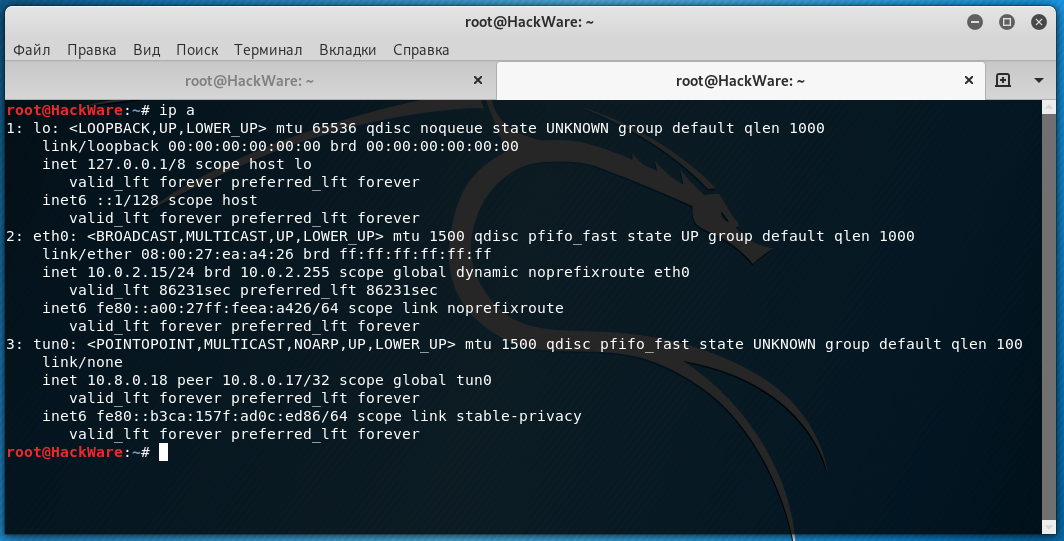
You can see that the eth0 interface has an IP address of 10.0.2.15 – this is a private IP and cannot be used to connect to this computer from the Internet. In addition, the system itself is behind NAT.
After enabling OpenVPN, a new network interface tun0 is created, for this system it has an IP address of 10.8.0.18. Using the IP address of the OpenVPN interface (tun0), other members of the OpenVPN network can connect to this computer. As I said, this computer is running a web server. Let's try to open it on a phone that is connected to the same OpenVPN network through a completely different ISP and, in general, may be thousands of kilometers away:

As you can see, this actually works. It can be a web server, file server (FTP and others), working environments for collaboration (for example, web applications running on a web server). At the same time, only members of the VPN network will have access to this working environment – it will be completely isolated from all others. Any of the network participants can share any resources, and any other participant can connect using the private IP assigned within the OpenVPN network. For this to work, you only need one public IP – for the OpenVPN server itself. For these purposes a VPS (Virtual Private Server) with a minimum hardware configuration is enough.
How to make static IPs for OpenVPN clients
The most basic way to access network services within a local network is by IP address, as shown above. The problem is that in the OpenVPN network, IP addresses are not rigidly tied to clients, and after reconnecting, clients can get a different IP.
You can configure the OpenVPN server to give the same IP to the same clients, but for this, one condition must be met. To make it clear, I will explain that to connect different clients to the same OpenVPN server, you can use the same public-private key pair, that is, in other words, the same configuration file. This is not prohibited, but not recommended, and to activate this feature, you must clearly indicate this with a directive in the configuration file. With this type of connection, the server will not be able to distinguish between clients. That is, when using the same keys (configuration files) by different clients, it is impossible to configure static IP addresses in OpenVPN.
So, the condition for setting static IP addresses for OpenVPN clients is to use different keys. It is according to this principle – each client has a unique key – configuration files are created by my script, which I presented at the very beginning.
So, if you created client configuration files using a script, then now you can configure static IP addresses.
Configuration is required only on the OpenVPN server side – nothing needs to be changed in client settings.
Let's say I want client1 to have an IP address of 10.8.0.10, the others have:
- client2 — 10.8.0.20
- client3 — 10.8.0.30
- client4 — 10.8.0.40
- client5 — 10.8.0.50
I need to create a directory on the server that will contain the settings for each client. With this folder I selected /etc/openvpn/ccd/, let’s create it:
mkdir /etc/openvpn/ccd/
In this folder, you need to create text files with the same names as the OpenVPN clients, which will store their special settings.
By the way, the client's name can be viewed in its configuration file, it is located in the cert certificate and goes into the Subject field, for example:
Subject: CN=client1
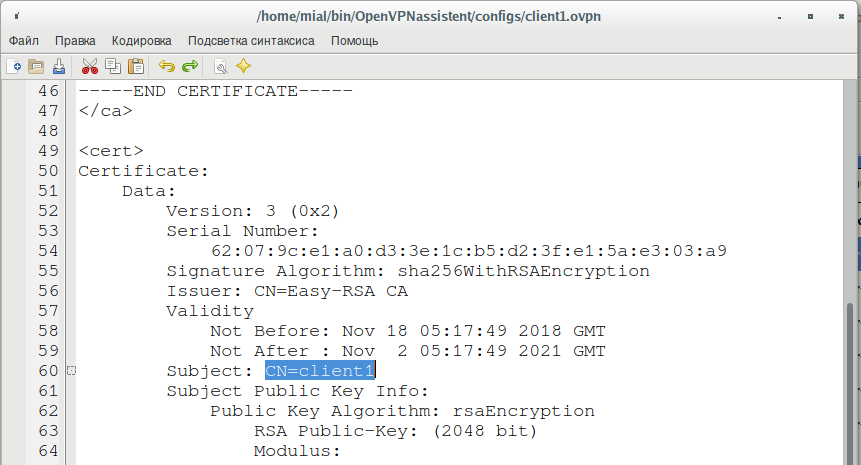
In this case, the client name is client1, therefore, the file name (path) is /etc/openvpn/ccd/client1.
====== ACTUAL PART ======
In this file, it is enough to specify a line like
ifconfig-push client_IP SUBNET_MASK
If you have the usual settings, then you will always have 255.255.255.0 as SUBNET_MASK.
So, for the first client, to which I want to assign the IP address 10.8.0.10, in the file /etc/openvpn/ccd/client1 I write:
ifconfig-push 10.8.0.10 255.255.255.0
The same can be done with the command:
echo 'ifconfig-push 10.8.0.10 255.255.255.0' > /etc/openvpn/ccd/client1
And for all other clients:
echo 'ifconfig-push 10.8.0.20 255.255.255.0' > /etc/openvpn/ccd/client2
echo 'ifconfig-push 10.8.0.30 255.255.255.0' > /etc/openvpn/ccd/client3
echo 'ifconfig-push 10.8.0.40 255.255.255.0' > /etc/openvpn/ccd/client4
echo 'ifconfig-push 10.8.0.50 255.255.255.0' > /etc/openvpn/ccd/client5
====== END OF ACTUAL PART ======
For the OpenVPN server to use the new settings for clients, in the file /etc/openvpn/server/server.conf
vim /etc/openvpn/server/server.conf
add the line (I put it in front of the certificates):
client-config-dir /etc/openvpn/ccd/
For the changes to take effect:
sudo systemctl restart openvpn-server@server.service
Well, make sure we haven't messed up anything:
systemctl status openvpn-server@server.service
Our Linux system with a web server is named client3, let's look at its IP after reconnecting:

Now it has the address 10.8.0.30, and this is the address that this system will have every time it connects to the OpenVPN server. Hence the web server will always have an IP of 10.8.0.30 – it can be bookmarked in a web browser.
Attention: Topology net30 is used for OpenVPN mobile clients – perhaps this is due to some limitations of mobile phones. Therefore, setting the IP using the method described above will not work for Android.
IP addresses for Android (perhaps in Windows the same situation) must end with numbers from the following list (the first number of each pair is for the server, the second for the client):
[  1,  2] [  5,  6] [  9, 10] [ 13, 14] [ 17, 18]
[ 21, 22] [ 25, 26] [ 29, 30] [ 33, 34] [ 37, 38]
[ 41, 42] [ 45, 46] [ 49, 50] [ 53, 54] [ 57, 58]
[ 61, 62] [ 65, 66] [ 69, 70] [ 73, 74] [ 77, 78]
[ 81, 82] [ 85, 86] [ 89, 90] [ 93, 94] [ 97, 98]
[101,102] [105,106] [109,110] [113,114] [117,118]
[121,122] [125,126] [129,130] [133,134] [137,138]
[141,142] [145,146] [149,150] [153,154] [157,158]
[161,162] [165,166] [169,170] [173,174] [177,178]
[181,182] [185,186] [189,190] [193,194] [197,198]
[201,202] [205,206] [209,210] [213,214] [217,218]
[221,222] [225,226] [229,230] [233,234] [237,238]
[241,242] [245,246] [249,250] [253,254]
For example, if we want to set the IP address 10.8.0.14 for the client2 client, then for the server we need to write 10.8.0.13, for example:
echo 'ifconfig-push 10.8.0.14 10.8.0.13' > /etc/openvpn/ccd/client2
Again, perhaps the same rule is mandatory for Windows clients – at least, it was like that before.
Everything is great in Linux – it works as described above.
Bypassing Captive Portals with OpenVPN
In the article “Fast and simple method to bypass Captive Portal (hotspot with authorization on the web-interface)” as a theoretical way to bypass it, I mentioned the ability to configure OpenVPN on UDP port 53. I also wrote that it didn't work for me. At that time, I did not have my own OpenVPN server, so I found OpenVPN with a test period and with the ability to select port 53 UDP. But attempts to connect to the OpenVPN server ended in failure.
Now I again have the opportunity to test another Captive Portals, hotspot with authorization on the web interface and this method really works this time. That is, if I just try to go online, then I get:

But if I enable OpenVPN, then I can immediately use the Internet access without authorization! That is, it really works, although apparently not with all Captive Portals. Apparently, some of them are smart enough to understand that these are some kind of incorrect DNS requests and that they should not be passed.

Let me remind you what the essence of the vulnerability of some Captive Portals is: their principle of operation is that they close all TCP and UDP ports for devices that have not yet logged in. All – except for one UDP port number 53. This port is necessary for DNS queries and if it would be close, then this entails too many problems. Therefore, this port is open and through it you can go out into the Internet.
Without preliminary preparation, through this port you can only make DNS queries for free… But if you configured your OpenVPN accordingly, then through the open UDP port 53 you can connect to the OpenVPN server, and it will go out for you to the outside world and return the received information in the same way.
It works stably and, according to subjective feelings, when the network is overloaded, UDP 53 traffic has priority… That is, it works even better than if I bought access and use the same hotspot on TCP traffic (I compared this and that). Although, perhaps OpenVPN plays a role. I have noticed that with a good connection, when I am using OpenVPN, the pings are better than when I use the Internet connection in the usual way.
So, for this you only need an OpenVPN server configured to work over UDP (this is the default) with port number 53 (you must select it when creating configuration files).
Perhaps it does not work for all hotspots – I will continue to test.
Bypassing Captive Portals from the phone
The method described in the previous paragraph works great for mobile phones as well – it's checked!
Access to public resources of the OpenVPN server
Perhaps this is too special a case, but I will still tell you about an interesting situation.
Let's assume that the IP address of the OpenVPN server is 185.117.153.79. Then the routing on the computer will be configured approximately as follows:
- all traffic, except for the one intended for the address 185.117.153.79, is directed to the gateway 10.8.0.1 (this is OpenVPN)
- traffic to the address 185.117.153.79 is an exception – it is directed to the regular interface and goes to the Internet
It is through the traffic to the address 185.117.153.79 that the connection to the OpenVPN server occurs. If no exception was made for this address, then it would be impossible to connect to the OpenVPN server and the computer would be left without Internet access at all.
All in all, it's okay, but what if I, for example, want to open the suip.biz site, whose IP address is 185.117.153.79? Every time I open this site, traffic is routed directly – bypassing the OpenVPN network. Under normal conditions, this may be fine, but if OpenVPN is used for anonymity or to bypass a Captive Portal (this is my case), then it turns out that I cannot open the suip.biz site at all. The way out of the situation is very simple. Recall that the OpenVPN server is available as part of a VPN at IP address 10.8.0.1. Therefore, in the /etc/hosts file
sudo gedit /etc/hosts
It is enough to add the line:
10.8.0.1 suip.biz
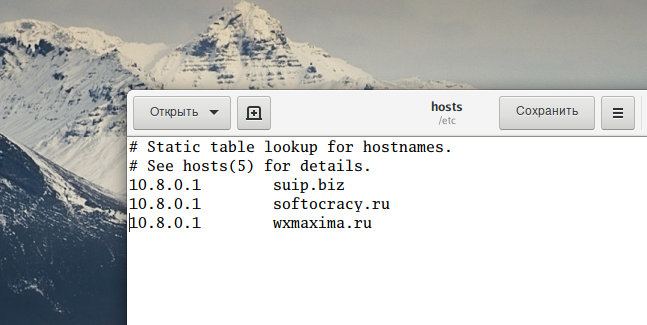
And now access to this site will occur over the OpenVPN network – that is, it will open without problems (but only while I am connected to OpenVPN – after disconnecting, you need to delete/comment out this entry).
Likewise, if I need to SSH into the OpenVPN server:
ssh root@185.117.153.79
Then when I am connected to OpenVPN, I can use the local IP of the virtual private network:
ssh root@10.8.0.1
I will connect to the same server, but the traffic will not go “apart from” – everything is inside the VPN!
How to capture and analyze VPN traffic with Wireshark
If you select a regular interface for capturing, for example, wlan0 or eth0, then all data will be encrypted – it is impossible to analyze it.
In order for the data transmitted through OpenVPN to be visible in a normal way, you need to select the tun0 interface for capturing.

By the way, if your task is to assess the quality/security of a VPN, then the capture should be done on the regular network interface – if you see readable data there like this:

It means that your VPN connection is simply not encrypted. By the way, this does not apply to the OpenVPN topic, but as researchers found from free Android VPN applications, 84% of them reveal the user's IP address. And among the paid VPNs, there are also many that allow data leaks.
But it would be much more interesting to find out how many of them monitor and log user activity…
Migrating from OpenVPN 2.4.* to OpenVPN 2.5.*
As of fall 2021, OpenVPN has moved to the new major branch 2.5.* for almost a year. If you were slow to update, now the new branch can be considered time-tested. However, if you are upgrading from the 2.4 branch, you may need to adjust the configuration files.
1. In the server and client configuration files, replace the line
cipher AES-256-CBC
with
data-ciphers AES-256-GCM:AES-128-GCM
2. If you are using the TCP protocol (which is not recommended), then instead of the line
;proto tcp
use the line on the server
proto tcp-server
and the line on the client
proto tcp-client
The UDP protocol is the same on the server and on the client:
proto udp
3. When configuring static IP addresses within a virtual private network, the following entry is now used:
ifconfig-push client_IP SUBNET_MASK
for example:
ifconfig-push 10.8.0.10 255.255.255.0
See the section “How to make static IPs for OpenVPN clients” for details.
How to use OpenVPN with TCP protocol
By default, OpenVPN uses UDP and it is officially recommended to use it. However, TCP also works great with OpenVPN and you can use it if needed. Theoretically, the TCP protocol has more “overhead”, that is, some part of the transmitted data will not carry the payload, but is only necessary for the normal operation of TCP, which monitors the safety and integrity of transmitted packets.
In my case, the need to add TCP support arose due to the fact that with some ISPs OpenVPN on the UDP protocol could not connect due to an error (the error will be discussed later), but it worked fine on the TCP protocol.
To configure OpenVPN to work with TCP, you need to know the following points:
1. The protocol must be specified explicitly
In the settings of the configuration files, instead of the line
;proto tcp
use on the server the line
proto tcp-server
and on the client the line
proto tcp-client
For reference: UDP protocol on both the server and the client is denoted the same way:
proto udp
2. The TCP protocol must be specified in the configuration files of both the server and the client
3. Do not use the explicit-exit-notify option
In the server config file, don't use the setting (just remove this line):
explicit-exit-notify 1
Otherwise, you will encounter the error:
Options error: --explicit-exit-notify can only be used with --proto udp
4. The port must be free
This applies equally to how OpenVPN works with UDP and TCP: the selected port must be free, otherwise you will encounter the error “TCP/UDP: Socket bind failed on local address [AF_INET][undef]:…: Address already in use (errno=98)”, for example:
2021-11-02 09:26:50 us=736094 TCP/UDP: Socket bind failed on local address [AF_INET][undef]:53: Address already in use (errno=98)
2021-11-02 09:26:50 us=736216 Exiting due to fatal error
Comparison of performance (data transfer rate) of OpenVPN over UDP and TCP
My internet connection speed without using OpenVPN:
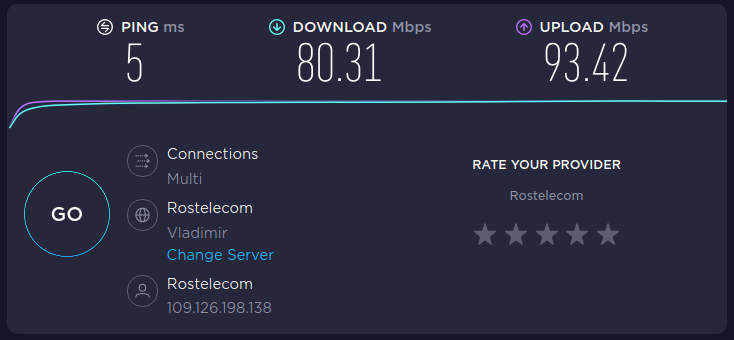
My internet connection speed using OpenVPN over UDP:

My internet connection speed using OpenVPN over TCP:

As you can see, the speed loss when migrating from UDP to TCP is quite significant. The difference in speed between the absence of OpenVPN and OpenVPN over UDP is negligible – in fact, in both cases, the speed is practically limited by the maximum bandwidth of my network.
Simultaneous use of multiple OpenVPNs on one server
You can simultaneously use several OpenVPN processes on the same server, while they will work on different ports and provide separate virtual private networks that do not overlap with each other.
Multiple instances of OpenVPN are provided out of the box, but additional configuration is required.
1. OpenVPN services must use different ports
All OpenVPN services must use a free port. Remember that the same UDP and TCP port numbers are different ports, that is, you can use the same port number in two instances of OpenVPN, provided that one of them is a UDP port and the other is a TCP port.
If two OpenVPN services use the same port, then the OpenVPN instance that is started first will work without error, and the second instance will not start due to the error “TCP/UDP: Socket bind failed on local address [AF_INET][undef]:…: Address already in use (errno=98)”, for example:
2021-11-02 09:26:50 us=736094 TCP/UDP: Socket bind failed on local address [AF_INET][undef]:53: Address already in use (errno=98)
2021-11-02 09:26:50 us=736216 Exiting due to fatal error
2. Range of addresses of the virtual private network
By default, a range of IP addresses for a virtual private network is specified in the server configuration file, for example:
server 10.8.0.0 255.255.255.0
Additional instances of the OpenVPN service must use different ranges. For example, for the second service, you can specify the following range:
server 10.8.1.0 255.255.255.0
For the third service, you can specify the following range of IP addresses, and so on:
server 10.8.2.0 255.255.255.0
3. Traffic routing for all virtual private networks
The section “Enable traffic routing on the OpenVPN server” shows how to enable NAT for VPN traffic so that clients can make connections to the Internet. The example in the above section shows how to configure routing for traffic from the 10.8.1.0/24 subnet. Since additional instances of the OpenVPN service use different subnets (for example, 10.8.1.0/24), in order for the clients of these virtual networks to access the Internet, you must configure routing for each of these networks.
An example of the original contents of the /root/bin/vpn_route.sh file:
#!/bin/sh

# specify the name of the interface, otherwise the script will try to select it automatically
#DEV='eth0'
DEV='ens3'
PRIVATE=10.8.0.0/24

if [ -z "$DEV" ]; then
	DEV="$(ip route | grep default | head -n 1 | awk '{print $5}')"
fi
# Turn forwarding packets on from the tunnel interface
# they got to the external interface
sysctl net.ipv4.ip_forward=1
# Make sure iptables do not block redirected traffic:
iptables -I FORWARD -j ACCEPT
# Network Address Translation (NAT) for packets coming from the tunnel
# When forwarding is enabled, packets are forwarded by default.
# with the original address unchanged, that is, in our case 10.8.0.*
# such packages are either deleted at the ISP gateway, or even if they are
# go to the destination, the answer never finds a way back.
# These private addresses are not routed to the Internet.
#
# The solution is Network Address Translation (NAT) of outgoing traffic,
# i.e. replace private 10.8.0.* address with the public IP address of the VPN server.
# This will allow responses to reach the VPN server,
# and there they will be sent back to the tunnel.
iptables -t nat -I POSTROUTING -s $PRIVATE -o $DEV -j MASQUERADE
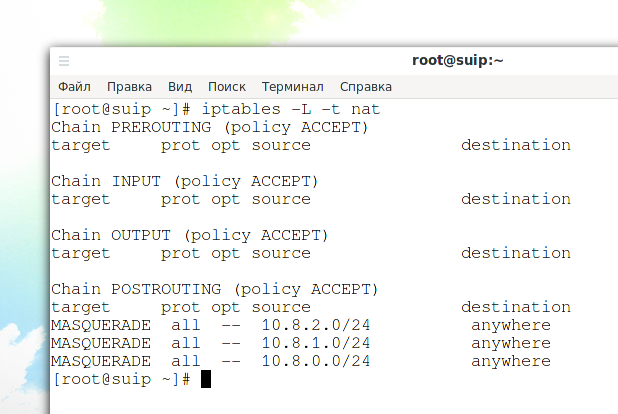
The file /root/bin/vpn_route.sh which has added NAT for subnets 10.8.1.0/24, 10.8.2.0/24, and 10.8.3.0/24:
#!/bin/sh

DEV='ens3'
PRIVATE=10.8.0.0/24

if [ -z "$DEV" ]; then
	DEV="$(ip route | grep default | head -n 1 | awk '{print $5}')"
fi

sysctl net.ipv4.ip_forward=1

iptables -I FORWARD -j ACCEPT

iptables -t nat -I POSTROUTING -s $PRIVATE -o $DEV -j MASQUERADE

iptables -t nat -I POSTROUTING -s 10.8.1.0/24 -o $DEV -j MASQUERADE

iptables -t nat -I POSTROUTING -s 10.8.2.0/24 -o $DEV -j MASQUERADE
To check the NAT settings, run the command
iptables -L -t nat
4. Configuring local static addresses
If you used the section “How to make static IPs for OpenVPN clients” and added entries like “ifconfig-push 10.8.0.10 255.255.255.0” to the file “/etc/openvpn/ccd/client1”, then you need to use different client names for the second and subsequent OpenVPN networks as they use different VPN IP ranges.
5. Starting and adding the second and subsequent OpenVPN services to startup
Note that with systemctl you can use a command like
openvpn-server@<configuration>.service
where <configuration> is a configuration file located in the /etc/openvpn/server/ folder, but without the .conf extension
For example, the second configuration file for the second instance of the OpenVPN service is placed in the /etc/openvpn/server/server-tcp.conf file, then the program for starting the service is as follows:
sudo systemctl start openvpn-server@server-tcp.service
Checking the status of the service with the server-tcp.conf configuration file:
systemctl status openvpn-server@server-tcp.service
View OpenVPN service errors with server-tcp.conf config file:
journalctl -xeu openvpn-server@server-tcp.service
Add service to startup:
sudo systemctl enable openvpn-server@server-tcp.service
How to fix ‘TLS Error: TLS key negotiation failed to occur within 60 seconds» и «TLS handshake failed’ errors
While using OpenVPN, you may face a situation where you cannot connect to the OpenVPN server for no apparent reason. For example, in general OpenVPN is working properly and connections are occurring, but on certain ISPs, the connection fails to complete a successful TLS handshake.
An example of logs on the OpenVPN server side:
2021-11-05 18:29:22 us=384206 MULTI: multi_create_instance called
2021-11-05 18:29:22 us=384302 176.59.38.132:56094 Re-using SSL/TLS context
2021-11-05 18:29:22 us=384395 176.59.38.132:56094 Outgoing Control Channel Authentication: Using 160 bit message hash 'SHA1' for HMAC authentication
2021-11-05 18:29:22 us=384424 176.59.38.132:56094 Incoming Control Channel Authentication: Using 160 bit message hash 'SHA1' for HMAC authentication
2021-11-05 18:29:22 us=384568 176.59.38.132:56094 Control Channel MTU parms [ L:1621 D:1184 EF:66 EB:0 ET:0 EL:3 ]
2021-11-05 18:29:22 us=384605 176.59.38.132:56094 Data Channel MTU parms [ L:1621 D:1450 EF:121 EB:406 ET:0 EL:3 ]
2021-11-05 18:29:22 us=384669 176.59.38.132:56094 Local Options String (VER=V4): 'V4,dev-type tun,link-mtu 1541,tun-mtu 1500,proto UDPv4,keydir 0,auth SHA1,keysize 128,tls-auth,key-method 2,tls-server'
2021-11-05 18:29:22 us=384700 176.59.38.132:56094 Expected Remote Options String (VER=V4): 'V4,dev-type tun,link-mtu 1541,tun-mtu 1500,proto UDPv4,keydir 1,auth SHA1,keysize 128,tls-auth,key-method 2,tls-client'
2021-11-05 18:29:22 us=384751 176.59.38.132:56094 TLS: Initial packet from [AF_INET]176.59.38.132:56094, sid=7b5f6347 776e80e1
2021-11-05 18:30:22 us=183787 176.59.38.132:56094 TLS Error: TLS key negotiation failed to occur within 60 seconds (check your network connectivity)
2021-11-05 18:30:22 us=183887 176.59.38.132:56094 TLS Error: TLS handshake failed
2021-11-05 18:30:22 us=184085 176.59.38.132:56094 SIGUSR1[soft,tls-error] received, client-instance restarting
An example of logs on the OpenVPN client side:
2021-11-05 18:30:21 TLS Error: TLS key negotiation failed to occur within 60 seconds (check your network connectivity)
2021-11-05 18:30:21 TLS Error: TLS handshake failed
2021-11-05 18:30:21 SIGUSR1[soft,tls-error] received, process restarting
2021-11-05 18:30:21 Restart pause, 5 second(s)
The reason for this error may be an Internet service provider that filters traffic in a certain way or uses an poorly configured NAT.
To fix the error, it may be sufficient to do one of the following:
- change the port of the OpenVPN server
- change the used protocol from UDP to TCP
Managing OpenVPN Connections on Linux
Unlike Windows, for which the OpenVPN developers have created and maintain a client with a graphical interface, in Linux, only a client with a command line interface is presented from the developers. But NetworkManager is a great alternative for the official client.
In most distributions, NetworkManager is already installed and even added to startup, since this service is responsible for all network connections, wired and wireless. In Debian derivatives the package is called “network-manager”, in Arch Linux derivatives the package is called “networkmanager”.
There are plugins for NetworkManager, some of which are available in the Linux distribution repositories. Since this post focuses on OpenVPN, we are interested in a plugin for running OpenVPN, which in Debian is called “network-manager-openvpn-gnome” (despite the name, Xfce uses the same plugin), and in Arch Linux it is “networkmanager-openvpn”. Install this plugin if you don't already have it.
Since most of the functions for managing OpenVPN connections are taken over by NetworkManager and the networkmanager-openvpn plugin, the work with OpenVPN is generally similar in different Linux distributions. However, desktop environments overlap. While the specifics are not critical, we'll cover working with OpenVPN in popular Linux desktop environments.
How to manage VPN Settings in Cinnamon
The Cinnamon desktop environment is primarily characteristic of Linux Mint.
When you click on the network connection icon (its appearance depends on whether you are using a wired or wireless connection), two options will be available to manage networks:
- Network Settings – featured by Cinnamon (therefore, it is present only in this desktop environment)
- Network Connections – featured by NetworkManager (hence, it is present in any distribution with NetworkManager)

In general, these settings allow you to do the same things: add, edit and remove network connections.
Network Settings contains a list of Wi-Fi networks available for connection, as well as a list of OpenVPN settings, proxies, wired connections. In Network Settings, you can activate a particular network connection.

Network Connections does not show Wi-Fi networks available for connection, but it stores the settings of the networks to which the computer has ever connected.

Managing OpenVPN Connections in Network Settings
To remove an OpenVPN connection, select it and click the minus sign (-).

The connection will be dropped without confirmation.
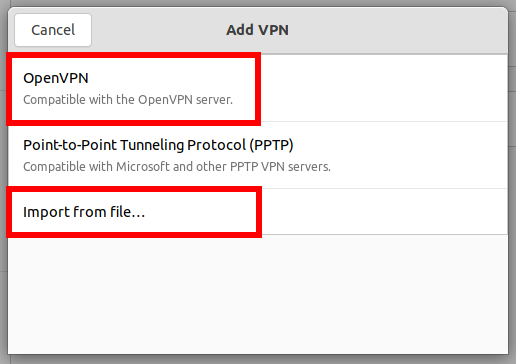
Click the plus sign (+) to add an OpenVPN connection.
You will be presented with 2 options:
- OpenVPN (compatible with the OpenVPN server) – you will need to enter the settings manually and specify the certificate files
- Import from file – import settings from an .ovpn file
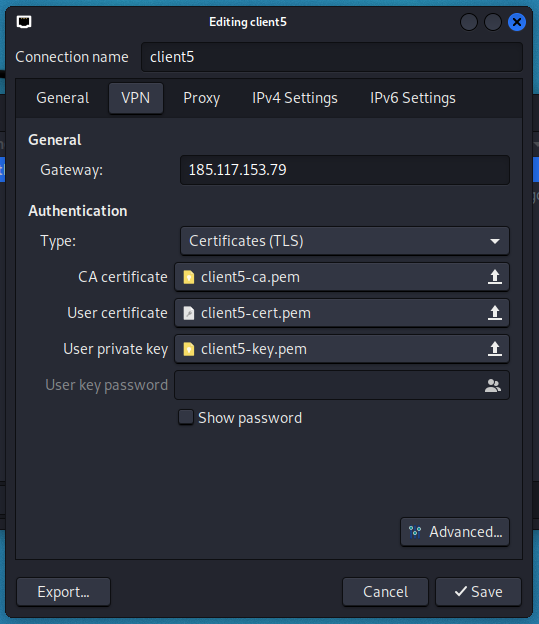
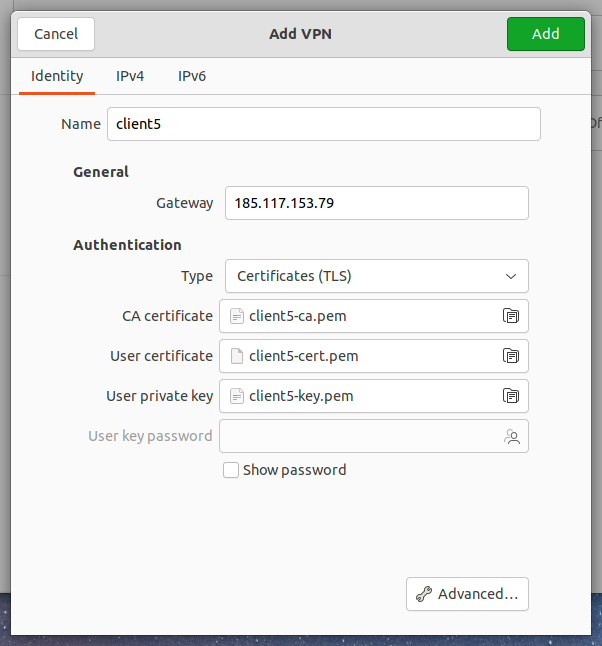
With manual configuration, you don't need to change anything in the “IPv4” and “IPv6” tabs. Some of the settings are located on the “Identity” tab, to access other settings, click the “Advanced” button:
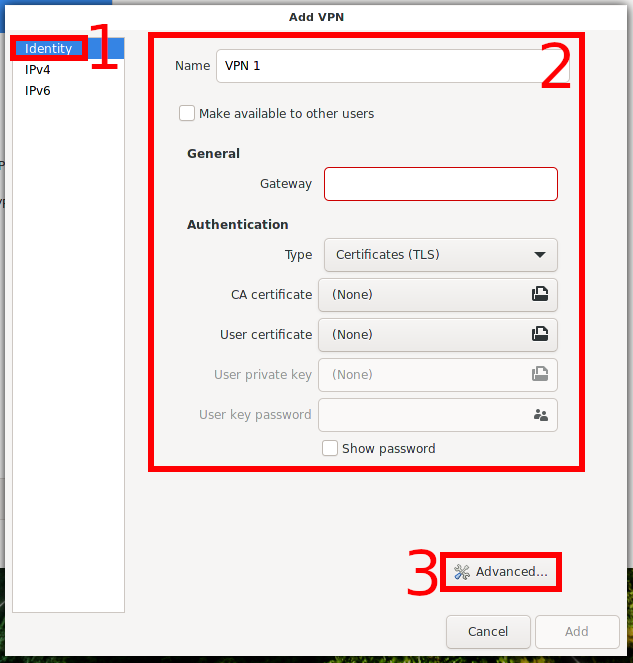
To edit an OpenVPN connection, select it and click the gear icon.
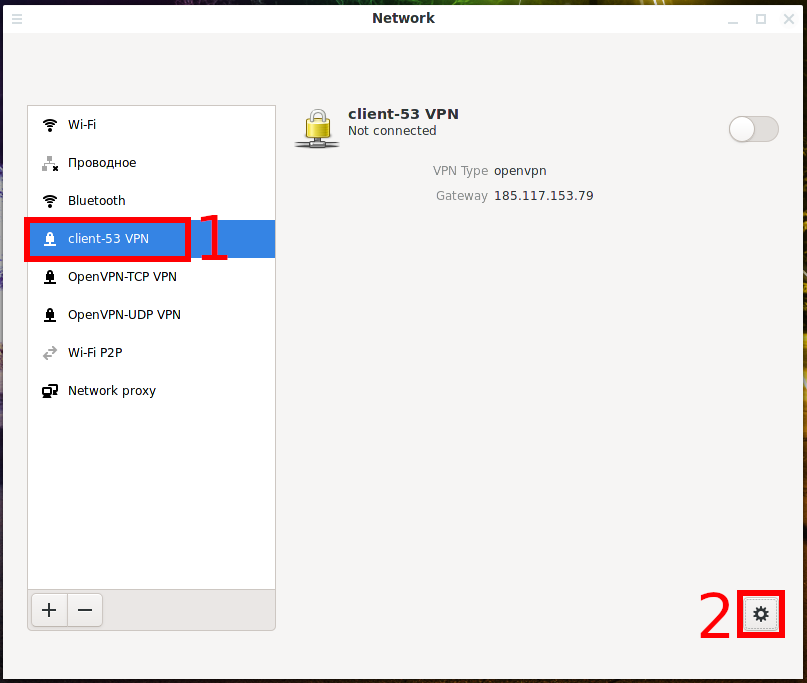
Some of the settings are located on the “Identity” tab.

To access other settings, click the “Advanced” button.

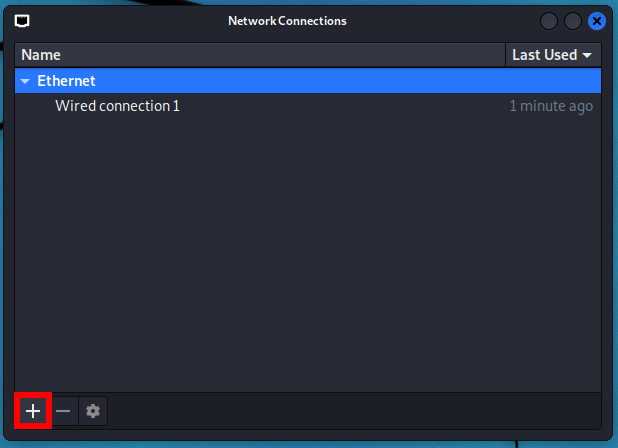
Managing OpenVPN Connections in Network Connections
To remove an OpenVPN connection, select it and click the minus sign (-).
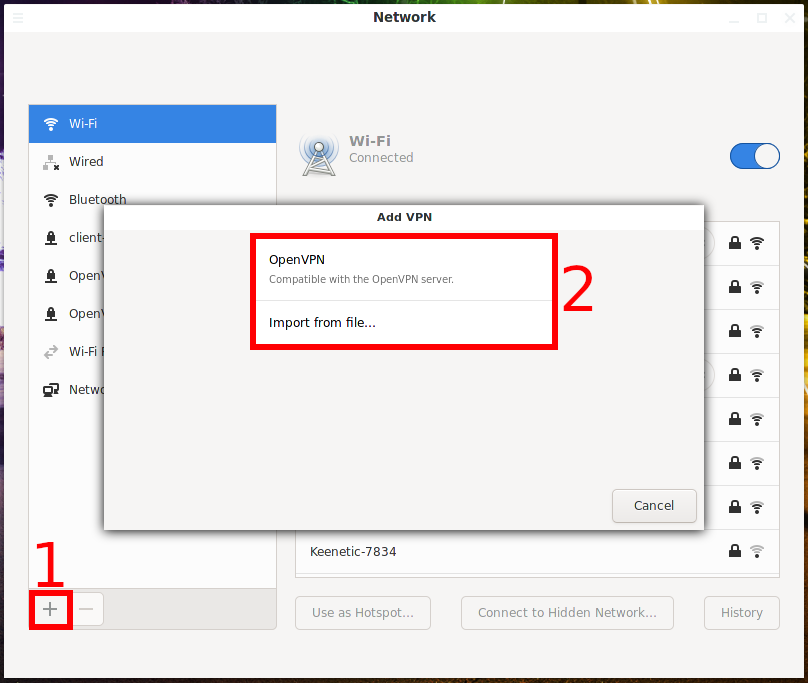
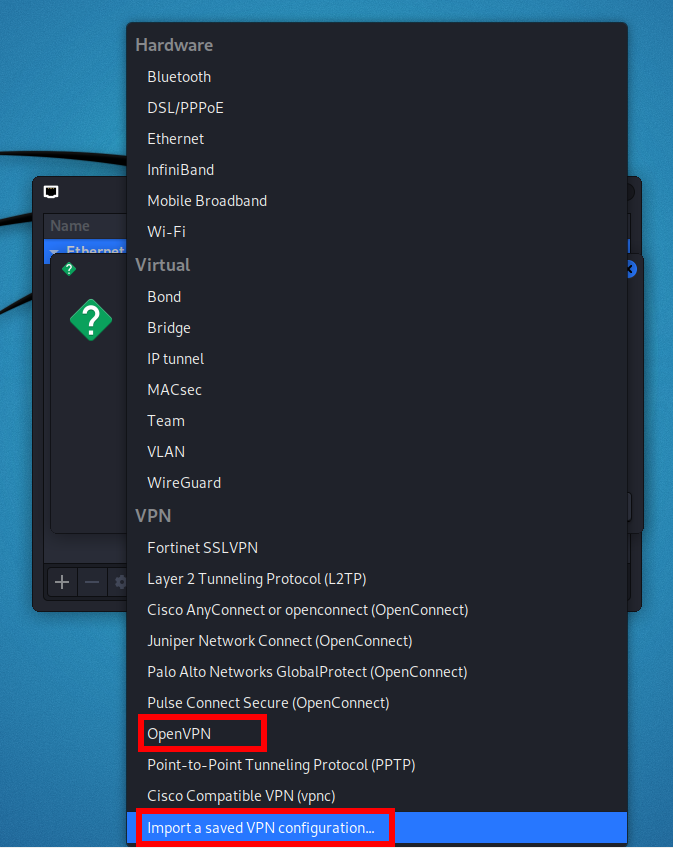
Click the plus sign (+) to add an OpenVPN connection.

In the drop-down list, you will have many options available, 2 of them are related to OpenVPN:
- OpenVPN – you will need to enter the settings manually and specify the certificate files
- Import a saved VPN configuration

With manual configuration, you do not need to change anything on the “General”, “Proxy”, “IPv4 Settings”, and “IPv6 Settings” tabs. Some of the settings are located on the “VPN” tab, to access other settings, click the “Advanced” button.

To edit an OpenVPN connection, select it and click the gear icon.
Connecting to OpenVPN server
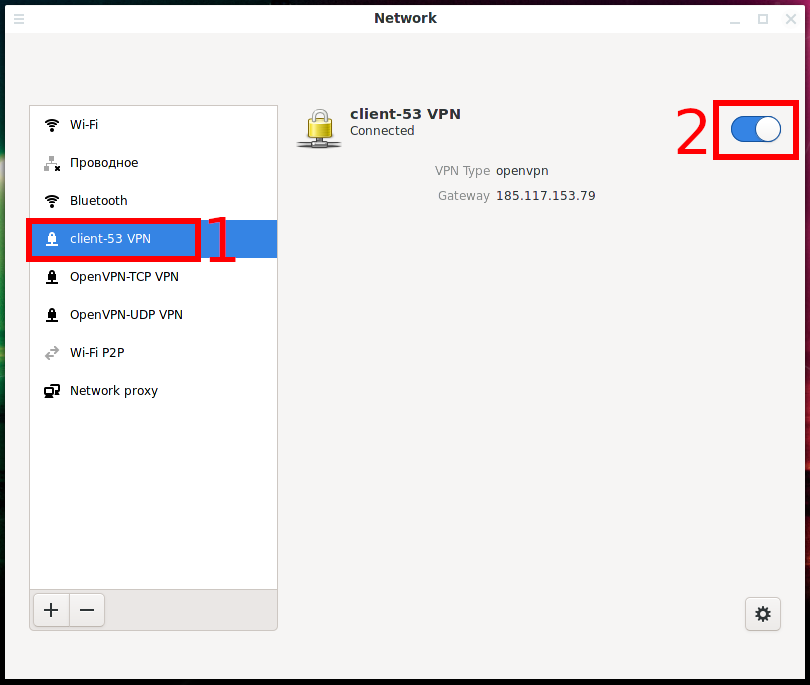
You can add multiple OpenVPN connections and enable any of them depending on your needs. You can enable them as in the main NetworkManager panel – click on the selected connection:

You can also enable VPN connections in Network Settings, to do this, select the desired VPN connection and click the switch:
How to manage VPN Settings in Xfce
Popular distributions with Xfce include Kali Linux and Xubuntu.
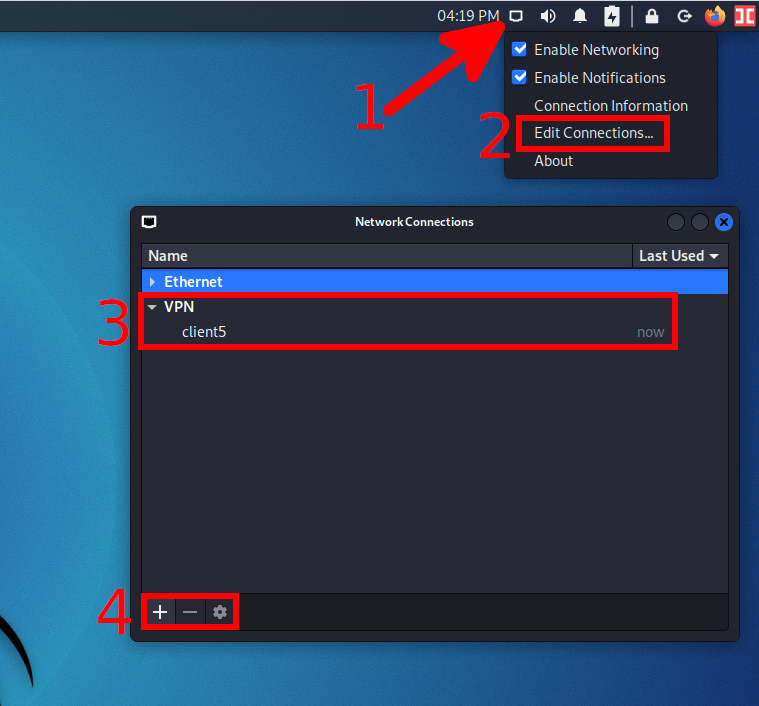
Xfce has “Network Connections” only.
There are two ways to add a new OpenVPN connection:
1) Right-click on the network connection icon and select “Edit Connections”:

In the already familiar Network Connections, click the plus sign (+).
2) Or left-click on the network connection icon and select “VPN Connections”→ “Add a VPN Connection”.
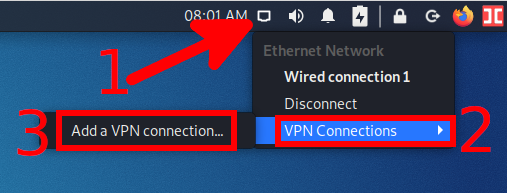
Select your preferred VPN connection type.
To import a VPN connection from a file, select “Import a saved VPN configuration”.
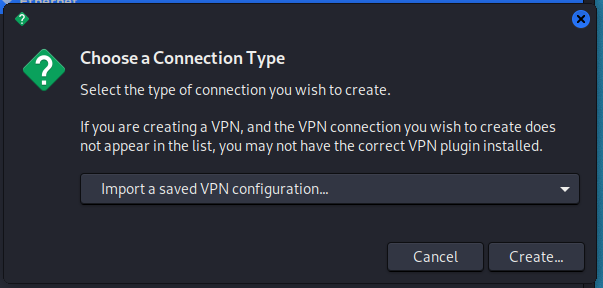
Click the “Create” button and specify the settings file.
With manual configuration, you do not need to change anything on the “General”, “Proxy”, “IPv4 Settings”, and “IPv6 Settings” tabs. Some of the settings are located on the “VPN” tab, to access other settings, click the “Advanced” button.
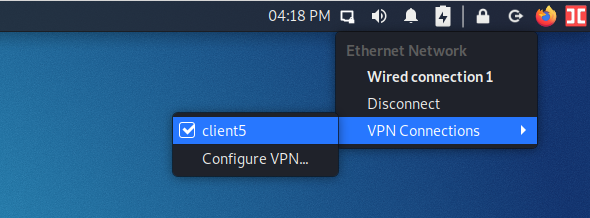
To connect to OpenVPN, left-click on the network connection icon and select “VPN Connections” and then select the desired connection.
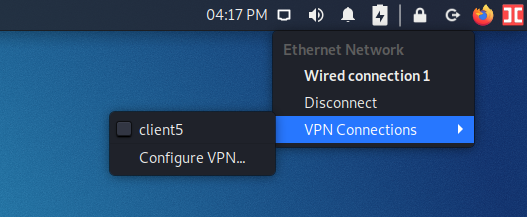
If the connection is successful, a check mark will appear next to the VPN connection name.
To add, change and remove VPN connections, go to Network Connections, for this, right-click on the network connection icon and select “Edit Connections”.
How to manage VPN Settings in GNOME 3
A popular example of a Linux distribution using GNOME 3 is Ubuntu.
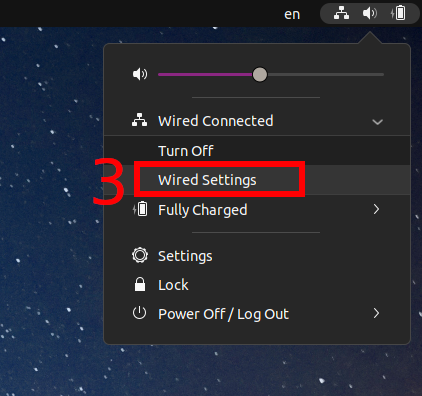
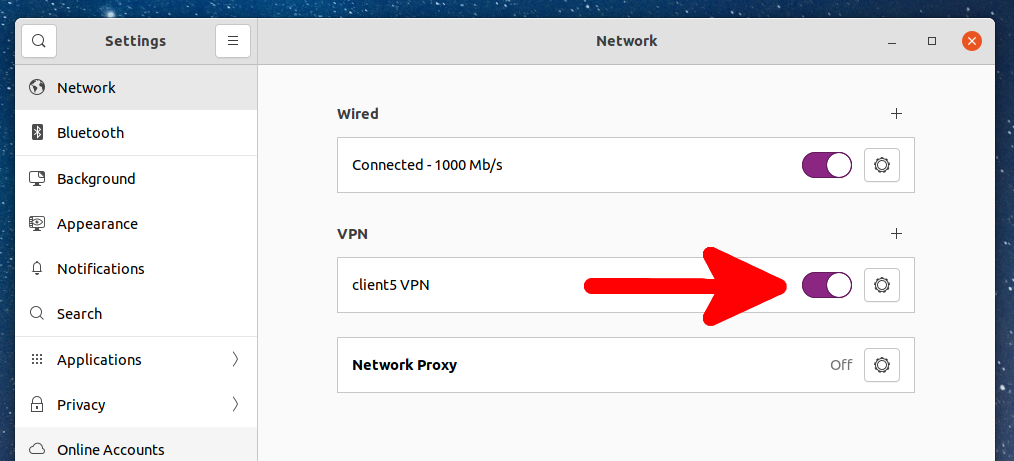
To add an OpenVPN connection, click on the network connection icon and expand the connections section.

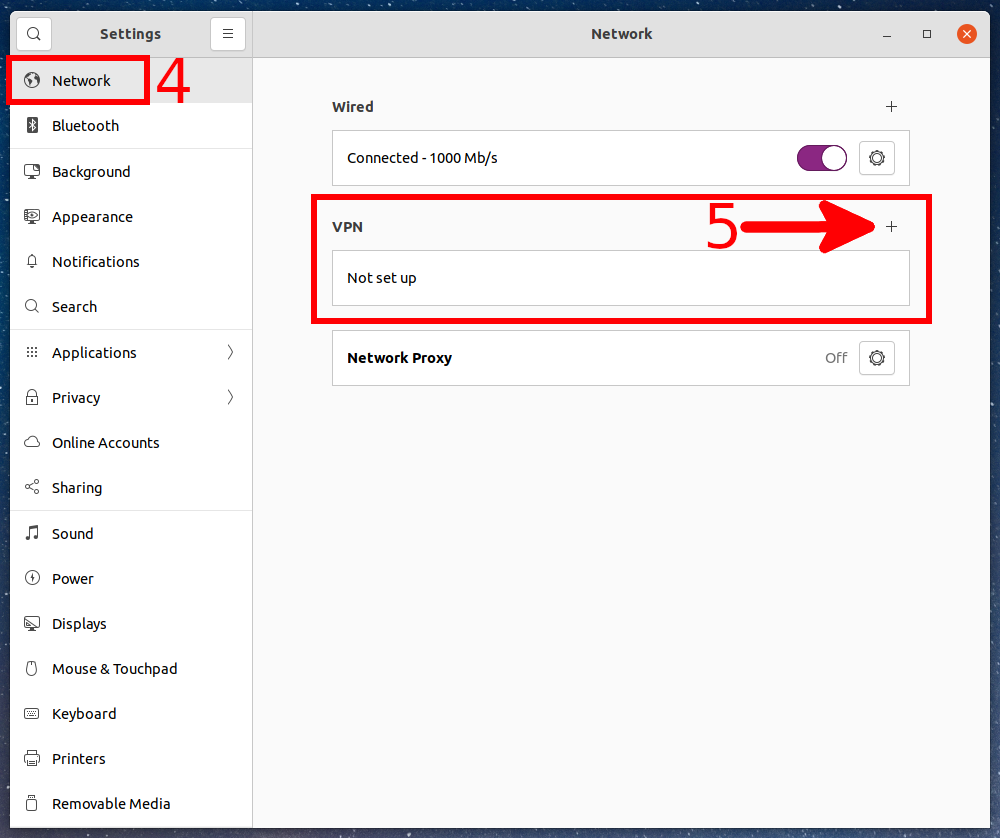
Select “Wired Settings”:
You will find yourself in the OS settings. On the “Network” tab, you can add a new VPN connection or manage existing ones. Click the plus sign (+) to add a new one.
You can enter the data manually, or import the OpenVPN connection settings from the .ovpn file.
With manual configuration, you do not need to change anything in the “IPv4” and “IPv6” tabs. Some of the settings are located on the “Identity” tab, to access other settings, click the “Advanced” button:
You can enable OpenVPN connection by clicking on the network connections button, then selecting the desired VPN connection.

You can also go to Network Settings and enable the selected OpenVPN connection there.
To edit VPN connections, click on the network connections button, then expand the VPN list and select “VPN Settings”.
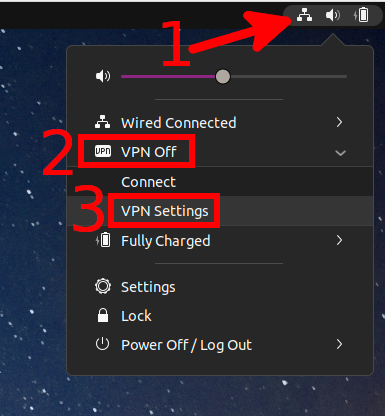
Select the connection you want to change and press the gear.

To remove an OpenVPN connection, go to its settings, as shown just above, and click the “Remove VPN” button.

How to connect to VPN via proxy or Tor
See the article “How to connect to OpenVPN via proxy or Tor”.
How to connect to Tor with OpenVPN
Connecting to Tor via a VPN is usually used in practice not so much to increase anonymity (although such use takes place), but to bypass the blocking of the Tor network. In some countries, the Tor network is blocked at the state level, so to connect the Tor browser or the Tor service, you must use bridges – intermediate nodes of the Tor network. Instead of bridges, you can connect to the Tor network through a VPN.
In fact, connecting to Tor via a VPN is even easier than using bridges.
Please note that due to the peculiarities of the blocking implementation (for example, blocking is performed only at the level of providers of the last mile), even the VPN of the country in which the Tor network is blocked can be used to bypass the connection blocking to the Tor network.
Signs that the ISP is blocking access to the Tor network are that the connection to Tor stops at the very first stages.
For example, Tor Browser freezes at the inscription:
Connecting to a Tor relay
Tor Browser routes your traffic over the Tor Network, run by thousands of volunteers around the world.

Another possible error:
Loading relay information
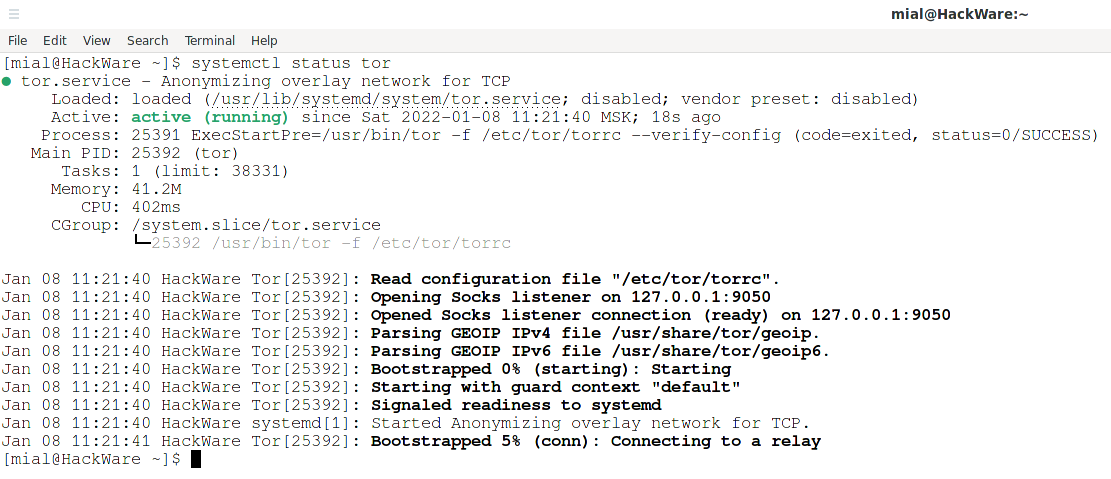
When trying to use the Tor service by starting it with the command
sudo systemctl start tor
status check
systemctl status tor
will show that the initial bootstrap stopped at 5%, that is, at the stage of connecting to the relay:
Jan 08 11:21:40 HackWare systemd[1]: Started Anonymizing overlay network for TCP.
Jan 08 11:21:41 HackWare Tor[25392]: Bootstrapped 5% (conn): Connecting to a relay
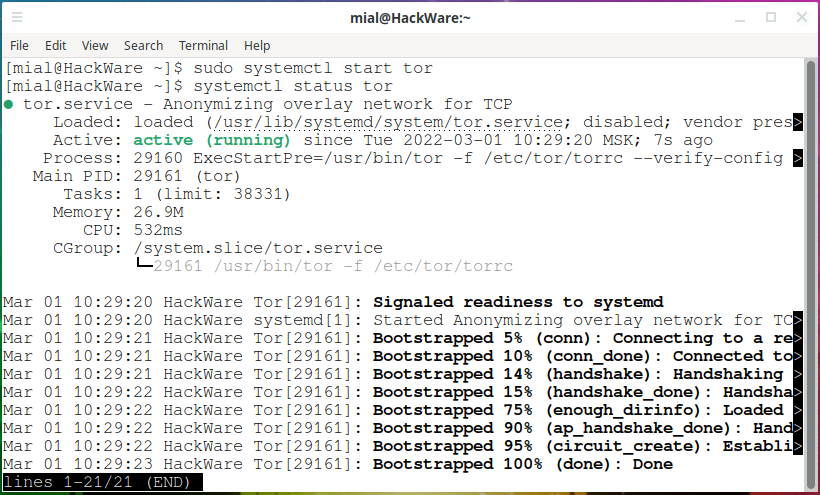
To connect to the Tor network over a VPN, start by connecting to a VPN server, for example using OpenVPN.

Right after that, you can use the Tor service as usual – no additional configuration is required.
The Tor Browser successfully connects to the Tor network and opens websites.

The tor service successfully establishes a connection to the Tor network.
Script to connect and disconnect from OpenVPN depending on server availability
Task:
Branch subnets are connected via OpenVPN. All clients connect to the server and routes to the Internet are set through the OpenVPN server. Everything works, but there is a problem. If the OpenVPN server for some reason loses Internet connection, then all other branches also lose Internet access, because the traffic does not go through its gateway, but through the OpenVPN server. Is there any way to write a script to:
1. If there was no connection to the OpenVPN server, the routes were restored and worked through their own gateway.
2. Once every 2-3 minutes the client would try to connect to the OpenVPN server.
3. When the connection is restored, the routes would be registered again through the OpenVPN server.
Solution:
In theory, it is quite possible to write a script in Bash (for Linux) or PowerShell (for Windows) that would ping the OpenVPN server and if the server is online connecting to it or if the connection is already present, it would do nothing. And if the OpenVPN server is offline, then it would disconnect from it or do nothing if the server is already offline. On Linux, such a script can be added to startup and then run regularly using Systemd timers or Cron. In Windows, too, this can be solved using the Windows Task Scheduler.
But, IMHO, this is a radically wrong approach. It is necessary to strive to ensure that the OpenVPN server is always online. Because for some reason it is needed in the work of users if they connect to it, right? And if so, then when users disconnect from OpenVPN, there will be failures in connecting to local resources.
And nevertheless, here are examples of scripts.
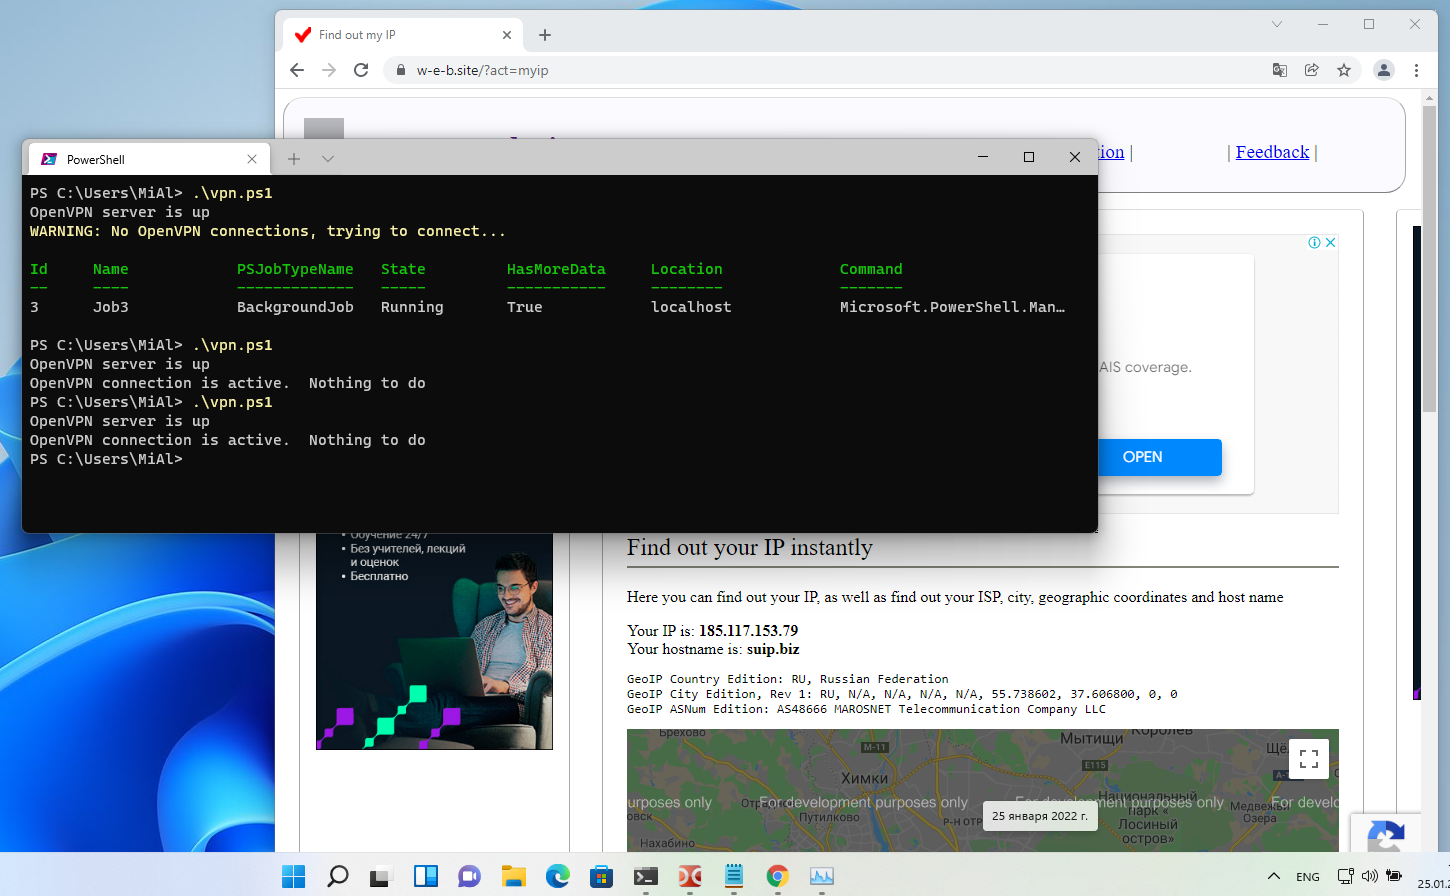
For Windows, the script is written in PowerShell, create the vpn.ps1 file and copy it into it (replace the IP address of the OpenVPN server and the path to the configuration file with yours):
# OpenVPN server IP address
$openvpnIP='185.117.153.79'
# path to the configuration file for connecting the client to the OpenVPN server
$openvpnFILE='C:\Users\MiAl\client1.ovpn'
if (Test-Connection -TargetName $openvpnIP -IPv4 -Count 1 -Quiet -TimeoutSeconds 1)
{
'OpenVPN server is up'
if (Get-Process | Where-Object { $_.Name -eq "openvpn" })
{
'OpenVPN connection is active. Nothing to do'
}
else
{
Write-Warning 'No OpenVPN connections, trying to connect...'
& "C:\Program Files\OpenVPN\bin\openvpn.exe" --config $openvpnFILE &
}
}
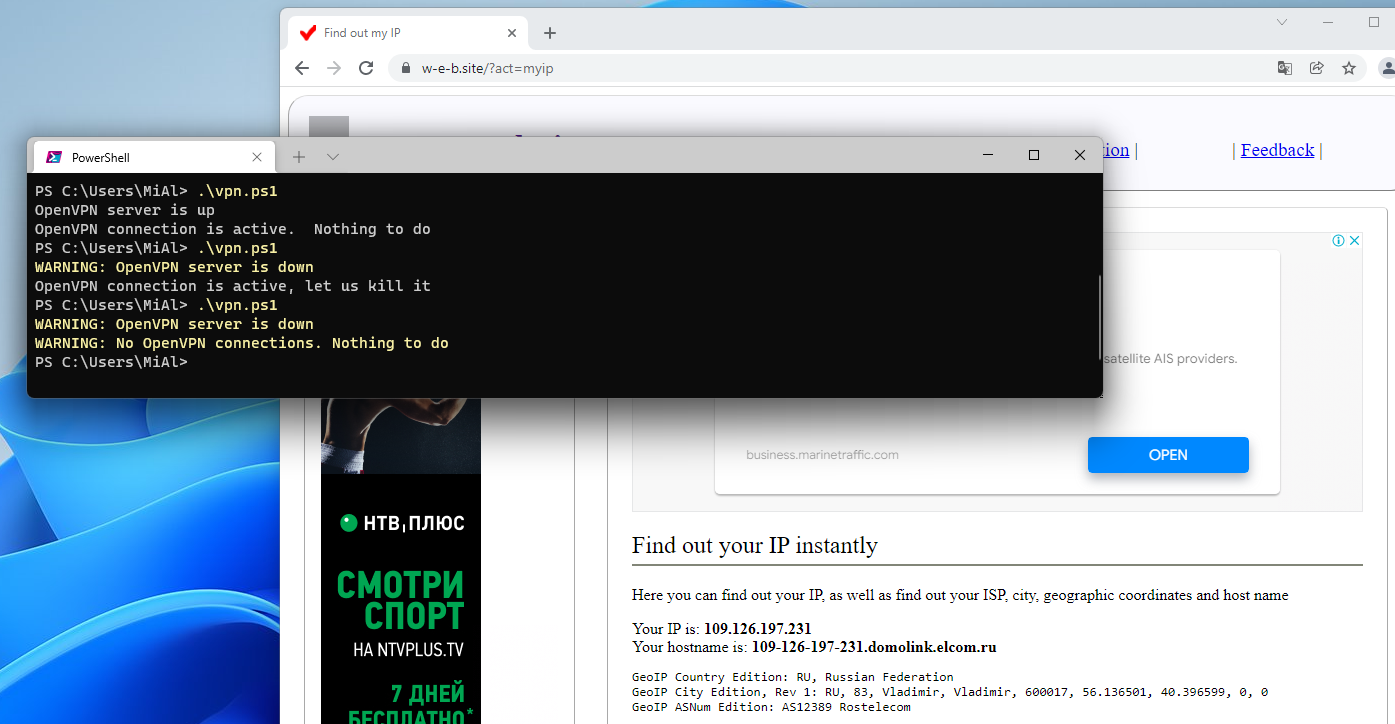
else
{
Write-Warning 'OpenVPN server is down'
if (Get-Process | Where-Object { $_.Name -eq "openvpn" })
{
'OpenVPN connection is active, let us kill it'
Get-Process | Where-Object { $_.Name -eq "openvpn" } | Select-Object -First 1 | Stop-Process
}
else
{
Write-Warning 'No OpenVPN connections. Nothing to do'
}
}
Check like this:
.\vpn.ps1
The OpenVPN server is online, so the script connects to it and does nothing on subsequent checks. Checking the client's IP shows that Internet access is really through OpenVPN:
OpenVPN is offline, so the script disconnects from it. On subsequent checks, the script does nothing until the OpenVPN server is available. When OpenVPN is online again, a connection is made to it.
Use Windows Task Manager to run your script like this:
powershell -File vpn.ps1 -WindowStyle Hidden
Furthermore create the script that it runs under a specific user account and not only when that user is logged on. Otherwise you'll see a console window.
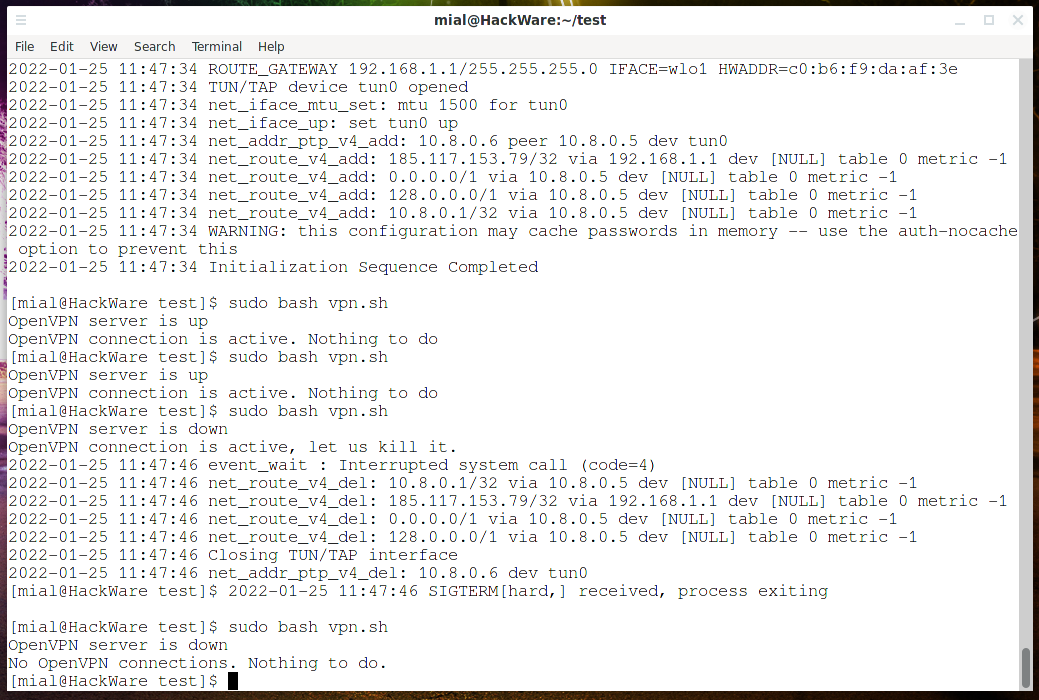
Sample script for Linux – create a vpn.sh file and copy into it:
#!/bin/bash

# OpenVPN server IP address
openvpnIP='185.117.153.79'
# path to the configuration file for connecting the client to the OpenVPN server
openvpnFILE='/home/mial/bin/OpenVPNassistent-конфигурации/configs/client1.ovpn'

isOpenVPNActive=`pgrep openvpn`

timeout 1 ping -c 1 $openvpnIP > /dev/null;
if [ $? -eq 0 ]; then
	echo 'OpenVPN server is up'
	if [ -z "$isOpenVPNActive" ]; then
		echo 'No OpenVPN connections, trying to connect.'
		sudo openvpn "$openvpnFILE" &
	else
		echo 'OpenVPN connection is active. Nothing to do'
	fi
else
	echo 'OpenVPN server is down'
	if [ -z "$isOpenVPNActive" ]; then
		echo 'No OpenVPN connections. Nothing to do.'
	else
		echo 'OpenVPN connection is active, let us kill it.'
		kill "$isOpenVPNActive"
	fi
fi
Run like this:
sudo bash vpn.sh
The OpenVPN server is online, so the script connects to it and does nothing on subsequent checks. Checking the client's IP shows that Internet access is really through OpenVPN. OpenVPN is offline, so the script disconnects from it. On subsequent checks, the script does nothing until the OpenVPN server is available. When OpenVPN is online again, a connection is made to it.
To run regularly, use systemd's .timer or cron.
Conclusion
The main goal of this article is to get you thinking about OpenVPN more broadly. This is not just a way to change the IP address. This is an opportunity to create a secure environment in which participants can access each other's resources bypassing all the problems and limitations of NAT. You can also come up with non-standard ways to use OpenVPN – to bypass Wi-Fi Captive Portals, for example.
Well, again, a referral link to the VDS/VPS server. This referral will help us host new interesting projects, as well as write more instructions for setting up VDS and various network services.
Related articles:
- How to change MAC address in Linux, how to enable and disable automatic MAC change (spoofing) in Linux (77.5%)
- autovpn2 and autovpn3 - scripts to automatically connect to a free VPNs (72.6%)
- How to connect to OpenVPN via proxy or Tor (72.6%)
- Free easy way to hide IP in Linux (63.2%)
- Errors in Kali Linux ‘W: Failed to fetch’ and ‘W: Some index files failed to download. They have been ignored, or old ones used instead.’ (SOLVED) (59.4%)
- Linux Wi-Fi Cheat Sheet: Tips and Troubleshooting (RANDOM - 11%)
Hi Alex,
I hope you will dive into Wireguard or Tailscale in your next articles. Thanks