How to connect to OpenVPN via proxy or Tor
Table of contents
1. Specifics of connecting to an OpenVPN server through an HTTP proxy
1.2 Using a proxy will affect network performance
2. How to check that the connection to OpenVPN is actually going through a proxy
3. How to connect to a OpenVPN server via an HTTP proxy without authentication
4. How to connect to a OpenVPN server via an HTTP proxy with Basic authentication
5. How to connect to a OpenVPN server via an HTTP proxy with NTLM authentication
6. How to connect to a OpenVPN server via an HTTP proxy with Digest authentication
7. How to connect to a OpenVPN server via a SOCKS proxy
8. How to connect to a OpenVPN server via the Tor network
8.1 How to connect to an OpenVPN server via Tor (SOCKS)
8.2 How to connect to the OpenVPN server via Tor (HTTP proxy via Privoxy)
10. Free VPN with proxy and Tor connection
This article is a list of recipes and tips in one way or another related to connecting to the OpenVPN server through a proxy server. For information on how to create your own OpenVPN network see “How to set up OpenVPN server and clients”. For a collection of various tips for using the OpenVPN network, see “OpenVPN advanced usage examples”.
Specifics of connecting to an OpenVPN server through an HTTP proxy
1) Use TCP protocol
See also:
- How to use OpenVPN with TCP protocol
- Comparison of performance (data transfer rate) of OpenVPN over UDP and TCP
If you plan to connect to OpenVPN via an HTTP/HTTPS proxy, then use TCP instead of UDP, otherwise you will encounter an error:
Options error: --http-proxy MUST be used in TCP Client mode (i.e. --proto tcp-client)
Even if you add the “--proto tcp-client” option to the command to connect to the OpenVPN server running on UDP, you will successfully connect to the proxy server, but attempts to connect to OpenVPN will fail. Due to an error, the client will constantly try to reconnect to OpenVPN:
2021-11-06 09:41:10 Outgoing Control Channel Authentication: Using 160 bit message hash 'SHA1' for HMAC authentication
2021-11-06 09:41:10 Incoming Control Channel Authentication: Using 160 bit message hash 'SHA1' for HMAC authentication
2021-11-06 09:41:10 TCP/UDP: Preserving recently used remote address: [AF_INET]157.245.118.66:44220
2021-11-06 09:41:10 Socket Buffers: R=[131072->131072] S=[16384->16384]
2021-11-06 09:41:10 Attempting to establish TCP connection with [AF_INET]157.245.118.66:44220 [nonblock]
2021-11-06 09:41:10 TCP connection established with [AF_INET]157.245.118.66:44220
2021-11-06 09:41:10 Send to HTTP proxy: 'CONNECT 185.117.153.79:5300 HTTP/1.0'
2021-11-06 09:41:10 Send to HTTP proxy: 'Host: 185.117.153.79'
2021-11-06 09:41:10 HTTP proxy returned: 'HTTP/1.1 200 Connection established'
2021-11-06 09:41:12 TCP_CLIENT link local: (not bound)
2021-11-06 09:41:12 TCP_CLIENT link remote: [AF_INET]157.245.118.66:44220
2021-11-06 09:41:13 Connection reset, restarting [0]
2021-11-06 09:41:13 SIGUSR1[soft,connection-reset] received, process restarting
2021-11-06 09:41:13 Restart pause, 5 second(s)
2021-11-06 09:41:18 Outgoing Control Channel Authentication: Using 160 bit message hash 'SHA1' for HMAC authentication
2021-11-06 09:41:18 Incoming Control Channel Authentication: Using 160 bit message hash 'SHA1' for HMAC authentication
2021-11-06 09:41:18 TCP/UDP: Preserving recently used remote address: [AF_INET]157.245.118.66:44220
2021-11-06 09:41:18 Socket Buffers: R=[131072->131072] S=[16384->16384]
2021-11-06 09:41:18 Attempting to establish TCP connection with [AF_INET]157.245.118.66:44220 [nonblock]
2021-11-06 09:41:18 TCP connection established with [AF_INET]157.245.118.66:44220
2021-11-06 09:41:18 Send to HTTP proxy: 'CONNECT 185.117.153.79:5300 HTTP/1.0'
2021-11-06 09:41:18 Send to HTTP proxy: 'Host: 185.117.153.79'
2021-11-06 09:41:18 HTTP proxy returned: 'HTTP/1.1 200 Connection established'
2021-11-06 09:41:20 TCP_CLIENT link local: (not bound)
2021-11-06 09:41:20 TCP_CLIENT link remote: [AF_INET]157.245.118.66:44220
2021-11-06 09:41:20 Connection reset, restarting [0]
2021-11-06 09:41:20 SIGUSR1[soft,connection-reset] received, process restarting
2021-11-06 09:41:20 Restart pause, 5 second(s)
2) Using a proxy will affect network performance
Using a proxy will decrease the speed of traffic transmission in the OpenVPN network and also increase the ping.
3) Configuring Squid
Configuring a Squid proxy server to work with OpenVPN does not require any special options. For example, to use Squid as a proxy server to connect to OpenVPN without authentication, it is enough to specify the following lines in the configuration file (replace port 44220 with any other):
http_port 44220
acl portA localport 44220
http_access allow portA
Additionally, you can set up Basic or Digest authentication – OpenVPN supports both.
See also: How to create and configure a Squid proxy server
How to check that the connection to OpenVPN is actually going through a proxy
1) Client and server logs
The client and server logs should contain numerous references to the IP and port of the proxy server.
For example, the initial data is as follows:
- Proxy: 157.245.118.66:44220
- OpenVPN server: 185.117.153.79:5300
Example of client log: as you can see, the connection is made with proxy 157.245.118.66:44220; commands are sent to the proxy server containing references to the VPN server 185.117.153.79:5300:
2021-11-06 11:07:25 TCP/UDP: Preserving recently used remote address: [AF_INET]157.245.118.66:44220
2021-11-06 11:07:25 Socket Buffers: R=[131072->131072] S=[16384->16384]
2021-11-06 11:07:25 Attempting to establish TCP connection with [AF_INET]157.245.118.66:44220 [nonblock]
2021-11-06 11:07:26 TCP connection established with [AF_INET]157.245.118.66:44220
2021-11-06 11:07:26 Send to HTTP proxy: 'CONNECT 185.117.153.79:5300 HTTP/1.0'
2021-11-06 11:07:26 Send to HTTP proxy: 'Host: 185.117.153.79'
2021-11-06 11:07:27 HTTP proxy returned: 'HTTP/1.1 200 Connection established'
2021-11-06 11:07:29 TCP_CLIENT link local: (not bound)
2021-11-06 11:07:29 TCP_CLIENT link remote: [AF_INET]157.245.118.66:44220
2021-11-06 11:07:29 TLS: Initial packet from [AF_INET]157.245.118.66:44220, sid=ae11f46a 0d3d585c
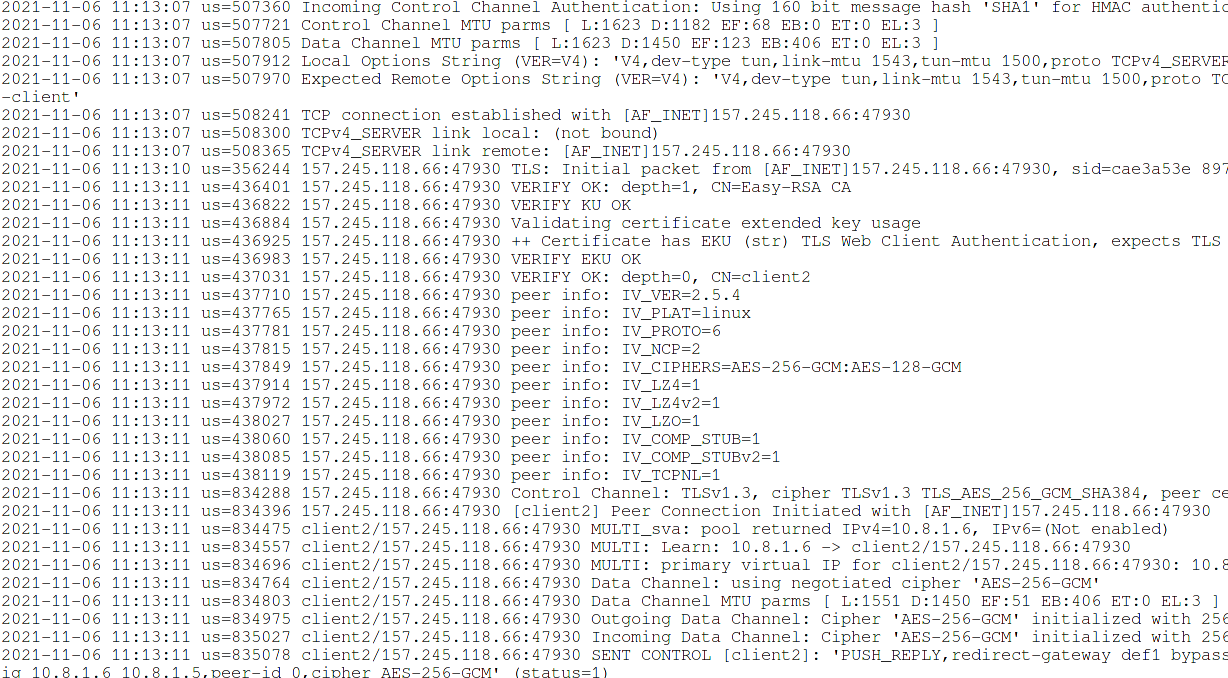
The OpenVPN server log says that the connection came from the proxy's IP address:
2021-11-06 11:13:07 us=508241 TCP connection established with [AF_INET]157.245.118.66:47930
2) Traffic route
When using an OpenVPN connection, all routes are redirected through the IP of the OpenVPN server. If the connection is made through a proxy, then in the settings of the user's route, all connections are sent through the IP address of the proxy server.
Command for displaying routes:
ip route
An example of routes with disabled OpenVPN connection:
default via 192.168.1.1 dev wlo1 proto dhcp metric 600
192.168.1.0/24 dev wlo1 proto kernel scope link src 192.168.1.44 metric 600
Let's see the routes on the client machine connected to the OpenVPN server:
ip route
As you can see, the routes mention the IP address 157.245.118.66, which is the address of the proxy server, not the OpenVPN server:
0.0.0.0/1 via 10.8.1.17 dev tun0
default via 192.168.1.1 dev wlo1 proto dhcp metric 600
10.8.1.1 via 10.8.1.17 dev tun0
10.8.1.17 dev tun0 proto kernel scope link src 10.8.1.18
128.0.0.0/1 via 10.8.1.17 dev tun0
157.245.118.66 via 192.168.1.1 dev wlo1
192.168.1.0/24 dev wlo1 proto kernel scope link src 192.168.1.44 metric 600
How to connect to a OpenVPN server via an HTTP proxy without authentication
To connect to a remote host via HTTP, you must use the --http-proxy option and specify at least two arguments with it: server address and port number.
For example, the command to connect to the OpenVPN server directly looks like this:
sudo openvpn client2.ovpn
It omits the --config option, which points to a configuration file. But when using other options, you must specify --config as the program will not be able to interpret the arguments correctly. Thus, the following command is identical to the previous one:
sudo openvpn --config client2.ovpn
To connect to OpenVPN through a proxy, use a command of the form:
sudo openvpn --config client2.ovpn --http-proxy PROXY-IP PROXY-PORT
Example command to connect to OpenVPN through a proxy (proxy address 157.245.118.66 and port number 44220) without checking the username and password:
sudo openvpn --config client2.ovpn --http-proxy 157.245.118.66 44220
The value of the --http-proxy option can be specified in the .ovpn configuration file, for example, by specifying the following line in the client2.ovpn file:
http-proxy PROXY-IP PROXY-PORT
For example:
http-proxy 157.245.118.66 44220
To connect to OpenVPN through a proxy, you can use the following command – you no longer need to specify proxy parameters in the command line:
sudo openvpn client2.ovpn
How to connect to a OpenVPN server via an HTTP proxy with Basic authentication
For basic authentication (in addition to the required IP address and proxy port in any case), a username and password are required to access the proxy server.
Proxy username and password cannot be specified on the command line. This data must either be placed in a file with two lines:
USERNAME
PASSWORD
For example, the username and password are placed in AUTHENTICATION-FILE.txt, then as the third argument of the --http-proxy option you need to specify the path to this file and the command to connect through the proxy will be something like this:
sudo openvpn --config client2.ovpn --http-proxy PROXY-IP PROXY-PORT AUTHENTICATION-FILE.txt
For example:
sudo openvpn --config client2.ovpn --http-proxy 157.245.118.66 44220 authfile.txt
The username and password for proxy authentication can be placed in the .ovpn file using the following syntax:
<http-proxy-user-pass>
USERNAME
PASSWORD
</http-proxy-user-pass>
The above shows how to add the value of the --http-proxy option to the configuration file, so all the settings for connecting to the proxy can be collected in the .ovpn file as follows:
http-proxy PROXY-IP PROXY-PORT
<http-proxy-user-pass>
USERNAME
PASSWORD
</http-proxy-user-pass>
If you did not specify the AUTHENTICATION-FILE.txt or the <http-proxy-user-pass>…</http-proxy-user-pass> section, you will be prompted for the username and password for connecting to the proxy in the console.
How to connect to a OpenVPN server via an HTTP proxy with NTLM authentication
As the fourth argument to the --http-proxy option, you can specify an authentication method, it can be one of “none”, “basic” or “ntlm”.
For NTLM authentication, specify “ntlm” string, for example:
sudo openvpn --config client2.ovpn --http-proxy 157.245.118.66 44220 authfile.txt ntlm
How to connect to a OpenVPN server via an HTTP proxy with Digest authentication
You may have noticed that there is no option for HTTP Digest authentication, but this kind of authentication is supported. It is enabled using the “auto” or “auto-nct” flags, which should replace the “AUTHENTICATION-FILE” argument. That is, it turns out that the username and password will need to be specified in the .ovpn file or entered manually in the console.
Proxy connection settings with Digest authentication in the .ovpn file:
http-proxy PROXY-IP PROXY-PORT auto
<http-proxy-user-pass>
USERNAME
PASSWORD
</http-proxy-user-pass>
The “auto” flag makes it so that OpenVPN automatically detects the authentication method.
The “auto-nct” flag (meaning no clear-text auth) instructs OpenVPN to automatically detect the authentication method, but reject weak authentication protocols such as HTTP Basic Authentication.
Examples:
- http-proxy proxy.example.net 3128
- http-proxy proxy.example.net 3128 authfile.txt
- http-proxy proxy.example.net 3128 stdin
- http-proxy proxy.example.net 3128 auto basic
- http-proxy proxy.example.net 3128 auto-nct ntlm
How to connect to a OpenVPN server via a SOCKS proxy
To connect to the OpenVPN server through a SOCKS proxy, use the --socks-proxy option. It has one required argument – this is the server. Optionally, you can specify a port (1080 by default) and an authentication file. The authentication file is a file containing the username and password in 2 lines, or “stdin” can be used to query from the console.
How to connect to a OpenVPN server via the Tor network
Since the Tor network uses the SOCKS protocol, one would think that connecting to OpenVPN through the Tor network is just a special case of connecting through a SOCKS proxy, but in practice you need to remember that the Tor network does not transmit UDP traffic. But this is just the beginning.
You cannot use Tor as a proxy for OpenVPN if Tor is running on the same machine from which you are trying to connect to the VPN server. To understand why such a connection is impossible, consider what happens when using a VPN server.
When we connect to a VPN server (without a proxy or Tor), new routes are set on the local computer:
- in the default route, all traffic now goes not to the gateway (router), but to the IP address of the VPN server
- in order not to be locked (it is impossible to get to the IP address of the VPN server without getting on the router), one more route is added: “all traffic for the IP address of the VPN server is now redirected to the router”. That is, an exception is made for the IP address of the VPN server.
If you connect to a VPN through a proxy (for example, through Tor), the following routes are added:
- the first as before – all traffic now goes to the IP address of the VPN server
- and the second is different – exactly the same exception is made, but for the IP address of the proxy server
So, if the proxy server is located on another computer, then it works without problems.
But if the LOOPBACK (localhost) IP address of the proxy server is specified, then the following set of rules is obtained:
- first, as usual – all traffic goes to the IP address of the VPN server
- second – an exception is made for the proxy IP address, but this is 127.0.0.1, that is, localhost.
That is, the system locks itself. Yes, it is possible to connect to a VPN over Tor even if the Tor service is running on the same computer. But immediately after that, the VPN adds the routes necessary for its operation, which tightly block the traffic flow – it cannot leave the computer.
This problem can be solved by connecting via Tor running on another computer, even if on the same local network, even using virtual machines. An example of a working configuration with a virtual machine: a real computer acts as a proxy running Tor, and connection to OpenVPN through a Tor proxy is performed from a virtual machine. The opposite option – connecting to OpenVPN from a real machine through a virtual proxy machine will not work. You can use two virtual machines, one of which will be a proxy running Tor, and the second will be used to connect to OpenVPN.
It is for this reason that the Whonix distribution has two halves – the main OS and the gateway.
You can use Tor as a VPN proxy like:
- SOCKS proxy – in this case, you will not need other programs except Tor
- HTTP proxy – in addition to Tor, you also need Privoxy
How to connect to an OpenVPN server via Tor (SOCKS)
Install the tor package on the computer that will act as a proxy through Tor.
On Debian, Kali Linux, Linux Mint, Ubuntu, this is done with the command:
sudo apt install tor
In Arch Linux, BlackArch, Manjaro, installation is performed by the command
sudo pacman -S tor
By default, the tor service only allows incoming connections from localhost, that is, connections from other computers are not accepted.
Open the /etc/tor/torrc file:
sudo gedit /etc/tor/torrc
and add a line like this to it:
SOCKSPort EXTERNAL_IP:9050
For example:
SOCKSPort 192.168.1.39:9050
Start tor services:
sudo systemctl start tor
You can add tor to startup:
sudo systemctl enable tor
Now you can connect to the OpenVPN server via Tor running on the remote computer:
sudo openvpn --config client5.ovpn --socks-proxy 192.168.1.39 9050
How to connect to the OpenVPN server via Tor (HTTP proxy via Privoxy)
Privoxy which can be used as an HTTP proxy → SOCKS proxy adapter. That is, the OpenVPN client will connect to Privoxy as an HTTP proxy, and Privoxy will redirect traffic to Tor, which uses the SOCKS protocol.
On the computer that will act as a proxy through Tor, install the tor and privoxy packages.
On Debian, Kali Linux, Linux Mint, Ubuntu, this is done with the command:
sudo apt install tor privoxy
In Arch Linux, BlackArch, Manjaro, installation is performed by the command
sudo pacman -S tor privoxy
To configure Privoxy on a computer that will act as a proxy through Tor, in the file /etc/privoxy/config
sudo gedit /etc/privoxy/config
add the line:
forward-socks5t / 127.0.0.1:9050 .
By default, Privoxy only accepts incoming connections from the same computer, so that Privoxy starts accepting connections from outside, replace the line
listen-address 127.0.0.1:8118
with
listen-address :8118
If you want connections to be accepted only from the local network, then specify the local IP address, for example:
listen-address 192.168.1.20:8118
Start tor and privoxy services:
sudo systemctl start tor privoxy
You can add these services to startup:
sudo systemctl enable tor privoxy
By default privoxy listens on port 8118, also specify the IP address of the computer running Privoxy and Tor, for example:
sudo openvpn --config client5.ovpn --http-proxy 192.168.1.39 8118
Due to the nature of the Tor network, the connection may not occur the first time, and the connection may be slow and unstable.
How to use VPN in Tails
Under the article on using Tails, I was asked how to connect to a VPN over Tor in Tails.
Not only is it impossible to use a proxy with a loopback address (and this problem cannot be solved at all), but there are also limitations in Tails itself. For example, commands run as root do not have network access, and OpenVPN requires root privileges.
That is, connecting to a VPN server via Tor in Tails is not possible. In general, in Tails, using a VPN (for example, to connect through a remote proxy server) is either impossible at all, or requires such changes in system settings that the OS loses all its specific advantages and actually ceases to be Tails.
If you are thinking of Tails and VPN, then Whonix should be considered to use Tor and VPN at the same time.
Free VPN with proxy and Tor connection
In the article “autovpn2 and autovpn3 - scripts to automatically connect to a free VPNs” I mentioned that the autovpn3 script (which searches for free VPN servers and connects the computer through them), so, this script allows you to search for free VPNs through a proxy, and also download them settings and make a connection through a proxy.
In order for the program to do all actions through a proxy, edit the following settings in the autovpn3.sh file:
proxy=0 # replace with 1 if you want to search for VPN and connect to VPN through a proxy
proxyIP='' # IP address of the proxy server
proxyPort=8080 # proxy server port
proxyType='http' # type of proxy server, can be socks or http
Remember that for the reasons explained above, you cannot use a locally running Tor as a proxy to connect to a VPN server.
Related articles:
- autovpn2 and autovpn3 - scripts to automatically connect to a free VPNs (68.7%)
- Errors in Kali Linux ‘W: Failed to fetch’ and ‘W: Some index files failed to download. They have been ignored, or old ones used instead.’ (SOLVED) (64.3%)
- How to make proxy with Tor in Windows (63.4%)
- How to redirect all traffic through the Tor network (61%)
- OpenVPN advanced usage examples (59.2%)
- IP addresses databases of organizations and geographical places (continents, countries, provinces and cities) (RANDOM - 0.6%)
hi,
when we use openvpn via one proxy we use this command that you told:
http-proxy PROXY-IP PROXY-PORT auto<http-proxy-user-pass>USERNAMEPASSWORD</http-proxy-user-pass>Please enter the connection commmand if we need to connect two or more proxies in a row with a separate username and password. For example, after connecting to the first proxy, connect to the next proxy server and then establish a connection with the main VPN server.thank you.