How to protect the Apache web server from hacking in Windows
Table of contents
1. Denying access from outside to MariaDB/MySQL
2. Denying access from outside to Apache
3. How to assign a root password for MariaDB/MySQL in Windows
5. Deletion of test files, archives with source code, backup copies of files
6. Prevent viewing the contents of folders without an index file
8. How to hide the web server version
9. Installing the mod_security file firewall
Many webmasters, as well as PHP programmers, use Apache on Windows for training. But we must not forget that Apache is a full-fledged web server, which in its default configuration is designed to serve any requests, no matter what network they come from: local or global Internet. At the same time, on Windows, the Apache web server is launched with high privileges. To summarize without further explanation: a vulnerable script on a web server could compromise the entire Windows system.
If you have a white IP, then anyone from the Internet can connect to your web server. Also, if you, for example, are connected to a local network, for example, via Wi-Fi, then again - any computer from this local network can connect to your web server. This could cause a source code, that you are developing or testing, to leak, or a computer compromise.
Therefore, it is necessary to take steps to properly configure the components of the web server. Thanks to the measures taken, the Apache web server will fully retain its functionality for the user who runs the sites working on this computer, but no one can connect to this server, either on the local or global network.
1. Denying access from outside to MariaDB/MySQL
A standard web server, including the one we just installed, has two network services:
- the web server itself, which listens on port 80 (when HTTPS is enabled, port 443 is also listened)
- network service of database management system, that is, MariaDB or MySQL, which listens on port 3306
The DBMS is a network service, it is convenient because you can connect to MariaDB/MySQL from another computer and perform various actions on the databases. For local processes, this is also normal - they connect to the network service using the virtual network interface Loopback. To say short, this is the way to connect to a network service that runs on the same computer. That is, we seem to make a request to the network, and the network service sees these packets as if they came from the network. That is, the network service client and the network service itself work as they should, but the traffic actually does not go anywhere from the computer.
By default, MariaDB/MySQL accepts connections from any computer. In order for MariaDB/MySQL to accept connections only from web applications running on this computer, the my.cnf file must contain the string
bind-address = 127.0.0.1
An example of the my.cnf configuration file:
[mysqld]
datadir="c:/Server/data/DB/data/"
bind-address = 127.0.0.1
After making changes to the configuration file, the service needs to restart (or restart the computer).
net stop mysql
net start mysql
This means that it only listens on the network interface with IP address 127.0.0.1, which is related to Loopback. This, in turn, means that no one from outside (outside the computer that the web server is running on) will be able to connect to MariaDB/MySQL. At the same time, sites and other applications will work with databases as if nothing had happened - they just use such connections to the address 127.0.0.1.
2. Denying access from outside to Apache
As for the web server, the setting here depends on your needs - what exactly is the server for?
If you use the server only for writing scripts, testing sites and you do not need to be able to connect to it from outside, then in the C:\Server\bin\Apache24\conf\httpd.conf file, find the Listen directive, its default value is:
Listen 80
And replace it with
Listen 127.0.0.1:80
Restart the server for the changes to take effect:
c:\Server\bin\Apache24\bin\httpd.exe -k restart
After that, no device in the global or local network will be able to connect to your web server. But as before, you can easily open its contents in a web browser using the address http://localhost/
If you want to make the Apache server available to everyone on the local network, but not available on the global network, then there are two options.
- The first:
Assign a static address to the computer with the server, and then set it with the Listen local_IP:80 directive. It turns out exactly the effect that is needed: the web server will respond to requests from the local network and will ignore requests from the Internet. For details on setting up static IP, see the article “How to make a web-server on Windows accessible to others.”
- Also, the second way is simpler than the first:
In the C:\Server\data\htdocs\ folder (this is our root folder for web documents), create a .htaccess file and type in:
Require ip 10.0.0.0/8 172.16.0.0/12 192.168.0.0/16 127.0.0.0/8 ::1/128
This line allowed access to the server for devices with IP from all local ranges, as well as loopback addresses, for all others, when you try to connect to the server, the following message will be displayed:
Forbidden
You don't have permission to access / on this server.

You can edit the above line for your needs, for example, you can remove the ranges 10.0.0.0/8 and 172.16.0.0/12 if they are not used on your local network. The IP addresses from 10.0.0.0/8 can be used by the Internet provider for NAT, and 172.16.0.0/12 can be used for local area networks at the city level (some providers have them). Therefore, if you leave the ranges 10.0.0.0/8 and 172.16.0.0/12, then under certain circumstances (the cable of the Internet provider is directly connected to the computer without a router, and the Internet provider uses the ranges 10.0.0.0/8 and 172.16.0.0/12) users of these local networks will be able to connect to your server with these settings.
So also try
Require ip 192.168.0.0/16 127.0.0.0/8 ::1/128
If everything works and there are no problems, then stop at the second version.
3. How to assign a root password for MariaDB/MySQL in Windows
By default, the root user has an empty password. Since we have disabled access to the MariaDB/MySQL server from outside, this is not so dangerous. Nevertheless, there is a threat that the attacker will find a vulnerability in a web application and be able to connect through it. Therefore, if you wish, for additional server security, you can set a password for the root user in MariaDB/MySQL.
To do this, open the command line, enter:
cd C:\Server\bin\mariadb\bin\
.\mysql -u root
Inside MySQL:
FLUSH PRIVILEGES;
ALTER USER 'root'@'localhost' IDENTIFIED BY 'new_password';
exit;
Replace new_password with your actual password.
4. Block access to phpMyAdmin
Perhaps you missed the second step, which blocked access to the web server from other computers, because, for example, you need to have the web server accessible from outside.
If this is the case, in any case, you need to block access to phpMyAdmin; on the local computer, it usually should not be open to others. Accessible phpMyAdmin allows attackers to brute force the password, and if you don’t update phpMyAdmin in time, the attacker can also exploit the vulnerabilities found in old versions of phpMyAdmin and enter the system.
To close access to phpMyAdmin in the /phpmyadmin/ folder on the server, create the .htaccess file and copy into it:
Require local
This is to prevent outsiders from entering phpMyAdmin - be sure to do it. To check that the ban is working, try to open from some other device (for example, from a mobile phone) an address like http://your_site/phpmyadmin/ or http://your_IP/phpmyadmin/ - a message should appear that access is denied and error 403. Or simply delete the /phpmyadmin/ folder, if you do not need phpMyAdmin.
Similarly, do with other folders on the server, which should not be unauthorized access.
5. Deletion of test files, archives with source code, backup copies of files
Delete the file with phpinfo(); or other checking files that were created during the installation and testing of the web server.
6. Prevent viewing the contents of folders without an index file
By default, if you enter a folder without an index file, a list of all files in this folder is displayed. Most likely, you do not need it (and this is worse for security). Therefore, in the Apache httpd.conf configuration file, find the <Directory "c:/Server/data/htdocs/"> directive.
After it, find the line
Options Indexes FollowSymLinks
And replace with
Options -Indexes
Restart the web server for the changes to take effect.
7. For public web servers, block access to folders where backup copies and intermediate work results are stored
This item is for those who do not completely block access to the web server from other computers, but uses it as a public server, as well as a development environment.
If you develop and test scripts right on this server, close access to the folder containing the project files using .htaccess as shown above. Do not store backups, backup files, for example, index.php.bak on this server!
8. How to hide the web server version
If on the command line you run:
curl -v localhost
That will be displayed about the following data:
* Rebuilt URL to: localhost/
*   Trying ::1...
* TCP_NODELAY set
* Connected to localhost (::1) port 80 (#0)
> GET / HTTP/1.1
> Host: localhost
> User-Agent: curl/7.55.1
> Accept: */*
>
< HTTP/1.1 200 OK
< Date: Mon, 18 Feb 2019 14:19:52 GMT
< Server: Apache/2.4.34 (Win64) PHP/7.3.2
< Content-Length: 1951
< Content-Type: text/html;charset=UTF-8
<
<!DOCTYPE HTML PUBLIC "-//W3C//DTD HTML 3.2 Final//EN">
<html>
 <head>
  <title>Index of /</title>
 </head>
 <body>
<h1>Index of /</h1>
<ul><li><a href="--.htaccess"> --.htaccess</a></li>
<li><a href="-index.html"> -index.html</a></li>
<li><a href="-index.php"> -index.php</a></li>
<li><a href="-phpmyadmin/"> -phpmyadmin/</a></li>
<li><a href="-wp-config.php"> -wp-config.php</a></li>
<li><a href="-www/"> -www/</a></li>
<li><a href="PHP_errors.log"> PHP_errors.log</a></li>
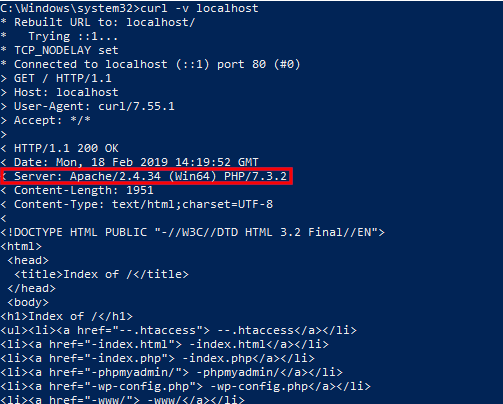
Pay attention to the line:
Server: Apache/2.4.34 (Win64) PHP/7.3.2
From it we can conclude about the exact versions of Apache and PHP, as well as that the web server is running on the Windows operating system. This may help the attacker. This string is part of the HTTP header and is sent each time a request is made to the web server.
Two directives can disable the output of this information.
Open the httpd.conf file (C:\Server\bin\Apache24\conf\httpd.conf) and add two directives to it:
ServerTokens Prod
ServerSignature Off
Restart the server for the changes to take effect:
c:\Server\bin\Apache24\bin\httpd.exe -k restart
Check back again:
curl -v localhost

As you can see, much less information is now displayed:
Server: Apache
9. Installing the mod_security file firewall
The file firewall examines every request that arrives at the web server, and if this request is a threat to the web application or web site, the file firewall blocks this request.
That is, even if your web server has a vulnerable script or website, mod_security will not allow an attacker to exploit this vulnerability.
mod_security is a file firewall, intrusion detection and prevention system.
Consider installing mod_security on Apache running on Windows.
[SECTION IN THE PREPARATION PROCESS]
Conclusion
Treat the web server on your computer as public: everything that is not closed and not blocked is like a courtyard. Take this seriously, because through the web server attackers can compromise (hack) the whole computer!
Related articles:
- Web server installation guide on Windows: Apache, PHP, MariaDB and phpMyAdmin. How to provide local web server security (87.6%)
- Installing and configuring MySQL and phpMyAdmin on Kali Linux (64%)
- 5 free and simple steps to secure WordPress web sites (63.6%)
- How to install web server on Windows 10 (Apache 2.4, PHP 8, MySQL 8.0 and phpMyAdmin) (62.8%)
- Web Server on Windows 11 (Apache, MySQL, PHP and phpMyAdmin): step-by-step installation guide (62.8%)
- How to install Tor and create Tor hidden service on Windows (RANDOM - 1.6%)