Kali Linux post-installation tips and settings
Table of contents
1. How to install VirtualBox Guest OS Add-ons for Kali Linux
5.1 How to install the analogue of Total Commander
5.2 How to install the analogue of the Task Manager
6. How to run commands without a password
7. How to enable root user in Kali Linux
8. How to disable screen lock in Kali Linux
9. How to enable login without password at system boot
10. How to switch to a light or dark theme?
11. How to change the Kali Linux language?
12. How to change the keyboard layout?
13. How to enable the language bar in the top menu of Kali Linux
15. How to disable window grouping in Kali Linux
16. Switching between community mirrors and CloudFlare CDN to download updates
17. How to open the root console
18. How to switch to one line command prompt
Here you can find tips on how to make the system more convenient for work by configuring the installed Kali Linux to your habits.
You do not need to do everything that is written here – select only those recommendations that will make your work in Kali Linux more comfortable. Moreover, from a security point of view, all recommendations related to passwords (for example, setting up logging in without a password, executing commands without a password, turning off the screen lock) are very harmful. But personally, this annoys me more than the potential protection gives (when an outsider physically accesses the computer, password protection does not give anything, see the article “How to reset a forgotten login password in Linux”).
1. How to install VirtualBox Guest OS Add-ons for Kali Linux
No longer required. VirtualBox guest OS add-ons are now installed automatically during the installation of the system itself.
2. How to use Windows drives in Kali Linux. How to solve the problem with the error ‘The disk contains an unclean file system (0, 0). Metadata kept in Windows cache, refused to mount’
This is needed if you have problems accessing Windows drives from Kali Linux. This can happen when you installed Kali Linux as a second system or on a USB flash drive.
We look at the disks and look for the problematic one that interests us:
fdisk -l
The found disk (I have it for example /dev/sdb1) we fix by the ntfsfix command:
sudo ntfsfix /dev/sdb1
3. Regular system updates
Updates fix bugs in the system and bring new features. To perform a full update, run the command:
sudo apt update && sudo apt full-upgrade -y
4. Regular system cleaning
From time to time it is recommended to execute commands to remove packages that were installed automatically (since they were dependencies of other programs), but are no longer needed.
To do this, use the command:
sudo apt autoremove -y
Its use is safe and should not cause problems.
Each program update, package files are downloaded to the package cache. After the update, downloaded files (you can call them installation files) are not deleted, and gradually the package cache grows to large sizes. This was done intentionally with the idea that if after the next update you find that the new package has problems and the old version is no longer available in the online repository, then you can roll back to the old version by installing it from a file saved in the package cache.
For rolling distributions, the cache grows very quickly, and if you are not qualified enough to roll back to the old version using the installation package which is stored in the cache, then for you these hundreds of megabytes or even several gigabytes are a waste of space on your hard drive. Therefore, from time to time you can execute commands
sudo apt autoclean -y
and
sudo apt clean -y
clean – delete downloaded archive files
clean cleans the local repository from received package files. It removes everything except the lock file from /var/cache/apt/archives/ and /var/cache/apt/archives/partial/.
autoclean – delete old downloaded archive files
Like clean, autoclean cleans downloaded package files from the local repository. The only difference is that it only removes package files that can no longer be downloaded and are largely useless.
This allows you to maintain the cache for a long period without growing too much. APT::Clean-Installed configuration option will not allow the installation files of those packages that are currently installed to be deleted.
The following command is not directly related to cleaning, but helps maintain system health.
sudo apt install -f -y
The -f, --fix-broken option tries to normalize a system with broken dependencies. This option, when used with install/remove, may skip any packages to allow APT to find a likely solution. If packages are listed, this should completely fix the problem. This option is sometimes necessary when starting APT for the first time; APT alone does not allow packages with broken dependencies to exist on the system. It is possible that the structure of the system dependencies can be so broken that manual intervention will be required (which usually means using dpkg --remove to eliminate some of the intruder packages). Using this option with -m may cause an error in some situations. Item in the configuration file: APT::Get::Fix-Broken.
5. Intall useful applications
How to install the analogue of Total Commander
Total Commander is a two-panel, cross-platform file manager, a complete analogue of Double Commander. To install it, do:
sudo apt install doublecmd-gtk
How to install the analogue of the Task Manager
Linux has many utilities for monitoring processes and the consumption of system resources, the most familiar one for you may be the “System Monitor”. It resembles the Windows Task Manager and shows a list of processes, the amount of resources they consume, the level of CPU utilization, the use of RAM, network and disk space.
To install, run the command
sudo apt install gnome-system-monitor
Find “System Monitor” in the menu to launch it.

Or run on the command line:
gnome-system-monitor

How to install Wine
Wine allows you to run Windows programs on Linux without using virtual machines.
In fact, delving deeper into Wine when you first get to know Linux is not the best strategy. Linux newbies should start by familiarizing themselves with native Linux programs. For many programs Wine is not needed as they are cross-platform: LibreOffice, Google Chrome, Firefox, Double Commander, VirtualBox, Etcher, VLC, DeadBeef, GIMP. OBS Studio, Viber, Wireshark, Apache, PHP, MySQL, Calibre, Netbeans, Burp Suite, Visual Studio Code, KeePass, KeePassXC, OpenShot Dropbox, Python, Ruby, Perl, PowerShell, SSH, Vuse BitTorrent Client, FileZilla, Tor Browser, JDownloader and many more. All of these programs do not need Wine as they have native Linux installation packages.
For some programs, you will find almost complete counterparts in Linux.
In fact, there are even more programs and utilities that work in Linux, but cannot be run and have no analogues for Windows. Therefore, it is more promising to delve into the study of the Linux universe than to try to port the program from Windows.
However, Wine does a pretty good job of getting many Windows programs up and running on Linux.
To install Wine type:
sudo dpkg --add-architecture i386
sudo apt update
sudo apt install wine winbind
After installation, run Wine – it may offer to download the necessary fonts and other components:
winecfg
6. How to run commands without a password
Until recently, in Kali Linux, the root user was the main user, you did not need to use sudo and enter a password when executing commands that require elevated privileges. If you do not want to enter a password each time you use sudo, then run the following command:
echo '%sudo ALL=(ALL:ALL) NOPASSWD: ALL' | sudo tee --append /etc/sudoers
7. How to enable root user in Kali Linux
The root user in Kali Linux is still there. If you want to use it instead of a regular user to log in, then just set the password for it with the following command:
sudo passwd root
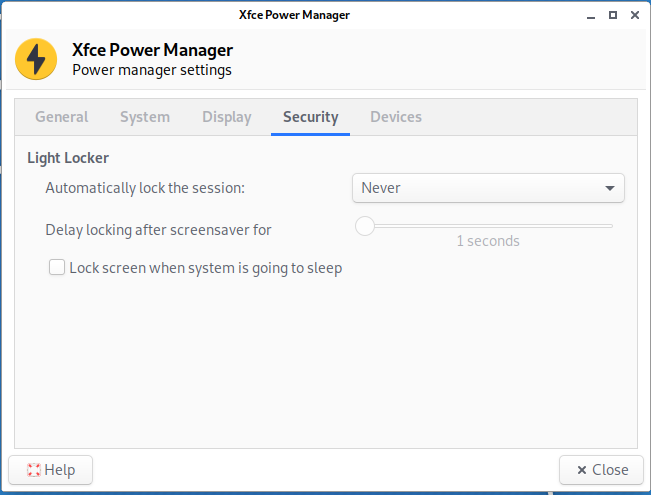
8. How to disable screen lock in Kali Linux
Click on the battery icon next to the clock and select “Power Manager Settings” from the menu:

In the Xfce Power Manager, go to the “Security” tab and select “Never” for “Automatically lock the session”. Also uncheck “Lock screen when system is going to sleep”.
9. How to enable login without password at system boot
Here is considered how to enable automatic login when the desktop is XFCE and the display manager is LightDM.
Open the /etc/lightdm/lightdm.conf file:
sudo apt install gedit
sudo gedit /etc/lightdm/lightdm.conf
and edit (don't forget to uncomment) or just add the lines:
[Seat:*]
pam-service=lightdm
pam-autologin-service=lightdm-autologin
autologin-user=USERNAME
autologin-user-timeout=0
session-wrapper=/etc/X11/Xsession
greeter-session=lightdm-greeter
In the previous lines, replace USERNAME with your username. If you accidentally forgot it, then look with the command:
echo $USER
You also need to create an autologin group and add your user to it:
sudo groupadd -r autologin
sudo gpasswd -a $USER autologin
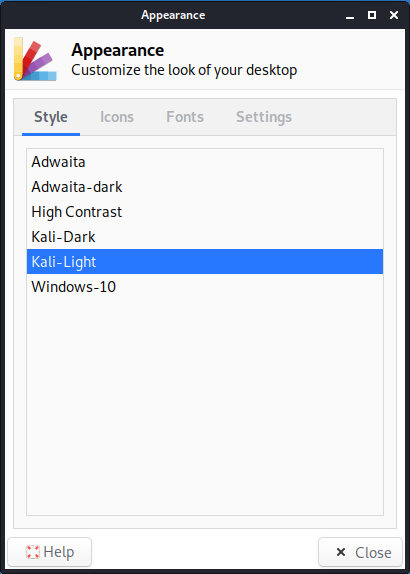
10. How to switch to a light or dark theme?
Kali Linux provides two default themes: dark and light. To switch to a light theme, go to “Settings” → “Appearance” and on the “Style” tab, select “Kali-Light”. And on the “Icons” tab, select “Flat-Remix-Blue-Light”.
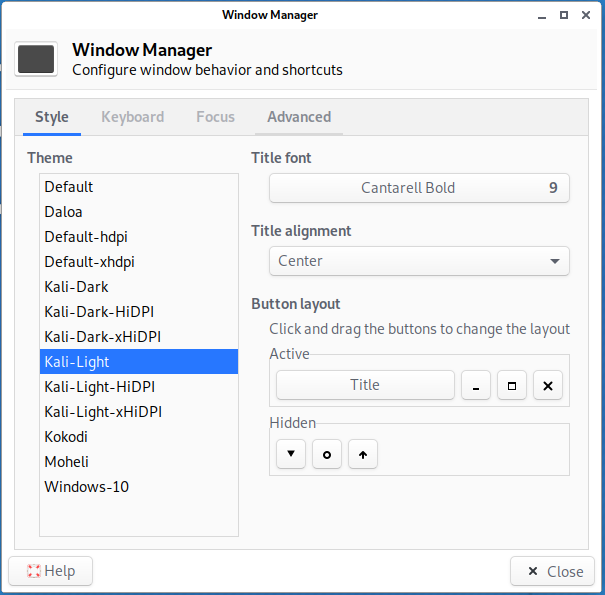
Then go to “Settings” → “Window Manager” and on the “Style” tab, select “Kali-Light”.
To switch from Light to a Dark theme, simply select Dark themes in the same settings.
11. How to change the Kali Linux language?
Run one the following command (specify the locale you need).
- To install English for Kali Linux, run the command:
sudo localectl set-locale LANG=en_US.UTF-8
- To install French for Kali Linux, run the command:
sudo localectl set-locale LANG=fr_FR.UTF-8
- To install German for Kali Linux, run the command:
sudo localectl set-locale LANG=de_DE.UTF-8
- To install Russian for Kali Linux, run the command:
sudo localectl set-locale LANG=ru_RU.UTF-8
The exact strings for the LANG values of your language can be found in the /etc/locale.gen file.
Details: How to change Kali Linux language without reinstalling the system
Finally, you can see a message like this:
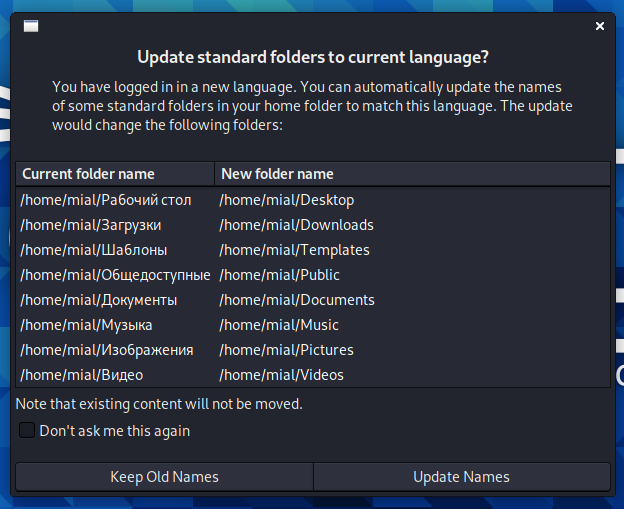
It offers to change the name of the automatically created folders in the user's directory. That is, to change to translate their name into a new system language.
To prevent this window from appearing every time the system boots, check the “Don’t ask this again” box.
To reopen this window, run at a command prompt:
echo 'en_US' > ~/.config/user-dirs.locale
xdg-user-dirs-gtk-update
12. How to change the keyboard layout?
Go to Settings → Keyboard → Layout:
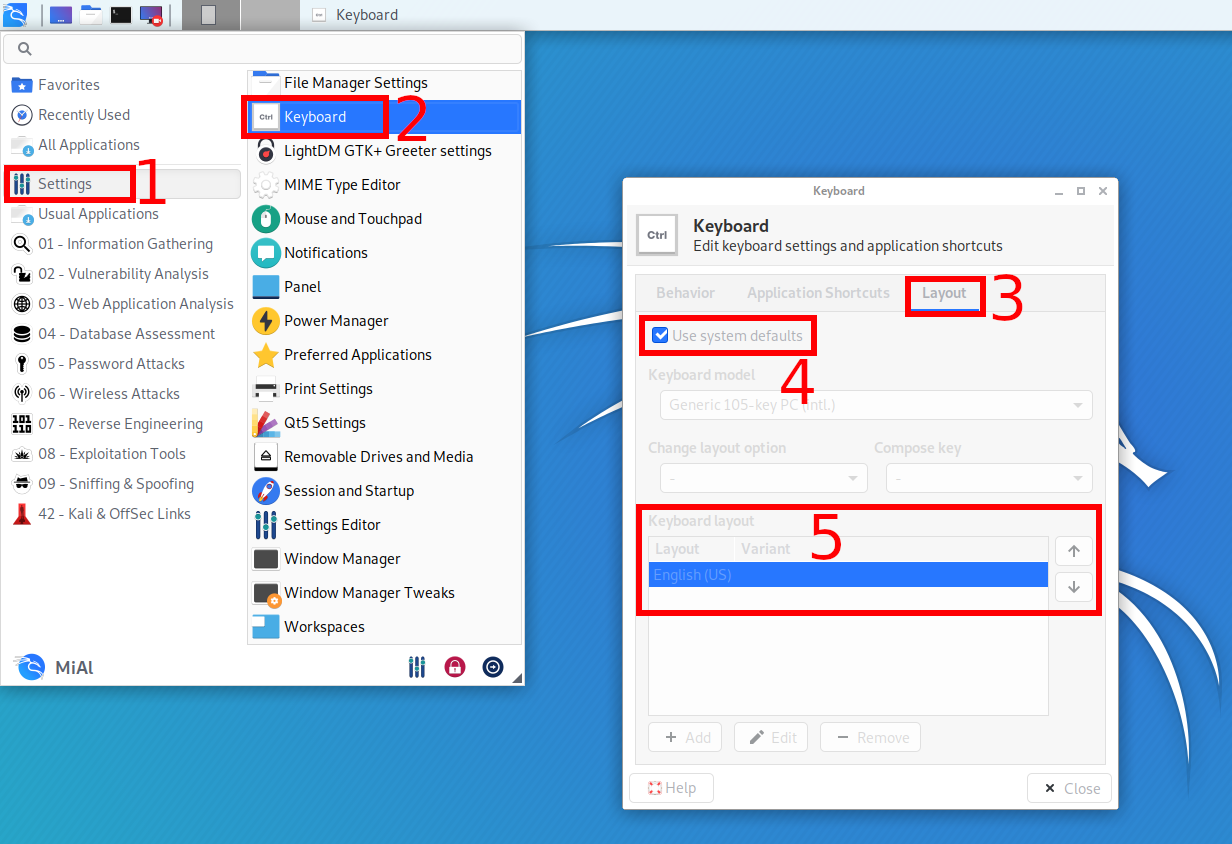
To configure, uncheck “Use system defaults”, as a result, you can add new keyboard layouts, select the default keyboard layout, change the key combination to change the keyboard.
To change and set other keyboard shortcuts, see the adjacent Application Shortcuts tab.
13. How to enable the language bar in the top menu of Kali Linux
Kali Linux does not have a keyboard layout indicator, that is, the language that is currently selected for input is not shown.
To display the language panel in the form of a button with a flag, when you click on it the keyboard layout will be switched, do the following:
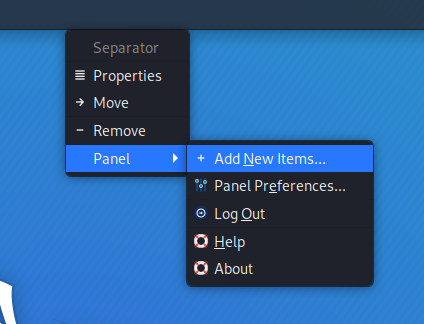
1) Click on the top panel with the right mouse button and in the context menu that opens select Panel → “Add New Items…”:
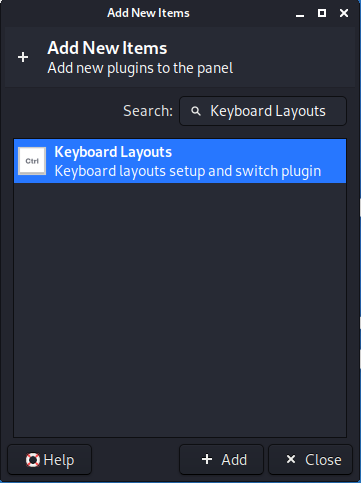
2) Find the “Keyboard Layouts” and click the “Add” button:
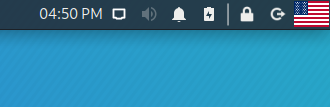
After that, the language bar appears in the form of a flag:
14. Install pip
pip is a package manager for the Python programming language. The pip command is heavily used to install tools or to install tool dependencies. You will almost certainly need pip.
To install, run the commands:
sudo apt update
sudo apt install python3-pip
Related: How to upgrade all Python packages in Kali Linux
15. How to disable window grouping in Kali Linux
Window grouping is a combination of icons of open applications of the same type into one. Grouping saves space on your control panel.

But not everyone likes the grouping of windows, because in this form, more actions are needed to switch to the desired window. You can also get confused in the windows and waste time switching between them.
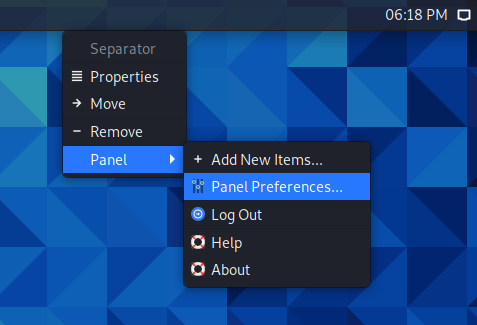
Start by right-clicking on the taskbar.
In the context menu that opens, select “Panel” → “Panel Preferences”:
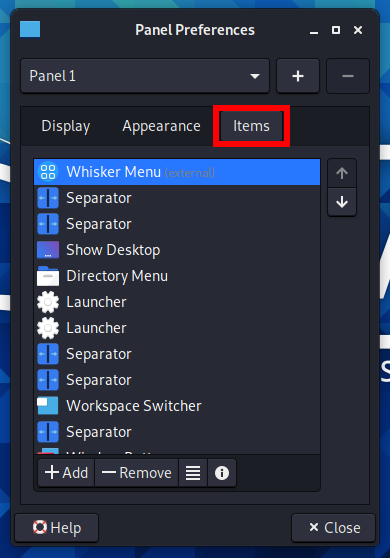
Switch to the “Items” tab:
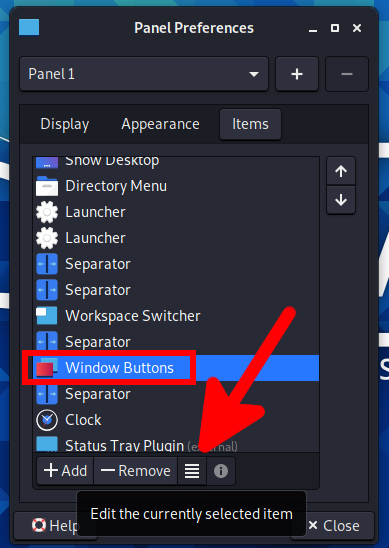
Find “Window Buttons” and click the “Edit the currently selected item” button.
In the “Windows grouping” drop-down list, select “Never”:
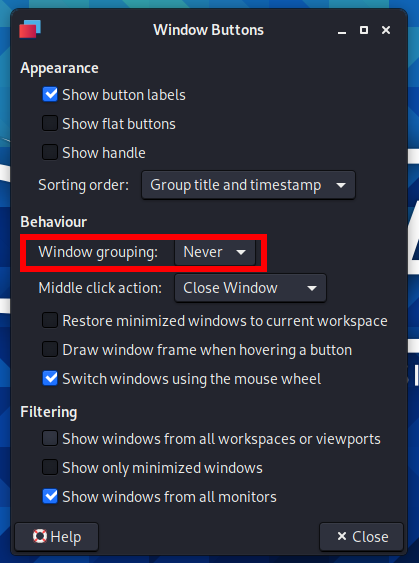
After that, the windows will no longer be assembled into one icon.

16. Switching between community mirrors and CloudFlare CDN to download updates
By default, when updating a Kali system, the Package Manager (APT) downloads packages from the nearest community mirror. But did you know that Kali can also be configured to receive a package from the CloudFlare CDN? You can use kali-tweaks to quickly configure if APT should use community mirrors or CloudFlare CDN.
Which is better, community mirrors or CloudFlare CDN and should you switch to CloudFlare CDN? There is no good answer to this question. The download speed for Kali updates can vary greatly and depends on many factors, including the speed of your Internet connection, your location, and even the time of day.
To switch between mirrors, run
kali-tweaks
Go to “Network Repositories”.

And choose “Cloudflare” or “Community”. Use the cursor keys or the Tab key to move between items. Use the Space key to select an item. Click the <Apply> button to save the changes.

17. How to open the root console
To open the console as root and not enter sudo for commands that require elevated privileges, enter into the console:
sudo su -

See also: How to run terminal as root in Kali Linux? How to run a GUI program as root
Another way is to use the dropdown menu to select the default terminal.

The red icon means that it will open a terminal as root.
18. How to switch to one line command prompt
If you are using ZSH, then you can switch between two-line and one-line prompts by pressing: CTRL+p. This will only affect the current session.
If you want to make the terminal use a single line prompt by default, then this can be done using kali-tweaks, run in the command line
kali-tweaks
Then go to “Shell & Prompt” → “Configure Prompt” and select one of two options:
- Two Lines
- One Line

Related articles:
- How to upgrade all Python packages in Kali Linux (95.5%)
- Solving the problem with 'error: attempt to read or write outside of disk “hd0″' (55.2%)
- How to install Kali Linux (step by step tutorial) (55.2%)
- How to install Kali Linux in VirtualBox (54.5%)
- How to install Python and PIP on Windows 10. How to set up Python as a web server module (54.4%)
- How to get started with Linux commands on Windows: Cygwin (RANDOM - 9.6%)
Thanks Alex …. I wonder if you can have a paid section for penetration testing/wireless using KRACK …. Thanks
Also, if you can write a blog on setting up wireguard in ubuntu container with multipeers ( Windows , Android , Mac and iOS) ? Thanks