Guide to GPS Metadata in Photos (Part 4): How to build motion tracks based on a group of photos
Table of Contents: Guide to GPS Metadata in Photos
1. Programs for manipulating metainformation in images
2. How to understand, extract and convert geographic coordinates
3. How to spoof GPS and other metadata in photos
4. How to build motion tracks based on a group of photos
4.1 Reconstruction of movements based on photographs
4.2 Track recording format GPX
4.3 How to create a GPX file from photos
Reconstruction of movements based on photographs
If the photos have GPS tags, then by placing these locations in chronological order on the map, you can see the route of movement. This can be used to reconstruct movement or for any purpose (calculate the number of kilometers traveled, average speed, and so on).
Of course, manually placing markers on the map is tedious, and in this article we will talk about programs that allow you to automate the process of building a route based on GPS data from a series of photographs. We will consider four programs at once, two of which are cross-platform and they work on Windows as well.
By the way, note to the owners of SLR cameras without GPS: if your camera does not have a GPS chip, this does not mean that your photos cannot have GPS tags. You can use a technique called GPS correlation. It is the opposite of the one that will be described in this article. Its essence is as follows: when shooting with a camera without GPS, take a mobile phone with you, it has a GPS chip. And while shooting, start recording the route – you can easily find free programs that can do this, the main thing is that it can save the recorded tracks in GPX format. Then use the GPS Correlate software. Each track point has two characteristics: 1) time and 2) coordinate. For each snapshot, the time of its creation is also known (stored in the meta information and file properties). The program looks at what time the picture was taken, then looks at the coordinates of that point on the track, which corresponds to this time, and then simply writes these coordinates into the metadata of the photo. Great idea in my opinion.
Track recording format GPX
Let's take a look at the GPX quote from Wikipedia.
GPX (GPS eXchange Format) is an XML-based text format for storing and exchanging GPS data. GPX is a free format and can be used without any license fees.
It can be used to describe waypoints, tracks, and routes. For each point, its longitude, latitude and height above sea level are stored (if information about the height is available). Track points also store the travel time of the point. The XML schema also provides for storing arbitrary user information for each point, only longitude and latitude are required. Examples of user information include terrain altitude (ele), speed, heart rate (hr), number of steps, cadence, temperature, etc.
The format is accepted by many programs, including Google Earth, Ozi Explorer, Yandex.Navigator (see the official list here).
In general, this is a text file with content like this:

How to create a GPX file from photos
As mentioned on Wikipedia, there are many programs that understand GPX. And the challenge is to generate this file based on meta information from a series of photos. Fortunately, ExifTool is already able to do this and we just need to specify the folder with photos.
To create a GPX route file from photos, you need to run the following command:
exiftool -fileOrder DateTimeOriginal -p /PATH/TO/gpx.fmt -d %Y-%m-%dT%H:%M:%SZ DIRECTORY > out.gpx
In this command:
-fileOrder DateTimeOriginal
We set the sorting of the displayed data by the time of shooting the photographs. Surprising as it may seem, but ExifTool processes and displays data not by the date of shooting, sorting by another criterion is used. Even more surprising, GPX programs process .gpx files regardless of the dates specified for the points, but simply sequentially.
-p /PATH/TO/gpx.fmt
This gpx.fmt file is provided by ExifTool. Linux users can find it on their system with the command
locate gpx.fmt
For example, in Kali Linux, the path to this file is /usr/share/doc/libimage-exiftool-perl/fmt_files/gpx.fmt
On Arch Linux/BlackArch, the path to this file is /usr/share/perl-image-exiftool/fmt_files/gpx.fmt
Windows users, apparently, need to download the package for Linux from the ExifTool website and take the file from there.
-d %Y-%m-%dT%H:%M:%SZ
This option sets the format of the date and time in the output.
DIRECTORY
A folder with photos that you want to process to compose a movement track.
> out.gpx
Saving output data to out.gpx file
My example of generating a .gpx file.
I go to the folder with photos:
cd /mnt/disk_d/Share/TestPics2/
Now I specify . (dot) as a directory, that is, the current directory:
exiftool -fileOrder DateTimeOriginal -p /usr/share/perl-image-exiftool/fmt_files/gpx.fmt -d %Y-%m-%dT%H:%M:%SZ . > out.gpx
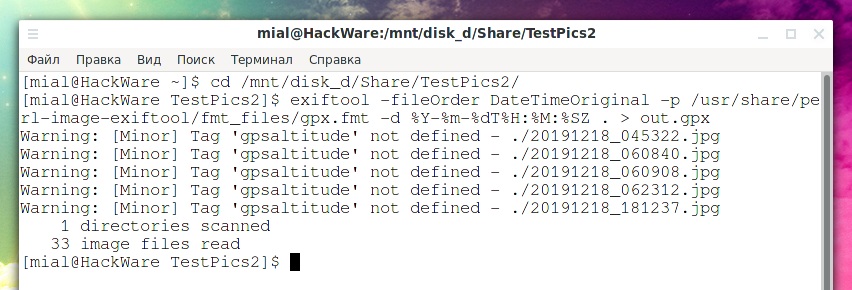
The screenshot shows that 33 images have been processed, but the output also contains the following lines:
Warning: [Minor] Tag 'gpsaltitude' not defined - ./20191218_045322.jpg
Warning: [Minor] Tag 'gpsaltitude' not defined - ./20191218_060840.jpg
…………...
These are not errors, but insignificant warnings that the gpsaltitude tag is not defined for some files – perhaps the GPS was turned off during the shooting or some other failure during the shooting. These five photos did not make it to the track, but there are still plenty of photos to build a route.
The complete point record looks something like this:
<trkpt lat="17.8966666666667" lon="101.658055555556">
  <ele>0</ele>
  <time>2019-12-17T23:27:08Z</time>
</trkpt>
My file contains incomplete records like these (missing time):
<trkpt lat="17.8961111111111" lon="101.656388888889">
</trkpt>
<trkpt lat="17.8969444444444" lon="101.659722222222">
</trkpt>
<trkpt lat="17.8969444444444" lon="101.659722222222">
</trkpt>
<trkpt lat="17.8972222222222" lon="101.659444444444">
</trkpt>
In principle, you can delete them, but they turned out to be placed in the correct order and, therefore, did not spoil the construction of the track. Apparently, the program took time from other file properties.
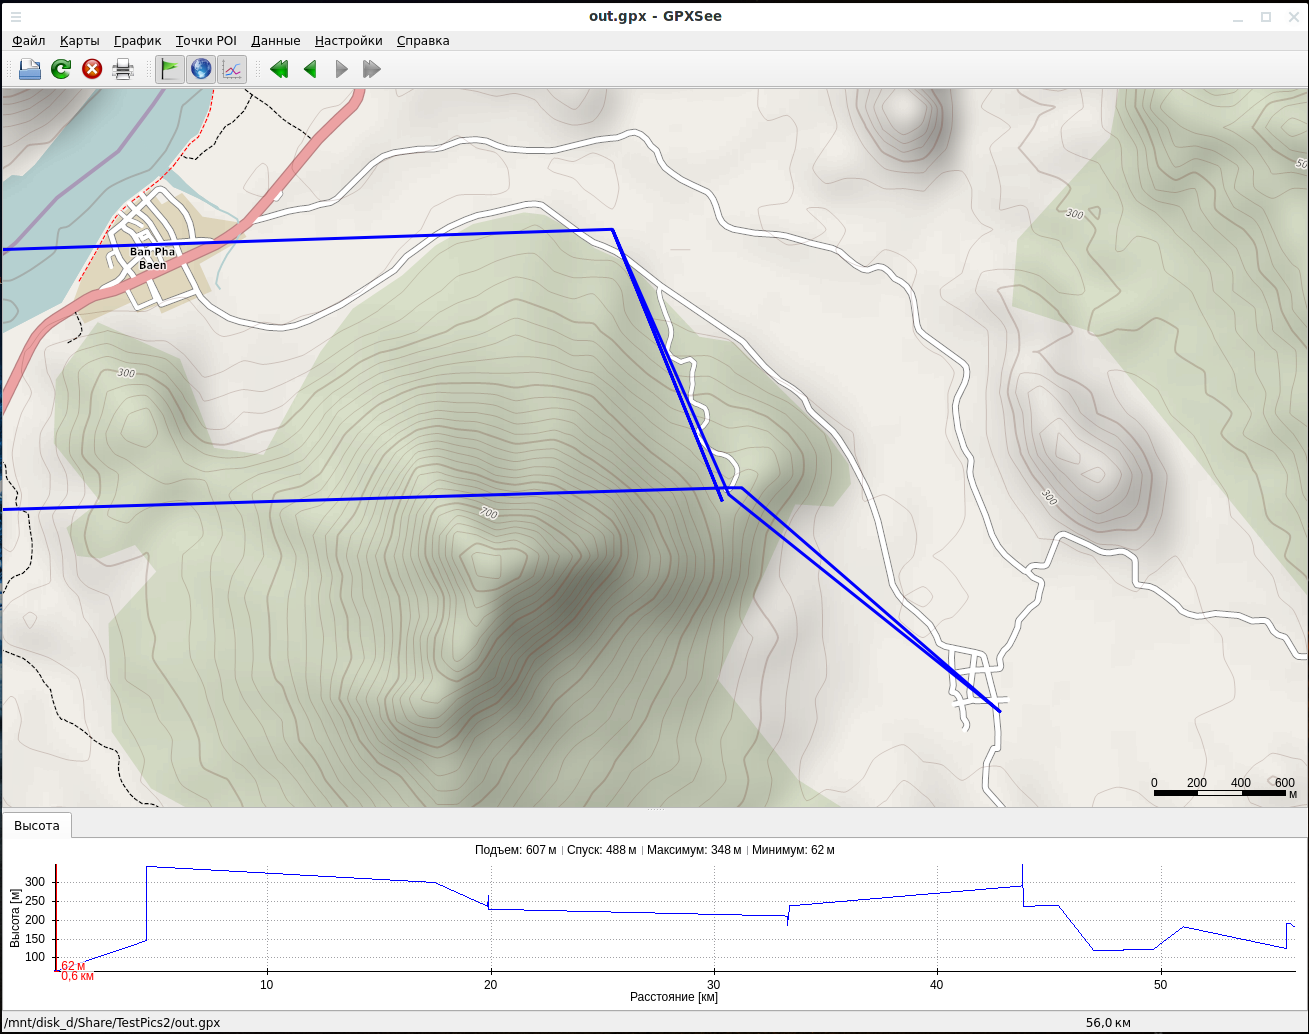
GPXSee
GPXSee is a GPS log file viewer and analysis software that supports all common GPS log file formats.
Key features:
- Opens GPX, TCX, FIT, KML, NMEA, IGC, CUP, SIGMA SLF, Suunto SML, LOC, GeoJSON, OziExplorer (PLT, RTE, WPT), Garmin GPI & CSV and geotagged JPEG files.
- User-definable online maps (OpenStreetMap/Google tiles, WMTS, WMS, TMS, QuadTiles).
- Offline maps (OziExplorer maps, TrekBuddy maps/atlases, Garmin IMG/GMAP & JNX maps, TwoNav RMaps, GeoTIFF images, MBTiles, BSB charts, KMZ maps).
- Elevation, speed, heart rate, cadence, power, temperature and gear ratio/shifts graphs.
- Support for DEM files (SRTM HGT).
- Support for POI files.
- Print and export to PNG and PDF.
- Multiple tracks in one view.
- Full-screen mode.
- HiDPI/Retina displays and maps support.
- Native GUI (Qt) for Windows, Mac OS X and Linux.
- Free software (GPLv3 open-source license).
GPXSee is designed as a small (no dependencies except of Qt), fast and uncomplicated GPS data/map viewer, not a full featured GIS software. However, the spectrum of supported data files/map sources is relatively rich.
Installing GPXSee on Windows
Download the installation file from https://sourceforge.net/projects/gpxsee/
Then install and run like any other application.
Installing GPXSee on Kali Linux
To add a new repository and install, run the following commands:
echo 'deb http://download.opensuse.org/repositories/home:/tumic:/GPXSee/Debian_Testing/ /' | sudo tee /etc/apt/sources.list.d/home:tumic:GPXSee.list
curl -fsSL https://download.opensuse.org/repositories/home:tumic:GPXSee/Debian_Testing/Release.key | gpg --dearmor | sudo tee /etc/apt/trusted.gpg.d/home_tumic_GPXSee.gpg > /dev/null
sudo apt update
sudo apt install gpxsee
Installing GPXSee on Arch Linux, BlackArch and their derivatives
It is enough to run the following command:
sudo pacman -S gpxsee
Installing GPXSee on any Linux
For GPXSee, binary packages are built for all popular distributions. Installation instructions for other Linux distributions and files can be found here.
Run from the menu or with the command:
gpxsee
Drag and drop the previously created out.gpx file into the program.
A map with the route of movement will open.

Below you will see a graph with the total track distance and elevation differences.
You can zoom in on the map to see the details.
By default, the 4UMaps map is selected, which allows you to scale only up to a certain limit. With Open Street Map you can scale more.

When changing the map, it may take time before it is shown – apparently, this is the time to download the map.
Green arrows in the menu can move from point to point. To see the entire track again, navigate to the last point.
GPX-Viewer
GPX-Viewer is a simple tool for rendering tracks and waypoints stored in a gpx file.
Installing GPX-Viewer on Debian, Kali Linux, Linux Mint, Ubuntu and their derivatives:
sudo apt install gpxviewer
Installing GPX-Viewer on Arch Linux, BlackArch and their derivatives
sudo pacman -S gpx-viewer
Run the program from the menu or command line:
gpxviewer # Debian and derivatives
gpx-viewer # Arch Linux and derivatives
Open the file out.gpx. You will see a movement track.

On the left side of the window, you will see a tab with detailed statistics, including: distance, duration, start and end times, various speeds and information about the change in altitude.
Below is a graph. You can choose the display: speed, altitude, distance, etc.
On the tab with detailed information, you will find the “Play” button.
And on the graph, you can select neighboring points to show them on the map.
GottenGeography
GottenGeography is an easy-to-use application that shows shooting locations for photos using GPS tags in metadata, as well as routes from GPX files.
This program is very old and uses Python 2 and its libraries. Therefore, this program will not work in Kali Linux.
On Arch Linux (from which Python 2 support has not been removed), the program can be installed with a single command:
sudo pacman -S gottengeography
The program can be run from the menu or from the command line:
gottengeography

In addition to displaying movement tracks, the program supports displaying the location of photographs taken on the map. In terms of functions, this program is inferior to the previous ones.
Google earth
Google Earth in Linux (Google Earth Pro) is a 3D interface for exploring the globe, terrain, streets, buildings and other planets.
Google Earth Pro features:
- Enhanced GIS data import capabilities.
- Measuring the area, length and perimeter of land plots.
- Print screenshots in high resolution.
- Create nice offline movies.
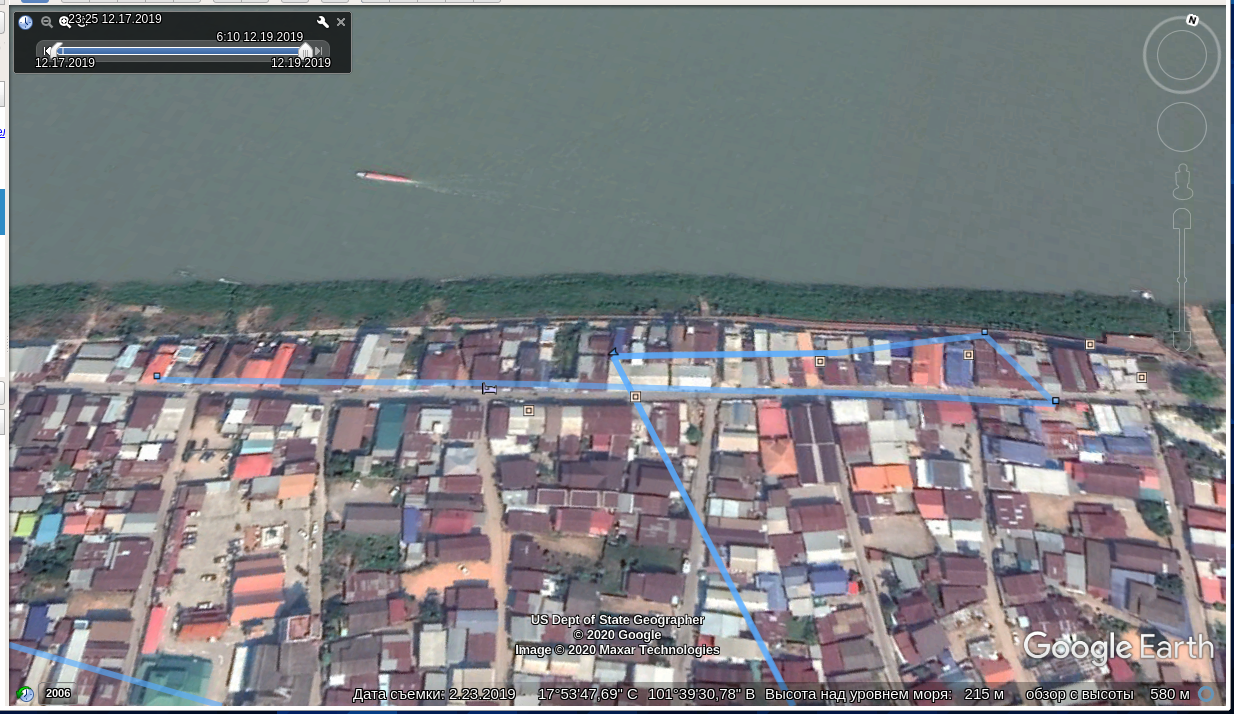
Among the many features of this program, it can also show routes from GPX files. A distinctive feature of this program is detailed satellite imagery. Previous programs use free maps, which are not always as detailed.
For installation, Windows users just go to the official website and download the installation file.
For Linux users, an instruction has been prepared you will find it here.
If you do not see the file to import, then switch to the “Gps” file type.

When importing, leave the Create polyline KML lines unchecked.

On a large scale, tracks look similar to other programs.
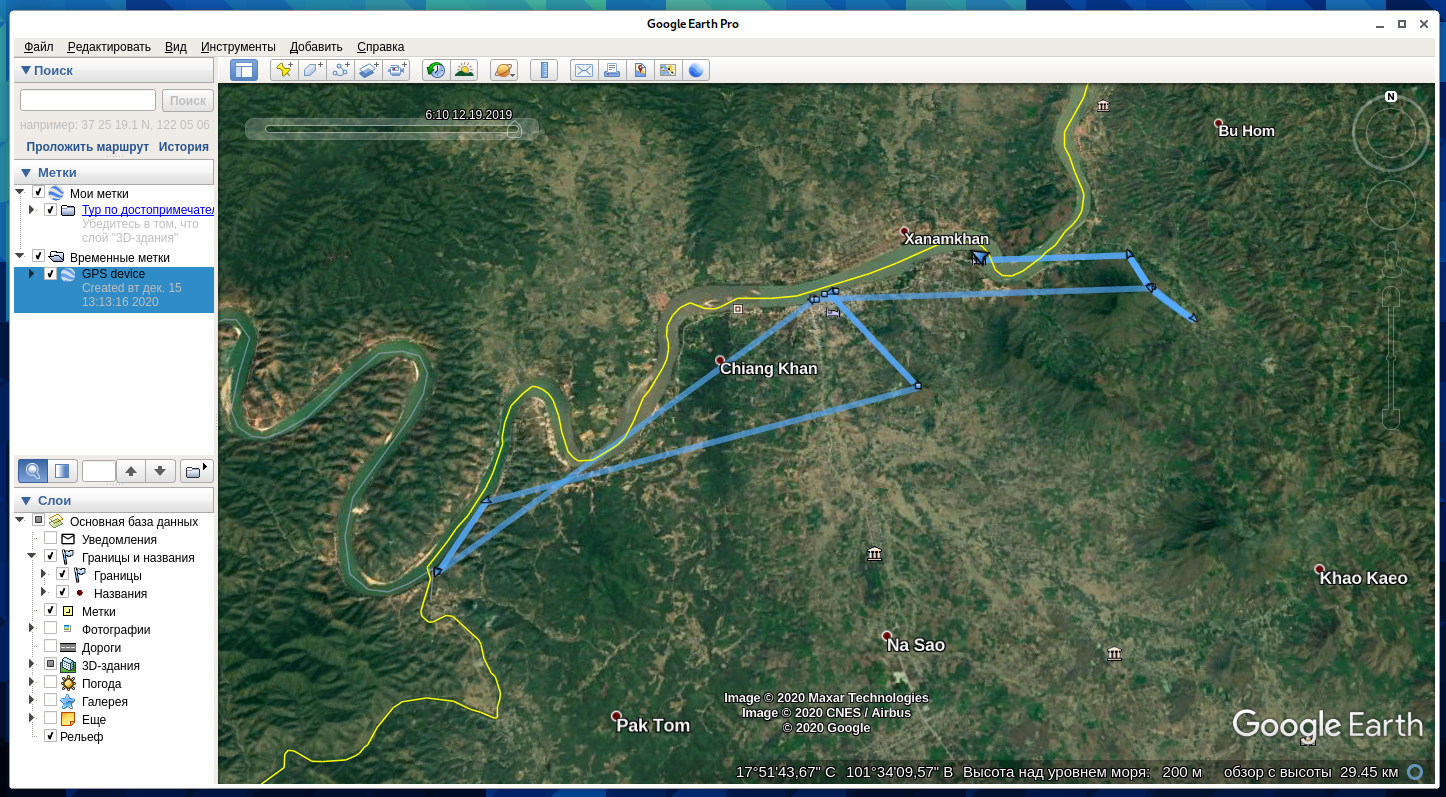
But with a large zoom, you can evaluate the quality of satellite images.
Conclusion
Since there can be a significant time interval between the photos, you need to understand that the lines do not show the real routes of movement – they simply connect two points found in successively taken photographs. The shorter the time between photographs, the more detailed the travel route.
Related articles:
- Guide to GPS Metadata in Photos (100%)
- Guide to GPS Metadata in Photos (Part 2): How to understand, extract and convert geographic coordinates (63%)
- How to find out the exact location of users (54.4%)
- 3WiFi: open database of Wi-Fi Access Points passwords (52.7%)
- How to find out the exact model of a router (wireless access point) (50.2%)
- How to find usernames on social media using Sherlock (RANDOM - 50.2%)