Nmap usage tips
Nmap is used for network analysis and port scanning. The program has a huge number of options. Entire books are devoted to the study of this program! In this article I share some common Nmap usage examples. I encourage you to share interesting nmap tips in the comments as well!
Normal scanning is performed by a command of the form:
sudo nmap TARGET
As a TARGET, you can specify the hostname, IP address, ranges of IP addresses in different notations.
If you need to scan a specific port or port range, the -p option is used.
How to scan all ports with nmap
By default, nmap scans only the most popular ports. To scan all ports, you can use the -p option with the full range:
sudo nmap -p 1-65535 TARGET
If you forget the maximum number of ports (I have such a problem), then you can always calculate it using the formula: 216 - 1
But it’s even easier to use the -p option as follows:
sudo nmap -p- TARGET
As the scanned ports, you can specify a range separated by a hyphen. If you do not specify the initial value of the range, then numbers starting from 1 will be scanned. If you do not specify the final value of the range, then numbers will be scanned up to the last. If you do not specify either the start or end value of the range, then all possible ports will be scanned.
How to find out alive hosts on the network without port scanning
Sometimes you just need to find out if the host is online, or scan the local network to see which devices are connected to it.
If you skip port scanning in this situation, you can save a lot of time.
To only detect active hosts but not scan their ports, use the -sn option, for example:
sudo nmap -sn 192.168.50.0/24
How to grab service banners
If the service is running on a non-standard port, it turns out that it is impossible to determine what kind of service it is by the port number. However, when you try to connect, the service may display enough information to reveal itself. This is what the banner collectors use – they initialize the very beginning of the connection process and see what the service has sent them. Nmap has a script (NSE) called banner, to use it, add two options -sV --script=banner. to your command.
You can collect banners for all ports, as well as for one or more.
Command example:
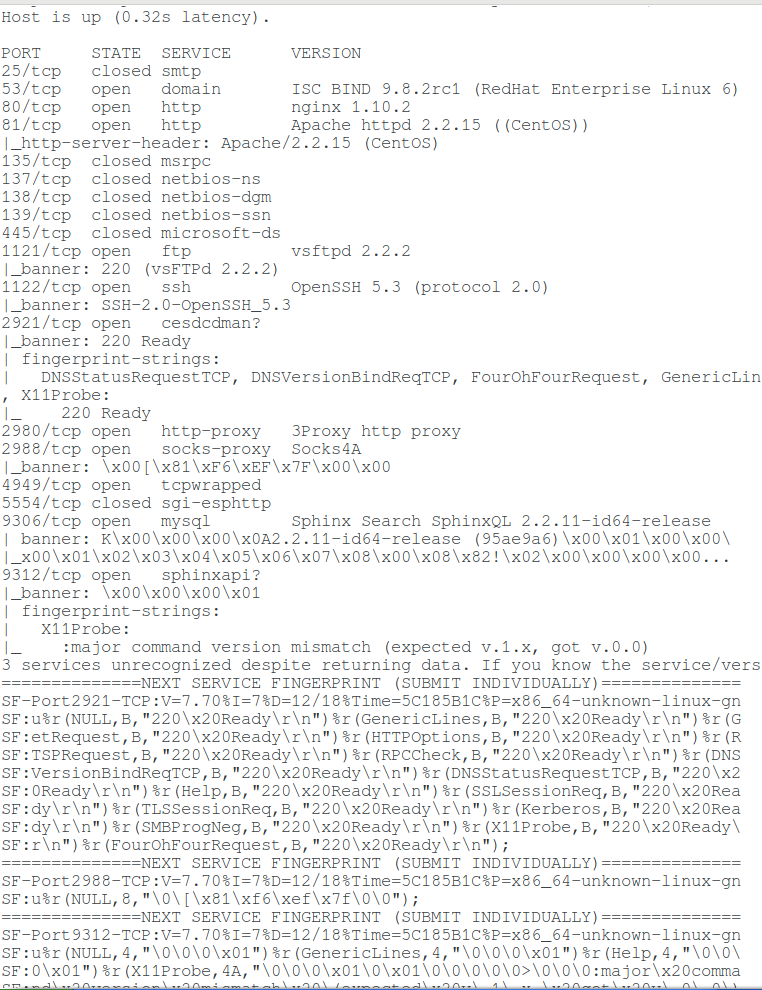
sudo nmap -p 25,53,80,81,135,137,138,139,445,1121,1122,2921,2980,2988,4949,5554,9306,9312 -sV --script=banner 88.99.152.33
Output example:
Host is up (0.32s latency).

PORT     STATE  SERVICE      VERSION
25/tcp   closed smtp
53/tcp   open   domain       ISC BIND 9.8.2rc1 (RedHat Enterprise Linux 6)
80/tcp   open   http         nginx 1.10.2
81/tcp   open   http         Apache httpd 2.2.15 ((CentOS))
|_http-server-header: Apache/2.2.15 (CentOS)
135/tcp  closed msrpc
137/tcp  closed netbios-ns
138/tcp  closed netbios-dgm
139/tcp  closed netbios-ssn
445/tcp  closed microsoft-ds
1121/tcp open   ftp          vsftpd 2.2.2
|_banner: 220 (vsFTPd 2.2.2)
1122/tcp open   ssh          OpenSSH 5.3 (protocol 2.0)
|_banner: SSH-2.0-OpenSSH_5.3
2921/tcp open   cesdcdman?
|_banner: 220 Ready
| fingerprint-strings:
|   DNSStatusRequestTCP, DNSVersionBindReqTCP, FourOhFourRequest, GenericLines, GetRequest, HTTPOptions, Help, Kerberos, NULL, RPCCheck, RTSPRequest, SMBProgNeg, SSLSessionReq, TLSSessionReq, X11Probe:
|_    220 Ready
2980/tcp open   http-proxy   3Proxy http proxy
2988/tcp open   socks-proxy  Socks4A
|_banner: \x00[\x81\xF6\xEF\x7F\x00\x00
4949/tcp open   tcpwrapped
5554/tcp closed sgi-esphttp
9306/tcp open   mysql        Sphinx Search SphinxQL 2.2.11-id64-release
| banner: K\x00\x00\x00\x0A2.2.11-id64-release (95ae9a6)\x00\x01\x00\x00\
|_x00\x01\x02\x03\x04\x05\x06\x07\x08\x00\x08\x82!\x02\x00\x00\x00\x00...
9312/tcp open   sphinxapi?
|_banner: \x00\x00\x00\x01
| fingerprint-strings:
|   X11Probe:
|_    :major command version mismatch (expected v.1.x, got v.0.0)
3 services unrecognized despite returning data. If you know the service/version, please submit the following fingerprints at  https://nmap.org/cgi-bin/submit.cgi?new-service  :
==============NEXT SERVICE FINGERPRINT (SUBMIT INDIVIDUALLY)==============
SF-Port2921-TCP:V=7.70%I=7%D=12/18%Time=5C185B1C%P=x86_64-unknown-linux-gn
SF:u%r(NULL,B,"220\x20Ready\r\n")%r(GenericLines,B,"220\x20Ready\r\n")%r(G
SF:etRequest,B,"220\x20Ready\r\n")%r(HTTPOptions,B,"220\x20Ready\r\n")%r(R
SF:TSPRequest,B,"220\x20Ready\r\n")%r(RPCCheck,B,"220\x20Ready\r\n")%r(DNS
SF:VersionBindReqTCP,B,"220\x20Ready\r\n")%r(DNSStatusRequestTCP,B,"220\x2
SF:0Ready\r\n")%r(Help,B,"220\x20Ready\r\n")%r(SSLSessionReq,B,"220\x20Rea
SF:dy\r\n")%r(TLSSessionReq,B,"220\x20Ready\r\n")%r(Kerberos,B,"220\x20Rea
SF:dy\r\n")%r(SMBProgNeg,B,"220\x20Ready\r\n")%r(X11Probe,B,"220\x20Ready\
SF:r\n")%r(FourOhFourRequest,B,"220\x20Ready\r\n");
==============NEXT SERVICE FINGERPRINT (SUBMIT INDIVIDUALLY)==============
SF-Port2988-TCP:V=7.70%I=7%D=12/18%Time=5C185B1C%P=x86_64-unknown-linux-gn
SF:u%r(NULL,8,"\0\[\x81\xf6\xef\x7f\0\0");
==============NEXT SERVICE FINGERPRINT (SUBMIT INDIVIDUALLY)==============
SF-Port9312-TCP:V=7.70%I=7%D=12/18%Time=5C185B1C%P=x86_64-unknown-linux-gn
SF:u%r(NULL,4,"\0\0\0\x01")%r(GenericLines,4,"\0\0\0\x01")%r(Help,4,"\0\0\
SF:0\x01")%r(X11Probe,4A,"\0\0\0\x01\0\x01\0\0\0\0\0>\0\0\0:major\x20comma
SF:nd\x20version\x20mismatch\x20\(expected\x20v\.1\.x,\x20got\x20v\.0\.0\)
SF:")%r(LPDString,4,"\0\0\0\x01")%r(TerminalServer,4,"\0\0\0\x01")%r(JavaR
SF:MI,4,"\0\0\0\x01")%r(ms-sql-s,4,"\0\0\0\x01");
Service Info: OSs: Linux, Unix; CPE: cpe:/o:redhat:enterprise_linux:6

Service detection performed. Please report any incorrect results at  https://nmap.org/submit/  .
Nmap done: 1 IP address (1 host up) scanned in 106.88 seconds
How to scan UDP ports in nmap
By default, nmap only scans TCP ports. If you use the -sU option, only UDP ports will be scanned. If you need to scan both types of ports, use -sS and -sU at the same time. For example:
sudo nmap -p 53 -sS -sU 88.99.152.33
Also, with the -p option, you can specify the letter before the port numbers: T for TCP, U for UDP, S for SCTP or P for IP protocols. For example, if you specify the -p U:53,111,137,T:21-25,80,139,8080 argument, UDP ports 53,111, and 137, as well as all the listed TCP ports, will be scanned. Keep in mind that to scan both UDP and TCP ports, you must specify the -sU option and at least one of the types of TCP scans (such as -sS, -sF or -sT) – if this is not done, then even despite the letters U and T when listing ports, the default options will be used, that is, only TCP ports will be scanned.
sudo nmap -p U:53,111,137,T:21-25,80,139,8080 -sU -sS 88.99.152.33

Scanning UDP ports is not a trivial task (due to the specifics of the protocol), so the received data may be inaccurate, and the scanning process itself can be very delayed, since UDP scanning is rather slow.
How to traceroute hosts in Nmap
In Nmap for tracing there is an option --traceroute, an example of tracing to the suip.biz website:
sudo nmap --traceroute suip.biz
If you do not want to scan ports, but just want to trace, add the -sn option:
sudo nmap --traceroute -sn suip.biz
By the way, this will significantly reduce the time before outputting the results.
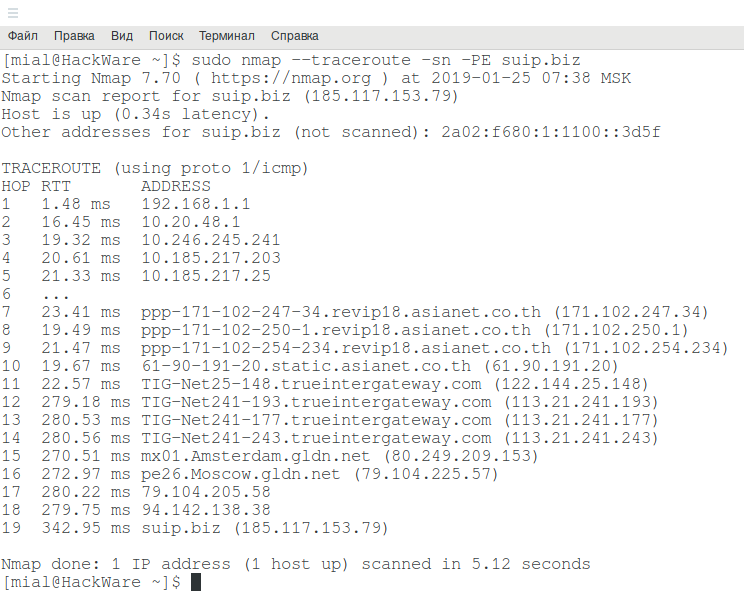
It happens that the data displayed during tracing with nmap is not complete. In this case, try adding the -PE option:
sudo nmap --traceroute -sn -PE suip.biz
How to specify IP Ranges in Nmap
Nmap has a very flexible range specifier – perhaps Nmap supports the most formats.
Ranges can be specified through a hyphen, and it can be used not only in the last octet, but in general in any. The recording may look difficult to read, but this method is as flexible as possible:
sudo nmap 91.235.128-129.0-255
You can use an asterisk and at the same time it can be combined with other methods of range notations:
sudo nmap -sn 91.235.128-129.*
Classless notation is supported as well:
sudo nmap 91.235.128.0/24
Should I run Nmap as root or as a regular user?
The Nmap program can be run with superuser privileges:
sudo nmap 91.235.129.250
Or with regular user privileges:
nmap 91.235.129.250
At first glance, it might seem that there is no difference, since the program in any case returns the result. But in fact, when launched from root, Nmap can send raw packets with which scanning is less noticeable: half-open connections are used. Bind to ports applications usually don’t notice this connections at all, therefore the scanning is not logged. But it can can be noticed by firewalls and other special network software and equipment.
When launched from a regular user, Nmap uses a system call and opens a full connection, which is more noticeable and slower.
Some types of scanning cannot be started by a user with normal privileges! In this case, the program will output:
You requested a scan type which requires root privileges.

QUITTING!
This means you need to prepend sudo before your command.
How to scan IPv6 addresses in nmap
To scan open ports on IPv6 addresses, a number of conditions must be met:
- remote host must have IPv6 address
- your Internet service provider must also have IPv6 support and your device must be assigned an IPv6 address
- if the device being scanned is not directly connected to the router, then this network must also support IPv6. For example, your ISP, your router, and your computer support IPv6 — hence, you can scan this version of addresses. But if you try to scan from the same computer, for example, from a virtual machine behind NAT, which is connected to the network 10.*.*.*, Then the scan will fail due to an error like:
setup_target: failed to determine route to suip.biz (2a02:f680:1:1100::3d5f)
If all conditions are met, then the -6 option must be added to the nmap scan command and specify as the target:
- fully qualified IPv6 address
- host name (if IPv6 is bound to it)
- you can use CIDR notation for subnets
Octet ranges for IPv6 are not yet supported.
Even if the IPv6 address is explicitly specified as the target, the -6 option must be specified, otherwise an error of the form will occur:
2a0b:f4c0:16c:4::1 looks like an IPv6 target specification -- you have to use the -6 option.
All nmap options and capabilities are also supported for IPv6 addresses.
Example of scanning IPv6 addresses in Nmap:
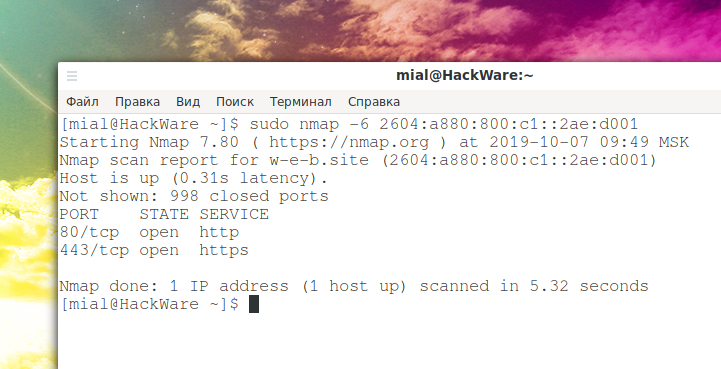
sudo nmap -6 2604:a880:800:c1::2ae:d001
If you need to scan ports on an IPv6 address, but there is no such technical ability, then you can use the online service “Scanning IPv6 addresses for open port” (free, does not require registration).
Fast scanning of huge networks in nmap
lijiejie, in his blog post, he offered a configuration to quickly scan huge subnets.
Scanning large subnets in nmap such as 10.0.0.0/8, 172.16.0.0/12, 192.168.0.0/16,100.64.0.0/10 is not a trivial task. On such networks nmap is very slow and you can never wait for scan results. Therefore, folks prefer to use other tools like Masscan and Zmap.
When scanning a huge network space, we are most concerned about efficiency, that is, the cost of time. Sometimes accuracy can be sacrificed for the sake of speed.
The main idea behind fast scanning is to ping with a high level of concurrency:
sudo nmap -v -sn -PE -n --min-hostgroup 1024 --min-parallelism 1024 -oX nmap_output.xml 100.64.0.0/10
Options meaning:
- -sn: do not scan ports, only ping the host
- -PE: determines if the host is alive via ICMP echo
- -n: Does not convert IP addresses to domain names.
- --min-hostgroup 1024: Adjust parallel scan group sizes. The minimum grouping is set to 1024 IP addresses. Nmap has the ability to port scan or version scan multiple hosts in parallel. Nmap does this by dividing the target IP space into groups and then scanning one group at a time. In general, larger groups are more efficient. The downside is that host results can't be provided until the whole group is finished. So if Nmap started out with a group size of 50, the user would not receive any reports (except for the updates offered in verbose mode) until the first 50 hosts are completed. By default, Nmap takes a compromise approach to this conflict. It starts out with a group size as low as five so the first results come quickly and then increases the groupsize to as high as 1024. The exact default numbers depend on the options given. For efficiency reasons, Nmap uses larger group sizes for UDP or few-port TCP scans.
- --min-parallelism 1024: Control parallelism of queries. This parameter is very important. These options control the total number of probes that may be outstanding for a host group. They are used for port scanning and host discovery. By default, Nmap calculates an ever-changing ideal parallelism based on network performance. If packets are being dropped, Nmap slows down and allows fewer outstanding probes. The ideal probe number slowly rises as the network proves itself worthy. These options place minimum or maximum bounds on that variable. By default, the ideal parallelism can drop to one if the network proves unreliable and rise to several hundred in perfect conditions.
- -oX nmap_output.xml: Output the result in XML format, filename is nmap_output.xml
After the scan is complete, you can parse the XML document to find out which IP addresses are active.
Tip: The number of concurrent probes can be configured according to your network conditions.
Look at the following scan result data:
Read data files from: /usr/bin/../share/nmap
Nmap done: 4012855 IP addresses (140507 hosts up) scanned in 2590.61 seconds
           Raw packets sent: 7897197 (221.122MB) | Rcvd: 160371 (6.456MB)

4012855 addresses were scanned in 2590 seconds - that's 43 minutes. Found 140507 hosts online. With the default settings, a network scan in /10 sized would take much longer.
Related articles:
- Port scanner for Windows (93.7%)
- GUI Port Scanner for Windows and Linux (Angry IP Scanner) (85.6%)
- Utilities for information gathering, OSINT and network analysis in Windows and Linux (84.2%)
- How to search and brute force services on non-standard ports (72.1%)
- Tracerouting tools and methods (72.1%)
- Best Kali Linux tools in WSL (Windows Subsystem for Linux) (Part 2) (RANDOM - 18.3%)