How to analyze and split compound files (firmware, multi partition disk images)
It is recommended to start with the first part entitled “How to find out the type of a file without an extension (in Windows and Linux)”.
Files containers (compound files)
Many files are concatenations of several files. For example, office document files .docx and .odt. You can replace the extension of such files with .zip, open with any archiver and make sure that in fact these are just containers containing many files. For example, if you inserted a picture into a Word document, then in order to extract this picture, it is not necessary to open the file in an office editor – you can change the extension, unpack the archive and take your picture back from it. Almost all firmware (for routers, IP cameras, phones) are containers. ISO images and filesystem images are also containers. Archives, as you might guess, also contain several files at once.
2 ways to combine files
From a practical point of view, from a file search point of view, there are 2 ways to combine files:
1. Files are stored unchanged, in their original form.
An example of such a combination of files is file systems without encryption and without compression. For example, EXT4, NTFS – they contain files in their original form. Accordingly, images of such file systems also belong to this group. This also includes some firmware, for example, for routers and IP cameras.
It is clear that stored files can be found in such large files (images). Moreover, the stored files can be extracted and saved as a separate file that will be identical to the original one.
2. Files are processed according to a certain algorithm.
Examples of this way of combining files are file systems with encryption or compression (for example, Squashfs), archives with compression.
To search for individual files by their signatures, you must perform the opposite action, that is, if the file was compressed, you must unzip it. If it is a compressed filesystem, then you need to mount it.
From a practical point of view, this means that it is useless to search for files by signatures in archives until these archives are unpacked (BUT: some programs for analyzing raw data support working with archives!). It is useless to search for files by signature in the Squashfs filesystem before it is mounted. In this case, you can use signature search in EXT4 and NTFS and they do not need to be mounted!
Mounting, for example, an NTFS image will give us the following: we will be able to access the files of this file system in the way the developers intended, that is, we will see a list of files and will be able to access any of them without having to search for files by signatures. But at the same time, we will not be able to get or even find out about already deleted files.
Without mounting an NTFS image, we will be able to work with the files stored on it directly, that is, on the one hand, we will have to search for files by signatures, but on the other hand, we will even get access to remote files. Deleted files are available as a result of the fact that usually deletion on the HDD means that information about the file is simply deleted from the “journal” of the file system, but the file itself remains where it was (unless it was accidentally overwritten with another file later). As for the SSD, data is usually deleted there.
Nothing prevents you from combining these methods, and forensic tools allow you to make the search for deleted data more efficient, for example, the search for deleted files is performed only on those parts of the disk that are considered empty.
How to unpack camera firmware
Let's look at an example of unpacking the firmware of a Network Surveillance DVR r80x20-pq camera (I used this camera in tests, for example, in the article “IP camera security audit”.
Links to the firmware that I managed to find: https://download.xm030.cn/d/MDAwMDExNDI= and https://yadi.sk/d/LqvlLP-1u_z8cQ
Download and unpack the archive. It is called General_IPC_XM530_R80X20-PQ_WIFIXM711.711.Nat.dss.OnvifS_V5.00.R02.20210818_all.bin, for brevity of subsequent commands I will rename it to firmware.bin.
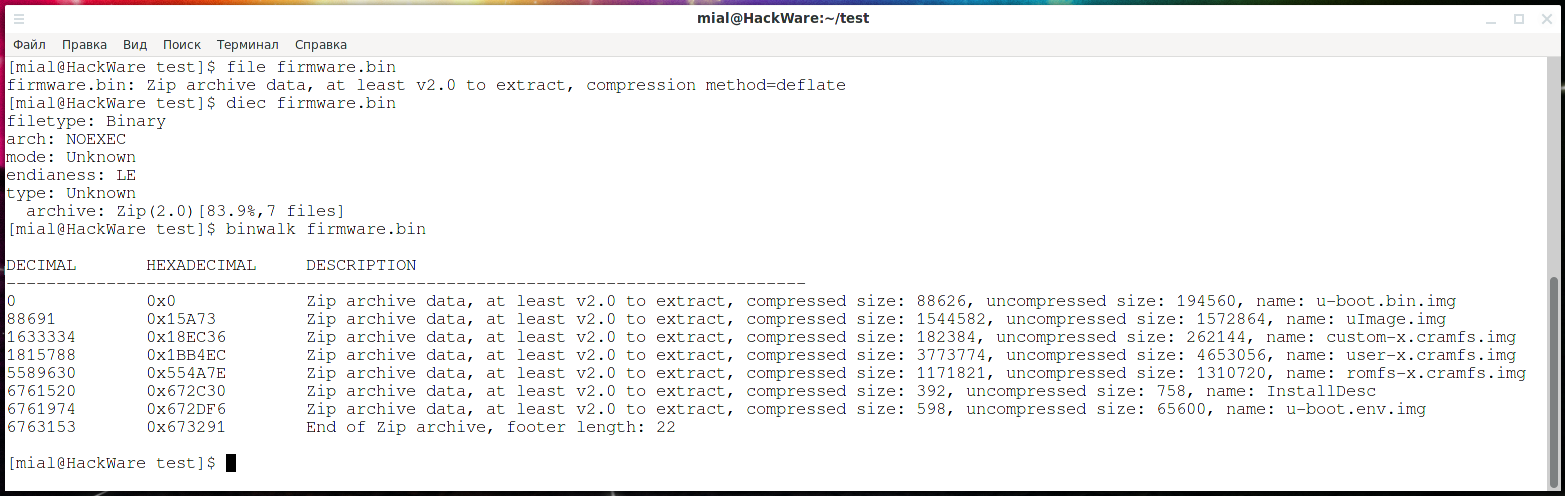
Let's check what kind of file it is:
file firmware.bin
The conclusion is as follows:
firmware.bin: Zip archive data, at least v2.0 to extract, compression method=deflate
That is, it is a Zip archive.
Let's check with Detect It Easy:
diec firmware.bin
We will also use the Binwalk utility, which is specially designed for analyzing firmware:
binwalk firmware.bin
Since this is just an archive, let's unpack it:
unzip firmware.bin
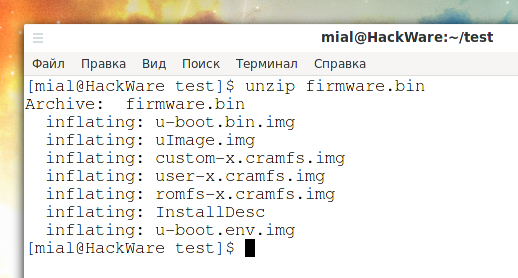
Apparently, the following images are part of the file system:
- u-boot.bin.img
- uImage.img
- custom-x.cramfs.img
- user-x.cramfs.img
- romfs-x.cramfs.img
- u-boot.env.img
Let's take an interest in the user-x.cramfs.img file:
file user-x.cramfs.img
Output:
user-x.cramfs.img: u-boot legacy uImage, linux, Linux/ARM, OS Kernel Image (gzip), 4652992 bytes, Wed Aug 18 07:04:49 2021, Load Address: 0x00300000, Entry Point: 0x00770000, Header CRC: 0xE5365952, Data CRC: 0x274BFB0E

U-Boot is a boot loader for Embedded boards based on PowerPC, ARM, MIPS and several other processors, which can be installed in a boot ROM and used to initialize and test the hardware or to download and run application code. On your Linux, you can find packages uboot-tools (Arch Linux and derivatives) and u-boot-tools (Debian and derivatives) – these are tools and utilities for building firmware and performing other actions with them.
Let's try to mount the user-x.cramfs.img image:
mkdir /tmp/firmware
sudo mount user-x.cramfs.img /tmp/firmware
We get the error:
mount: /tmp/firmware: wrong fs type, bad option, bad superblock on /dev/loop0, missing codepage or helper program, or other error.

Let's turn to the Binwalk utility for help, which can find files and file systems even if they are not at the beginning:
binwalk -t user-x.cramfs.img
Output:
DECIMAL       HEXADECIMAL     DESCRIPTION
--------------------------------------------------------------------------------
0             0x0             uImage header, header size: 64 bytes, header CRC: 0xE5365952, created: 2021-08-18 07:04:49, image size: 4652992 bytes, Data Address: 0x300000, Entry Point: 0x770000, data CRC: 0x274BFB0E, OS: Linux, CPU: ARM, image type: OS Kernel Image, compression type: gzip, image name: "linux"
64            0x40            Squashfs filesystem, little endian, version 4.0, compression:xz, size: 3771362 bytes, 339 inodes, blocksize: 65536 bytes, created: 2021-08-18 07:04:49
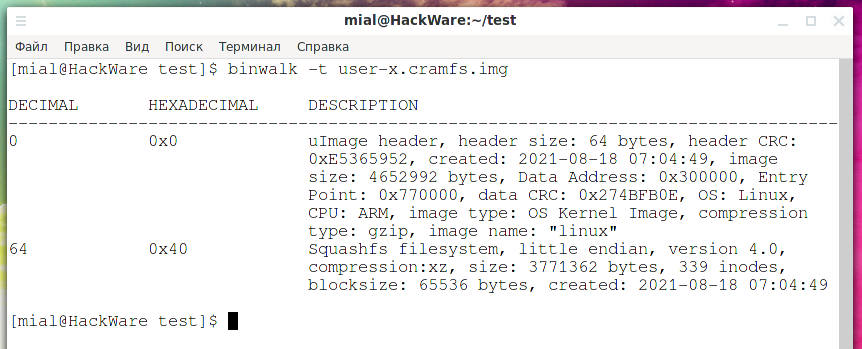
Now everything has become clear – this image consists of two partitions. The first 64 bytes are occupied by the uImage header. And the Squashfs file system itself starts at 64 bytes.
We can extract the file system – how to do this in several ways will be shown below – but we can also still simply mount it, specifying the offset:
sudo mount -o offset=64 user-x.cramfs.img /tmp/firmware
Let's look at the files located in the user-x.cramfs.img image:
ls -l /tmp/firmware
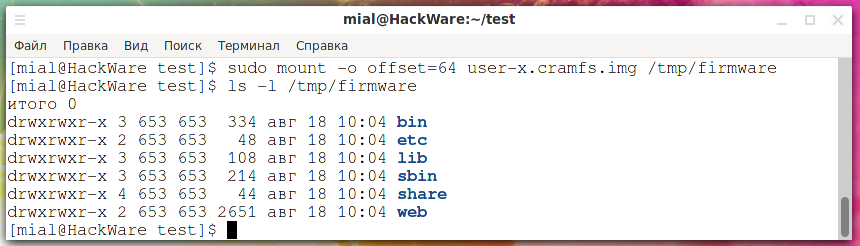
I didn't find anything interesting in this image, let's unmount it:
sudo umount /tmp/firmware
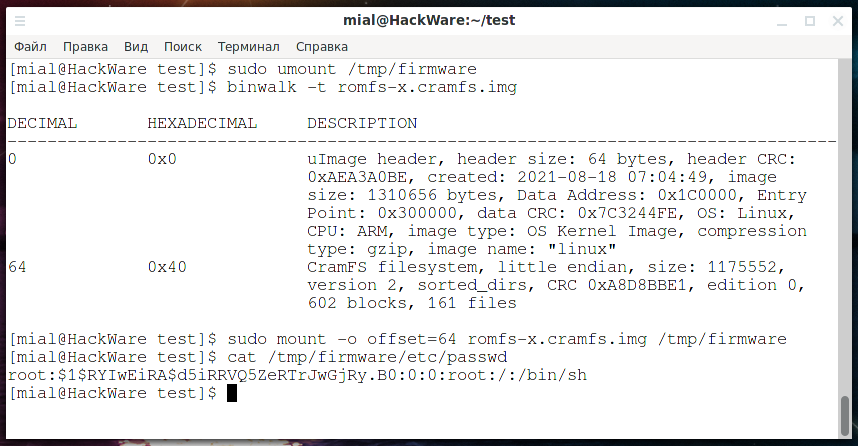
Let's see where the filesystem starts in romfs-x.cramfs.img:
binwalk romfs-x.cramfs.img
Let's mount:
sudo mount -o offset=64 romfs-x.cramfs.img /tmp/firmware
The hash of the default root user can be found here:
cat /tmp/firmware/etc/passwd
Likewise, by scanning with Binwalk and mounting file system partitions, you can look for interesting files.
How to separate partitions within a disk image (carving partitions)
1. Mount without separating
As shown above, using the offset option, you can specify an offset and mount a file system that is part of the image and is not located at the very beginning:
sudo mount -o offset=IMAGE_OFFSET /MOUNT/POINT
If the image contains multiple filesystems, you may also need to specify the sizelimit option – the size of the filesystem:
sudo mount -o offset=OFFSET,sizelimit=IMAGE_SIZE /MOUNT/POINT
For example:
sudo mount -o offset=64,sizelimit=3771362 romfs-x.cramfs.img /tmp/firmware
2. Extract with dd
For example, let's take the ZyXEL Keenetic Lite II firmware: https://help.keenetic.com/hc/article_attachments/115009890565/Keenetic-II-V2.06(AAFG.0)C3.zip
Let's find the sections in the firmware:
binwalk 'Keenetic-II-V2.06(AAFG.0)C3.bin'
Output:
DECIMAL       HEXADECIMAL     DESCRIPTION
--------------------------------------------------------------------------------
0             0x0             uImage header, header size: 64 bytes, header CRC: 0x8F18AEF5, created: 2017-10-19 13:25:49, image size: 1175311 bytes, Data Address: 0x80020000, Entry Point: 0x80020414, data CRC: 0x87BAAA6D, OS: Linux, CPU: MIPS, image type: OS Kernel Image, compression type: lzma, image name: "ZyXEL Keenetic II"
64            0x40            LZMA compressed data, properties: 0x6D, dictionary size: 8388608 bytes, uncompressed size: 3466800 bytes
1376256       0x150000        Squashfs filesystem, little endian, version 3.0, size: 6205991 bytes, 593 inodes, blocksize: 65536 bytes, created: 2017-10-19 13:25:45
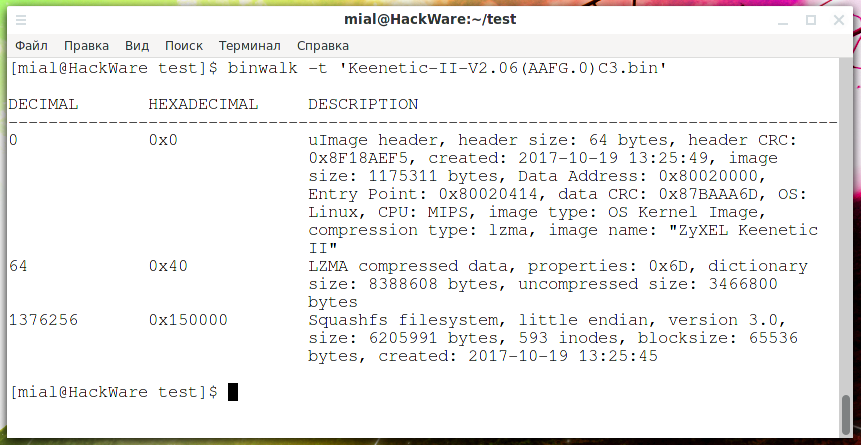
There are three areas in total:
- from 0 to 64 bytes – uImage header.
- from 64 byte LZMA compressed data starts
- the Squashfs file system begins with 1376256, its size is 6205991 bytes, this follows from the line “size: 6205991 bytes”.
To extract each of these sections, you can use a command like this:
dd if=INPUT of=OUTPUT bs=BLOCK count=WRITE skip=SKIP
In it:
- INPUT – initial image
- OUTPUT – partition to be carved
- BLOCK – block size, a larger block size speeds up writing, but the subsequent WRITE and SKIP values indicate the number of blocks, that is, if the block size is taken as 1, it will be easier to count
- WRITE – how many blocks to write
- SKIP – how many blocks from the beginning of the file to skip
For example, from the Keenetic-II-V2.06 (AAFG.0) C3.bin file I want to extract the first 64 bytes, then the command is as follows:
dd if='Keenetic-II-V2.06(AAFG.0)C3.bin' of=uImage-header.bin bs=1 count=64 skip=0
Now I want to extract the second partion starting at 64 bytes. This section ends at byte 1376256, but the count option of the dd command specifies how many bytes to read (not the fetch boundary), so count is calculated using the formula:
end of area – number of bytes skipped
In our case, this is 1376256 - 64 = 1376192, we get the command:
dd if='Keenetic-II-V2.06(AAFG.0)C3.bin' of=data.lzma bs=1 count=1376192 skip=64
An LZMA file can be unpacked, for example, with 7z:
7z e data.lzma
Basically, the command fetched the data, although it reported an error:
7-Zip [64] 17.04 : Copyright (c) 1999-2021 Igor Pavlov : 2017-08-28
p7zip Version 17.04 (locale=ru_RU.UTF-8,Utf16=on,HugeFiles=on,64 bits,12 CPUs x64)

Scanning the drive for archives:
1 file, 1376192 bytes (1344 KiB)

Extracting archive: data.lzma
--
Path = data.lzma
Type = lzma
Method = LZMA:23:lc1:lp2

ERROR: There are some data after the end of the payload data : data

Sub items Errors: 1

Archives with Errors: 1

Sub items Errors: 1
The essence of the error is that data was found after the end of the payload. We can say that this is normal (inevitable) in this case, since we did not know the exact size of the block and indicated as its end byte where another section begins. Another section starts with byte (in hexadecimal) 0x150000, so it can be assumed that for padding (alignment) between sections, the end of the partition was just “stuffed” by zeros. You can verify this by opening the data.lzma file in a hexadecimal editor, for example, in Bless:
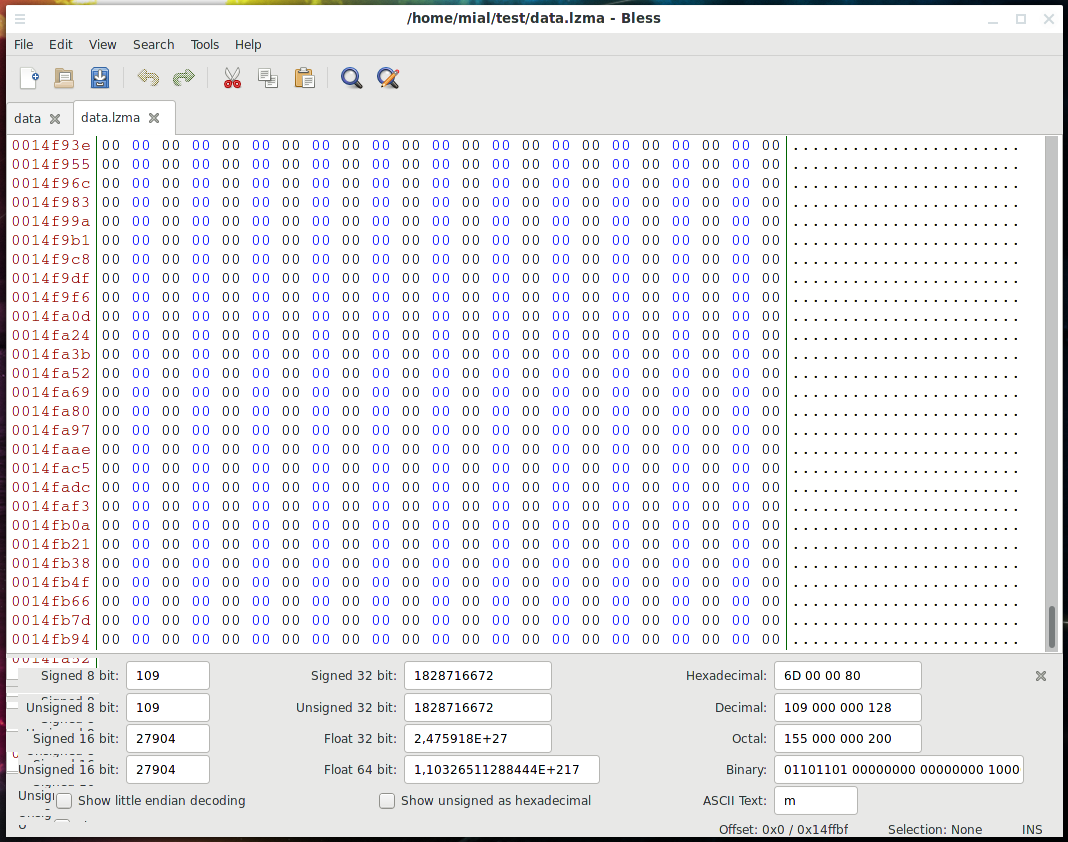
Yes, there are zeros at the end of this file – if the exact size is unknown, then it is better to write too much than to lose data.
The third block starts with 1376256 bytes and has a size of 6205991, the string “size: 6205991 bytes” tells us about it. The command to extract it is as follows:
dd if='Keenetic-II-V2.06(AAFG.0)C3.bin' of=filesystem.squashfs bs=1 count=6205991 skip=1376256
But the firmware manufacturers still outwitted me by using Squashfs version 3.0 from 2006 and I could not open it for technical reasons:
sudo squashfuse -d filesystem.squashfs /tmp/firmware/
Squashfs version 3.0 detected, only version 4.0 supported.
3. Extract with Binwalk
Binwalk has the following extraction options:
    -e, --extract                Automatically extract known file types
    -D, --dd=<type[:ext[:cmd]]>  Extract <type> signatures (regular expression), give the files an extension of <ext>, and execute <cmd>
    -z, --carve                  Carve data from files, but don't execute extraction utilities
You can read a more detailed description of them in the program card https://en.kali.tools/?p=1634. It seems convenient to fetch the data automatically, but in practice the result will not be exactly what you expect. Since, even in manual mode, we do not always know the exact boundaries of partitions, the same applies to the specified options, which do not work well with partitions for which a specific size is not specified.
4. Extract with dc3dd and dcfldd
dd has improved versions of dc3dd and dcfldd. If desired, you can use them to extract file system partitions from a disk image.
Finding a sequence of bytes in a binary file
The file utility, Binwalk, and Detect It Easy use signatures to find data. These signatures are predefined in their databases (so called magic files).
If you need to search for your own signatures, that is, a string of binary data, then you can use Binwalk with the following options:
    -R, --raw=<str>              Scan target file(s) for the specified sequence of bytes
    -m, --magic=<file>           Specify a custom magic file to use
For example, looking for 53EF hex bytes in /mnt/disk_d/fs.ext4:
binwalk -R '\x53\xEF' /mnt/disk_d/fs.ext4
The sigfind program from the Sleuth package also allows you to search by signatures, while the program allows you to specify an offset from the beginning of a block (NOT a file). The program contains several signatures for searching for file systems, for example:
sigfind -t ext4 /mnt/disk_d/fs.ext4
The following example searches for a sequence of bytes 53EF (big endian) with an offset of 56 from any block (if you do not specify an offset, then only blocks where this sequence of bytes has an offset of 0 will be displayed):
Conclusion
So, the methods shown allow you to find partitions of file systems even if they are not at the beginning of the image. For example, try to find the beginning of file systems in the images fs.ext4.xz, fs.ntfs.xz (from forensics-samples) without the tools listed here and you will once again see how much easier the analysis of firmware and compound files is made by the Binwalk program and others listed in this article.
Related articles:
- How to find out the type of a file without an extension (in Windows and Linux) (92.3%)
- Reverse engineering of network traffic (51.9%)
- How to deobfuscate JavaScript code (50%)
- How to see JavaScript code written using unprintable characters (50%)
- Bless manual (hex editor) (50%)
- How to hack HTTP Basic and Digest Authentication (RANDOM - 1.4%)